Use the CRM WebClient UI to customize CRM business roles. Understand the underlying concepts and test the customizing by assigning the user to a business role.
Key Concept
Business roles are roles that contain business content from CRM applications. Business roles are controlled by different elements that define which work centers, direct link groups, logical links, and central search objects are available for further customization on the business role level. Defining a business role determines what content is visible to a user assigned to a specific role based on his given authorizations. Users log into their CRM system and use predefined roles to access the applications assigned to the role.
In SAP CRM 2006s, SAP began to deliver the CRM applications with the CRM WebClient, a role-based workspace that provides an easy-to-use navigation and user interface (UI). SAP CRM 2007 expands on the CRM WebClient and delivers more then 35 preconfigured business roles, such as Sales Professional, Interaction Center Agent, and Marketing Professional, to reflect the needs of different user groups, business scenarios, and industries.
You can also create your own business roles by copying the preconfigured business roles or creating them from scratch. You can adjust your business roles to your needs. In SAP CRM 2007 Support Package (SP) 02, SAP developed the CRM WebClient UI for business role customizing. This provides an easy, Web-based way for you to adjust the business roles within your organization.
Note
You can upload SAP CRM business roles to SAP NetWeaver Portal. This discussion is beyond the scope of this article. For more information go to
https://help.sap.com and follow menu path
SAP Business Suite>SAP CRM>SAP CRM 2007>Application Help>SAP Customer Relationship Management>Components and Functions>Basic Functions>UI Framework and Configuration>Portal Integration.
When you implement SAP CRM, you typically want to use the standard scenarios delivered by SAP such as Opportunity Management, Sales Order Processing, and Marketing and Campaign Management. These will, in general, fit to your processes and provide a good starting point for adjustments.
However, when you look at the delivered business roles in detail, you may realize that some applications included in the roles aren’t required for your organization. You may also want to rename some of the provided work centers or links, or perhaps you may want to make further adjustments to a role, such as restricting the personalization capabilities for the user or adjusting the central search.
Controlling Business Roles
The business roles that are available for your company and how they are customized should be part of the business blueprint that you created at the beginning of the project. Make sure you discuss any required adjustments with the business users and that the application consultants implement the adjustments together with the key users.
The CRM business roles are controlled by different elements. The most important of these is the navigation bar profile because it defines which work centers, direct link groups, logical links, and central search objects are available for further adjustments at the business role level. This level is where you set work centers, direct link groups, logical links (in the second-level navigation, direct link groups, and on work center pages), and central search objects to be visible or hidden. You can also rename work centers, direct link groups and logical links, change the order of elements, assign icons (e.g., to direct links), and define keyboard shortcuts at the business role level.
Note
Further adjustments can be made to the business role by using technical profiles, layout profiles, or functional profiles. An example for assigning a functional profile is described later. For more information go to the IMG documentation: Transaction SPRO>SAP Reference IMG>Customer Relationship Management>UI Framework>Technical Role Definition and Customer Relationship Management>Business Roles.
Each business role has an authorization role assigned to it. The authorization role either allows or restricts users to view data. Authorizations are always checked at the user level. Therefore for authorization checks, the authorizations based on the profile assigned to the business role are not checked; the authorizations assigned to the user (in transaction SU01) are checked. The assignment of an authorization role to a business role is used for administrative purposes only. Usually the administrator manually assigns authorization roles to the users.
With SAP CRM 2006s, onwards an ABAP report is delivered, which determines the assigned users for a business role and then automatically assigns (in the background) the related authorization role to all the users. This saves the administrator some time and manual work. A second ABAP report is also available. This report can determine, together with an authorization trace, the authorization objects that are relevant for a particular business role. Based on this information it is easier for the administrator to maintain the authorization roles later. For more information go to the IMG documentation: Transaction SPRO>SAP Reference IMG>Customer Relationship Management>UI Framework>Technical Role Definition>Define Authorization.
Navigation Bar
The navigation area is called the navigation bar. Here you can find menu entries called work centers. You can click on a work center and then the work center page with further links and content is displayed in the work area. A second level navigation can also be configured. In this case, the right side of each work center containing second-level entry arrows is visible. You can click on an arrow and a sub-menu with links will open (Figure 1).

Figure 1
Structure of the navigation bar and work center page
The navigation bar also includes the Create direct link group with direct links (e.g., Task, Corporate Account, Appointment, Lead, and Contact). Direct link groups provide quick links to frequently accessed tasks. For example, by clicking on Lead the user can quickly create a new lead without using the menu and opening the second-level navigation (Figure 1).
Navigation Bar Profile
Before you start customizing you need to ensure that the business role you want to work with has a navigation bar profile assigned. The navigation bar profile contains work centers, which contain work center link groups with logical links that are used to start CRM applications (such as Account Search or Opportunity Creation), direct link groups that contain logical links, and central search objects.
Note
Work center link groups structure the logical links assigned to a business role. The work center link groups are not visible in the user’s application; they are only visible at design time in the IMG customizing.
A navigation bar profile can be reused for several business roles. To customize the navigation bar profile follow the IMG menu path Customer Relationship Management>UI Framework>Technical Role Definition>Define Navigation Bar Profile. You can also define the logical links, work centers, work center link groups, and direct link groups here.
I describe how you can easily configure business roles for the different user groups in your company. Before you start customizing, you need to configure a CRM business role for yourself. To do this you would create a new navigation bar profile and ensure that all configuration activities you want to execute are assigned. For example you would assign the logical link for business role customizing (CT-BR-SR), which is available in the administration work center (CT-ADMIN), and the logical link to maintain the organizational model (SLS-ORG-CR), which is assigned to the sales operations work center (SLS-ADMIN). Creating a business role for administrators is usually customer specific. Therefore, SAP doesn’t deliver a preconfigured role.
Note
How to configure an administration business role in detail is beyond the scope of this article. More information on how you configure work centers and assign them to a navigation bar profile, which you can then use in your administrator business role, can be found by following IMG menu path Customer Relationship Management>UI Framework>Technical Role Definition>Define Navigation Bar Profile.
Business Role Customizing
Business role customizing can be started in two ways. I will focus on using the CRM WebClient UI because this is the easiest way to do customizing. If you are interested in the SAPGUI customizing, go to https://help.sap.com for more information and follow the menu path SAP Business Suite>SAP CRM>SAP CRM 2007>Application Help>SAP Customer Relationship Management>Components and Functions>Basic Functions>UI Framework and Configuration>Business Roles. Details for both the CRM WebClient UI and SAPGUI can be found in the documentation.
- IMG customizing: Follow path Customer Relationship Management>Business Roles
- Launch business role customizing from the CRM WebClient UI via a link in the navigation bar. The Business Role Customizing logical link (CT-BR-SR) is available in the Administration work center (CT-ADMIN).
Based on the navigation bar profile assigned to the business role you can make further adjustments at the business role level. You can set work centers and direct link groups to be either visible or not visible. You can define which links should be part of the second-level navigation and which should appear on the home page or work center pages. You can also change the names and order of the work centers, direct link groups, and logical links as well as define keyboard shortcuts and further characteristics based on the layout profile, technical profile, and functional profile you assigned.
Users are assigned to a business role via the organizational model (Figure 2). SAP CRM provides you with Organizational Management, a flexible tool for displaying your company’s task-related, functional organizational structure as a current organizational model.
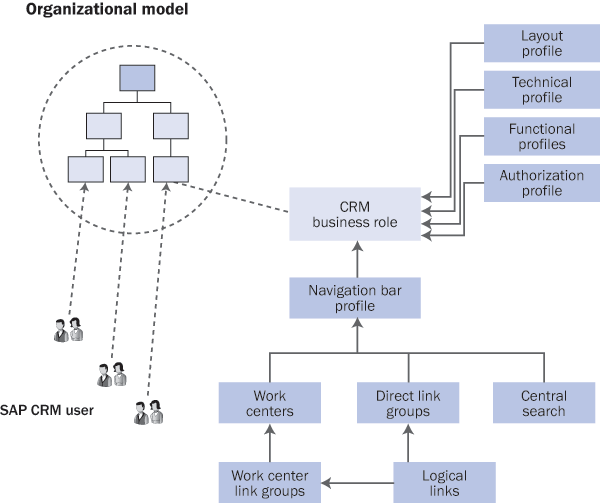
Figure 2
Business role assignment and navigation bar customizing
When a user logs on to the CRM application the system determines to which organizational units the user is assigned. Based on the organization unit, the right business role for the user is determined. If the user is assigned to more than one organizational unit, then the user can choose which business role to log on to via a pop-up screen.
In the CRM WebClient UI you can search for business roles, create business roles from scratch, copy existing business roles, maintain and adjust business roles, or delete business roles. All business roles can be assigned to organizational units in the organizational model. Customizing is recorded in transport requests.
You can translate the text set in the business role customizing for the business role, work centers, direct link groups, and logical links directly in the CRM WebClient UI. If you log on to the system with the target language, you can see the translated business roles.
Customizing a Custom Sales Professional Role
In my example I want to copy the standard Sales Professional business role and adjust it to the organization’s needs. Before you can start the Web-based business role customizing, ensure that your administrator business role has the administration work center with the business role customizing logical link assigned.
The authorization role should be created in advance as well using transaction PFCG. Business role customizing and maintaining authorization bar profiles are different tasks and often are executed by different persons. Therefore it would be sufficient to have an empty authorization profile that can be assigned to the new business role only at the beginning of the implementation project. The authorizations can be maintained in detail later.
Step 1. Copy a business role. Figure 3 shows the start of business role customizing. After you log on to the CRM WebClient, you can see the Administration work center in the navigation bar. The Bus. Role Customizing link located in the second-level navigation leads you to the business role customizing. The business role customizing starts with a search page (Figure 4).

Figure 3
Start business role customizing
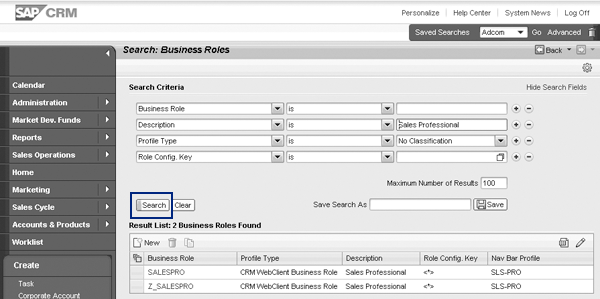
Figure 4
Search for business roles
Figure 4 shows the screen where you search for the business role. Search for the Sales Professional business role by entering the text in the Description field and clicking on the Search button. You can copy the business role directly from the search Result List or you can display it first and then click on the copy icon. A pop-up screen appears that asks whether you want to copy all dependent entries (especially assigned profiles). Confirm this by clicking on OK.
If you did not create an authorization role before creating the new business role, click on the Authorization Roles button (Figure 5). The PFCG transaction for authorization profile maintenance is opened in a separate window. In the Details block you can set the Role Configuration Key in the UI Configuration Tool, which allows you to create different view configurations based on the business role.

Figure 5
Screen after copying
Next you need to enter a technical name for the business role, change the description, assign your previously created authorization role, and then choose or create a transport request. If users are assigned to more then one business role, they get a pop-up screen after logon and they need to choose which business role to use.
To assign the authorization role you can use the value help in the field PFCG Role ID (Figure 5). When you click on Save, a pop-up screen appears in which you can choose an existing change request or create a new one.
This leads you to Figure 6. You can translate the description of the business role directly in the CRM WebClient. Click on the Translate button in the Business Role Details block to do this. Translation is only necessary if you use CRM in different languages. You can also start with one language and do the translations later when CRM is rolled out to other countries.

Figure 6
Created business role
Step 2. Adjust work centers and assign logical links (Navigation Bar block). After creating the new business role, I want to rename Sales Cycle to Opportunities & Leads and ensure that only the links related to Lead and Opportunity Management are available. In my example the users assigned to this new business role need only the lead and opportunity processes for their work. Therefore all the other applications related to other processes in the work center (e.g., campaigns and sales orders) can be removed.
To do this, click on Edit List in the Navigation Bar block. In the Visible in Menu column, keep the Leads and Opportunities links visible and remove the Visible in Work Center links for Campaigns, Quotations, Sales Orders, and Contracts as shown in Figure 7.
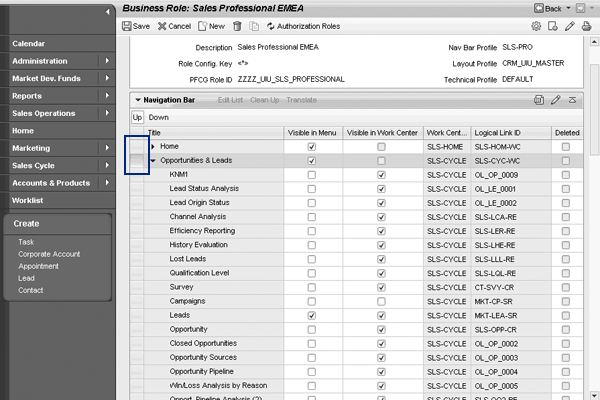
Figure 7
Changes in the Navigation Bar block
As of now, the work center contains only the lead and opportunity related links and the work center title Sales Cycle might not be clear enough for users. Therefore, I will rename it to Opportunity & Leads by clicking in the Sales Cycle cell and typing in the new name.
Opportunities & Leads is an important area for this business role, so I moved the work center for it to the second position by using the Up button highlighted in Figure 7. The changed titles can be translated via the Translate button.
Step 3. Adjust the direct link groups. To adjust the direct link groups, click on Edit List (Figure 8). First, rename the group title to Quick Links by clicking in the cell and typing in a new name. Then, set all the links except for Lead and Opportunity to not visible as shown in Figure 9. For the remaining two links I’ll assign icons via the value help in the Icon column. Icons make the links look nicer and users can distinguish the links more easily. The changed title can be translated via the Translate button.
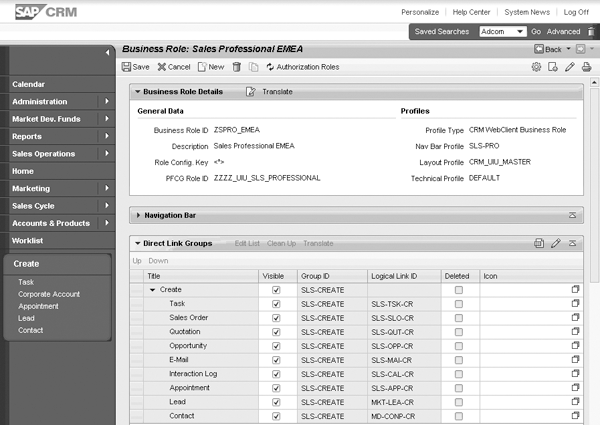
Figure 8
Direct link groups

Figure 9
Adjusted direct link group
Step 4. Review the central search objects and keyboard shortcuts. In Figure 10, the Central Search objects and Keyboard Shortcuts shown are fine for the business role and I don’t need to change them for this example.
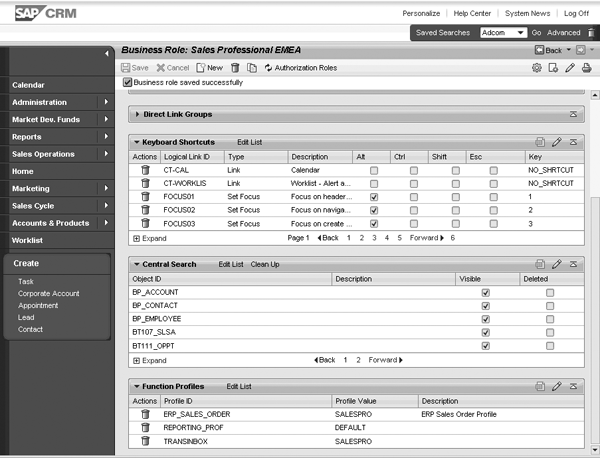
Figure 10
Keyboard Shortcuts and Central Search blocks
Step 5. Personalize the work area. Users can personalize their work areas with the personalization page and icons. For users in this example business role I want to disable the personalization icons in the work areas. Users typically like personalization functionality, but if the users can set columns in tables via personalization to hide or change the order of elements, then that could lead to confusion and more work for the administrator trying to identify bugs because the UI looks slightly different for every user.
In Figure 11 I assigned the PERSONALIZATION functional profile and set the value to PP_ENABLED by clicking on Insert and then choosing the profile from a value help pop-up screen. I also chose the PP_ENABLED value from a value help. With this setting the personalization page is still enabled, but the icons are disabled. Save the business role and choose the transport request.
Note
All possible settings for the PERSONALIZATION functional profile are described in the IMG documentation for business roles. For more information refer to the IMG path Transaction SPRO>SAP Reference IMG>Customer Relationship Management>UI Framework>Technical Role Definition and Customer Relationship Management>Business Roles.

Figure 11
Added PERSONALIZATION functional profile
Test the Customizing
To test the newly created role, assign the role to a test user. This is done in two steps. First, assign the business role to an organizational unit in the organizational model as shown in Figure 12. Then, assign the user to the organizational unit. With this, the user is automatically assigned to the business role.

Figure 12
Organizational assignment
In the CRM WebClient, start the maintenance of the organizational model via the logical link SLS-ORG-CR. (It is also available in the Sales Operations work center in the Sales Professional business role.) To do this, click on Sales Operations and the work center page is displayed. Click on the Organization Model link and search for the organizational unit where you want to assign the test user. Select the organization unit as shown in Figure 12 and then click on the Employee button. In the pop-up screen choose the employee you want to assign. Then, click in the Position Details Edit block and use the value help in the business role field. All available business roles are provided. Choose Sales Professional EMEA and save your settings.
The organizational model can also be maintained via transaction PPOMA_CRM in the SAPGUI. You can find further information at https://help.sap.com by following menu path SAP Business Suite>SAP CRM>SAP CRM 2007> Application Help>SAP Customer Relationship Management>Components and Functions>Basic Functions>UI Framework and Configuration>Business Roles>Defining the Organizational Assignment or by following menu path SAP Business Suite>SAP CRM>SAP CRM 2007>Application Help>SAP Customer Relationship Management> Components and Functions>Master Data>Organizational Management in SAP CRM.
Note
If you want to assign the user to the business role in the CRM WebClient UI then ensure beforehand that the logical link for the organizational model is available in your business role.
Log in with the new business role created in the example. Figure 13 shows that the business role is now customized.

Figure 13
Newly created business role at runtime
Lastly, transport the customizing to the test system and assign test users to the newly created business role. Thoroughly test the customizing in the test system before implementing it in the live environment.
If the CRM organizational model isn’t used, then the business roles can be assigned to users via authorization roles or a user parameter. This discussion is outside the scope of this article. For more information go to the IMG documentation and follow menu path Transaction SPRO>SAP Reference IMG>Customer Relationship Management>UI Framework>Technical Role Definition>Define Authorization.
Britta Ollrogge
Britta Ollrogge is a senior product management specialist for SAP CRM Architecture in Walldorf. She is a graduate of the business school of the University of Applied Sciences Bremerhaven. Britta has worked at SAP since January 2000. Currently she is responsible for SAP CRM UI configuration, extensibility, and application integration.
You may contact the author at Britta.Ollrogge@sap.com.
If you have comments about this article or publication, or would like to submit an article idea, please contact the editor.


