With the release of SAP BusinessObjects Design Studio 1.5, some important enhancements to components, performance, and functionality have been made in several areas. Review the most important updates of the release 1.5 for SAP BusinessObjects Design Studio and learn the steps for how to make the best use of these new dashboarding functionalities.
Key Concept
SAP BusinessObjects Design Studio 1.5 provides dashboard designers with new functionality in the areas of components, geographic visualization, performance improvements, scripting, and prompt/variable handling, among others. With these new features, such as parallel query execution and the ability to visualize geographic information, SAP BusinessObjects Design Studio has become a true dashboarding environment.
With the release of SAP BusinessObjects Design Studio 1.5, SAP has made significant enhancements in the area of performance and data handling. Here, I review the functionalities of merging and un-merging of variables, parallel query execution, and the new data binding capabilities that come with this new release. All these added capabilities improve the performance of your dashboard. In addition, SAP BusinessObjects Design Studio 1.5 has other new capabilities, such as being able to display geographic information in map form, export the dashboard to a PDF file, the ability to allow users to select data source on-demand, and new components for navigation and filtering.
In this article, I focus on three performance-relevant topics: variable merge and unmerge, parallel processing, and the new data-binding options. In my next article (part two to this one), I discuss the new components, such as the filter line, the navigation panel, the chart picker, and the back-end connection component. In addition, I take a closer look at the integration of geographic maps and the ability to export the dashboard to a PDF file.
How to Merge and Un-Merge Data Source Variables
Before going into the details about these enhancements, let me first clarify what merging of variables actually means in SAP BusinessObjects Design Studio. When you use data sources that contain prompts/variables, these data sources are turned into variables in SAP BusinessObjects Design Studio. Prior and up to release 1.4, the SAP BusinessObjects Design Studio product merged variables based on their technical names, so that a user would only be prompted once. For example, let’s say your dashboard is making use of two underlying BEx queries from your SAP BW system. Both of the BEx queries contain a variable for the dimension customer, and the technical name for the variable is identical (for example VAR_CUSTOMER) in both BEx queries. In this example, SAP BusinessObjects Design Studio would merge these two variables and the user only has to provide the input value once.
In most situations you want to merge these kinds of variables, but there are also circumstances where you would like to un-merge the variables and have the option to provide different values for the variables for each of the used data sources. With SAP BusinessObjects Design Studio 1.5, this is now possible. For example, you might have a dashboard that compares data from the first quarter with the second quarter of the year, the data is retrieved from two data sources, and each data source asks for a time range as input. In such a scenario it is an advantage to be able to un-merge the variables and provide different input values—in my example, for the first and second quarters—for each data source.
Steps for Merging and Un-Merging Variables
So let’s take a look at how you can make use of this new feature. Here are the steps (note that screenprints are not shown for steps 1 through 11):
1. Start the SAP BusinessObjects Design Studio design environment.
2. Once in SAP BusinessObjects Design Studio, select the menu Application > New.
3. Click the Browse… button and select a folder in which to save your application.
4. Click the OK button.
5. Select a name for your application.
6. Select iPad as the target device.
7. Click the Finish button.
8. Navigate to the Outline pane (bottom left) of your new application.
9. Select the folder Data Sources.
10. Right-click the Data Sources folder and select Add Data Source from the context menu options.
11. Add two data sources to your application that share a variable based on the technical name of the variable. In this example I added two BEx queries, which share several variables.
12. After the two data sources have been added, navigate to the menu Application > Show Prompts (Figure 1).

Figure 1
The prompt to merge the variables
By default, the merging of variables is activated as part of the application and you only see each variable that is shared between the two data sources once. In Figure 1 you can see that each of the BEx variables in my example is only shown once in the prompt screen.
13. Click the Cancel button in the figure.
14. In the screen that opens (not shown) navigate to the Outline pane and select the top-most object in the list; this represents your application object.
15. Right-click and select Properties from the context-menu options to open the Properties for your application object. In the screen that opens (Figure 2) navigate to the Merge Prompts property.
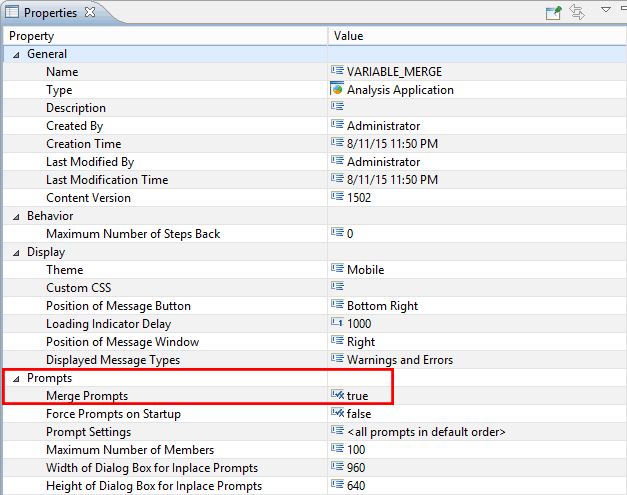
Figure 2
Open the Properties screen and select Merge Prompts
16. Set the Merge Prompts property value to false (the default is true).
17. Navigate to the menu Application > Show Prompts again and the screen in Figure 3 opens.

Figure 3
Un-merge the variables
As shown in Figure 3, all the variables are now un-merged, so each variable shows up for each data source individually. In this example, that means that each variable shows up twice in the prompt screen—once for data source DS_1 and once for data source DS_2.
Remember that the merging and un-merging of variables not only has an impact on the Prompts screen, but also impacts the scripting area in SAP BusinessObjects Design Studio. When you decide to merge variables that means you also only need to pass the value to the variable once, instead of passing it to each data source as is the case when un-merging.
In most situations, you would merge the variables and the dashboard consumer will leverage the identical values for the different data sources, but there will be situations in which you want to pass a different set of values to the variables—such as asking for different time frames—and with SAP BusinessObjects Design Studio 1.5 you can now make that choice.
How to Execute Queries in Parallel
Another performance improvement of SAP BusinessObjects Design Studio 1.5 is the new ability to execute data source queries in parallel. Prior to release 1.5 all data sources were executed sequentially, which means that in a scenario in which a dashboard was using five data sources and each data source takes 2 seconds to return the data, the dashboard would take 10 seconds to come up and return the data as all data source. This is because each is executed one after the other, and not in parallel. With SAP BusinessObjects Design Studio 1.5 you now have the ability to configure Processing Groups and the ability to assign data sources to the Processing Groups. Processing Groups are then executed in parallel instead of sequentially. If dashboards contain five data sources and you want to execute all five data sources in parallel, then you would configure each data source with its unique Processing Group—setting up five Processing Groups in total.
Before I show an example for how to set up a Processing Group and configure the data sources for parallel execution, I want to discuss some of the limitations of this method, as follows:
- Parallel execution of data sources with Processing Groups is currently only supported in combination with the SAP BusinessObjects BI platform as the deployment platform for SAP BusinessObjects Design Studio.
- Parallel query execution requires you to un-merge all variables of the used data sources as merging variables in combination with parallel execution is not supported.
- You cannot use planning-enabled BEx queries in combination with Processing Groups for a parallel query execution.
Steps for Setting Up Processing Groups and Configuring Data Sources for Parallel Execution
Let’s now look at how to set up the parallel loading of data sources. (Note that there are no screenshots to illustrate steps 1 through 8.)
1. Start the SAP BusinessObjects Design Studio design environment.
2. Create a new application by selecting Application > New from the menu.
3. Select a name for your application.
4. Select iPad as the target device.
5. Click the Finish button.
6. Navigate to the Outline pane (bottom left) of your new application.
7. Select the Data Sources folder.
8. Right-click the Data Sources folder, select Add Data Source from the context-menu options, and then add three data sources to your application.
9. Select the first data source in the Outline panel, right-click, and select Properties from the context-menu options to open the data source’s Properties screen (Figure 4).
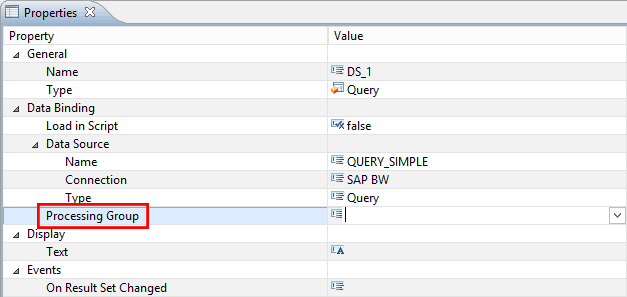
Figure 4
Open the data source’s properties
10. Configure the Processing Group property with the value GROUP1.
11. Repeat these steps for each of the data sources in your project to assign each data source to its own Processing Group.
With this configuration, the setup of parallel execution of the data source is complete. In this example, the three data sources (based on your three BEx queries) are configured for parallel execution.
A Detailed Look at Parallel Execution versus Sequential Execution of Data Sources
Figure 5 shows the behavior in an SAP BusinessObjects system without parallel execution of data sources, where an SAP BusinessObjects Design Studio application is generating a single session against the data source. For example, if the dashboard application contains five BEx queries from SAP BW as data sources, all five queries are executed sequentially in a single session.
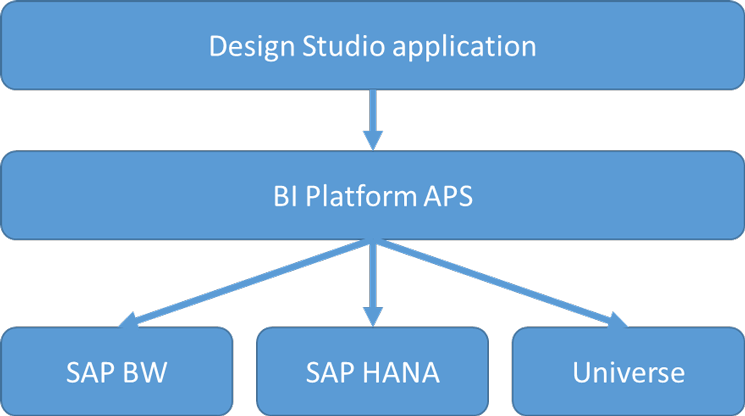
Figure 5
Executing data sources sequentially (e.g., single session)
Figure 6 shows an example of several Processing Groups being leveraged. Here there are a total of four Processing Groups, meaning that there is a total of five sessions (one per Processing Group, and an additional general session for SAP BusinessObjects Design Studio). In this example, Group 1 executes Query 1 from SAP BW and Group 2 is executes Query 2 and Query 3 from SAP BW. Group 1 and Group 2 are being executed in parallel, but in this example that does not mean that all three BEx queries are executed in parallel, because Query 1 is assigned to Group 1 and Query 2 and Query 3 together are assigned to Group 2. Query 2 and Query 3 will be executed sequentially in the session for Group 2.
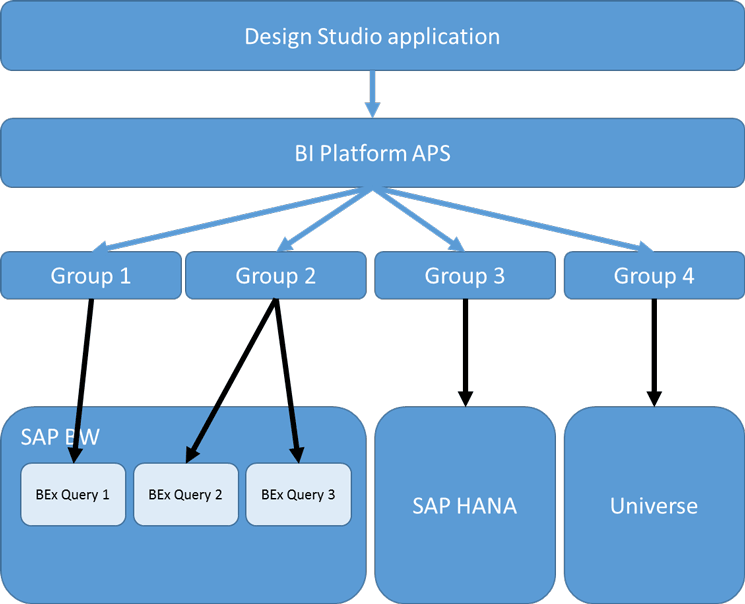
Figure 6
Executing data sources in parallel
It is very important to consider the impact of executing data sources in parallel on your system landscape. Continuing the example shown in Figure 6, each execution of the dashboard would generate five sessions and, in particular, it would generate two sessions per dashboard execution for SAP BW. Now assume that the dashboard is being rolled out to 100 users—in that case, you are looking at 200 additional sessions on the SAP BW session (when this dashboard is being executed by 100 users). Before you roll out several dashboards with parallel execution, you should discuss the different scenarios and their impact with your SAP administrator to ensure that all back-end systems are configured to accept all these additional sessions. In regards to the implications for sizing of the back-end systems, refer to SAP Note 1177020 for more details.
How the New Data Binding Functionality Works
Prior to the release of SAP BusinessObjects Design Studio 1.5, most components required actual coding to add the functionality of filtering to the overall dashboard. For example, a dashboard that offered users the ability to filter a chart based on a selected product from a list of all products available would require the following two steps:
- Scripting to load the list of products to the Listbox.
- Scripting as part of the OnSelect event of the Listbox to then set the selected product value as a filter for the data source of the chart.
The first part would look similar to this example:
LISTBOX_PRODUCT.setItems(<DataSource>.getMemberList(<Dimension>,MemberPresentation.INTERNAL_KEY,MemberDisplay.TEXT,100,”All”));
In this scripting example you would replace <Data Source> with the alias name of the data source that you are using and <Dimension> would be replaced with the technical name of the product dimension. The script would then load the first 100 values of the product dimension and use the internal key value as the value and the text for display purposes.
The second part, which is the actual filtering of the data source to the selected value, would be a script similar to this example:
<Data Source>.setFilter(<Dimension>,LISTBOX_PRODUCT.GetSelectedValue());
In this scripting you would replace <Data Source> and <Dimension> with the values as in the scripting example, above, and the script would be placed as part of the OnSelect event of the Listbox.
With the release of SAP BusinessObjects Design Studio 1.5, SAP also added the option to create a direct data binding of component properties to elements of the data source. Let’s take a look at how this new feature can be used.
Steps for Setting Up the New Data Binding Functionality
For the next steps, I am assuming that a BEx query is the data source, with several dimensions, and that I want to create a Listbox with a list of customers. In addition, I want to filter the data based on a selected customer. Here are the steps for doing this (note that screenprints are not shown for the first 11 steps):
1. Start the SAP BusinessObjects Design Studio design environment.
2. Create a new application by following menu Application > New.
3. Select a name for your application.
4. Select iPad as the target device.
5. Click the Finish button.
6. Navigate to the Outline pane (bottom left) of your new application.
7. Select the Data Sources folder.
8. Right-click the Data Sources folder and select Add Data Source from the context-menu options.
9. Add the BEx query as a data source to your application.
10. Add a Listbox to your application.
11. Select the new Listbox, right-click, and open the Properties of the Listbox using the context menu.
12. In the screen that opens (Figure 7) navigate to the Items property.

Figure 7
Data binding
13. Click the data binding icon (boxed in red) in the top right corner of the Properties window to open the data binding menu.
14. Activate the Dimension Members Binding option for the Input Binding.
15. Click the data binding icon again to re-open the data binding menu.
16. This time activate the Filter Binding option for the Output Binding.
The input binding option allows you to select a dimension from the data source to provide values for the Listbox, and the output binding option allows you to define which data source and dimension are going to be filtered based on the selected values of the Listbox.
17. After these two options are activated, the properties of the Listbox should look similar to those in Figure 8.
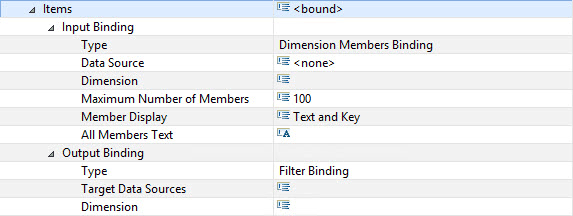
Figure 8
The new Listbox properties
18. Select the Data Source property in the Input Binding area of your Listbox. In this case, you select the same data source you defined for your BEx query.
19. Select the Dimension property in the Input Binding area. In this case, you select the dimension from the complete list of available dimensions based on the data source. In this scenario, select the customer dimension.
20. In addition, you can decide if you would like to see the Text, Key, or both by selecting the property Member Display property and you can provide an All Members Text.
Note
The All Members Text option (Figure 8) allows you to provide the user with the
choice to select all the values from the list. So, in this example, the
user would have the option to select the All Members text and retrieve
the data for all customers. The All Members text is also shown as the
first entry in the Listbox.
21. Select the Target Data Source property in the Output Binding options of your Listbox, and set the Target Data source to the data source you created for the BEx query earlier.
22. Select the property Dimension property in the Output Binding options. Here you can specify which dimension should be filtered based on the selected value of the Listbox. In this example, specify the value for the dimension customer.
With these few configuration changes you have created a Listbox that retrieves the values from the dimension customer, has the added option to select all customers, and now automatically filters the data source based on the selected value of the Listbox. All this without adding or changing a single line of code.
Here I reviewed the three main enhancements delivered with SAP BusinessObjects Design Studio 1.5: variable merge and unmerge, parallel processing, and the new data-binding options. In my part 2 of this series, I’ll discuss some of the new components of SAP BusinessObjects Design Studio 1.5—such as the navigation panel, chart picker, and back-end connection, and examine the integration of geographic maps and how to export the dashboard to a PDF file.
Product Roadmap Disclaimer
The descriptions in this article of
future functionality are the author’s interpretation of the publicly
available product integration roadmap. These items are subject to change
at any time without any notice, and the author is not providing any
warranty on these statements.

Ingo Hilgefort
Ingo Hilgefort started his career in 1999 with Seagate Software/Crystal Decisions as a trainer and consultant. He moved to Walldorf for Crystal Decisions at the end of 2000, and worked with the SAP NetWeaver BW development team integrating Crystal Reports with SAP NetWeaver BW. He then relocated to Vancouver in 2004, and worked as a product manager/program manager (in engineering) on the integration of BusinessObjects products with SAP products. Ingo's focus is now on the integration of the SAP BusinessObjects BI suite with SAP landscapes, such as SAP BW and SAP BW on SAP HANA, focusing on end-to-end integration scenarios. In addition to his experience as a product manager and in his engineering roles, Ingo has been involved in architecting and delivering deployments of SAP BusinessObjects software in combination with SAP software for a number of global customers, and has been recognized by the SAP Community as an SAP Mentor for SAP BusinessObjects- and SAP integration-related topics. Currently, Ingo is the Vice President of Product Management and Product Strategy at Visual BI Solutions, working on extensions to SAP’s product offering such as SAP BusinessObjects Design Studio and SAP Lumira. You may follow him on Twitter at @ihilgefort.
You may contact the author at Ingo@visualbi.com.
If you have comments about this article or publication, or would like to submit an article idea, please contact the editor.