SAP Lumira allows you to connect to your SAP ERP system directly by connecting to classic InfoSets, and you can use the Universe (UNX)-based connectivity to connect to your SAP ERP system. Using the UNX-based connectivity allows you not only to connect to classic InfoSets, but also to connect to ABAP functions and queries. In this article I discuss the details of all three options.
Key Concept
SAP Lumira (formerly called SAP Visual Intelligence) and SAP Lumira Cloud are SAP’s offerings focused on your business analysts, enabling them to create their own reports and analytics. SAP Lumira and SAP Lumira Cloud can be used in combination with your operational data from SAP ERP.
SAP Lumira allows you to connect to your SAP ERP system directly by connecting to classic InfoSets, and you can use the relational Universe (UNX)-based connectivity to connect to your SAP ERP system. Using the relational UNX-based connectivity allows you not only to connect to classic InfoSets, but also to connect to ABAP functions and queries. In my previous article I discussed the data connectivity options in general. In this article I discuss the details of all three options when it comes to using SAP Lumira in combination with your SAP ERP system.
Sample Data
In this first step I use the SFLIGHT demo data model, which is part of the SAP ERP system. The SLFIGHT application is used to generate some test data. I use the sample InfoSets that are delivered as part of the SFLIGHT model to generate this test data. For more details on how to activate the sample data, follow this link: https://help.sap.com/erp2005_ehp_04/helpdata/en/db/7c623cf568896be10000000a11405a/content.htm?frameset=/en/db/7c623cf568896be10000000a11405a/frameset.htm.
Data Connectivity – SAP Lumira and SAP ERP
In my previous BI Expert SAP Lumira article, I showed how SAP Lumira is able to leverage a direct connectivity to SAP ERP and connect to the classic InfoSets, as well as use a relational UNX-based connectivity to the SAP ERP system and in that way connect to classic InfoSets and ABAP functions and queries (Figure 1).
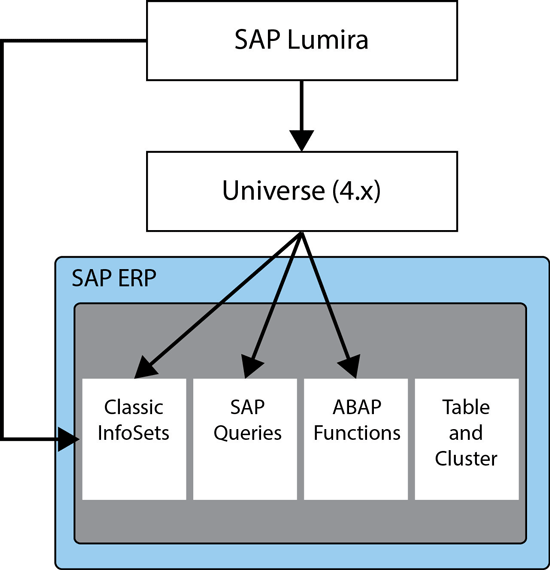
Figure 1
SAP Lumira and SAP ERP
In this next set of steps, I show how to use SAP Lumira to establish the connectivity towards the SAP ERP system using direct and relational UNX-based connectivity, along with the advantages and disadvantages of each option and also the known limitations at this point in time (April 2014).
Connecting to Classic InfoSets Directly
Here I show how to use SAP Lumira to create new content based on the direct connectivity to your SAP ERP classic InfoSets. To create your first data discovery content using SAP Lumira, follow these steps:
1. Navigate to the menu Start > Programs > SAP Business Intelligence > SAP Lumira > SAP Lumira.
2. In the screen that results (not shown) select the menu File > New (Figure 2).
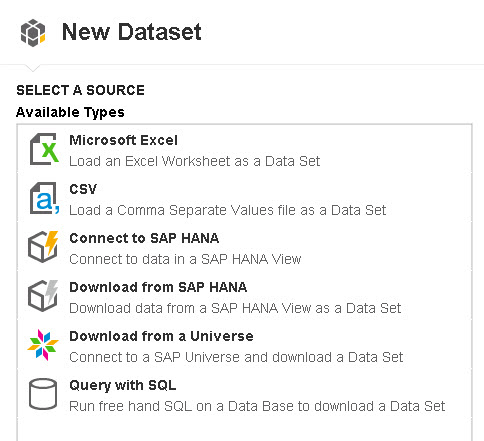
Figure 2
Select a new dataset
3. Select the Query with SQL option (Figure 2), which opens the screen in Figure 3.

Figure 3
SAP ERP data connectivity
4. Click Next.
5. This opens the drop-down options under SAP in Figure 3. Select the SAP ERP 6 – SAP Java Connector option.
6. Click Next, which opens the screen in Figure 4.
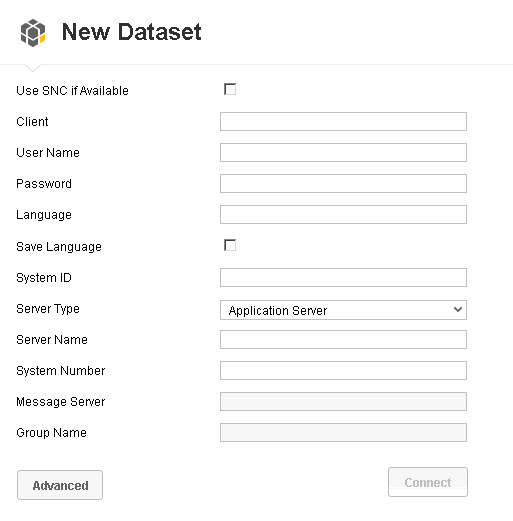
Figure 4
Connection details
7. Enter the details of your SAP ERP system in Figure 4, as follows: In the Server Type field drop-down options you can select Application Server or Message Server. If you select the Application Server option, you have to provide the full qualified server name and the system number of your SAP ERP system. If you select the Message Server option, you need to provide the full qualified name of the Message Server and the corresponding Logon Group.
8. After you enter all the system details and your SAP user credentials, click the Connect button.
9. In the next screen (Figure 5) you are presented with the Global and Local InfoSet areas. Below are those areas you see with the User Groups for the InfoSets.
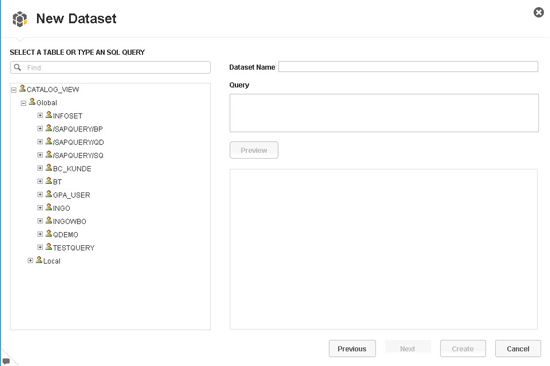
Figure 5
List of InfoSets
Note
Remember that for your SAP credentials to have access to the classic InfoSets in your SAP ERP system, the credentials have to be assigned to the InfoSet groups in transaction code SQ03.
10. Double-click the + sign next to the INFOSET option, and all your InfoSets are listed (Figure 6).
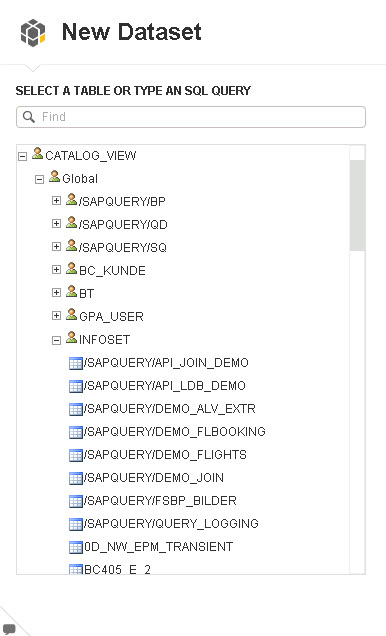
Figure 6
Global InfoSets
11. Open the list of InfoSets and select the InfoSet SAPQUERYDEMO_FLIGHTS. This opens the screen on the right of Figure 7.

Figure 7
Sample InfoSet
12. On the right side, you see the technical name of the InfoSet in the Dataset Name field. You should also see a SQL statement in the Query box asking for all the fields from the InfoSet. Notice that at this point in the data acquisition process, SAP Lumira does not provide a list of fields from the underlying InfoSet. In addition, note that SAP Lumira is not able to provide a list of selections from the InfoSet for input.
13. Click the Preview button, which opens the screen in Figure 8. SAP Lumira lists all the fields with their technical names. Now you can determine which of these fields should become part of your analytical content.
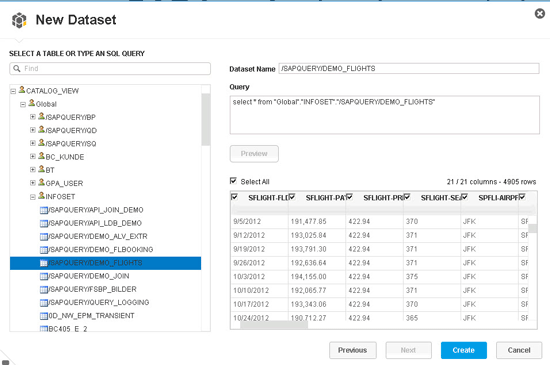
Figure 8
List of fields
14. For now, check the Select All check box to select all the columns from the InfoSet and click the Create button. This opens the screen in Figure 9.
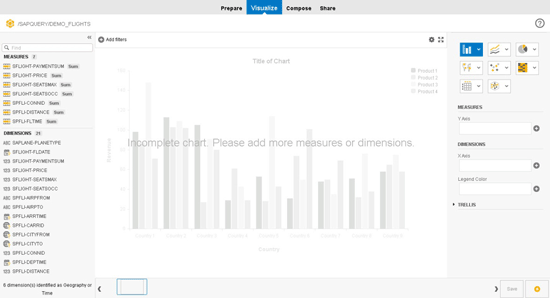
Figure 9
SAP Lumira with SAP ERP data
Note
Note that when you do this, SAP Lumira is connecting online to your SAP ERP system. Therefore, you should try to avoid requesting a very large volume of records or else you could degrade performance.
On the left side of Figure 9 notice that several columns are shown as measures. By default, all numeric columns are being added to the measures with the default aggregation function SUM. When you want to remove some of the measures that were generated or you would like to change the aggregation function (for example, instead of aggregating by sum, you prefer to aggregate the data using an average function), right-click on each measure you want to change. This opens the options menu that you can use to make your changes (Figure 10).
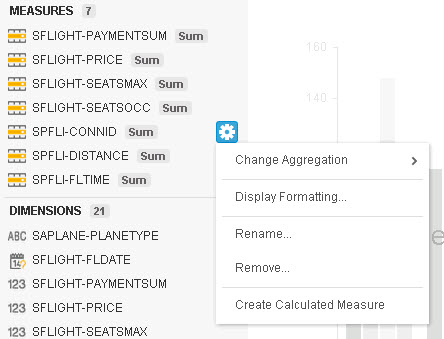
Figure 10
Change aggregation options
At this point SAP Lumira is successfully connected to the information stored in the SAP ERP system. Using the direct connectivity towards your SAP ERP system with SAP Lumira allows you to quickly use the information and create compelling data visualizations, and share your findings with your colleagues. In terms of the limitations of this approach, note that the direct connectivity of SAP Lumira does not support any pre-defined selections and prompts for the InfoSets and that SAP Lumira does not yet leverage the field descriptions—instead it only shows the technical names for the fields.
Using a Universe on Top of SAP ERP
In addition to the option to connect directly to your SAP ERP InfoSets, SAP Lumira also supports the option to use Universes as data sources. Universes allow you to establish a data connection to classic InfoSets, ABAP Queries, and ABAP functions. In the following section I first show how to create a Universe on top of a classic InfoSet, and then how to use the new Universe with SAP Lumira.
1. Start the Information Design tool by following this menu path: Start > Programs > SAP Business Intelligence > SAP Business-Objects BI Platform 4 Client Tools > Information Design Tool.
2. Follow menu path File > New > Project to create a new project for your Universe.
3. Enter a name for the new project and click the Finish button.
4. Follow menu path File > New > Relational Connection to start the process to set up the data connection to your SAP ERP system.
5. Enter a name for the data connection and click the Next button. This opens the screen shown in Figure 11.
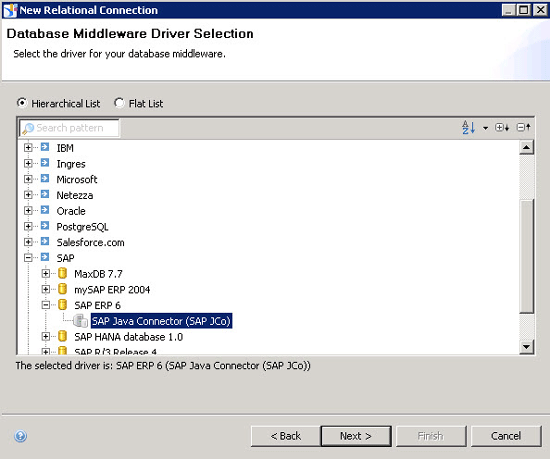
Figure 11
New project
6. Select SAP ERP 6 from the list of available options in Figure 11.
7. Click the Next button, which results in the screen shown in Figure 12.

Figure 12
Enter your system details
8. Now you need to enter the necessary system details to establish the connection. Enter your SAP ERP system details and click the Next button, which opens the screen in Figure 13.

Figure 13
Connection options
9. Here you can now limit the list of ABAP functions returned from the SAP system by entering criteria for either the function name or the function group.
10. In addition, you can select the Map Table Parameters into Input Columns check box to map the input parameters of an ABAP function into input columns for the table.
11. If you are using an InfoSet as a data source, select the Map Selection Fields into the Table Columns check box so that the configured selections from the InfoSet are turned into input columns for the table.
12. The last option you have is to configure several settings for the connection (e.g., Connection Pool Mode, Array Fetch Size, Array Bind Size, and Login Timeout). For now, though, leave the default values (e.g., keep the connection active for 10 minutes, 10, 5, and 600 seconds, respectively).
13. Select the Map Table Parameters in the Input Columns check box.
14. Click the Finish button. Your data connection should now appear in your new project (Figure 14). The next step is to publish the connection to a repository. To do this, follow these remaining steps.
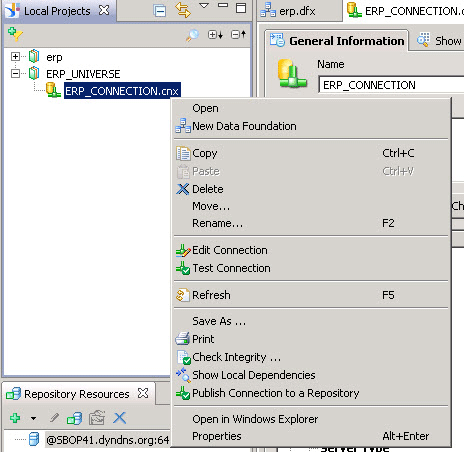
Figure 14
Publish the connection
15. Right-click the connection (ERP_CONNECTION.cnx) and select the Publish connection to a Repository option (Figure 14).
16. You are asked to log on to your SAP BusinessObjects system. Log on with your credentials and click the Connect button.
17. Select a folder for your newly created connection and click the Finish button.
18. Now you are asked whether you wish to create a shortcut for the connection (Figure 15). Click the Yes button, as the shortcut is needed for the next steps.

Figure 15
Creating a shortcut
19. In the screen that appears (not shown) click the Close button.
20. Follow menu path File > New > Data Foundation.
21. Enter a name for the data foundation, and click the Next button (Figure 16).

Figure 16
Choose your data foundation type
22. You are asked whether you would like to create a single-source or a multi-source foundation. For this example, select the Single-Source radio button and click the Next button.
23. In the screen that appears (not shown), select the secured data connection shortcut that you created in the previous step, and click the Finish button. This opens the screen in Figure 17, where you can now open the connection as part of the data foundation and browse all the available sources.
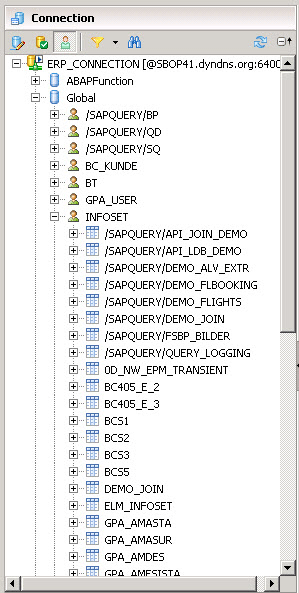
Figure 17
SAP ERP sources
The data connection provides you with access to the classic InfoSets, InfoSet queries, and ABAP functions. Here are some details:
- InfoSets are first grouped based on the InfoSet environment: Local or global.
- Below the local or global environment, the INFOSET entry contains a complete listing of the available InfoSets.
- The entries below the local or global group represent the InfoSet query user groups, and below each user group the corresponding InfoSets are listed.
- The ABAP function entry contains a complete list of available ABAP functions organized on the first level by the name of the assigned function group.
For this example, use the BAPI_FLIGHT_GETLIST ABAP function from the SAPBC_BAPI_SFLIGHT function group.
24. Open the list of sources as part of your newly established connection, and navigate to the list of ABAP functions and then to the SAPBC_BAPI_SFLIGHT function group (Figure 18).
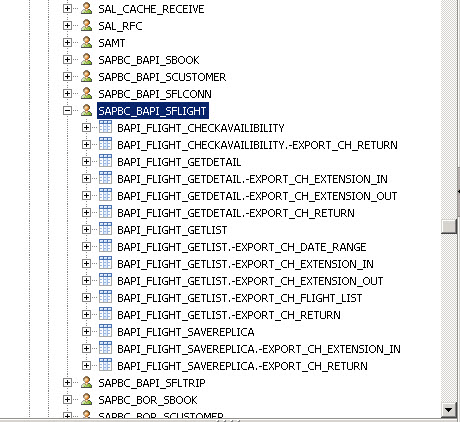
Figure 18
List of ABAP functions
25. Navigate to the BAPI_FLIGHT_GETLIST BAPI function.
26. Notice that each export and table of the ABAP function is returned as a table as part of the data connection. For these reporting requirements, the most interesting table is the BAPI_FLIGHT_GETLIST.-EXPORT_CH_FLIGHT_LIST.
27. Double-click the entry to select the table, and the ABAP Function is added to the Data Foundation (Figure 19).
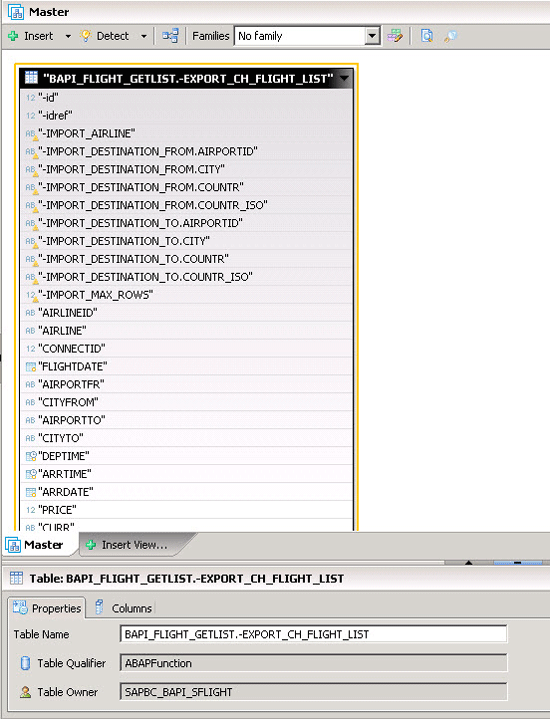
Figure 19
Import the BAPI function
28. As shown in Figure 19, the BAPI function is imported with several input columns, which are the result of the input parameters of the ABAP function itself.
29. Now navigate to the Parameters and List of Values area (Figure 20).

Figure 20
Parameters
30. Click the new parameter icon in the Parameters area to create a new parameter; this opens the screen in Figure 21.
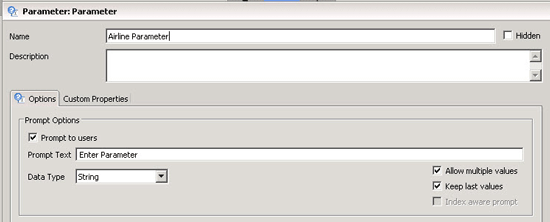
Figure 21
Parameter properties
31. Enter your new parameter Name (Airline Parameter) and select the Prompt to users check box.
32. Set the Data Type to String.
33. Uncheck the Allow multiple values check box.
34. Set the Data Type to String.
35. Select the Keep last values check box.
36. From the File menu, click Save to save your changes.
37. Now navigate back to the table in your Data Foundation, select the IMPORT_Airline column, and open the context menu (Figure 22).
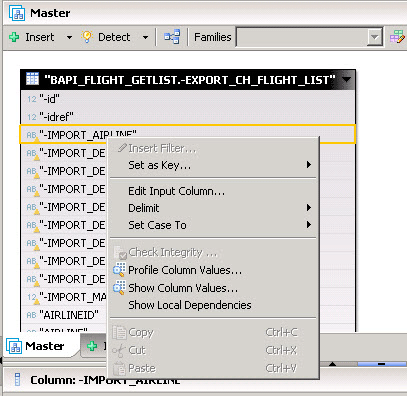
Figure 22
Data foundation
38. Double-click the Edit Input Column…. menu option (Figure 23).
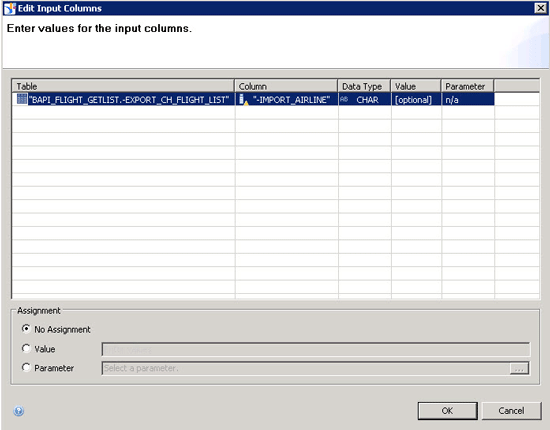
Figure 23
Enter the column configuration
39. Select the row for the Airline column in the dialog.
40. Select the Parameter option.
41. Use the details icon and select the newly created parameter.
42. Click the OK button twice.
43. Select the menu File > Save to save your changes.
44. Select the menu File > New > Business Layer.
45. Select Relational Data Source.
46. Click the Next button.
47. Enter a name for the business layer.
48. Click Next.
49. Select your newly created Data Foundation.
50. Click Finish.
51. Make sure the Automatically create classes and objects for ERP connections check box is checked.
52. Click Finish (Figure 24).
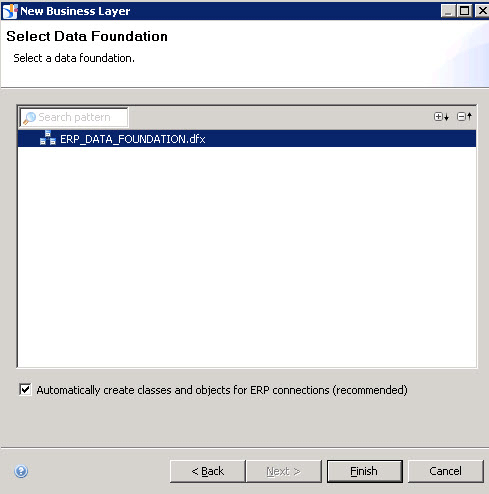
Figure 24
The new business layer
53. Click Finish.
54. Select the business layer in the local project and right-click.
55. Select Publish > To a Repository. You are presented with a set of checks that you can perform.
56. Click Next.
57. Select a folder for your Universe.
58. Click Finish.
59. Click Close.
You now have a universe as part of your SAP BusinessObjects BI system, which is based on the BAPI_FLIGHT_GETLIST BAPI function. In the next steps, I show how to use this Universe with SAP Lumira and in that way connect from SAP Lumira to your SAP ERP system.
To create your first data discovery content using SAP Lumira, follow these steps:
1. Navigate to the menu Start > Programs > SAP Business Intelligence > SAP Lumira > SAP Lumira.
2. In the screen that appears, select File > New.
3. Select the Download from a Universe option.
4. Click the Next button, which opens the screen shown in Figure 25.
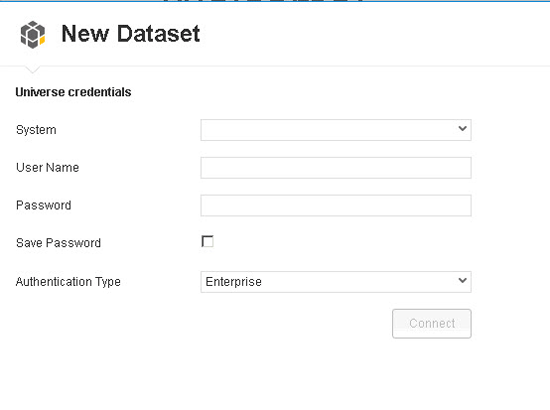
Figure 25
SAP BusinessObjects BI server logon
5. Enter the details to log on to your SAP BusinessObjects BI Server and click the Connect button (Figure 26).
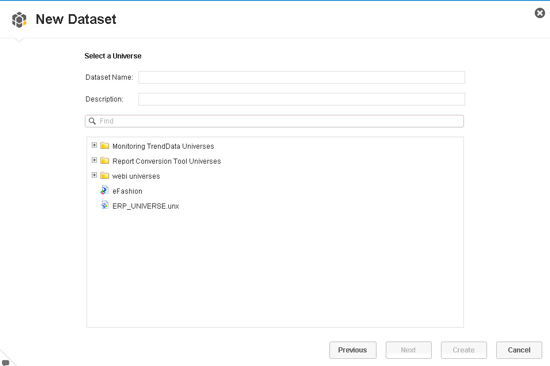
Figure 26
Universe selection
You are presented with the list of available Universes (Figure 27). Select the newly created Universe connecting to your SAP ERP system (ERP_UNIVERSE.unx in my example), and click the Next button.
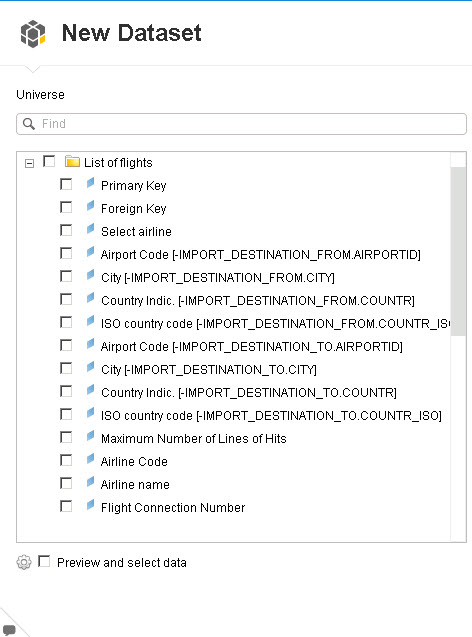
Figure 27
The list of available fields
The list of fields from the InfoSet is shown. Select the fields you would like to use with SAP Lumira from the list of available fields, and click the Next button (Figure 28).
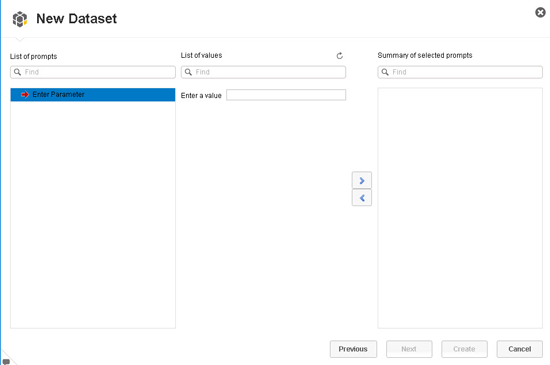
Figure 28
The Universe parameter
In this example, because I created parameters for input to the ABAP function and SAP Lumira does support the use of parameters of a Universe, a prompt screen appears (not shown). Here values can be entered as inputs to the parameter.
6. Once the entries have been made, click the Create button, which opens the screen shown in Figure 29.
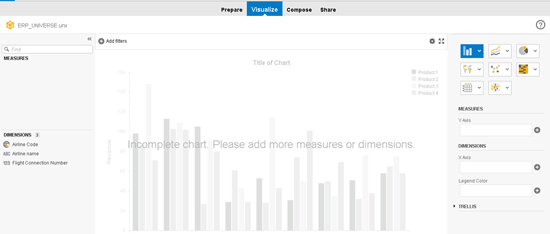
Figure 29
SAP Lumira desktop
Now you can use the data that was retrieved via the Universe from your SAP ERP system with SAP Lumira.
Recommendations
Following the steps outlined above, you should be able to establish the connection from SAP Lumira to SAP ERP using the Universe as well as using direct connectivity. The most important difference between connecting via the Universe versus the direct connection is the fact that with connection via the Universe you are able to not only connect to the classic InfoSets but also connect towards ABAP queries and ABAP functions.
On the other hand, the direct connectivity allows you to provide your business user and analysts with an environment where they are able to connect to the operational data stored in your SAP ERP system and create compelling data visualization without the need for a Universe and without the need for an SAP BusinessObjects BI Server landscape. The different options of these two types of connectivity are shown in Table 1.
|
Direct connectivity |
Universe-based connectivity |
| Data sources |
InfoSets |
InfoSets, ABAP function, ABAP query |
| Metadata |
Only the technical field names of the InfoSets are presented |
Technical names and field descriptions are available. Additionally, you can create custom descriptions. |
| Prompting |
No support for pre-defined selections |
Pre-defined selections can be used and prompts can be created in the Universe |
|
Is an SAP BusinessObjects server required?
|
No |
Yes |
|
Merging/Joining of data
|
Merging of data is directly possible in SAP Lumira
|
Merging of data can be done in the Universe or directly in SAP Lumira
|
Table 1
Connectivity options
Product Roadmap Disclaimer
The descriptions in this article of future functionality are the author’s interpretation of the publicly available product integration roadmap. These items are subject to change at any time without any notice, and the author is not providing any warranty on these statements.

Ingo Hilgefort
Ingo Hilgefort started his career in 1999 with Seagate Software/Crystal Decisions as a trainer and consultant. He moved to Walldorf for Crystal Decisions at the end of 2000, and worked with the SAP NetWeaver BW development team integrating Crystal Reports with SAP NetWeaver BW. He then relocated to Vancouver in 2004, and worked as a product manager/program manager (in engineering) on the integration of BusinessObjects products with SAP products. Ingo's focus is now on the integration of the SAP BusinessObjects BI suite with SAP landscapes, such as SAP BW and SAP BW on SAP HANA, focusing on end-to-end integration scenarios. In addition to his experience as a product manager and in his engineering roles, Ingo has been involved in architecting and delivering deployments of SAP BusinessObjects software in combination with SAP software for a number of global customers, and has been recognized by the SAP Community as an SAP Mentor for SAP BusinessObjects- and SAP integration-related topics. Currently, Ingo is the Vice President of Product Management and Product Strategy at Visual BI Solutions, working on extensions to SAP’s product offering such as SAP BusinessObjects Design Studio and SAP Lumira. You may follow him on Twitter at @ihilgefort.
You may contact the author at Ingo@visualbi.com.
If you have comments about this article or publication, or would like to submit an article idea, please contact the editor.


