Find out how you can use Production Planning time events for Operational Equipment Effectiveness (OEE) calculations. By using time events, record type groups, and production orders without materials, you do not need custom tables to create OEE reports.
Key Concept
A time event is a confirmation at a particular point in time, such as at the start of setup or the finish of processing. You can calculate the duration between this event and the previous event — for example, the total time spent during a setup.
First, I’ll explain how to use Production Planning (PP) time events. Then, I’ll show you how you can use PP time events for OEE calculations. For this process you use record type groups, a little-known feature in the work center master data for PP that allows you to capture productive time and unplanned down time. You also use production orders without materials to book time events in the system, such as breakdowns or setups. Finally, I’ll explain how to create an OEE report using these calculations.
Note
You can use either time tickets or time events to confirm production time. I prefer using time events for OEE calculations because you can ensure that users do not overwrite the date and time fields. Also, time events can start and stop clocks automatically on certain activity types and also split up setup, processing, and teardown times more accurately.
PP Time Events
To view time events in the work center, use transaction CR02. The activities on the Costing tab determine what happens in the background during time events (Figure 1). In my example, I use the standard value key SAP1 with three standard time values: Setup, Machine, and Labor. Each of these production operations goes through three basic cycles: setup, processing, and teardown. Only one cycle is active at a time.

Figure 1
Work center master data Costing tab and routing operation data
For OEE, the system accrues machine time automatically each time an interruption occurs and each time the system confirms a partial or full finish. You can find the total elapsed running time for setup, process, and teardown as a single total or two or three separate totals if you wish. I opted to split setup and processing time to get two totals in this example (Figure 1). After you set up your Costing tab, you are ready to configure the record type groups to use with the time events.
Time Events and Record Types
Each time event transmits a record type. The system analyzes these record types and matches up pairs of events to validate the sequence of transactions the operator enters. The system also uses record types to calculate elapsed times and activity postings. For example, a start must precede a completion and follow an interrupt. Table 1 shows the corresponding record types for the three basic time event cycles. In Figure 1, you can see that you can link each activity to a record type group: 0 (variable activity), 1 (setup), 2 (processing), or 3 (teardown).
| Start |
R10 |
B10 |
A10 |
|
| Partial finish |
R20 |
B20 |
A20 |
V20 |
| Interrupt |
R30 |
B30 |
A30 |
|
| Finished |
R40 |
B40 |
A40 |
V40 |
| |
| Table 1 |
Time event record types |
With record types, the system has strict rules concerning what happens in what sequence. For example, you must follow a setup interrupt (R30) with a setup start (R10), and you cannot follow a setup partial finish (R20) with a setup start (R10). Processing and teardown record types operate in the same way. For instance, partial variable activity (V20) and variable activity finish (V40) must not occur after a processing finish (B40). A typical sequence for one operation could be R10, V20, R40 (setup complete) B10, B30, B10, V20, V20, B20, B30, B10, V20, B40 (process complete). It is not essential to use setup or teardown in every operation.
If you set a 0 in the Rec. type group column in Figure 1, you can use the partial variable activity (V20) and variable activity finish (V40) time events to post irregular or spontaneous amounts of this activity that are not linked to quantities or elapsed times. For example, you might have a flexible labor resource in which one person can work on multiple orders, or several people can work on one order. In this case, the system would not need to calculate the operation’s accrued actual labor time. If you set a 1, 2, or 3 in the Rec. type group column, then the system calculates and posts the appropriate activity or activities during time event transactions.
Note
OEE regards setup and teardown as unplanned down time, so make sure they accrue separately from machine process time. Note also that if the work center has fixed breaks in the capacity category you use for scheduling and the two events are on either side of one of these breaks, then machine time does not include the break. This saves you from entering fixed breaks (e.g., meals) as an interrupt and a start pair of events.
Use transaction CO19 to generate the record type. In Figure 2, select the kind of time event you want to confirm in the Time Event tab. After you make your selection, the system generates the record type automatically.
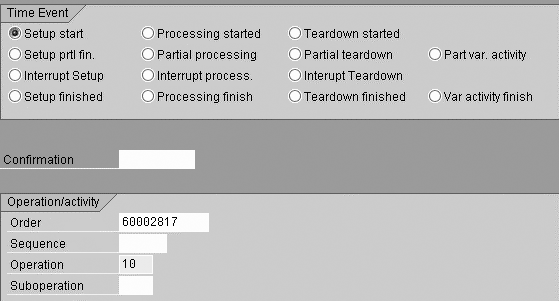
Figure 2
CO19 PP time event first selection screen
Follow menu path Logistics>Production>Shop Floor Control>Confirmation>Enter>For operation>Time event>Partial Processing to view the partial processing screen (Figure 3). Here you can view the operation’s status in more detail, such as setup finished, processing started, and teardown interrupted. You can confirm quantities during any of the record types, except the start record type. The start record types assume you have not yet produced anything, so you do not have any quantity fields. You can use the elapsed time between a start and a finish or between a start and an interruption to post an activity’s incremental value. This posting is not available to edit manually during the transaction because it is linked directly to the start and end times.

Figure 3
CO19 processing partial finish second screen
Between the interruption and the restart, you should not post further activity. This makes the SAP data entry process reflect the sequence of events on the shop floor without having to keep a separate running total of machine time used and lost.
Follow menu path Logistics>Production>Shop Floor Control>Order>Display. Enter the order number and then click on Operations Overview. Select the operation, then click on Operation Details. Click on the Qty/activities tab (Figure 4). If you look at the operation’s confirmed activities in the production order, you can see the different values posted in the Confirmed column. The system calculated the Setup and Machine times from the elapsed times between the events. The system used one or several V20 partial variable activity transactions to post the Labor time.

Figure 4
Activity postings in the production order
Next, click on the Confirmed dates tab (Figure 5). Here you can see the System status string CNF PRFN REL SUFN VACT. Click on the info icon  to the right to see the details of this status.

Figure 5
Production order operation dates summary
Table 2 explains what happened in operation 0010. The system started, interrupted, restarted, and then completed a setup. The production run started after a short, unexplained break and various stoppages occurred during the run before it finished. To see how the data in Table 2 appears as a list of transactions in SAP, use transaction code CO14 or follow menu path Logistics>Production>Production Control>Confirmations>Display (Figure 6) to see a list of confirmations using time events. You can relate the key aspects of OEE to the setup and machine time in Figure 6 easily. The setup and machine time relate to the unplanned down time and the actual run time, which you use in the OEE formulas I explain in the next section.
| Start setup |
R10 |
08:00 |
None |
|
| Interrupt setup |
R30 |
09:00 |
Setup 60 minutes |
60 minutes |
| Restart setup |
R10 |
09:45 |
None |
45 minutes |
| Finish setup |
R40 |
11:15 |
Setup 90 minutes |
90 minutes |
| Start processing |
B10 |
11:30 |
None |
15 minutes |
| Interrupt processing |
B30 |
16:00 |
Machine 4 hours 30 minutes |
|
| Start processing again |
B10 |
16:15 |
None |
15 minutes |
| Interrupt processing again |
B30 |
16:30 |
Machine 15 minutes |
|
| Start processing again |
B10 |
16:45 |
None |
15 minutes |
| Partial finish 4 pieces good, 1 scrap |
B20 |
20:45 |
Machine 4 hours |
|
| Post 30 hours variable activity |
V20 |
n/a |
Labor |
|
| Finish processing no more pieces produced |
B40 |
06:00 the
following day |
Machine 6 hours 15 minutes |
|
| |
| Table 2 |
Actual sequence of events |

Figure 6
Confirmation transactions list
Time Events and Production Orders Without Materials
You can capture time spent on planned maintenance or cleaning as planned downtime using time event confirmations with another standard feature, production orders without materials. This offers you a wider view of OEE because you can distinguish, for example, between time when no one is working on site and time spent cleaning the line. You can then include this as unplanned down time, if required. For instance, you can book time spent cleaning against a production order without producing an end material. Figure 7 shows the formulas you need for these OEE calculations.

Figure 7
OEE formulas. The availability, efficiency, and quality rates should never be more than 100%.
In these formulas, total calendar time includes non-working time and regular planned maintenance. You can plan this by creating production orders without materials to which you can book time events. Available time includes time lost on breakdowns and performing setups. Operating time includes slow running, excluding setups and interruptions. Net operating time stands for the theoretical time you should have taken to make the actual good and bad products if you had been running at full speed. Valuable operating time stands for time spent making good product at full speed.
In my example in Table 2, I had a planned downtime of two hours each night, during which I assumed the line was taking a break. I had unplanned downtime: I lost three hours and 15 minutes doing setup (between 08:00 and 11:15), an unexplained gap of 15 minutes before processing started (at 11:30), and another 30 minutes during processing (between 16:00 and 16:15 and again between 16:30 and 16:45). I had speed losses — the extra time it took to produce five pieces compared to what it should have taken (between 11:30 and 06:00 the next day). I also had a quality loss, because one of those pieces was scrap (confirmed at 20:45) and therefore was a waste of machine time.
The total calendar time was from 8 am yesterday to 6 am today, so A = 22 hours. However, the planned break time on the work center capacity category 001 (which is used for scheduling) was two hours — between 22:00 and 24:00 each night.
The planned downtime was two hours, so B = 20 hours. The unplanned downtime — the stoppages including the time spent on setup, interruptions, and the unexplained gap between setup completion and process start — totals four hours, so the actual operating time is C = 20 - 4 = 16 hours. In the production order for this operation, one piece should take two hours, so the planned machine time for five pieces should be 10 hours.
The net operating time was 10 hours (D = 10 hours) and the valuable operating time = E = 4/5 of D = 10 * 4/5 = 8 hours.
You now can use these figures to find other values using the equations I listed above.
• Availability rate = 16/20 = 80%
• Efficiency rate = 10/16 = 62.5%
• Quality rate = 4/5 = 80%
• OEE = 80% * 62.5% * 80% = 40%
The data appearing on the Qty/activities tab and Confirmed dates tab (Figure 4) enables you to calculate OEE. Normally when there are several operations, you would select the bottleneck operation. The bottleneck operation constrains the maximum throughput of the production when there are no other constraints or speed losses at any other operation. The other operations typically would not run at full speed and would not be measured in detail until they became a bottleneck (i.e., the operation that limits the overall speed of the process).
Now that I’ve explained how you can use record types and production orders without materials for OEE calculations, let’s see how you can create an OEE report from this data.
Create an OEE Report
To create an OEE report with your calculations you need to use several PP tables. The AFRU confirmations table captures the confirmations for one operation. It contains the detailed records with timestamps that you see in transaction CO14 and can reverse in transaction CO13.
The AFVV confirmation summary table contains the summary of all confirmed dates and times and accumulated activities and quantities. You can use this table in the display of the production order operation tabs Qty/activities and Confirmed dates (Figure 4). The SAP production order display transaction uses the AFVV table to populate the data on the Qty/Activities tab in Figure 4. Therefore, you can include this table in the query to allow you to work out how much was made and how much activity time was consumed for each operation. The system collects the total machine time and setup times for your calculations.
The AFKO, AUFK, and AFPO tables store the order header data and the AFVC table stores the operation data. You can construct a simple query to link these tables together and calculate an OEE at the operation level for each order using a small amount of ABAP code to calculate elapsed times and link them into the standard OEE calculations. I wrote a simple ABAP query that uses these tables to extract and calculate OEE. An example of the output is shown in Figures 8 and 9, with columns showing the intermediate figures before the system calculates OEE. I set up the report selections to select by order, plant, material, date, work center, or operation.

Figure 8
Sample report results that show key times, left side of screen

Figure 9
Sample report results that show key times, right side of screen
You can use this simple ABAP query for orders with and without materials. For example, you can book against an order without material for gaps between orders, cleaning, or maintenance time. Figure 10 shows the ABAP code to set up the InfoSet for this query. This code includes the main join to bring together the key tables required.
AFKO INNER JOIN INNER JOIN AFVC INNER JOIN AFVV

            Conditions

            AFKO-AUFPL = AFVC-AUFPL

            AFVC-APLZL = AFVV-APLZL

            AFVC-AUFPL = AFVV-AUFPL
Additional tables are used to bring in work center description from CRHD (if required) and the planned break time from the KAKO table.
            SELECT SINGLE * FROM CRHD

            WHERE CRHD-OBJTY = 'A'

            AND CRHD-OBJID = AFVC-ARBID

            SELECT SINGLE * FROM KAKO

WHERE KAKO-KAPID = CRHD-KAPID |
| Figure 10 |
The table join in the ABAP code to create OEE reports |
After you set up the InfoSet, set up additional fields to hold the intermediate results of calculations and attach the code to show the sequence and logic of the calculations. You could use either converted code or ABAP code. Download this document for full coding of the calculations for the additional fields.
David Newick
David Newick has nine years of experience as a PP and QM consultant and currently is a lead consultant at Morse. Morse is an international consulting company, offering clients specialist business and IT advice and helping them execute for maximum benefit. David lives in Glastonbury, Somerset.
You may contact the author at editor@SCMExpertOnline.com.
If you have comments about this article or publication, or would like to submit an article idea, please contact the editor.