SAP projects have a tendency to be quite large, covering a vast array of business processes in a delivered solution. While building the solution, project teams must navigate a Business Process Hierarchy (BPH) that could contain thousands of hierarchy nodes. By using customer attributes and filters, teams can work with only the nodes they are charged with building. The combination of filters and customer attributes is similar to creating a separate project for each team.
Key Concept
Customer attributes aren’t just for documents. They can be created to help manage the Business Process Hierarchy (BPH) itself. Once configured and assigned, customer attributes can be used to filter the BPH to the subset of nodes that meet the filter criteria. This reduces the number of nodes to be navigated by team members and leads working on the project.
Most project teams are organized around functional areas such as finance, manufacturing, warehouse management, and so on. Since scenarios such as order-to-cash collect processes to describe the business in an end-to-end fashion, a single scenario crosses multiple functional areas.
For example, the order-to-cash scenario for standard sales-order management has processes in sales, inventory and warehouse management, customer invoicing, payment receipts, and accounts receivable clearing.
If you’re a member of the finance team, you’ll have processes in multiple scenarios, so, to do your work, you’ll have to continuously navigate up and down the Business Process Hierarchy (BPH).
Wouldn’t it be handy if you could log into Solution Manager and work with only the process nodes that belong to your team? Well… read on.
The Mechanics
I’ll show you how to perform the basic configuration for customer attributes for BPH nodes, assign values to the attributes, and use the filter functionality to tame those beastly big BPHs that are so common on large projects.
Prior to taking advantage of the Solution Manager’s filter functionality to manage project hierarchies, some quick configuration of customer attributes is needed. In this article I’ll cover the basics of this configuration. For more detailed guidance, see my
SAP Professional Journal article “
Leveraging Customer Attributes to Manage Work.”
You need to complete some one-time setup tasks to make these filters really useful:
- Create customer attributes for the BPH structure nodes
- Assign the attributes to the BPH structure nodes
Once that’s done, you’re ready to go.
Create the Customer Attributes
Access the IMG using transaction code SPRO in Solution Manager. If your project is not using IMG projects or views, you can use the reference IMG by pressing F5.
Follow SAP Solution Manager IMG menu path SAP Solution Manager > Capabilities (Optional) > Implementation/Upgrade > Blueprint and Configuration > Object Attributes. Click the IMG Activity for Definition of Customer Attributes for Object Types, which takes you to
Figure 1. This is where you set up the attributes and bind them to Data Dictionary objects.
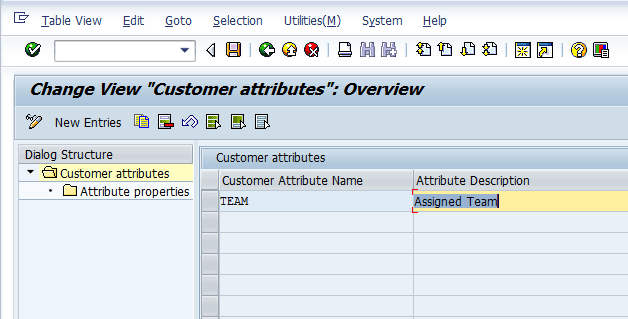
Figure 1
TEAM customer attribute created
Figure 1 shows the screen where the TEAM attribute already exists in the system. It was created by clicking the New Entries button and entering the attribute name and description. Selecting the TEAM attribute and double-clicking the Attribute properties folder on the left side of the screen takes you to the details of the TEAM attribute shown in
Figure 2.
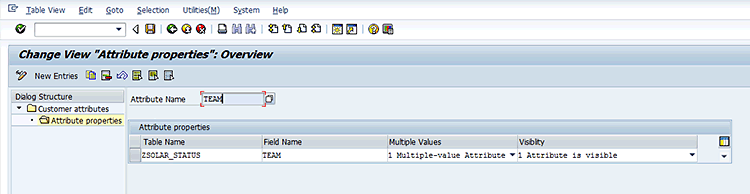
Figure 2
Attribute properties for the TEAM customer attribute
Note
The Data Dictionary (Table Name and Field Name entries) table is a
custom table with a field called TEAM that has search help assigned to
it. The search help defined in the Data Dictionary is what provides the
list of TEAMs you see when you populate the TEAM attribute on the BPH.
For more information on this see my article “
Create Custom Tables and
Fields for Attributes.”
The last step in configuring the customer attribute is to assign it to the BPH structure object. In the IMG, follow menu path SAP Solution Manager Implementation Guide > SAP Solution Manager > Capabilities (Optional) > Implementation/Upgrade > Blueprint and Configuration > Object Attributes > Assign Customer Attributes to Objects (
Figure 3).
Figure 3 shows the object types overview maintenance screen. You can see that three objects already have customer attributes assigned to them: BMRE Program, BMTA Transaction, and COBJ IMG Object. Solution Manager presents this as an empty table if this is the first time you’re using this feature.

Figure 3
The Object Types maintenance screen
Click the New Entries button to open the Object Types table and add the BPH structure object to the configuration (
Figure 4).

Figure 4
The Object Types new entries screen
Click the Object Types drop-down and select the PNOD Project and Solution Node. This activates the use of customer attributes for the BPH structure nodes (
Figure 5).

Figure 5
Activate the BPH structure object for use with customer attributes
Click the save icon

to save the new entry and assign the configuration to a transport if prompted to do so. The last step is to assign the customer attribute to a PNOD – Project and Solution Node object. Select the new row just entered into the table (PNOD) and double-click the Assign Attributes folder on the left side of the screen shown in
Figure 6.
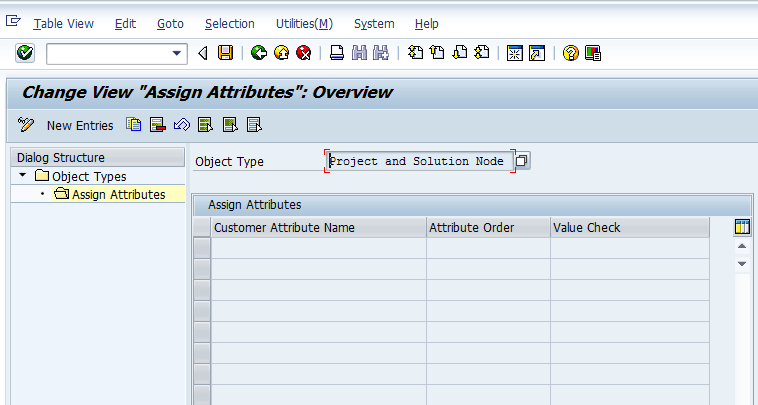
Figure 6
Assign attributes to object types
Click the New Entries button to open the table for editing. As before, the table turns white and appears empty (
Figure 7).
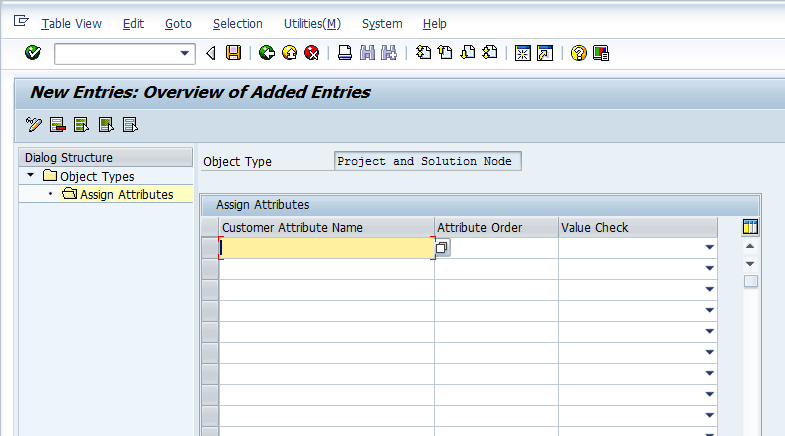
Figure 7
Assign attributes to the Object Types entry screen
Click the drop-down icon

to assign the TEAM attribute to the PNOD object type (
Figure 8).
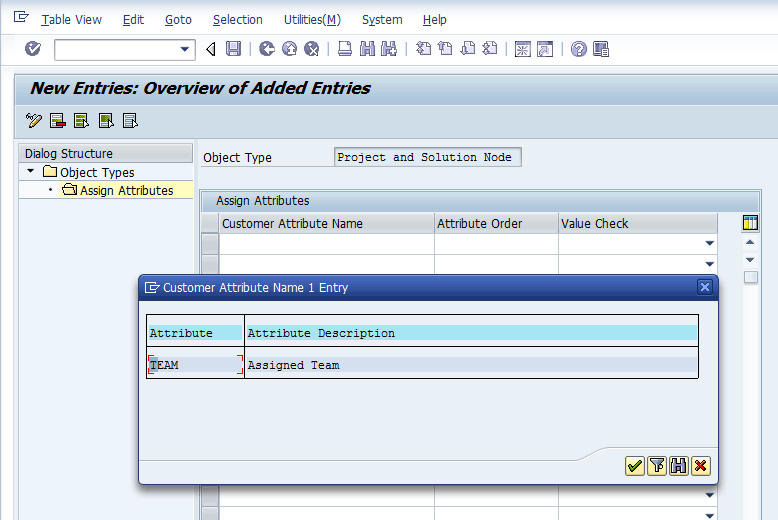
Figure 8
Select the TEAM attribute and assign it to object type PNOD
Double-click the TEAM attribute to take it into the assignment table (
Figure 9).

Figure 9
Customer attribute TEAM assigned to the PNOD object type
The Attribute Order column is used to enter a numeric sequence for the attributes when you wish to assign more than one attribute to the object type and you want them to appear in a particular order (for example, lowest to highest). This is a freely entered value.
The Value Check column controls how Solution Manager oversees the use of the attribute in the BPH. Since my example attribute is assigned to a custom Data Dictionary field that has a search help, I can leave the Value Check field unpopulated. For your configuration, you may wish to choose one of the four options (or leave it blank) shown in
Table 1.
| Value check option
|
Description |
Required input? |
| Blank |
No checking. Any value can be entered including blank. |
No |
| No Check |
Same as blank |
No |
| Check Value |
Input values are validated against any value controls defined in the Data Dictionary for the field assigned to the customer attribute |
No |
| Input Required |
Input values are not checked against the Data Dictionary definitions |
Yes |
| Input Required and Value Check |
Input values are checked against the Data Dictionary definitions |
Yes |
Table 1
Value Check options
The details of these options are covered in my “Leveraging Customer Attributes to Manage Work” article. That’s it. Your configuration is complete.
Populating the BPH Structure Attributes
Open your project structure (BPH) via transaction code SOLAR01 or SOLAR02 and navigate to a node that is one level higher than the node where you want to populate the attribute. For example, if you want to set the attribute on a business process node, select the node labeled Business Processes underneath the parent Scenario Node and click the Structure tab (
Figure 10). If you want to populate attributes for process steps, select the Process node and the steps appear on the Structure tab.
Figure 10
Business Processes node selected with the Structure tab as active
Note
A step is a child of a process.
Select the process by clicking the gray square to the left of the Process Name on the right side of
Figure 10. That takes you to
Figure 11, which shows the row that is selected with the attributes icon

circled. Click the attributes icon.

Figure 11
Select the process and click the attributes icon
Figure 12 shows the Attributes Maintenance pop-up that opens.
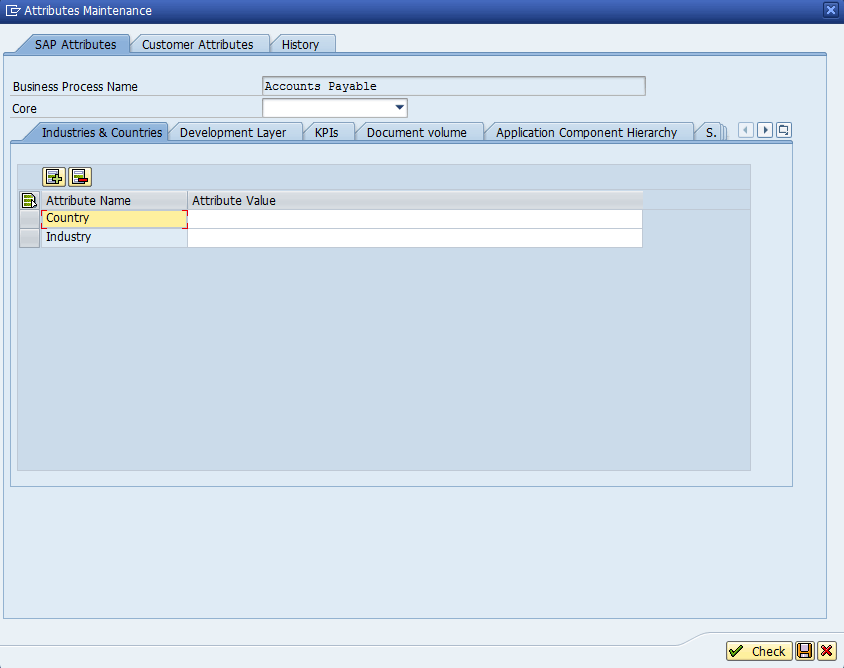
Figure 12
Attributes Maintenance pop-up
Note
SAP provides numerous attributes. The description and use of these is beyond the scope of this article.
Click the Customer Attributes tab to see the TEAM attribute just configured. Using the drop-down option (F4) choose a value from the list by double-clicking it.
Figure 13 shows the Customer Attributes tab with the values displayed.

Figure 13
Customer attributes with values for the TEAM attribute
Repeat these assignment steps until you’ve properly populated the TEAM attribute for each of your BPH nodes.
Now For the Really Useful Part: Filters!
At the top of the BPH structure, there is a series of handy icons. You reach it by using transaction code SOLAR01. The icon to the far left is the filter structure icon

. Click the little black triangle in the bottom right corner of the icon, and you’re presented with a drop-down list of the available filters. (The available filters are based on the project type and project functionality configurations. See
Table 2 for more detail on filter availability.)
Figure 14 shows the available filters described in
Table 2.
| Filter name |
Function |
| Status |
Filters by the status of the structure node as maintained on the Administration tab |
| Team Member |
Only show the BPH nodes if the team member selected has been assigned on the Administration tab of the BPH node |
| Key Words |
Only show the nodes that have the selected key words assigned on the Administration tab |
| End User Roles |
Only show the nodes that have the selected end-user role assigned on the End User Roles tab |
| SAP/Customer Attribute |
Filter by attributes provided by SAP or Customer Attributes |
| Template |
Show the nodes that are assigned to a particular scenario template |
| Scope |
Only show the nodes marked as In Scope for the project (implementation projects only) |
| Global Attribute |
Show only the nodes that are assigned the chosen Global Attribute value on the Structure tab (available on implementation projects), and on template projects when the Global Rollout Functionality is Active (check box on the templates tab in the project header maintained in SOLAR_PROJECT_ADMIN) |
Table 2
Filters and functions

Figure 14
Available filters for a template project
For the purposes of this article, I focus on the SAP/Customer Attribute filter. Choosing this filter brings up a pop-up for selecting which attribute to filter by and what values to search for in the attribute value.
Figure 15 shows the Select Attributes pop-up with the Customer Attributes tab selected, and the prompt (F4) values shown for the TEAM attribute.

Figure 15
The Select Attributes pop-up in the Customer Attributes tab
Figure 16 shows the filtered BPH when FIN is used as the TEAM, as well as the selection of the process and its attributes to confirm the process is in fact assigned to the finance team.
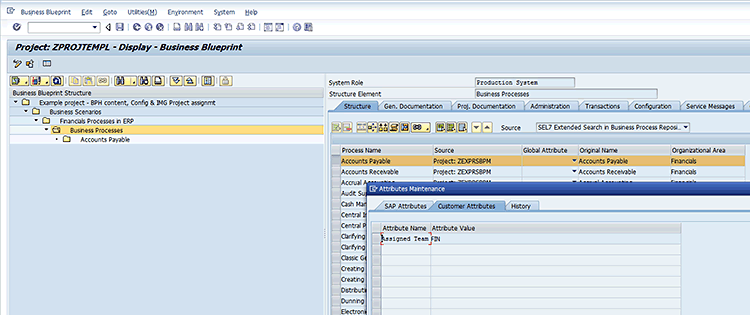
Figure 16
Filtered BPH on the customer attribute TEAM with the value set to FIN
Additional Features of Filters
Note that the top of the pop-up in
Figure 15 has OR and AND radio buttons. This allows you to further control the behavior of the filter. In OR mode, the node must match at least one of the criteria selected. In AND mode, the node must match all the criteria you select for the filter.
Stacking or Combining Filters
When you click the drop-down on the filter icon (the little triangle in the bottom right of the icon) to display the available filters, the currently selected filters have a black dot next to their names. This means you can combine multiple filters to see the subset of the BPH you’re interested in.
Remember, combined filters are always AND, which means the nodes displayed must meet all the criteria defined in the multiple filters, even if the individual filters have OR parameters.
Note
Combining filters or having a lot of criteria selected within a single filter can make for long filter times in large projects.
Figure 17 shows the filter selection when Team Member and SAP/Customer Attribute are applied.
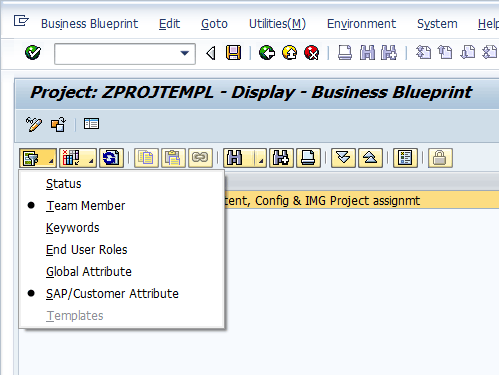
Figure 17
Multiple filters are applied
As always, set up this configuration and experiment with it in a sandbox environment so you thoroughly understand how it behaves. Once you understand filters, you’ll be better able to minimize the time you spend navigating the BPH structure, and have more time to focus on the work at hand, and maybe, even enjoy the experience a little more.
D. Russell Sloan
D. Russell Sloan is a specialist in project and program governance for IBM. He focuses on the use of SAP Solution Manager for global rollout projects for IBM’s largest customers, having worked with SAP software since 1996. Russell has degrees in accounting and information systems and has been a team and project leader for SAP projects for more than 14 years. He has been developing and deploying software systems for over 30 years.
You may contact the author at
solmanruss@gmail.com.
If you have comments about this article or publication, or would like to submit an article idea, please contact the
editor.