Learn how to use a feature of SAP BusinessObjects Explorer 4.1 by following step-by-step instructions for uploading a Microsoft Excel spreadsheet file into SAP BusinessObjects Explorer and then exploring the data included in the file. Discover how to make data residing within an Excel file available so that it can be explored with the creation of a temporary information space. In addition, learn how to make the data available both without and with any configuration changes.
Key Concept
SAP BusinessObjects Explorer 4.1 is a relatively new end-user application within the BusinessObjects 4.1 application suite that provides data discovery and ad-hoc query capabilities.
Fundamentally, SAP BusinessObjects Explorer 4.1 allows users to rapidly explore data in a highly graphical and intuitive format. The Explorer application can be accessed by users through the BI Launch Pad portal, which is the common end-user interface for all BusinessObjects applications. SAP BusinessObjects enables users to quickly and intuitively find the information they are looking for without the need for creating and formatting reports. Users can combine multiple data perspectives into a single view and quickly go from data discovery to at-a-glance dashboard to details of the data.
SAP BusinessObjects Explorer allows for Microsoft Excel to be used as a data source for data exploration with the use of a temporary information space. Moreover, permanent information spaces are typically created by developers and not end users. However, this temporary information space enables any user to explore data residing in an Excel spreadsheet file. In addition, SAP BusinessObjects Explorer contains functionality to enable users to upload and explore an Excel spreadsheet while keeping the file on the user’s workstation.
I show how you can use and explore an Excel spreadsheet file directly within SAP BusinessObjects Explorer 4.1. I also demonstrate how to connect to an Excel file, how to explore data without any configuration changes, and how to explore data within preview mode with configuration changes.
Step 1. Connect to SAP BusinessObjects Explorer 4.1
In order to import and use a Microsoft Excel spreadsheet file for the basis of a temporary information space, SAP BusinessObjects Explorer users must have the following prerequisites:
- Access to the SAP BusinessObjects BI launch pad application
- Access to the SAP BusinessObjects 4.1 Explorer application
- Have view rights to information spaces
An administrator of SAP BusinessObjects should be able to set these rights for any users of the system as needed.
Once you’ve established that you have the prerequisites in place, connect to the BI launch pad application within an Internet browser using the URL for the BI launch pad application as shown in
Figure 1.

Figure 1
Open the BI launch pad application
After connecting to the BI launch pad application, click Applications > Explorer at the top of the screen or click the Explorer icon on the bottom right (
Figure 2).
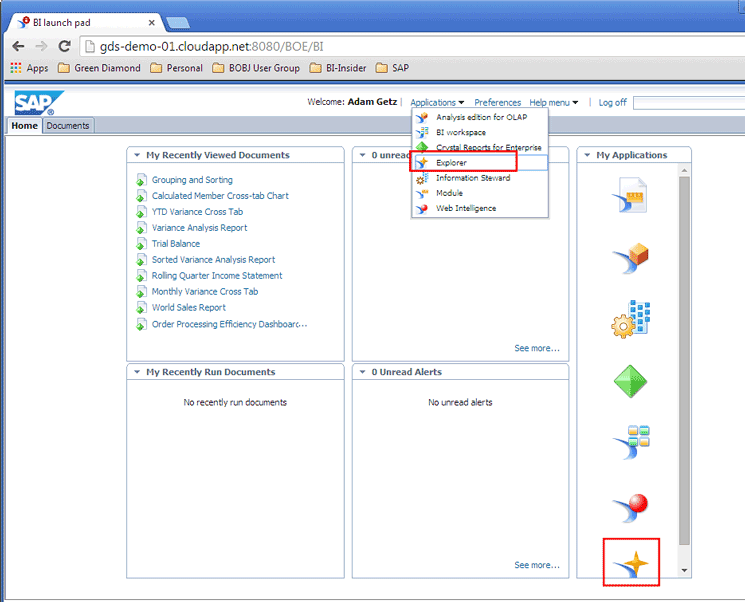
Figure 2
Open BusinessObjects Explorer 4.1
Now you’re connected to SAP BusinessObjects 4.1.
Step 2. Import a Microsoft Excel Spreadsheet
The next screen that opens is the Home page of SAP BusinessObjects Explorer (
Figure 3). Here you view existing information spaces and upload an Excel spreadsheet file to explore.
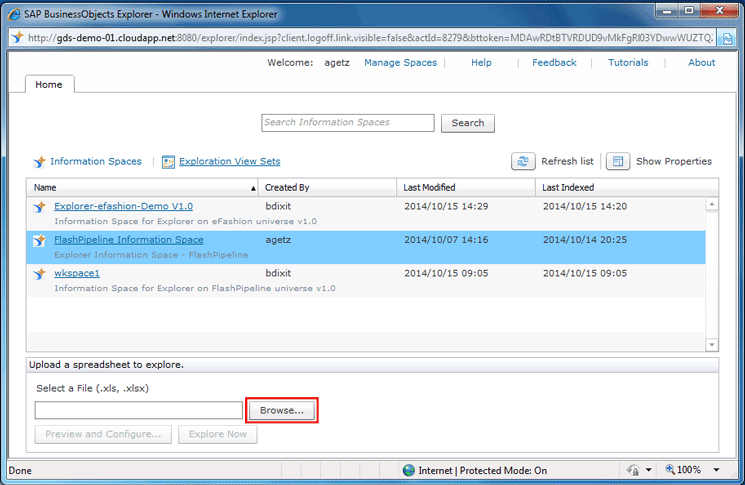
Figure 3
The Home page of SAP BusinessObjects
Click the Browse button at the bottom of the page to search for and select the Excel spreadsheet file you want to upload into Explorer. Either an .xls or .xlsx file may be uploaded.
Navigate to the folder that contains the file to import and select the data file. In this case, I select the file Explorer-efashion-Demo v1.0.xlsx to be uploaded into Explorer 4.1 (
Figure 4). Then click the Open button.
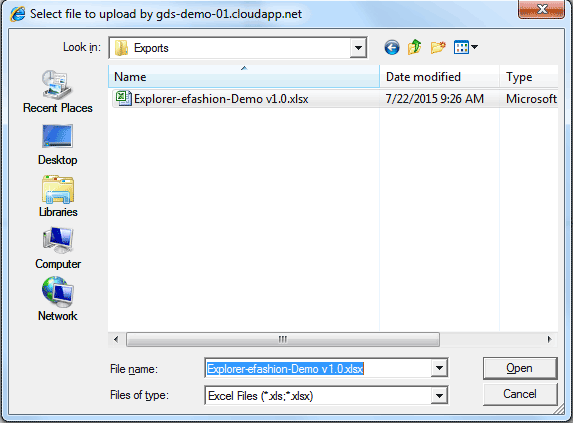
Figure 4
Select the file to upload
The screen in
Figure 5 opens with the selected file (Explorer-efashion-Demo v1.0.xlsx) in the Select a File (.xls, .xlsx) field. In addition, two button options are enabled: Preview and Configure… and Explore Now.

Figure 5
The SAP BusinessObjects Home page with the file to be uploaded
Step 3. Explore an Excel Spreadsheet Without Making Configuration Changes and Preview One With Configuration Changes
At this point, the user can convert the Excel file into a temporary information space that can be explored within SAP BusinessObjects Explorer. Once converted, the fields and values within the Excel file will be available within the temporary information space.
Subsequently, users have one of two options to convert the Excel file into a temporary information space. They can:
- Explore the data now without any configuration changes. By choosing this option, all of the columns from the spreadsheet are available in SAP BusinessObjects Explorer for users to conduct data exploration within a temporary information space.
- Preview the data in the spreadsheet and configure changes within SAP BusinessObjects Explorer. This option allows the user to choose the columns to include within the temporary information space and provide some options for how to view the data.
I discuss both options in more detail below.
Option 1 – Exploring an Excel Spreadsheet Without Making Configuration Changes
To choose the first option, click the Explore Now button at the bottom of the screen in
Figure 5.
This opens a temporary information space that is based on all the columns in the selected Excel spreadsheet file, with all of the default options as shown in
Figure 6. The user can explore this data the same way as any data in any other information space. However, this newly created information space is temporary and only exists during the current session of SAP BusinessObjects Explorer. Once SAP BusinessObjects Explorer closes, this temporary information is no longer available.
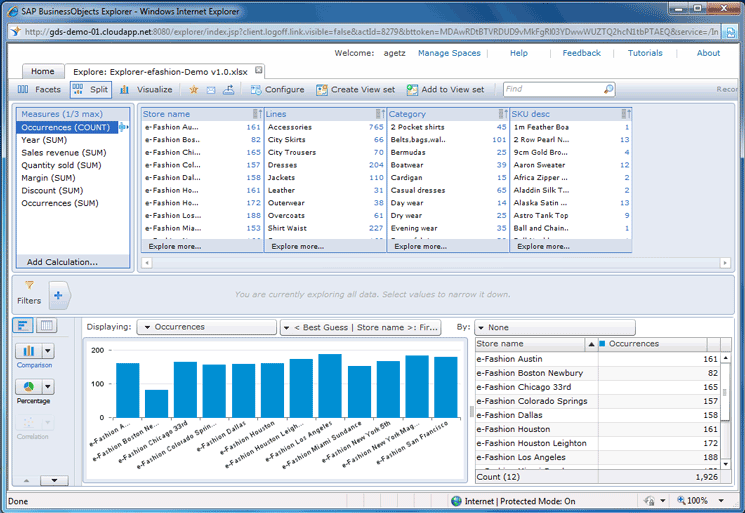
Figure 6
The temporary information space based on an Excel file
Option 2 – Previewing an Excel Spreadsheet and Making Configuration Changes to It
To choose the second option, click the Preview and Configure… button at the bottom of the window as shown in
Figure 5.
This opens the screen in
Figure 7 with a preview of the data located within the selected Excel spreadsheet. Note that Explorer has automatically selected Sheet0 as the Worksheet. For spreadsheets with multiple worksheets, the user must choose which worksheet to use within the new temporary information space (note that only one worksheet can be selected). The Headers are provided by the first row checkbox option is selected by default, but the user can unselect this option. This option should be selected if the columns in the spreadsheet include column titles at the top of the column, and should be unselected if the columns do not include column titles. In this example, Worksheet Sheet0 is chosen and the option of Headers are provided by the first row is selected.
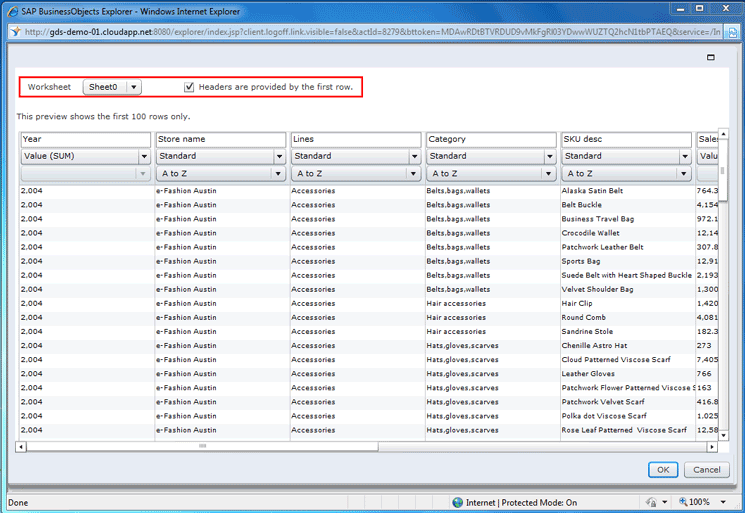
Figure 7
Preview the Excel spreadsheet
Within the review screen, each field should be validated to make sure it has been identified correctly by the import function. Here the user can also update the following settings for each field that has been imported:
- Field Name
- Data Type
- Default Sort Order
Within the data-type setting configuration, the user can define the field as either a dimension or a measure, or can hide the field altogether. By default, fields with alphanumeric or string values are assigned to be standard dimensions and fields with numeric values are assigned to be Value (SUM) measures. However, the user can override and change the data type that has been automatically assigned.
Let’s take a look at the Year field. As this field contains mostly numerical values, the system has assigned it by default to be a Value (SUM) measure field as shown in
Figure 8.
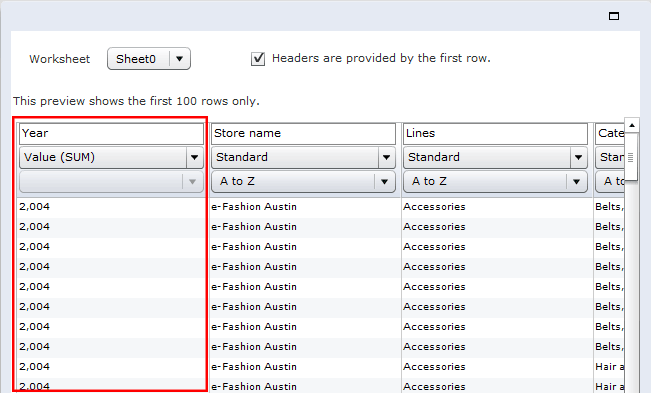
Figure 8
The default configuration for the Year field
However, in this example I want to change the Year field to be a data type dimension. This is because it is not a calculated field and it provides a basis for filters and groupings.
Figure 9 shows how to update the data type for a field. In this case, I have selected the Value (SUM) option and, from the drop-down options that open, I select Dimension and then Standard as the field type.
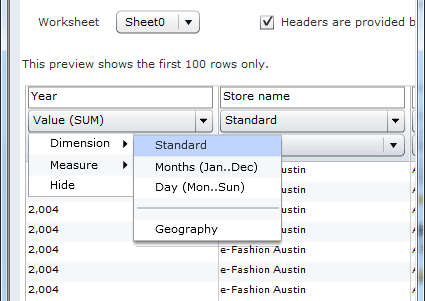
Figure 9
Change the data-type configuration for the Year field to the standard dimension
There are four dimension type options:
- Standard
- Months (Jan..Dec)
- Day (Mon..Sun)
- Geography
The Standard dimension type is the most common and, as a result, is the default. Each dimension type has multiple sort settings from which to choose as the default sort for the field when the temporary information space is opened in SAP BusinessObjects Explorer for data exploration. These setting options are shown in
Table 1.
| Dimension type
|
Available sort order
|
Description |
| Standard |
A to Z
Z to A
Smallest to largest
Largest to smallest
Occurences |
Alphabetical ascending
Alphabetical descending
Values ascending
Values descending
Number of records descending |
| Months (Jan...Dec) |
Ascending (month)
Descending (month)
Smallest to largest
Largest to smallest
Occurrences |
Month ascending
Month descending
Values ascending
Values descending
Number of records descending |
| Day (Mon...Sun) |
Ascending (day)
Descending (day)
Smallest to largest
Largest to smallest
Occurrences |
Month ascending
Month descending
Values ascending
Values descending
Number of records descending |
| Geography |
A to Z
Z to A
Smallest to largest
Largest to smallest
Occurrences |
Alphabetical ascending
Alphabetical descending
Values ascending
Values descending
Number of records descending |
Table 1
The different Dimension types with their available sort orders
Table 2 shows if the sort is based on the Dimension field itself, if the sort is based on the value of the selected measure or if the sort is based on the number of occurrences of the selected measure. The sort can also be set to be in the left or right column within the dimension field or the row count of the field.
| Sort order
|
Sort based on
|
| A to Z
Z to A
Ascending (month)
Descending (month)
Ascending (day)
Descending (day) |
Dimension field (left column) |
| Smallest to largest
Largest to smallest |
Value of selected measure (right column) |
| Occurrences |
Number of occurences (row count) |
Table 2
Sort orders and the criteria or field on which the sort order is based
After selecting the Standard dimension type for the Year field (
Figure 9), the next step is to select the default sort order for the Year field. In this case, select the Largest to Smallest drop- down option under the Year field to make it the default (
Figure 10). This means that by default, the field will be sorted in numerical, descending order by the values of the selected measure in the temporary information space.

Figure 10
Set the default sort order for the Year field
After configuring the Year dimension field, view the configuration settings for the Sales revenue measure field. As this field contains mostly numerical values, the system by default has assigned it to be a field with a Value (SUM) measure, as shown in
Figure 11.
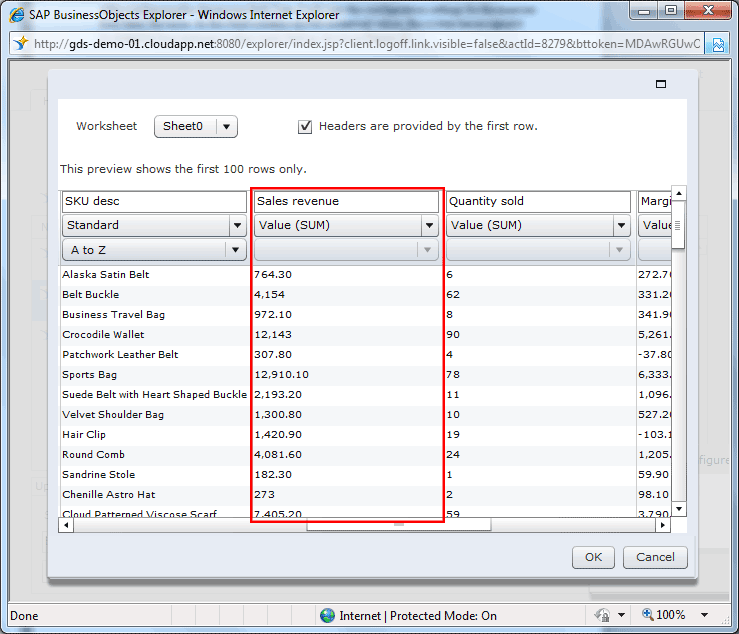
Figure 11
Set the default configuration for the Sales revenue field
Next, check to see what type of aggregation is available for the Sales revenue measure field. Select the Sales revenue drop-down field to expand a menu as shown in
Figure 12.
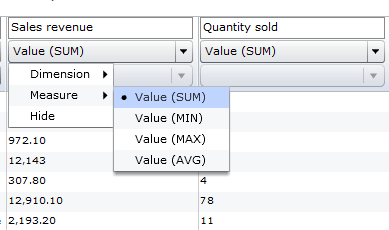
Figure 12
The data type configuration for the Sales revenue field
There are four types of measure fields that determine the way measures are aggregated in SAP BusinessObjects (
Table 3). Sum is the way that most measures are aggregated and is the default option assigned by the system (i.e., the Value (SUM) option is selected as the field type). However, the user can override and change the field type so that other types of aggregations are performed on the field.
| Measure field type
|
Aggregation |
| Value (SUM) |
The sum of all the values in the selected measure for the respective dimension field. |
| Value (MIN) |
The minimum value of all the values in the selected measure for the respective dimension field. |
| Value (MAX) |
The maximum value of all the values in the selected measure for the respective dimension field. |
| Value (AVG) |
The average value of all the values in the selected measure for the respective dimension field. |
Table 3
The Measure field type with aggregation
Check the measure field type of the field Sales Revenue. In this example, I decided to keep the Value (SUM) field type as I want the values in the Sales revenue field to be summed up in my exploration of the data.
Next, check the configuration settings for the Occurrences measure field. As this field contains mostly numerical values, the system has assigned it by default to be a Value (SUM) measure field as shown in
Figure 13.
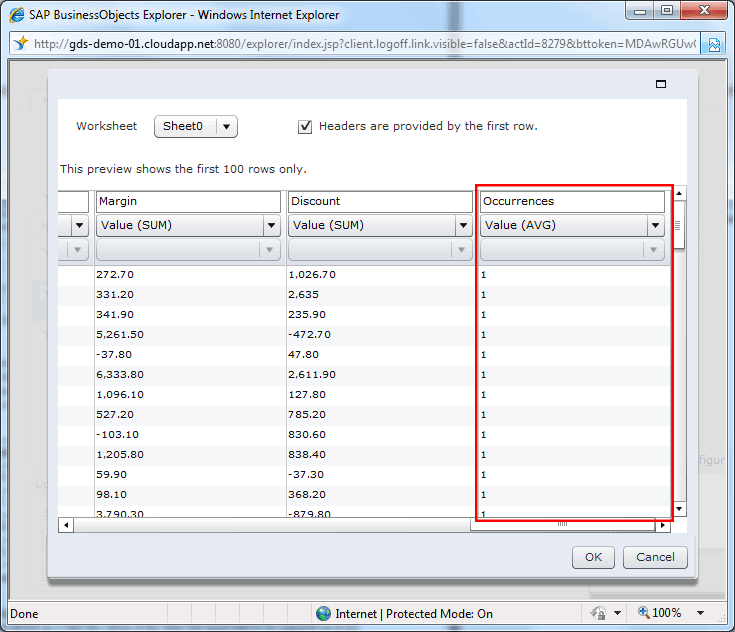
Figure 13
The default configuration for the Occurrences field
Next, hide the Occurrences field as it contains the same value in every record (i.e., the value 1) and does not help with data exploration or analysis. Select the Occurrences field and then, from the drop-down options, choose Hide (
Figure 14). Once selected, the Hide option ensures that this field does not appear as the data is explored.
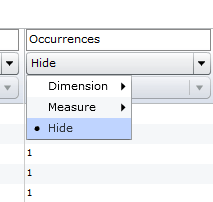
Figure 14
The data type configuration to hide the Occurrences field
Once you’ve checked all the fields to confirm that they’ve been configured correctly, it is now possible to proceed with the indexing of the temporary information space. At the bottom of the preview screen, click the button OK (
Figure 15).
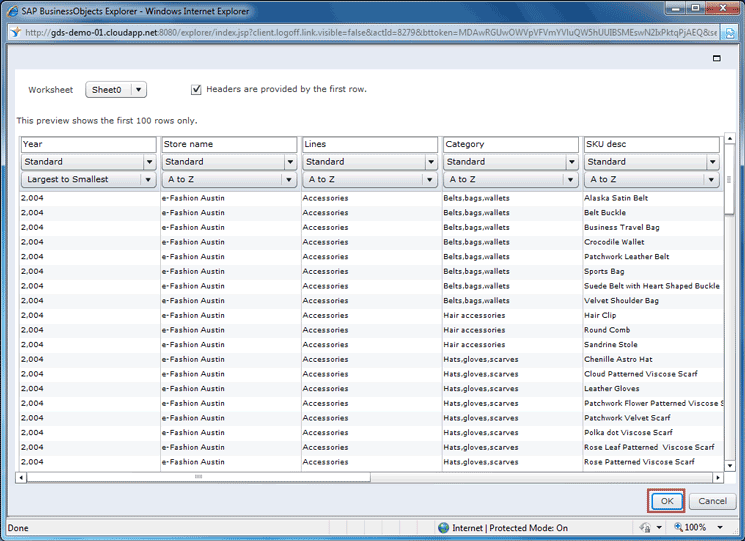
Figure 15
A preview of the Excel spreadsheet
This opens up a screen (
Figure 16) with a temporary information space based on the configuration settings. The user can now conduct the data exploration and analysis on this data like it is any other information space. However, this newly created information space is temporary and only exists during the current session of SAP BusinessObjects. Once SAP BusinessObjects closes, this temporary information is no longer available.

Figure 16
The temporary information space based on the Excel file with custom configuration settings
Once the temporary information space based on the Excel spreadsheet has been checked, the user can go back and change the configuration settings. Simply click the Configure button on the ribbon as shown in
Figure 16. The user is returned to the preview screen (
Figure 15) where they can again select the OK button to re-index the temporary information space as before. Once the OK button is clicked, a temporary information space appears that is based on the new configuration settings chosen.
Adam Getz
Adam Getz currently serves as a Manager, Business Intelligence for CGI Federal. In this position, he is leading a large business intelligence and data warehousing implementation for a federal client. He is a thought leader in the field of information technology and an expert in the deployment of leading business intelligence, database management, and data integration products. He has presented at a variety of local, national, and international events, including the 2006 BusinessObjects International Conference, 2007 Oracle BIWA Summit, 2008 Oracle Open World, and 2010 and 2011 ASUG SAP BusinessObjects User Conferences. In addition, Adam is the creator and main author of
bi-insider.com, a website, portfolio, and blog that provides rich technical and functional content to business intelligence and data warehousing professionals. He has also published numerous technology white papers that have focused on various topics within business intelligence and data warehousing. Adam currently serves as the chairperson of the Washington DC Business Objects User Group.
You may contact the author at
adagetz@yahoo.com.
If you have comments about this article or publication, or would like to submit an article idea, please contact the
editor.