When batch input recording is too cumbersome for uploading data, you can use a BAPI using SAP Legacy System Migration Workbench in SAP ERP Central Component. See how to do this with specific reference to Flexible Real Estate Management.
Key Concept
You can do data conversion through batch input recording, direct input, BAPI, or Intermediate Documents in SAP Legacy System Migration Workbench. Some modules require you to use certain methods, and one such circumstance is that Flexible Real Estate Management requires you to use BAPIs.
Legacy data transfer is one of the most critical events during an implementation. Normally, you use batch input recording for uploading data. However, depending on the complexity of the application, you need to use a different method of data transfer in SAP Legacy System Migration Workbench (SAP LSMW).
For example, you cannot use the batch input recording method if the input screens are not standardized. In such cases, depending on your initial input, subsequent input screens might change, leading to overly complicated recording and setup.
Also you cannot use the batch input recording method if there is no 1-1 relationship between the field and input (i.e., you can provide more than one input into a single field). You often have a scenario in which one real estate contract has 10 objects attached to it, while another has 20.
It might not be possible to handle these scenarios through batch input recording. Even if you can do it through an out-of-the-box method, the recording becomes so complex that it is not worth the effort. These complications occur as the SAP system inputs these values through the front-end program using the batch input recording method.
I'll explain the legacy data conversion of real estate contracts using BAPIs in SAP LSMW in Flexible Real Estate Management (RE-FX). Even though RE-FX is my example, you can apply the functionality to other components depending on the availability of SAP-delivered BAPIs (e.g., FI-AR, FI-AP, FI-AA). While converting data through BAPIs, you input the data directly through the target data structure, whereas in the case of the batch input recording, the data is input through the front-end program.
The BAPI method is advantageous because you do not need to follow the cumbersome process of recording the transaction that you have to do in the batch input recording method. The BAPI method, apart from handling the complications, is easy to implement and less prone to errors, and the data conversion is faster compared to the recording method. My example includes screenprints from SAP ERP Central Component (SAP ECC) 6.0, which might vary slightly in other versions.
Note
BAPIs are function modules that play an important role in the technical integration and in the exchange of business data between SAP components, and between SAP and non-SAP components.
Note
For components such as RE-FX, use of BAPIs is mandatory for data conversion. See SAP Note 1151136 (FAQ: Using BAPIs in RE-FX) for more information.
This process involves three main phases:
- Partner profile settings
- SAP LSMW project preparation
- Data upload with SAP LSMW
Partner Profile Settings
In the following steps, you select the applicable partner profile settings and specify them against an example SAP LSMW project called CREATE_RE_CONTR.
Note
Your Basis administrator needs to create the partner profile settings before you can perform the activities in this section, which you need to address in SAP LSMW.
Step 1. Create the project for SAP LSMW. Use transaction LSMW to create the project. In my example, I have created a project, subproject, and object with the name CREATE_RE_CONTR (
Figure 1).

Figure 1
Create the SAP LSMW project
Step 2. Make the settings for the logical system and partner profile. Click Settings on the menu bar and select Intermediate Document (IDoc) Inbound Processing to bring up the screen shown in
Figure 2. The File port, Partn. Type, and Partner No. fields are technical settings and therefore the Basis administrator creates them. You just need to select the relevant settings for your SAP LSMW project. If you need any assistance in selecting the values or you don't find any values, talk to your Basis administrator.

Figure 2
IDoc inbound processing
Note
F4 (possible entries) help is not available for selecting the values for the File port, Partn.Type, and Partner No. fields.
Figure 3

Figure 3
Selection of ports in IDoc processing
Click the back icon twice to see the original screen. Enter SAPECC210 in the File port field. Next, select the partner type by clicking the Maintain Partner Types button. Then select LS in the Partn.Type column (
Figure 4). You can see the other partner types in
Figure 4. Go back to the screen in
Figure 2 and click the Maintain Partner Numbers button (
Figure 5).

Figure 4
Available partner types in the SAP system

Figure 5
Give parameters for the partner number
Because the SAP system receives the data from the legacy system in this case, check the inbound parameters. You have to add the message type for the creation of RE-FX contracts. Click the add icon at the bottom of
Figure 5 to bring up the screen shown in
Figure 6. In my example, because I am uploading real estate contracts, I drill down and select BUS1505_CREATE as the Message type and BAPI as the Process code. After saving, click the back icon to bring up the screen shown in
Figure 7, where you can see the message type you specified in
Figure 6.
Note
For complete help on BAPIs, use transaction BAPI to reach the BAPI Explorer.

Figure 6
Give parameters for message type and process code

Figure 7
Message types available for inbound processing
Click the back icon. After filling the values, the initial screen for partner profile setting looks like the screen in
Figure 8. Save the settings. You have completed the partner profile technical settings necessary for IDoc inbound processing. Now you are ready to prepare the SAP LSMW project.

Figure 8
Partner profile settings
SAP LSMW Project Preparation
I created a CREATE_RE_CONTR project in step 1 of the previous section and made the relevant settings for partner profiles. Now you have to prepare the project for the upload. Click the execute icon in that screen (
Figure 1) to see the normal SAP LSMW screen (
Figure 9).

Figure 9
Normal SAP LSMW screen with process steps
After you double-click the process step 1 in
Figure 9, you reach the screen in
Figure 10 and can begin the steps of the project preparation.

Figure 10
Maintain the object attributes
Step 1. Maintain object attributes. Select the radio button Business Object Method (BAPI) and maintain the values in the Business Object and Method fields as shown in
Figure 10. Because I am creating the real estate contracts, I drilled down in the Business Object and Method fields and selected the values BUS1505 and Create, respectively.
Save and go back to the initial SAP LSMW screen, which changes as shown in
Figure 11. The number of process steps changes depending on the input provided in
Figure 11. Every time you complete a process step and go back to this screen, the system advances you to the next process step.

Figure 11
SAP LSMW steps after maintaining the object attributes
Step 2. Create the source structure and fields. Before moving to the source structure definition, you need to look at the target structure and identify the structure where the relevant fields for upload are available.
First, ascertain the mandatory fields by manually creating an RE-FX contract. In my example, I have ascertained that company code, contract type, contract start date, contract text, and profit center are the mandatory fields. However, in real time, you need to input the data under the tabs General data with fast entry, Partners, Term, Objects, Posting parameters, Conditions, and Resubmissions. Depending on the business requirements, you need to ascertain the fields required for input. For simplicity, I have chosen only the mandatory fields. The next step is to search the fields in the target structure.
Jump to process step 4 in
Figure 11 just to see the target structure so that you can maintain the source structure accordingly. Ignore the warning you receive (“You have not defined any source fields”) and the screen in
Figure 12 appears.

Figure 12
Target structure as defined by the system
Figure 12 shows the target structure the system has defaulted as I have chosen the business object and method as Create Real Estate Contract in
Figure 10. You want to define a source structure that has a similar relationship. This makes the mapping of fields (covered in step 4) easier. Now click the header segment (text) to see the fields in the structure (
Figure 13).

Figure 13
Fields in the header segment structure
You should use the COMP_CODE_EXT, CONTRACT_TYPE, and CONTRACT_NUMBER_EXT fields for the header data. Copy the fields into an Excel file along with the number in the Length column, which helps in preparing the Excel file for upload. You use this later to define the source structure. Repeat this process for the other structures: E1BP_RE_CONTRACT_DAT (Real Estate Contract – Data) and E1BP_RE_TERM_OA_DAT (Organizational Assignment of an RE Object). Click the back icon. Now see the line items one by one to find the location of the fields to be uploaded. You need to see the Contract start date, Contract text, and Profit center fields now. You can find them in substructures Real Estate Contract – Data and Organizational Assignment of an RE Object – Data.
Based on the target structure, I have designed my source structure as shown in
Table 1.
| ZHEADER_SEGMENT |
COMP_CODE_EXT |
ZDATA_GENERAL |
CONTRACT_TEXT |
|
CONTRACT_TYPE |
|
CONTRACT_START_DATE |
|
CONTRACT_NO_EXT |
|
|
|
|
ZORG_ASSIGN |
PROFIT_CTR |
|
| Table 1 |
Source structure elements |
To create the source structure, click the create icon. First create the top node and then create the node for the other structures at the lower level and save the settings (
Figure 14). After this, go back to the main screen in
Figure 11 and execute process step 3.

Figure 14
Define the source structure
Step 3. Assign source fields in the source structure. Now you have to assign the source fields to the source structure that you defined in the previous step. Keep the cursor on the source structure and click the table maintenance icon. This brings up the screen shown in
Figure 15. I have maintained the source fields as decided in step 2 (
Table 1).

Figure 15
Source fields for source structure header segment
Save and maintain the source field assignment for the other two source structures as well (
Figure 16). It is important to note that while maintaining the source fields for source structures ZORG_ASSIGN and ZDATA_GENERAL, include the common fields in the header segment (e.g., COMP_CODE_EXT, CONTRACT_NO_EXT).

Figure 16
Screen after saving the source fields in the source structure
Save and click the back icon. Double-click process step 4 in
Figure 11 to go to the screen shown in
Figure 17.
Step 4. Link the source structure and target structure. Now you have to create a link between the source structure created in the previous step and the target structure. Click the create icon to create the relationship and select the source structure. After finishing the relationships, the screen looks like the one shown in
Figure 17.

Figure 17
The relationship between the source and target structure
Step 5. Maintain field mapping and conversion rules. Then you need to map the source fields to the target fields. You can either create the field mapping manually or get the system map automatically. To map the fields manually, keep the cursor on the field and click the Create source field button on the toolbar. The system then prompts you with a list of fields from the source structure. Choose a field from the list to complete the assignment. Because I have maintained the fields exactly the same as the standard ones, I choose the automatic route.
Go to Extras ? Auto field mapping. For the header segment, after the auto field mapping, the screen looks like the one shown in
Figure 18. The fields in other structures are also mapped similarly.

Figure 18
Mapping of the header segment
Now that you have created the SAP LSMW project and are ready to upload the data, you need to prepare the files and specify them in your SAP LSMW project.
Note
For any master data conversion, you can make the number range external so that you have more control on the master data creation process. To see the number range assigned to the contract type, access the transaction via IMG menu path Flexible Real Estate Management (RE-FX) ? Contract ? Contract Type ? Define Contract Types. See the number range interval assigned to the contract type. Then change the number range interval using IMG menu path Flexible Real Estate Management (RE-FX) ? Contract ? Number Assignment ? Number Range for Contracts. Then set the number range as external. After uploading the master data, you can change the number range back to internal.
Data Upload with SAP LSMW
Step 1. Specify the files. Maintain the data in the Excel file and convert it into a delimited text file such as Notepad. In my example, you need three files: one each for ZHEADER_SEGMENT, ZORG_ASSIGN, and ZDATA_GENERAL. Enter the file path and fill the details as shown in the screen in
Figure 19. Then specify the two other files. Select the appropriate delimiter of the file. In my example, the source files are tab-delimited, so I chose Tabulator, but you could also choose Comma, Semi-Colon, or a custom one. Then select the two check boxes at the bottom of the screen, Field Names at Start of File and Field Order Matches Source Structure Definition, if applicable. If you check the Field Names at Start of File check box, your source file has the field names in the first row. If you check the Field Order Matches Source Structure Definition check box, the order of fields replicates the source structure definition. These options are common to SAP LSMW projects and they are self explanatory. Save the settings.
Note
If the file name for converted data exceeds 45 characters, the system produces an error message. In this case, manually change the name of the converted file to below 45 characters.

Figure 19
Assign the files and select the delimiter and file structure
Step 2. Assign the files to the source structure. Assign the three files specified in the previous step to the source structure that you defined. Click the create assignment icon. The system prompts you with a dialog window asking which of the three files defined in the previous step should be associated with this source structure. You have to select the source structure by clicking it once before clicking the button. After assigning the files, the screen looks like the one shown in
Figure 20.
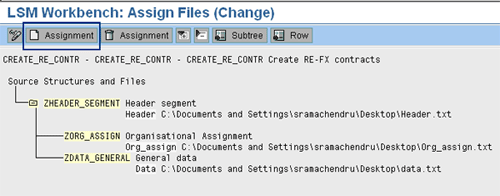
Figure 20
Assign the files to the source structure
Step 3. Read and display data. The SAP system reads the data from the legacy files through source structures. If your source data contains the date field, maintain your date value in format YYYYDDMM in the source file and check the Data Value -> YYYMMDD check box (
Figure 21). It lets the system know the format of the input date fields and value fields. Click the execute icon to load the data into the SAP system. Display the read data and check whether there are any errors.

Figure 21
Display the read data transaction
Step 4. Convert and display data. After reading the data, you need to convert the data. Select the radio button Create File to create the file with converted data (
Figure 22). In the subsequent steps, you generate IDocs with the converted file. The other option — Create IDocs Directly — does not create a file, but creates IDocs immediately. I recommend the first option. When you choose the Create IDocs Directly option, you need to specify how many IDocs you want to transfer per package. You can accept the default value. Convert the data by clicking the execute icon. The output screen appears after conversion. Then go back to the original screen in
Figure 11.
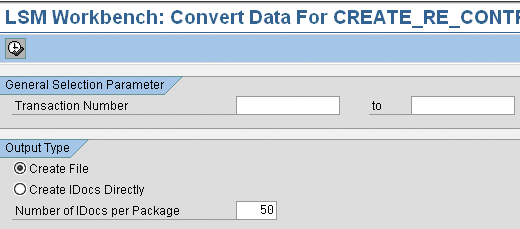
Figure 22
Convert the legacy data
Step 5. Start IDoc generation. This is process step 13 in the screen in
Figure 11. Click the execute icon (
Figure 23). See the message that the file has been transferred for IDoc generation. Then go back to
Figure 11.
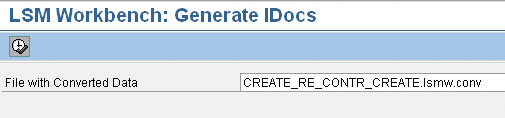
Figure 23
Convert the legacy data and click the execute icon
Step 6. Start IDoc processing. The screen in
Figure 24 appears. Click the execute icon to process the IDocs. In the screen in
Figure 25, you can view the IDocs created from the screen in
Figure 24.
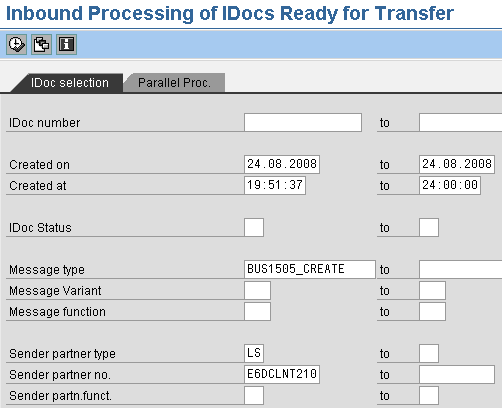
Figure 24
IDoc processing
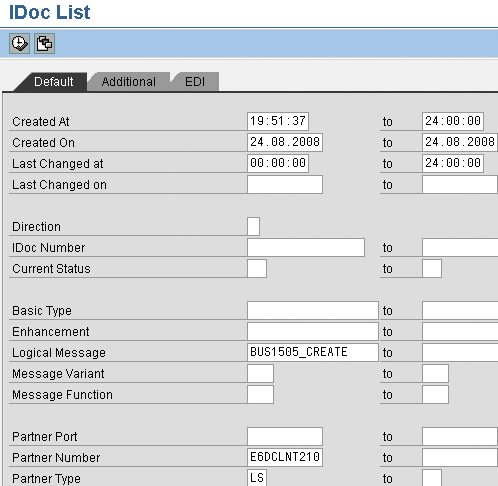
Figure 25
Display the IDoc list
After you execute the IDocs, you see the screen shown in
Figure 26. It displays the list of IDocs along with the status. Green indicates success and red indicates failure. Double-click any IDoc to see the details of the real estate contract created with the IDoc. You can double-click the red status IDoc to see a screen similar to the one shown in
Figure 27, which displays the errors on the left side under the folder Status records.
Note
You cannot process the failed transactions directly from the screen in Figure 27. You need to correct the errors in the data or the settings, and follow the same steps again from step 3 in the “Data Upload with SAP LSMW” section.
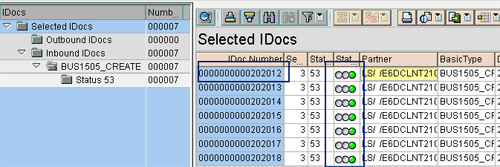
Figure 26
List of IDocs generated
Figure 27 displays the real estate contract (e.g., 0001/10) details created with IDoc 202012. You can see the technical details on the right side of the IDoc record.
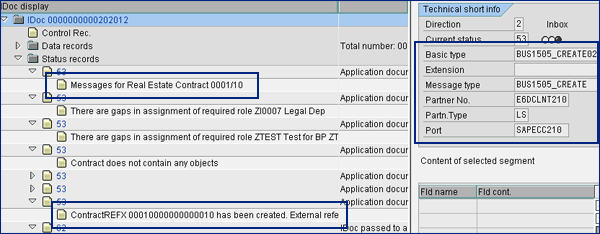
Figure 27
Display of IDoc created with messages
Finally, after the upload, check the master data and confirm that the legacy data is correctly uploaded. You can export and import the SAP LSMW project to other servers similar to other SAP LSMW projects.
Sivaprasad Ramachendruni
Sivaprasad Ramachendruni is a solution architect (SAP Financials and SAP S4/HANA Finance) with SAP professional certification. He is currently working for a multinational corporation in the IT sector. He has more than 17 years of functional and SAP system experience spanning across several industries. He has expertise with various modules, including FI, Controlling (CO), Funds Management (FM), Flexible Real Estate Management (RE-FX), Financial Supply Chain Management (FSCM), and SAP S4/HANA Finance. He helps companies design, implement, deploy, and streamline business processes and gain efficiency. He is an Indian cost and management accountant and has a master’s degree in financial management.
You may contact the author at
sivaprasadr@rediffmail.com.
If you have comments about this article or publication, or would like to submit an article idea, please contact the
editor.