Learn the configuration steps needed for the intercompany loans process outlined in the article “Track Intercompany Loans Using SAP’s Transaction Manager Module, Part 1.” The configuration is in line with the process described in part 1 of this article.
Key Concept
When companies reach a more complex size, they often need to implement financing processes to facilitate borrowing from surplus cash entities and lending to the deficit cash entities. Therefore, intercompany loans are a common trade that corporations use. Intercompany loans is a good trade type to use to show basic functionality within SAP’s Transaction Manager. Through customizing intercompany loans, the structure, functionality, and accounting of the trade are defined. Before starting on the configuration, it is important to understand the requirements of the trade, including the accounting entries that should be generated.
Transaction Manager configuration is extensive when considering the several submodules within Transaction Manager (e.g., Money Market, Foreign Exchange, Securities, and Derivatives). This article concentrates on the required configuration for processing intercompany loans using SAP’s Transaction Manager module, which includes the following:
- Definition of product type
- Definition of transaction types
- Definition of flow types
- Definition of update types
- Mirroring configuration
- General ledger (G/L) account determination configuration
- Definition of reference interest rates
Transaction Manager configuration is consistent wherever possible across different trade types. For example, there are basic differences between money market trades and derivative trades. Derivative trades have underlying assets, but money market trades do not. The configuration required for the different trade types is going to be different. Therefore, understanding the configuration for intercompany loans, which is in the Money Market submodule, greatly expedites the understanding of processing other trade types using Transaction Manager. Once you understand the processing and configuration for one trade type, it is easy to expand that knowledge to other trade types, such as Foreign Exchange or derivative trades.
Configuration for types of trades across all Transaction Manager sub-modules requires the following:
- Define Accounting Codes
- Assign Accounting Codes to Valuation Areas
- Definition of Product Type
- Definition of Transaction Types
- Definition of Flow Types
- Definition of Update Types and Assign Usages
- Set Effects of Update Types on Position Components
- Derived Business Transactions
- Account Determination
Note
The above list is not exhaustive. There are other configuration nodes that are relevant to all Transaction Manager trade types.
Although the settings for each of the above configuration nodes could be different across the different trade types, understanding the structure of the trades and the configuration process for Money Market trades is absolutely going to be helpful in understanding how to configure Foreign Exchange or Derivative trades. That is what I mean by the statements above.
The intercompany loans process for which you apply the configuration steps in this article is outlined in the
Financials Expert article “
Track Intercompany Loans Using SAP’s Transaction Manager Module, Part 1.”
Prerequisites
The functionality described in this article is included in SAP ERP Central Component (ECC), although licensing may be required to use the SAP Treasury and Risk Management module. SAP’s Transaction Manager module tracks Treasury trades through their full life cycle–from trade entry to payments to month-end processing to maturity of the trades. All accounting entries related to the trades are triggered by the trades and are posted directly to the SAP General Ledger.
The primary advantages of implementing intercompany loans in an SAP system include:
- Implementing intercompany loans is a manageable and self-contained project, which gives a Treasury department a feel for the functionality contained in Transaction Manager.
- The Transaction Manager modules integrate well into other SAP modules, such as Cash Management and Financial Accounting.
- The configuration for intercompany loans is well supported by Transaction Manager. Custom development should not be necessary.
- Configuration is similar across other submodules within Transaction Manager.
We have divided the configuration into the logical sections listed in Table 1. The configuration can be entered into the SAP system in the order displayed in Table 1.
| Configuration |
Description |
IMG menu path
|
Intercompany trade configuration
|
In this configuration, the structure of intercompany loan trades is defined.
|
Financial Accounting > Financial Supply Chain Management > Treasury and Risk Management > Transaction Manager > Money Market > Transaction Management
|
Initial Transaction Manager configuration
|
This configuration is used across the submodules in Transaction Manager and must be done before trade processing can be done.
|
Financial Accounting > Financial Supply Chain Management > Treasury and Risk Management > Transaction Manager > General Settings
|
Accounting configuration
|
This configuration drives the accounting entries made for the intercompany loans.
|
Financial Accounting > Financial Supply Chain Management > Treasury and Risk Management > Transaction Manager > General Settings > Accounting.
|
Mirroring configuration
|
This configuration drives the creation of the mirrored intercompany loan trade.
|
Financial Accounting > Financial Supply Chain Management > Treasury and Risk Management > Transaction Manager > General Settings > Transaction Management > Distribution of Mirror Transactions
|
Market data configuration
|
Market data settings for importing external market data into the SAP system are made here.
|
Financial Accounting > Financial Supply Chain Management > Treasury and Risk Management > Transaction Manager > Basic Functions > Market Data Management
|
Table 1
Sections of intercompany loans configuration
Note
The configuration described in this article does not include business partner, correspondence, or Financial Accounting (FI) configuration that may be needed for the processing of intercompany loans.
To access Transaction Manager in the Treasury and Risk Management configuration, follow IMG menu path Financial Accounting > Financial Supply Chain Management > Treasury and Risk Management > Transaction Manager. SAP’s Transaction Manager is a module within Treasury and Risk Management. Within Transaction Manager, the intercompany loans functionality is entered in the Money Market submodule of Transaction Manager.
Note
In Transaction Manager configuration, an element that has “type” in the name is an element that can be defined in configuration. An element that has “category” in the name is something that is predefined by SAP and not changeable. The categories are used in the definition of types, (product types, transaction types, and flow types). For example, the SAP system provides product categories that are used to define product types.
In addition, throughout this article, we discuss only configuration nodes and fields that are relevant to intercompany loans.
Intercompany Loans Trade Configuration
In this first section of configuration, you define the structure of the intercompany loan trades.
Define Product Types
In this first configuration step, the product types for intercompany loans are defined. The product type should be given three characters that clearly indicate intercompany loans. The product type and transaction type define the different types of trades a company may track in SAP’s Transaction Manager module. In other words, the product type and transaction type categorize the type of trade. If other money market trade types were tracked in the SAP system, further product types and transaction types would be defined here.
The maintenance of the product types in the SAP system consists of a three-digit identification code (ID) with short and long text that is assigned to a certain product category. The product category used for intercompany loans is the interest rate instrument. The product category holds specific functionality such as fixed or floating rate interest and repayment of principal at maturity, which should be included in the intercompany loan trades.
SAP Treasury and Risk Management is delivered with product types, such as 51A or 52B. We feel it is better to reference the SAP-delivered settings, but to create new settings that are more user-friendly. We suggest you create a product type ICI for the intercompany loan investment, which will be entered into by the lending entity, and ICB for the intercompany loan borrower, which will be entered into by the borrowing entity.
In addition, a default value for interest calculation method can be selected. The interest calculation method drives the day count for a year and is used in the calculation of interest. If a default interest calculation method is not specified in the product type definition, this just means it does default into the trade, and instead needs to be set manually. It is possible to enter a default interest calculation method and default effective interest method (Eff. Int. Method field).
To define product types follow menu path Financial Supply Chain Management > Treasury and Risk Management > Transaction Manager > Money Market > Transaction Management > Product Type > Define Product Type. In the initial screen that the system displays, click the New Entries button (not shown) and in the refreshed screen, enter ICI in the Product Type field (Figure 1). When you are finished, click the next entry icon  (not shown in Figure 1) and enter ICB in the Product Type field, which is the same as ICI except for the description in the Text field. Click the save icon.
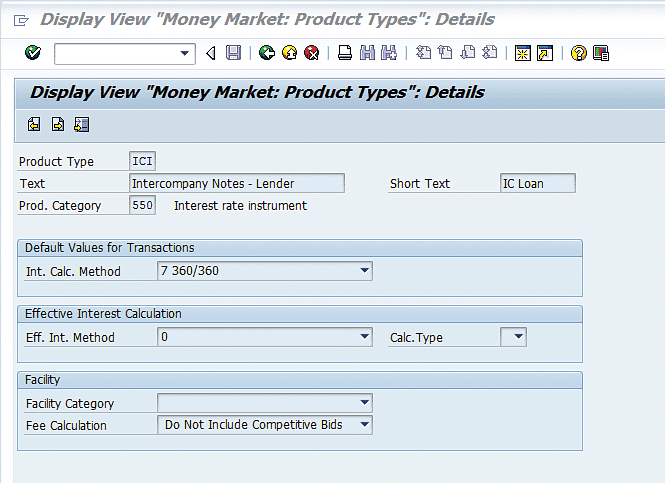
Figure 1
Definition of the investment side of the intercompany loan
Define Number Ranges
In the next step, you create the number ranges for intercompany loans. It is a good practice to use different number ranges for different categories of trades. For example, have external money market trades fall into the number range of 1000000 to 1999999, and intercompany loans be assigned to the number range 2000000 to 2999999. This way, just by knowing the trade number, Treasury users know what type of trade it is. Follow IMG menu path Financial Supply Chain Management > Treasury and Risk Management > Transaction Manager > Money Market > Transaction Management > Transaction Types > Define Number Ranges. Enter the first company code in the Company Code field and click the Change Intervals button (not shown). This action displays the screen in Figure 2.

Figure 2
Define the number range to be used for intercompany loan trades
Click the insert line icon  . A new blank line appears (not shown). Enter the number range as shown in Figure 2 and then click the save icon.
Define Transaction Types
The next configuration step to be discussed is the definition of the transaction types. The (financial) transaction type determines the direction of the flow of money relevant for the product types that are defined.
The transaction type is assigned to a product type, and it defines the direction of the trade. The ICB/BOR is a borrowing type. At inception of the trade, the borrowing entity receives funds, and at maturity, the principal and interest are paid back to the lending entity. For the lending entity, it is the opposite. At the inception of the trade, the lending entity lends funds to the borrower, and at the maturity of the trade, the lender receives back interest plus repayment of the principal.
In the case of intercompany loans, the transaction types defined are INV (investment) and BOR. Apart from the transaction category (purchase versus sell), the product type and transaction type fields are the same. For each transaction type, a number range is assigned in the Number Ranges box. The Processing Cat. of 00002 is used for the intercompany loan trades. The processing category field defines the possible life-cycle steps of the trade.
To define a transaction type, follow IMG menu path Financial Supply Chain Management > Treasury and Risk Management > Transaction Manager > Money Market > Transaction Management > Product Type > Define Transaction Types. In the initial screen the system displays (Figure 3), click the New Entries button.
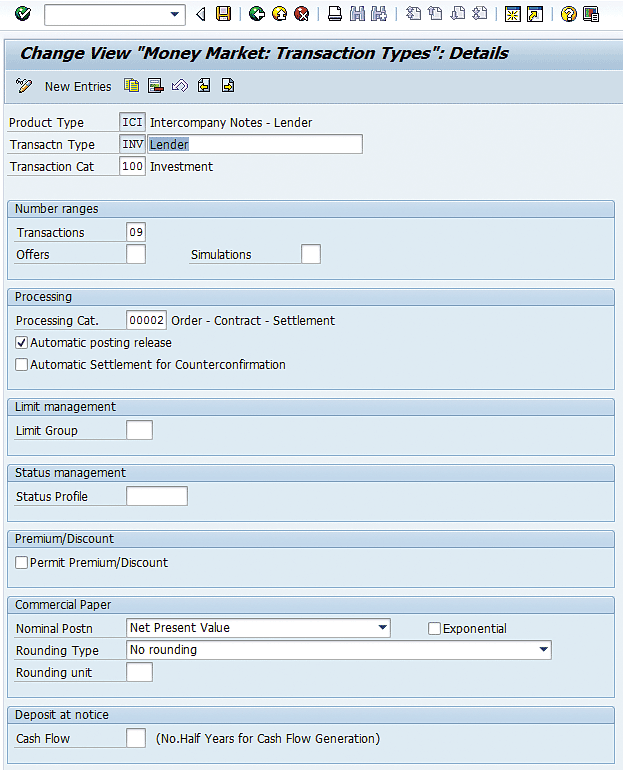
Figure 3
Transaction type for the lending side of a trade
In the Transactn type (transaction type) field enter the investment transaction type and then click the next entry icon. Now enter BOR (Borrower) in the Transactn type field, as shown in Figure 4. Click the save icon.

Figure 4
Transaction type for the borrowing side of a trade
Define Flow Types
In the next configuration step, you define the flow types that define the intercompany loan trades. The flow types could be trades-related flow types or accounting-only flow types. In this step, the characteristics of each flow type are defined.
Flow types represent the different types of flows related to trades. For each flow type defined, the characteristics of the flow type are specified, such as whether the flow should reflect in the Cash Management and Forecast report (transaction codes FF7A and FF7B), if it posts to the SAP General Ledger, if it posts to the profit and loss (P&L), if it is relevant to trade valuations, or if it accrues. Relevant to Position means the flow posts to the balance sheet. Relevant to P/L means the flow posts to the P&L. If you do not get a payment request for a trade flow and have set the trade payment details to generate a payment request, double-check that the flow type has been set to create payment requests in both directions.
The effective interest calculation indicator drives if the flow is included in the effective interest calculation.
We suggest copying from SAP standard flow types that are like the flow types being defined, as shown in Table 2.
SAP standard flow type
|
New flow type
|
Flow type name
|
1200
|
IN00
|
Interest |
| 1100 |
PI00
|
Principal increase |
| 1110 |
PD00 |
Principal decrease |
1120
|
PF00 |
Final repayment |
2100
|
AB00 |
Interest accrual |
| 2150 |
AR00 |
Interest accrual: Reset |
Table 2
Intercompany loan flow types
To define a flow type, follow IMG menu path Financial Supply Chain Management > Treasury and Risk Management > Transaction Manager > Money Market > Transaction Management > Flow Types > Define Flow Types. In the screen the system displays (Figure 5), for each flow type in Table 2 copy from the SAP standard flow type. Create the new flow type with the flow type name by selecting the SAP flow type and clicking the copy as icon  . Then enter the new flow type and new flow type name. Click the save icon when you complete those steps. Create a flow type for each of the flow types in Table 2.
Figure 5 shows the definition of the interest flow type.
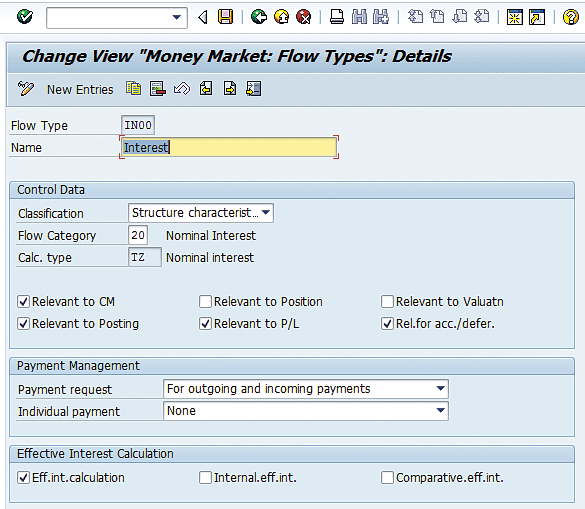
Figure 5
Definition of the interest flow type
Assign Flow Types to Transaction Types
In the next configuration step, you assign each trades-related flow type defined in the step above to each of the product type or transaction type combinations for the intercompany loan. The flow types that are assigned in this step are the flow types that are not generated by a condition type. To get to the configuration node, follow IMG menu path Financial Supply Chain Management > Treasury and Risk Management > Transaction Manager > Money Market > Transaction Management > Flow Types > Assign Flow Types to Transaction Type. In the screen the system displays click the New Entries button and enter the values shown in Figure 6. Click the save icon when you are finished.
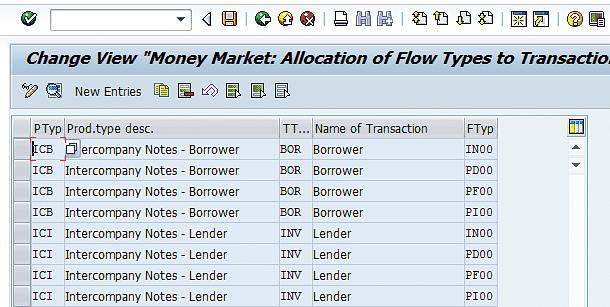
Figure 6
Assign flow types to intercompany product and transaction types
Define Update Types and Assign Usages
In this configuration step, you define the update types. It is a two-step process. The first step defines the update types. The second step assigns a usage to the update type. This usage defines how the system uses the update type. For example, if an update type will be used in the interest accrual functionality, a usage of Accrual / Deferral is assigned to the update type.
Follow IMG menu path Financial Supply Chain Management > Treasury and Risk Management > Transaction Manager > Money Market > Transaction Management > Update Types > Define Update Types. In the screen the system displays (not shown), click the New Entries button. In the next screen (Figure 7), enter the update types and descriptions shown in Table 3.
Update type
|
Description |
Usage |
MMAB00+
|
Interest Accrual
|
Accrual/Deferral
|
MMAB00-
|
Interest Accrual
|
Accrual/Deferral
|
MMAR00+
|
Interest Accrual Reset
|
Accrual/Deferral
|
MMAR00-
|
Interest Accrual Reset
|
Accrual/Deferral
|
MMIN00+
|
Interest
|
Transaction Management
|
MMIN00-
|
Interest
|
Transaction Management
|
| MMPD00+ |
Principal Decrease |
Transaction Management |
| MMPD00- |
Principal Decrease |
Transaction Management |
| MMPF00+ |
Principal Final Repayment |
Transaction Management |
| MMPF00- |
Principal Final Repayment
|
Transaction Management |
| MMPI00+ |
Principal Increase |
Transaction Management |
| MMPI00- |
Principal Increase |
Transaction Management |
Table 3
Definition of update types
Click the save icon. Double-click the Assign Update Type to Usages folder, and for each update type, assign a usage, as shown in Figure 7. Click the save icon.

Figure 7
Usages for update types
Assign Flow Types to Update Types
In the next configuration step, you assign a flow type and direction to an update type. Follow IMG menu path Financial Supply Chain Management > Treasury and Risk Management > Transaction Manager > Money Market > Transaction Management > Update Types > Assign Flow Types to Update Types. In the screen that the system displays (not shown) click the New Entries button. In the next screen enter the data displayed in Figure 8. Click the save icon to save your entries.
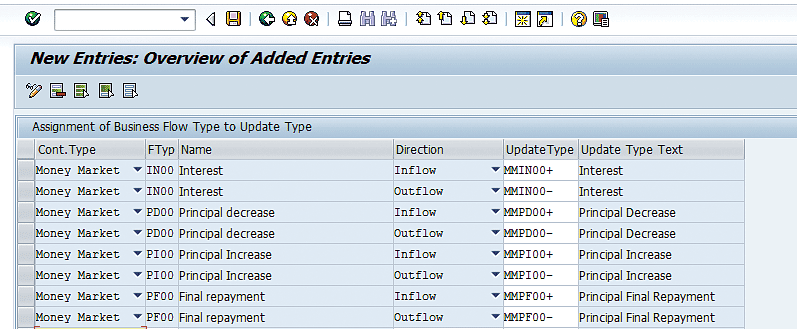
Figure 8
Assign flow types to update types
Define Condition Types
In this configuration step, you define condition types. Condition types hold functionality such as interest, repayment of principal, interest rate adjustment, and dividend payment. When you define the trade type, you assign it conditions to give it specific functionality. In many cases, a flow type is assigned to the definition of the condition type. For the intercompany loans, you copy from SAP standard condition types, give them a new name, and update the flow type assigned to the condition type.
The condition types that are used for the intercompany loan trades are interest (fixed interest rate), interest rate adjustment (floating interest rate), and final repayment (of principal).
To define condition types, follow IMG menu path Financial Supply Chain Management > Treasury and Risk Management > Transaction Manager > Money Market > Transaction Management > Condition Types > Define Condition Types. In the screen the system displays (not shown), select the first SAP standard condition type in Table 4, and then click the copy as icon. In the next screen (Figure 9), enter the new flow type and new flow type name. Click the save icon when you are finished. Do this for the three condition types listed in Table 4.
SAP standard condition type
|
New condition type
|
Condition type name
|
Flow type |
| 1120 |
1000 |
Final repayment |
PF00 |
| 1200 |
2000 |
Nominal interest |
IN00 |
| 1210 |
2010 |
Interest rate adjustment |
<blank> |
Table 4
Condition types for intercompany loans
Figure 9 shows the definition of the final repayment condition type.
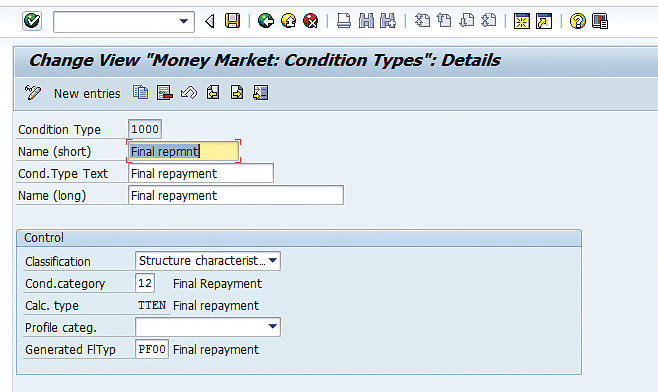
Figure 9
Definition of the final repayment condition type
Assign Condition Types to Transaction Types
In the next step you assign the condition types defined in the last step to the product type or transaction types created for the intercompany loans.
To complete this configuration, follow IMG menu path Financial Supply Chain Management > Treasury and Risk Management > Transaction Manager > Money Market > Transaction Management > Condition Types > Assign Condition Types to Transaction Types. In the screen the system displays, click the New Entries button and enter the data displayed in Figure 10. Click the next entry icon between entries. Do this until you enter all entries in Figure 10. Click the save icon when you are done.
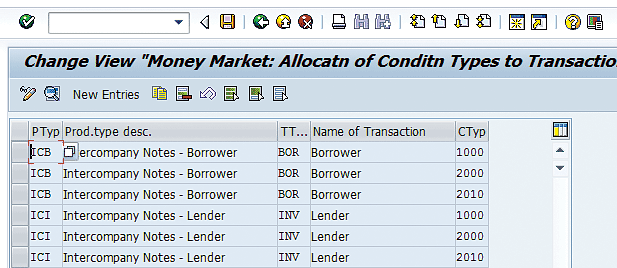
Figure 10
Assign a condition type to the product type/transaction type
Initial Transaction Manager Configuration
In this section, we describe the initial Transaction Manager configuration that must be done before any Transaction Manager functionality can be used. This configuration is not specific to intercompany loans, but must be done before the intercompany loans functionality can be used.
Define Company Code Additional Data
There is one setting under the Define Company Code Additional Data configuration relevant to intercompany loans. This setting drives how the intercompany loan floating interest rate cash flow amount fields are determined. We recommend using the Update with current interest rate setting, which calculates the floating rate amounts using the last interest rate entered up until the interest rate adjustment has taken place. Make company code additional settings by following IMG menu path Financial Supply Chain Management > Treasury and Risk Management > Transaction Manager > General Settings > Organization > Define Company Code Additional Data. In the screen the system displays (Figure 11), click the New Entries button. Enter a code in the Company Code field and set the Planned record update field to Update with the current interest rates. This configuration should be populated for all company codes in the scope for intercompany loans.
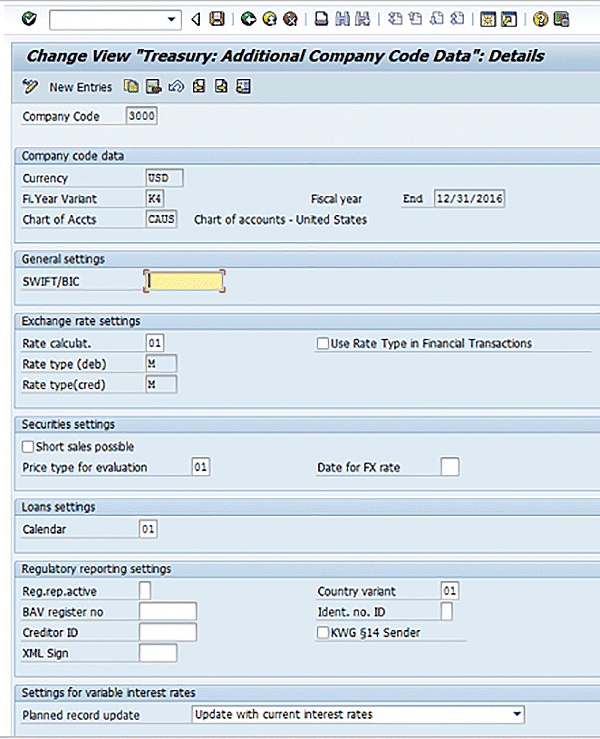
Figure 11
Make settings for variable interest rates
Define Traders
The trader field can be automatically populated in the Treasury trades when this configuration is done. A trader is created for each user who enters trades into the SAP system. When you populate the trader field in trades, you need to authorize the traders for the specific trade types they can enter using Trader Authorizations with transaction code TBT1 (not shown). In the pop-up screen (not shown), enter the company code and then press the Enter key.
After you press Enter, click the New Entries button in the screen the system displays (Figure 12) and enter the traders. Follow IMG menu path Financial Supply Chain Management > Treasury and Risk Management > Transaction Manager > General Settings > Organization > Define Traders. Click the New Entries button, enter the traders, then click the save icon. Repeat this for each company code in scope for intercompany loans.
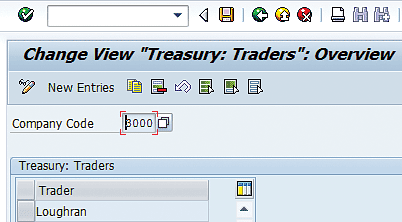
Figure 12
Enter traders by company code
Define User Data
In this step, you link the trader IDs created above to the user’s login. The M and T fields indicate the short key symbol for millions and thousands, respectively. For example, when entering a trade, you can enter 3m in the amount field instead of 3,000,000. The fields M and T are related to the shortcut keys mentioned in Part 1 of this series. You can also define how error messages are displayed to users in this configuration.
Follow IMG menu path Financial Supply Chain Management > Treasury and Risk Management > Transaction Manager > General Settings > Organization > Define User Data. In the screen the system displays (not shown), click the New Entries button, and in the next screen, enter the users and then click the save icon, as shown in Figure 13.

Figure 13
Assign a user name to a trader ID
Define Field Selection
Using the configuration in this step, you can set fields in Treasury trades as hidden, mandatory, or display only. Field status configuration is found under IMG menu path Financial Supply Chain Management > Treasury and Risk Management > Transaction Manager > General Settings > Transaction Management > Define Field Selection.
The first step is to create field selection definitions (for example, external debt, I/C loans), and then for each of these, define the field status. After that, you assign the field selection definitions to the product types or transaction types.
Go to the Define Field Selection configuration and double-click the Field selection definition folder in the left panel. Click the New entries button (not shown), and in the screen shown in Figure 14, enter a name for the Field selection definition such as IC Loans. Also, enter a product category in the field under the PrC (product category) column, which should be 550 for Interest rate instrument. Interest rate instrument is the product category used for the intercompany loans. Click the save icon.
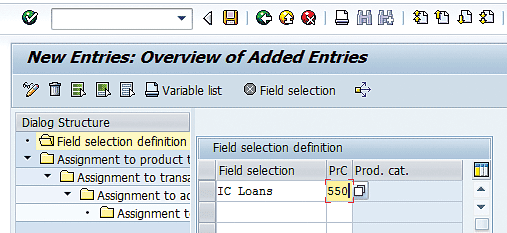
Figure 14
Create Field select definition for trade level field selection
Next, define the field selection by placing your cursor on the field selection just created and clicking the Field selection button on the toolbar. Initially, all fields are set to Not spec. (Not specified). Based on the company-specific requirements, set the Hide, Req.entry (required entry), Opt.entry (optional entry), or Display toggles, as shown in Figure 15. When you are done, click the save icon.

Figure 15
Trade field status configuration
The last step for the field status configuration is to assign the field selection to the intercompany loans product type. To complete this step, follow the menu path listed at the beginning of this section. In the screen the system displays (Figure 16), double-click the Assignment to product types and company codes folder in the left panel. Click the New entries button (not shown), and in the next screen, enter the data as displayed in Figure 16. Leaving the Co… (company code) field blank makes the settings apply across all company codes. Click the save icon.
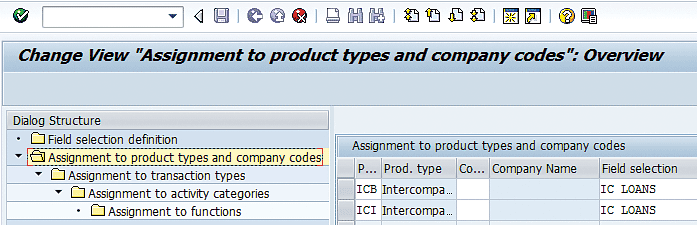
Figure 16
Assign field selection to intercompany loan product types
Define Valuation Areas
The valuation areas are defined in the configuration under Financial Supply Chain Management > Treasury and Risk Management > Transaction Manager > General Settings > Accounting > Organization > Define Valuation Areas. Valuation areas are accounting ledgers that are tracked for Transaction Manager trades. In the screen the system displays, click the New Entries button and enter the valuation areas needed, as shown in Figure 17. Click the save icon.
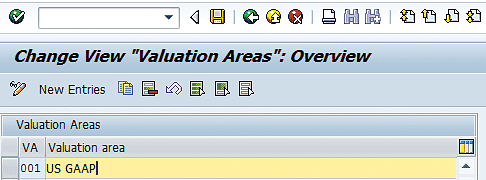
Figure 17
Define valuation areas to be used for intercompany loans
Define Accounting Codes
Add the company codes relevant to intercompany loans as accounting codes in this step. The name of the accounting code should be the same as the corresponding company code.
To define the accounting codes, follow IMG menu path Financial Supply Chain Management > Treasury and Risk Management > Transaction Manager > General Settings > Accounting > Organization > Define Accounting Codes. This path takes you to the configuration shown in Figure 18.
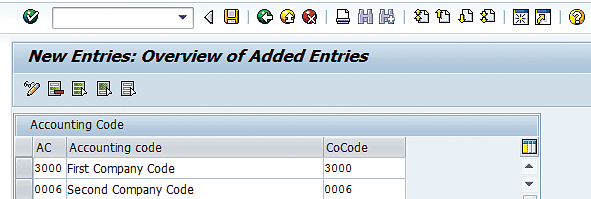
Figure 18
Define the company codes to be used in Transaction Manager
Assign Accounting Codes and Valuation Areas
In this step, you assign the operating valuation area to each company code used for tracking trades. The valuation areas map to accounting books of record. For example, if a company needs to track its Treasury trades by both US Generally Accepted Accounting Principles (GAAP) and International Financial Reporting Standards (IFRS), two valuation areas would be defined. At least one valuation area is required. For our example, create this as US GAAP.
To complete this step, follow IMG menu path Financial Supply Chain Management > Treasury and Risk Management > Transaction Manager > General Settings > Accounting > Organization > Assign Accounting Codes and Valuation Areas. In the screen the system displays, click the New Entries button and then enter the data shown in Figure 19 for each company code. When you are done, click the save icon.
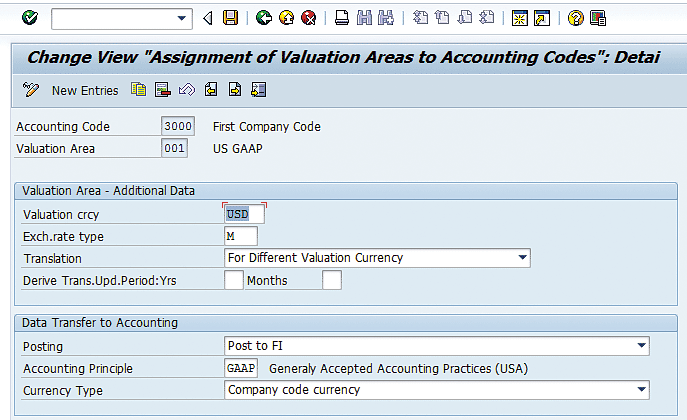
Figure 19
Define company codes to be used in Transaction Manager
Define and Assign Valuation Classes
Next, you define a general valuation class for the intercompany loans. The general valuation class is a required field in the trades. The general valuation class is a field used to drive the assignment of the position management procedures, which is significant to the valuation and accounting of trades. As an example of the use of valuation classes, for security trades, the accounting treatment is different if the trade is designated as Trading, Available for Sale, or Held to Maturity. If you are using Transaction Manager for securities trades, you need to create Trading, Available for Sale, and Held to Maturity as general valuation classes and assign each of these general valuation classes to both the US GAAP and IFRS valuation areas in this configuration, as the three different accounting treatments are relevant to both US GAAP and IFRS accounting. As the security trade is entered into the SAP system, the general valuation class would be categorized as Trading, Available for Sale, or Held to Maturity. For our example of intercompany loans, just one valuation class needs to be created and assigned to our US GAAP valuation area 001, as there will be just one approach to valuation and accounting for intercompany loans.
Keep in mind when entering this configuration, the general valuation class is independent of a valuation area, and is a required field when entering a trade into the SAP system. The special valuation class is what is used to drive the accounting treatment of the trade. For this reason, this configuration includes three steps, which are: 1) define a general valuation class, 2) assign the general valuation class to a valuation area or valuation areas, and 3) assign the general valuation class to a valuation area and a special valuation class.
To create a valuation class for intercompany loans and assign it to the US GAAP valuation area 001, follow IMG menu path Financial Supply Chain Management > Treasury and Risk Management > Transaction Manager > General Settings > Accounting > Settings for Position Management > Define and Assign Valuation Classes. Click the New Entries button and enter the intercompany loans general valuation class shown in Figure 20, which creates the general valuation class that will be assigned in the trades. Click the save icon.
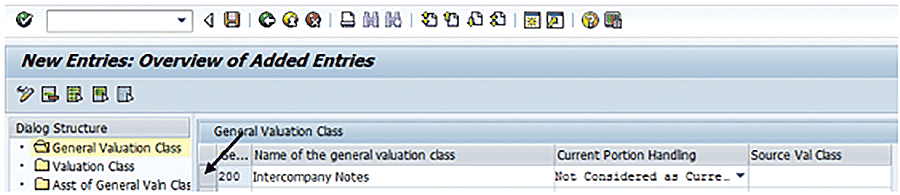
Figure 20
Define a general valuation class for intercompany loans
Next, select the blank field pointed out in Figure 20, and double-click the Valuation Class folder in the left panel. This action displays the screen in Figure 21. In this step, you are assigning the new General Valuation Class to the Valuation Area 001. Click the New Entries button and enter the configuration shown in Figure 21.
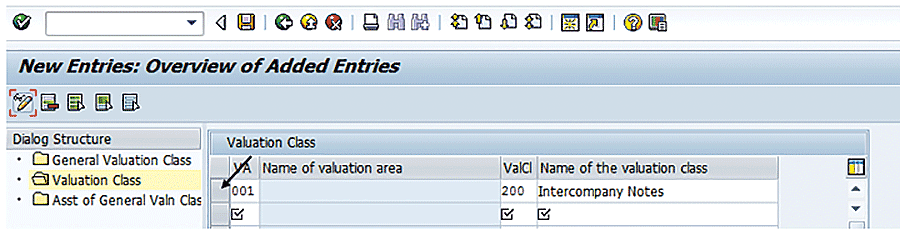
Figure 21
Assign a general valuation class for intercompany loans to valuation area 001
Select the blank field pointed out in Figure 21, and double-click the Asst of General Valn Class folder. Click the New Entries button and enter the configuration shown in Figure 22. The configuration shown in Figure 22 is used to create the special valuation class to the general valuation class in valuation area 001. This special valuation class is what is set in configuration to drive the accounting for the trades. Click the save icon to save the changes made.

Figure 22
Assign the general valuation class to the valuation class for intercompany loans
Assign General Valuation Class
As mentioned, the General Valuation Class is a required field in trades and drives different accounting principles or rules within a product type or transaction type combination. Since for our intercompany loans all will be accounted for within a product type/transaction type combination, only one valuation class is needed for intercompany loans.
To assign the General Valuation Class created for intercompany loans to the in-scope company codes and the intercompany loans product types and transaction types, follow IMG menu path Financial Supply Chain Management > Treasury and Risk Management > Transaction Manager > Money Market > Transaction Management > Assign General Valuation Class as shown in Figure 23. For each product type, the general valuation class can be defaulted to the setting in this step.
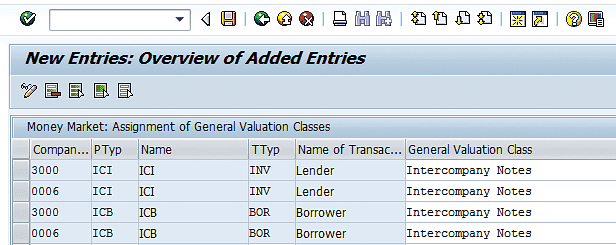
Figure 23
Settings to default the General Valuation Class into intercompany loan trades
Set the Effects of the Update Types on the Position Components
In this step, you define how the system should handle changes in the trade. For example, this configuration tells the system that when the principal amount of the trade changes by a positive amount, the system should treat this as a purchase and an incoming payment will be expected. For each trade-related cash flow update type assign a position change category.
Follow IMG menu path Financial Supply Chain Management > Treasury and Risk Management > Transaction Manager > General Settings > Accounting > Settings for Position Management > Set the Effects of the Update Types on the Position Components, and click the New Entries button. Click the save icon when complete. In the case of intercompany loans, this configuration is straightforward and is shown in Figure 24.
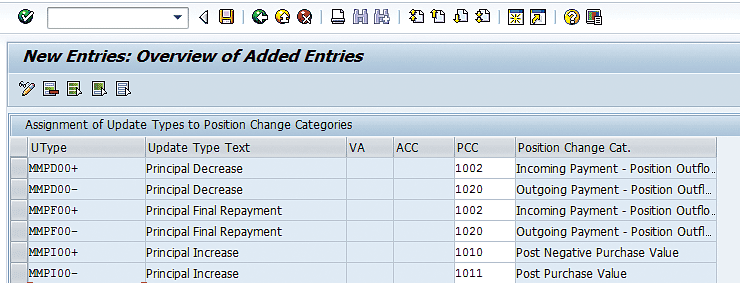
Figure 24
Assign update types to position change categories
Define a Position Management Procedure
In this configuration step, you create a Position Management Procedure. The Position Management Procedure drives how trades are valued, which is typically done at month-end. The Position Management Procedure is a required setting in trades. Since intercompany loans are not valued at month-end, a Position Management Procedure is created, but it does not have any steps.
The Position Management Procedure defines how valuations are done and how derived business transactions are generated. In this step, a Position Management Procedure for the intercompany loans is defined. In subsequent steps, the definition of how the Position Management Procedure behaves is defined. For the processing of intercompany loans, the Position Management Procedure is very basic as the requirements driven by Position Management Procedures, such as valuation, amortization, and balance sheet and security account transfers, are minimal for intercompany loans.
To define a Position Management Procedure, follow IMG menu path Financial Supply Chain Management > Treasury and Risk Management > Transaction Manager > General Settings > Accounting > Settings for Position Management > Define Position Management Procedure and click the New Entries button. Enter the data displayed in Figure 25 and click the save icon. No steps are required in the Position Management Procedure because for our example no valuation is required for intercompany codes.
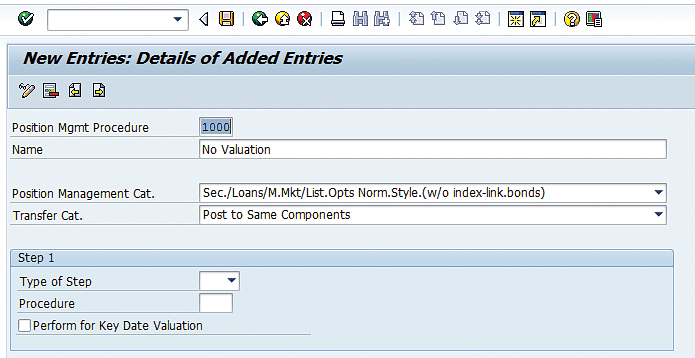
Figure 25
Define the Position Management Procedure
Assign the Position Management Procedure to a Trade
All trades must have a Position Management Procedure assigned to them. This can be done manually when entering the trades, but it is more efficient to assign the Position Management Procedure in configuration to the intercompany loan product types. The defaulting of this assignment is done in this step.
Follow IMG menu path Financial Supply Chain Management > Treasury and Risk Management > Transaction Manager > General Settings > Accounting > Settings for Position Management > Assign Position Management Procedure and click the New Entries button. Assign the defined Position Management Procedure to the two intercompany loan product types defined, as shown in Figure 26.
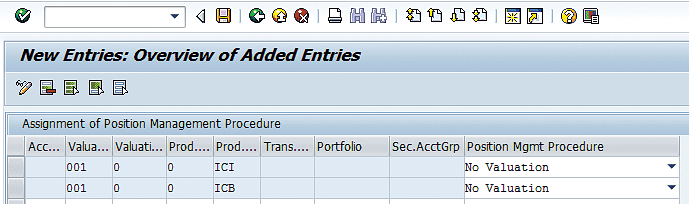
Figure 26
Assign the Position Management Procedure
Assign Update Types for Derived Business Transactions
Derived business transactions include realized gain or loss flows, amortizations, partial position sales, and security account transfers. Although most of these are not relevant to intercompany loan processing, this is required configuration in Transaction Manager.
Derived business transactions ensure the accounting executed for a trade follows the accounting principle (e.g., US GAAP or IFRS) being tracked. As expected based on their definition, the derived business transactions are assigned to the valuation area–events that can occur during the life of the trades.
To assign the required update types to the Position Management Procedure, follow IMG menu path Financial Supply Chain Management > Treasury and Risk Management > Transaction Manager > General Settings > Accounting > Derived Business Transactions > Assign Update Types for Derived Business Transactions as show in Figure 27. Click the New Entries button, and enter the Position Management Procedure created for intercompany loans, as shown in Figure 27. Click the save icon.

Figure 27
Assign update types for derived business transactions
Double-click the Position Outflows folder in the left panel and add the SAP-defined update types in the Purchase Value (1) and (2) fields, as shown in Figure 28, as these are required.

Figure 28
Assign DBT Update Types for purchases
Control the Processing of Derived Business Transactions
In this step, you define how derived business transactions are processed. The choices are online (real-time as trades are created in the SAP system) or offline (triggered with transaction code TPM27 [Update Derived Business Transactions]). As the volume of intercompany loans is low, there is no need to trigger the derived business transactions at a later point. For our example, set the configuration to have the derived business transactions created as the trades are created in the SAP system.
Follow IMG menu path Financial Supply Chain Management > Treasury and Risk Management > Transaction Manager > General Settings > Accounting > Derived Business Transactions > Control of Processing of Derived Business Transactions, and click the New Entries button. Enter the data shown in Figure 29. Click the save icon to save the changes.
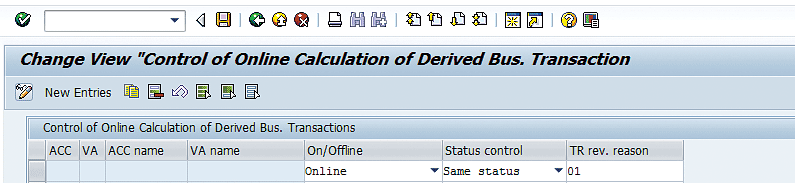
Figure 29
Define calculation of derived business transactions to be online
Mirroring Configuration
The next configuration described is the mirroring configuration. With the mirroring configuration, if you enter the investing side of an intercompany loan, the SAP system automatically creates the mirror image of the investment side by creating the borrowing side of the intercompany loan. In addition, when the mirroring functionality is used, the SAP system automatically links the intercompany loans using the SAP standard MIR reference category. The mirroring reduces the amount of manual work when entering the intercompany loans. Keep in mind that to keep the two sides of the intercompany loan the same, any processing of the trades after creation must be done to both the lending and borrowing sides of the intercompany loan.
All mirroring configuration is done in the configuration nodes in the Distribution of Mirror Transactions folder, which is in the IMG under SPRO > Financial Supply Chain Management > Treasury and Risk Management > Transaction Manager > Money Market > Transaction Management > Distribution of Mirror Transactions.
Maintain Relevant Product Types and Transaction Types
In the Maintain Relevant Product Types and Transaction Types configuration, shown in Figure 30, you specify the characteristics of the leading or initiating company code. This configuration of the initial table for mirroring transactions drives a program that starts the mirroring process if the combination of inputs in this table matches a trade. The fields are company code, product type, transaction type, and business partner of the trade. Activity 01 is for create. Activity Category 10 is for Contract, which represents the status of the trade just created. Click the New Entries button and enter the data displayed in Figure 30. Click the save icon when you are finished.

Figure 30
Mirroring configuration – product types and transaction types
Map Product Types and Transaction Types
Under the Map Product Types and Transaction Types configuration node found under IMG menu path SPRO > Financial Supply Chain Management > Treasury and Risk Management > Transaction Manager > Money Market > Transaction Management > Distribution of Mirror Transactions > Map Product Types and Transaction Types, the system maps from the one side of the trade to the mirrored side of the trade (for example, from the lending side of the trade to the borrowing side of the trade), by matching the entries using the MetaText field.
As shown in Figure 31, the highlighted lines go together and must have the same MetaText field. For our example, when you create a trade in company code 3000 with product type ICI and transaction type INV, create a mirrored transaction using the characteristics (company code, product type, and transaction type) in the record that has the matching MetaText of the original query into this table. When you create a trade with company code 3000, product type ICI, and transaction type INV, create a mirrored transaction in company code 0006, product type ICB, and transaction type BOR.

Figure 31
Mirroring configuration – define the opposite side of the mirroring trade
Click the New Entries button and enter the data displayed in Figure 31. Click the save icon to save your entries.
Process Incoming Data
Under the Process Incoming Data configuration node found under IMG menu path Financial Supply Chain Management > Treasury and Risk Management > Transaction Manager > Money Market > Transaction Management > Distribution of Mirror Transactions > Process Incoming Data, as shown in Figure 32, the SAP programs query the configuration to determine further parameters of the mirrored trade being created. Here you maintain the configuration for processing incoming data from the perspective of the company code of the mirrored trade. Click the New Entries button and enter the data displayed in Figure 32. Click the save icon when you are finished.
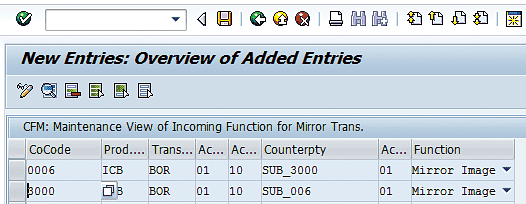
Figure 32
Mirroring configuration to define the opposite side of the mirroring trade
Assign Company Code to a Partner
To complete this configuration step, follow IMG menu path Financial Supply Chain Management > Treasury and Risk Management > Transaction Manager > Money Market > Transaction Management > Distribution of Mirror Transactions > Assign Company Code to Partner. As shown in Figure 33, the SAP programs query the Assign Company Code to the Partner configuration table to determine the business partner of the mirrored trade to create. This configuration step links a company code to a business partner. For example, this configuration tells the system that SUB_3000 represents company code 3000. Click the New Entries button and enter the data displayed in Figure 33. Click the save icon when you are done.

Figure 33
Mirroring configuration – assign the company code to a business partner
Define Number Ranges for Linking Transactions
When the mirroring functionality is used, the SAP system automatically links the intercompany loans using the SAP standard MIR reference category. There is a number range associated with each reference category. This can be found in IMG menu path Financial Supply Chain Management > Treasury and Risk Management -> Transaction Manager > General Settings > Transaction Management > Define Number Ranges for Linking Transactions. In this transaction, in the Reference Cat. field (not shown), enter MIR and click the change Intervals button. The system then displays the screen in Figure 34. Click the insert line icon. A new blank line appears (not shown). Enter the number range as displayed and then click the save icon.
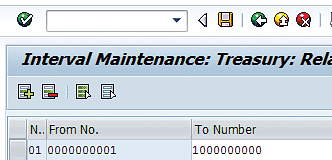
Figure 34
Define MIR reference category number range
Accounting-Related Configuration
All accounting entries are driven by the configuration. If a trade is entered incorrectly, the error affects the amounts posted, but does not affect the SAP General Ledger accounts to which it is posted.
Accounting
In this section of configuration, we explain how to make the settings for the accounting entries generated when the intercompany loans are posted to the ledger.
Money Market: Define Accrual/Deferral
In the next configuration node, the accrual type is specified for specific flow types. The interest flows are accrued at month-end for intercompany loans. There are two choices for the accrual or deferral procedure. The choices are the reset or the difference (incremental) method.
With incremental postings, the incremental interest accrual amount from the last accrual date or month-end date to current month-end date is booked on the last day of the month. On the payment date, the interest payment is booked and the accrued interest is reversed with an additional posting.
With book and reverse postings, the full interest accrual amount from the inception of the trade or last interest payment to month-end date on the last day of the month is booked, and then the full amount is reset the next day. On the payment date, the full amount of interest is booked. This approach is the cleanest when dealing with foreign currency accruals as there is no chance for there to be exchange rate issues that would produce false gains and losses.
In this step, the interest flows are configured to be accrued (so the interest flow amounts can be accrued at month-end). To enter the configuration settings, follow IMG menu path Financial Supply Chain Management > Treasury and Risk Management > Transaction Manager > General Settings > Accounting > Accrual/Deferral > Money Market: Define Accrual/Deferral and click the New Entries button. Enter the relevant company codes and product types for intercompany loans, as shown in Figure 35. If the fields such as the Valuation Area or Position Management Procedure are left blank, the entries apply across all valuation areas and position management procedures.
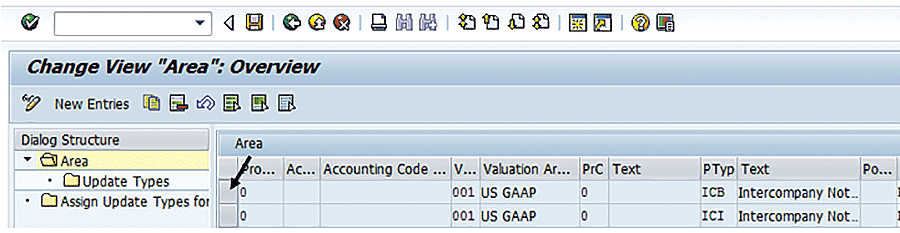
Figure 35
Define accrual product types
Next, for each entry in Figure 35, select the blank field to the left of the entry and double-click the Update Types folder in the left panel. Click the New Entries button and enter the values shown in Figure 36. These values specify the update type that should be accrued for the intercompany loan product types (based on the interest flows assigned to the product types). For our example, specify that the Reset Procedure method of accrual should be used. Click the save icon.
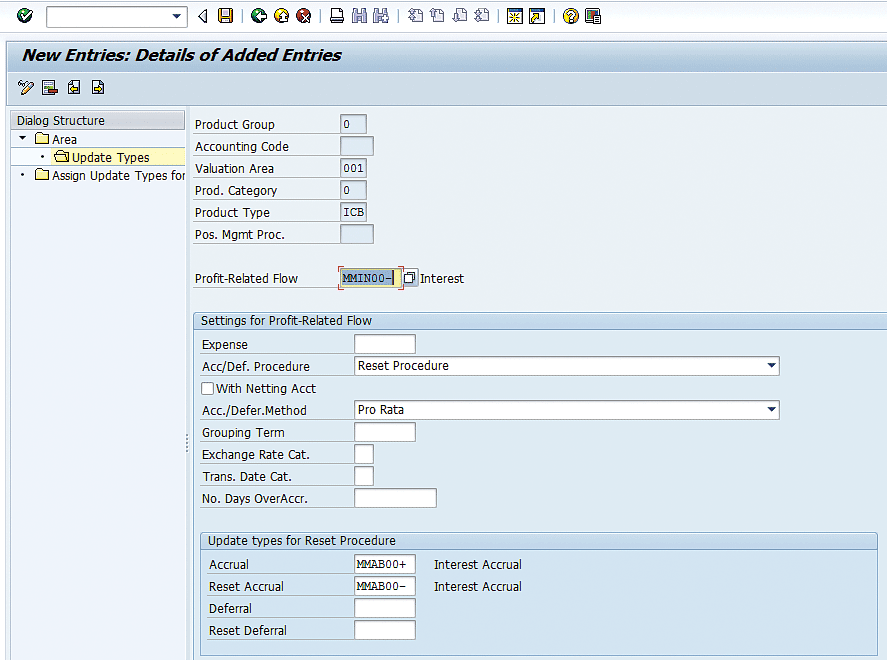
Figure 36
Specify the reset method of accrual for interest update type MMIN00-
Define Account Assignment References
In this step, you create an account assignment reference for the intercompany loans. Account assignment references are used to drive accounting entries for Treasury trades. At this point in the configuration, though, only the account assignment reference symbol is defined. At a later point, the SAP General Ledger account is assigned.
Follow IMG menu path Financial Supply Chain Management > Treasury and Risk Management > Transaction Manager > General Settings > Accounting > Link to Other Accounting Components > Define Account Assignment References and click the New Entries button to create the Account Assignment Reference shown in Figure 37. Click the save icon.
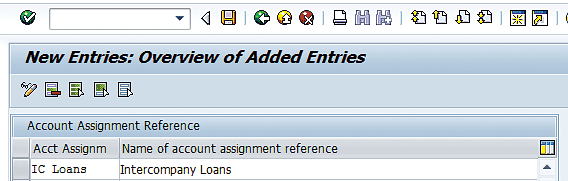
Figure 37
Definition of account assignment reference for intercompany loans
Define Account Assignment Reference Determination
In the determination of account assignment reference, you set up rules for how the system should determine the account assignment reference as a trade is entered. The account assignment reference is a required field in trades, and it is a key field in the Account Determination configuration when you are determining to which SAP General Ledger account to post the trade.
Follow IMG menu path Financial Supply Chain Management > Treasury and Risk Management > Transaction Manager > General Settings > Accounting > Link to Other Accounting Components > Define Account Assignment Reference Determination (OTC Transactions) and click the display <-> change icon  . Next, click the create step icon
  . In the pop-up screen that appears (Figure 38), select the Derivation rule toggle and then click the continue icon
  .
.
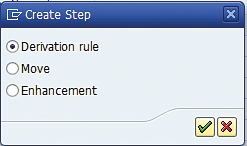
Figure 38
Select the type of determination rule to derive the account assignment reference
The system now displays the screen in Figure 39. In this configuration, you enter the source fields at the top of the screen and the target field at the bottom. For our example, use the product type field as the source field. You want to determine the account assignment reference, so make the account assignment reference the target field, as shown in Figure 39.

Figure 39
Derivation rule to derive the account assignment reference
The next step is to define what the source and target field should be set to for this rule. To do this, click the Maintain Rule Values button and enter the values shown in Figure 40.
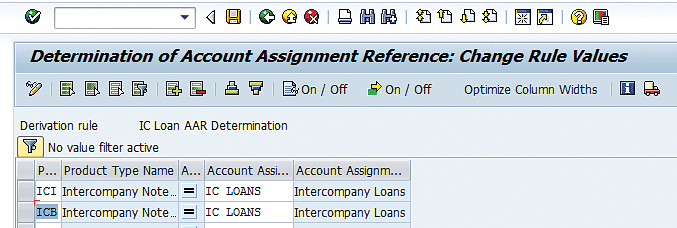
Figure 40
AAR Maintain Rule Values for intercompany loan product types
Note
To capture your determination of account assignment reference configuration to a transport, you must select the derivation rule created and click the transport icon

. The derivation rule is then saved to a workbench transport.
Allocate Additional Account Assignments to Account Assignment References
In this step, if necessary, a cost center is assigned to an account assignment reference. This is used when posting Treasury trades to a profit and loss (P&L) account where a cost center is required for interest expense and income postings. In this step, a cost center is specified for company code and account assignment reference combinations. This cost center is used in the accounting entries for the combination specified if a cost center is required.
To enter the configuration, follow IMG menu path Financial Supply Chain Management > Treasury and Risk Management > Transaction Manager > General Settings > Accounting > Link to Other Accounting Components > Allocate Additional Account Assignments to Account Assignment References. Click the New Entries button, enter the data as shown in Figure 41, and click the save icon.

Figure 41
Assignment of a cost center to the company code and account assignment reference
Define Account Determination
In this configuration, you define the postings related for Treasury trades. Before you start the account determination configuration, it is important to know the accounting entries to be made for each trade cash flow.
The account determination (G/L postings) is done at the update type level. An update type maps roughly to a type of cash flow that is included in a trade. This is the main account determination IMG node to specify accounting entries for Transaction Manager. It is here that you assign posting rules to update types, which drive the postings made for trades when the accounting programs are run. The update types drive the accounting for all trade postings. The first step is to define account symbols to which you post the different types of accounts.
The next configuration step described is the trade-related account determination, found by following IMG menu path Financial Supply Chain Management > Treasury and Risk Management > Transaction Manager > General Setting >Accounting > Link to other accounting components > Define Account Determination. After selecting this configuration node, you see the pop-up screen in Figure 42. Enter the company’s chart of accounts and click the enter icon (not shown).
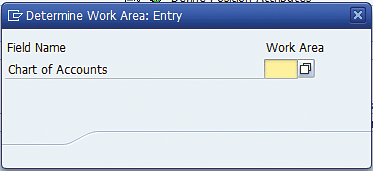
Figure 42
Enter the company chart of accounts
The first step is to define account symbols, which is done after double-clicking the Definition of Account Symbols folder. Symbols such as INTEREST EXP or INTEREST INC should be created to represent the types of G/L accounts to which to post. This makes the account determination more user friendly. Click the New Entries button (not shown), enter the Account Symbol, Account Symbol Text, and Posting Category to be used for intercompany loans, as shown in Figure 43, and click the save icon.

Figure 43
Account determination configuration – define symbols
In the next step, you define posting specifications. To get to the posting specifications, double-click the Definition of Posting Specifications, which is the second folder in the left panel, as shown in Figure 44. The posting specifications define the types of posting rules made by treasury trades. Each posting rule contains the document type used and the debit and credit symbols in that type of posting. Click the New Entries button and enter the posting specifications required. Click the save icon when you are done.
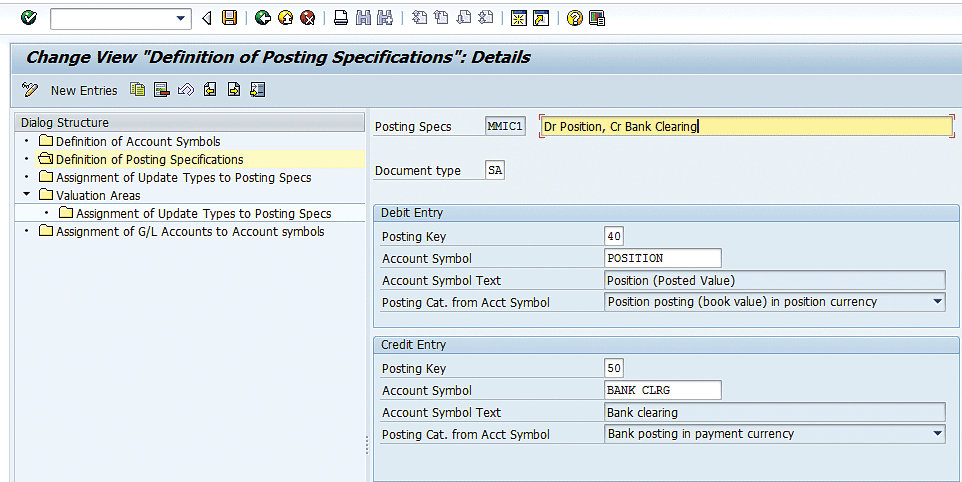
Figure 44
Define posting rule keys
Next, you assign the posting specifications to update types as shown in Figure 45. To enter the configuration, click the New Entries button and enter the update types related to the intercompany loans and the associated posting specifications to get the accounting needed.
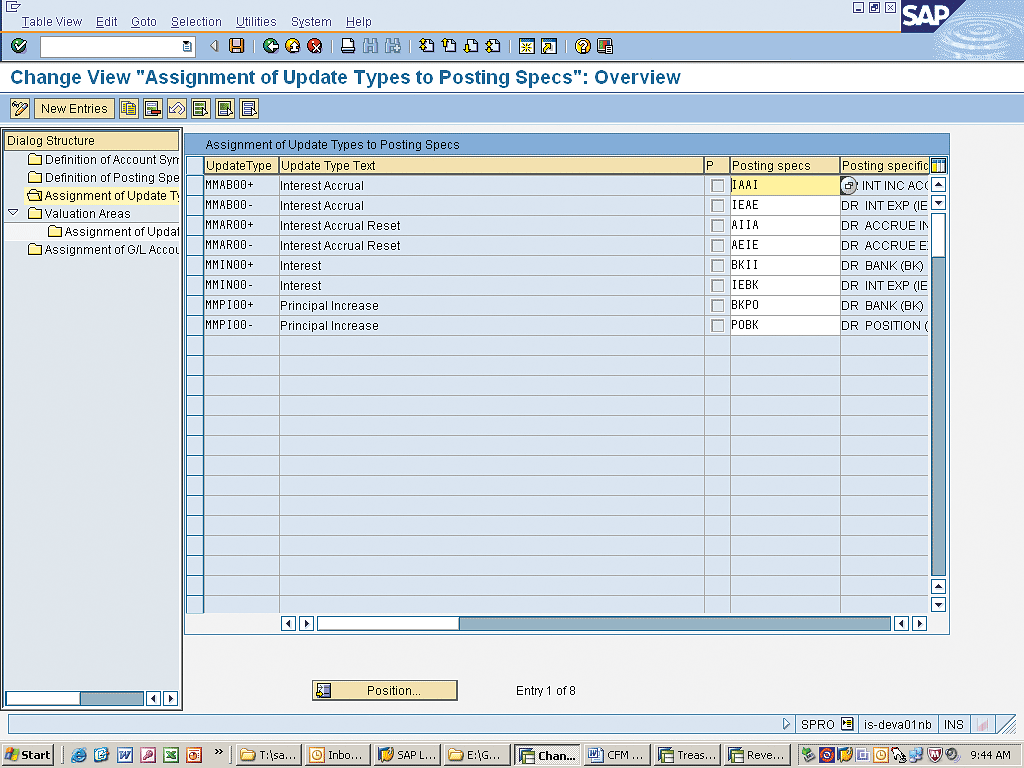
Figure 45
Assign update types to posting rules
Next, for each account symbol and account assignment reference, you assign an SAP General Ledger account. Other fields can factor in to the determination of a SAP General Ledger account, such as currency, if relevant, by entering the different values for those fields (for example, USD, EUR, and GBP). To enter values for the configuration, click the New Entries button and for all the accounting entries to be made for the intercompany loans, enter the account symbol, valuation area, account assignment reference (IC LOANS), and a SAP General Ledger account corresponding to the account symbol, as shown in Figure 46. Click the save icon when you are finished.
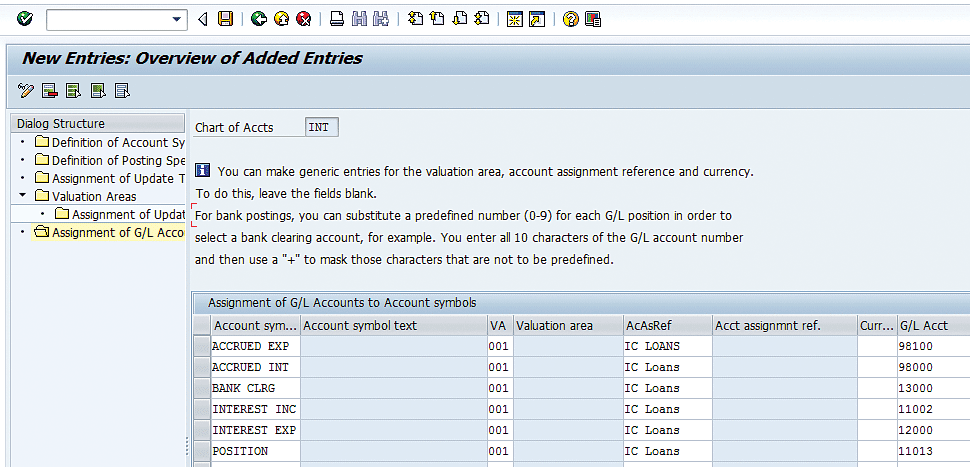
Figure 46
Account determination configuration – assign account symbols to SAP General Ledger accounts
Market Data Configuration
Now you are ready to go through the steps for market data configuration.
Define a Reference Interest Rate
Reference interest rates are one point on a yield curve (for example, one week LIBOR or one month LIBOR). (LIBOR stands for London Interbank Offered Rate and is a commonly used benchmark interest rate.) This is shown in Figure 47.
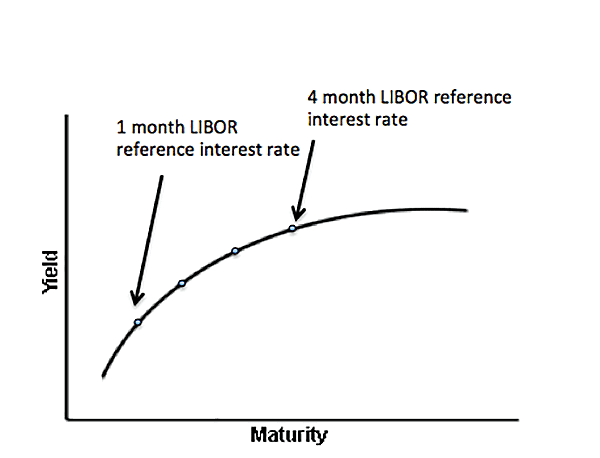
Figure 47
Yield curve and reference interest rate
Reference interest rates are used in floating rate intercompany loans. Typical reference interest rates used in intercompany loans are LIBOR rates or the Banker’s Acceptance rate.
To define a reference interest rate, follow menu path Treasury and Risk Management > Basic Functions > Market Data Management > Master Data > Settings for Ref. Interest Rates and Yield Curves for Analyzers > Define Reference Interest Rate. In the initial screen that the system displays (not shown), click the New Entries button to create a new reference interest rate, and in the screen shown in Figure 48, create the three-month USD LIBOR reference interest rate.
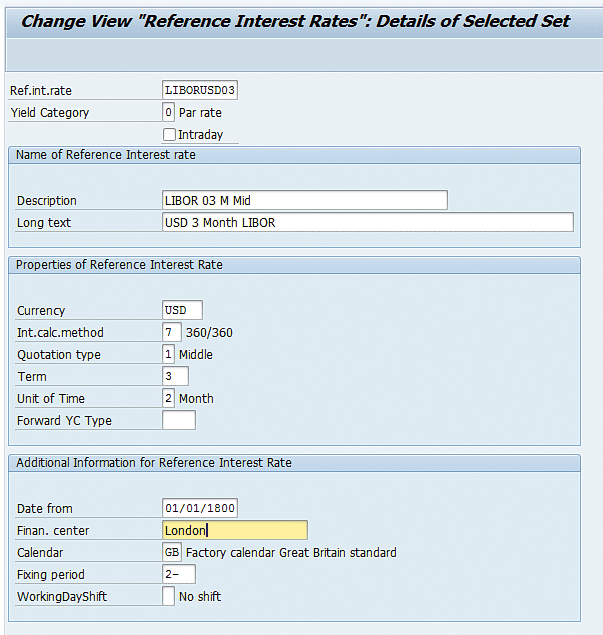
Figure 48
Definition of a three-month LIBOR reference interest rate
Note
The Unit of Time field with a value of 2 is equal to a month. Since this is a reference rate for three-month LIBOR, we set the Term to 3. If it were a reference rate for six-month LIBOR, we would set the Unit of Time field to 2 and Term to 6.
Market data consists of information such as exchange rates, interest rates, volatilities, security prices. The market data is imported from an external source such as Bloomberg or Reuters. The SAP system supports manual entry, file upload, or a data feed interface to load market data. The volume of market data to be imported typically drives the method selected of uploading market data into the SAP system and would be an implementation-specific decision.
Mary Loughran
Mary Loughran has been specializing in the SAP Financials area since 1997 and has worked with numerous clients throughout North America and Europe in the areas of finance and treasury. She was employed as a consultant with SAP America and was a designated expert within SAP America for treasury before she left SAP in 2004. Mary’s expertise is in the areas of SAP Treasury and Risk Management, SAP In-House Cash, Liquidity Planner, Accounts Payable, payments from SAP in general, Cash Management, and Electronic Banking. Mary was an independent consultant from 2004 to 2016.
You may contact the author at loughran@gmail.com.
If you have comments about this article or publication, or would like to submit an article idea, please contact the editor.

Valerie Choo
Valerie Choo is a global treasury subject matter expert. She has been involved in multiple SAP Treasury and Risk Management projects such as implementing global treasury systems, consolidation of SAP Treasury and Risk Management activities, and process improvements, particularly in Cash Management Operations. Valerie’s expertise in the functional areas includes cash management back office operations, electronic bank statement processing, in-house cash, and SAP Treasury and Risk Management integration with other work streams, particularly accounts payables, accounts receivables, intercompany and tax.
You may contact the author at choova24@gmail.com.
If you have comments about this article or publication, or would like to submit an article idea, please contact the editor.