Now that Desk Intelligence has been retired and direct access to SAP Business Explorer queries have been added, Web Intelligence will be used more than ever before. As Web Intelligence continues to evolve and new features are added, query, analysis, and reporting capabilities continue to improve.
Key Concept
The new enhancements to SAP BusinessObjects Web Intelligence in 4.0 give developers more capabilities than ever before. The combination of a new charting engine, the ability to assign a report to scale to page, the element linking feature, and the hide when feature blur the lines that separate dashboards from reports. Much attention has been given to enhancing the visual capabilities in Web Intelligence 4.0. The ability to import a Cascading Style Sheet file of defined styles leads to more consistent visual design.
This article was originally published on BusinessObjects Expert
SAP BusinessObjects Web Intelligence (also known as WebI) continues to evolve as a query and analysis reporting tool to provide users with more capabilities, functionality, and connectivity options with each new release. The latest version of Web Intelligence, which is 4.0, is no exception. It includes many significant improvements over Web Intelligence in XI R2 and XI 3.1. This new and improved version of Web Intelligence also comes at a very important time in the product’s history as it coincides with the retirement of BusinessObjects Desktop Intelligence.
Beginning with BI 4.0, all Desktop Intelligence reports created in earlier versions need to be converted to Web Intelligence to continue to exist. Not every Desk Intelligence feature is available in Web Intelligence, but it’s getting closer with every new release, service pack, and feature pack. As the BusinessObjects product line evolves and becomes more firmly integrated with SAP systems, the number 1 new feature has to be the direct connectivity with SAP Business Explorer (BEx) queries. This single feature potentially makes a bigger impact than any of the other outstanding new improvements.
The top 11 new features appear in no particular order with the exception of number 1.
1. Integration with SAP NetWeaver BW and BEx Data Sources
Direct connectivity to SAP BEx queries is one of the most significant new capabilities in Web Intelligence 4.0. In pre-BI 4.0 Web Intelligence reports, the de facto standard data source was always the universe. This has changed in 4.0. Users now have the option of choosing from three different data sources types – while working with Web Intelligence in the BI launch pad – and six data source types while in Web Intelligence Rich Client.
Choosing BEx as the data source gives users direct access to multidimensional SAP NetWeaver BW data in a Web Intelligence report. Users no longer have to be limited with data delivery options from data retrieve by BEx queries as the full report panel of Web Intelligence 4.0 can now be used to display this data. It comes complete with hierarchical data tables and charts, simple filters, block filters, drilling capabilities, element linking, and all the other great features of the report panel. Most of all, it’s easy and direct. Web Intelligence takes on a whole new perspective when BEx queries can be leveraged to build, share, and distribute reports.
2. New Charting Engine
The new charting engine enhancement is the most overdue of all the new improvements in BI 4.0. Web Intelligence developers and users have been craving improvements to charts for quite some time. This is especially true after realizing the impact of next-generation graphics in Xcelsius (now known as BusinessObjects Dashboards).
A new charting engine, new chart types, and an extensive set of modifiable properties bring a tremendous amount of flexibility to report design in 4.0. With some creativity, Web Intelligence reports can conform to traditional dashboard specifications and produce a dashboard/report hybrid known as dashports. The graphical impact of a dashboard can be easily created with the new report elements and visual properties in Web Intelligence 4.0 and traditional dashboard functionality can also be delivered. This is accomplished by incorporating two other new Web Intelligence 4.0 features, both of which are also listed in the top 10. The first, element linking, is used to drive the interaction between report elements and the second, the hide when feature, provides the capability to produce Xcelsius-like dynamic visibility.
3. Enhanced User Interface and Ribbon Toolbar
Editing properties and accessing report elements in Web Intelligence 4.0 is completely different than in previous versions. It takes a few minutes to get used to if you’ve spent a lot of time with Web Intelligence in XI R2 or 3.1 but once you do, you’ll find it much easier to use. The properties are now grouped into a tabbed ribbon located in logical groupings across the top of the report canvas rather than on the left side of the page.
The toolbar ribbon is based on these five tabs: Report Element, Format, Data Access, Analysis, and Page Setup. Each of the following tabs provides access to relevant sub-tabs that allow for quick selections. Shortcut icons are presented to users in logical sub-tabs.
- Report Element – Add components and report elements to the canvas and provide the following: Layering, Linking, Page Breaks, and Hide When. The sub-tabs in the primary Report Element tab are:
- Table, Cell Section
- Chart, Other (charts)
- Tools, Position, Linking
- Format – Modify the appearance settings in report elements and configure the chart color and style when a chart is selected. Additional visual properties are available in Feature Pack 3. The sub-tabs are:
- Font, Border, Cell
- Style, Numbers
- Alignment, Size, Padding
- Tools
- Chart Style (when a chart is selected)
- Data Access – Use this tab to accomplish the following: add a new data provider, edit an existing query, add a new variable, and merge dimensions of objects when using multiple data providers. The sub-tabs are:
- Data Providers, Tools
- Data Objects
- Analysis – This tab contains a large number of functional shortcut icons. Use the Analysis tab to access icons to accomplish the following: add report and block filters, ranking, input controls, track data changes, adding sorts, creating conditional formatting rules (previously known as alerters), enable/disable drill, enable/disable the filter bar, enable/disable the report outline, and creating functions. The sub-tabs in the primary Analysis tab are:
- Filters, Data Tracking
- Display, Conditional
- Interact
- Functions
- Page Setup – The Page Setup tab lets you apply configuration changes to the entire report panel. Options include adding and renaming a new report, changing the page format (portrait or landscape), showing or hiding the page header and footer, and configuring the new Scale To Page feature to replace the Fit to Page feature previously in Desk Intelligence. The sub-tabs in the primary Page Setup tab are:
- Report, Rename, Move
- Page, Header, Footer
- Scale To Page, Margins, Display
4. Element Linking
Element linking gives developers the capability to create interactivity between report elements. This feature lets you create a guided analysis throughout a reporting document by allowing one element to pass values to other dependency report elements when clicked.
Because of the significant visual improvements to charts in Web Intelligence, more users will request them to be added to reports. Developers will then explore new ways to add additional functionality to reports while visually displaying data. Element linking provides developers with a simple way for creating the type of functionality that’s normally only seen in dashboards.
Steps for Adding Element Linking
- Begin by clicking Design in the upper-right corner to enter Design mode
- Right-click the chart or data table with which you’d like users to interact
- Select Linking from the list of choices available
- Click the Add Element Link option
After performing the four steps above, you’ll be taken to the Define Input Control window used for selecting the report object or objects to be used as the filtering object and passed to dependency charts. From here, you’ll have two options for selecting the filtering object:
- All objects
- Single object
The best practice is to select Single object. Make this selection, then choose an object from the list provided. The objects displayed will be the dimension or detail objects currently assigned to the chart. Click Next to proceed.
The next window allows you to modify the label name of the report element and add a description. These two options are important for properly labeling and describing the Element Link source chart or table. The step is optional. Click Next to proceed.
Assigning Report Elements
The final step is to select the charts or data tables to be filtered when a value from the chart or table containing the Element Link is clicked. Do not select the Page Body section because the filter is then applied to itself. Notice in Figure 1 that the chart used as the source for the element link is disabled and not selectable, but the Section and Page Body are both available. Click only the individual charts or tables that should receive the filter value.

Figure 1
Select the target charts or tables to receive the element link filter
Figure 2 shows that even though Column Chart: Block 4 is disabled in Figure 1, it is checked when the Page Body option is selected. The system automatically selects all child objects when a parent object is selected. Such is the case when Page Body is selected. Even though the element link is being added to Column Chart: Block 4, it is selected as a target object when Page Body is checked. Figure 3 shows the appropriate method for selecting dependency elements.

Figure 2
When Page Body is checked, all child objects are automatically checked
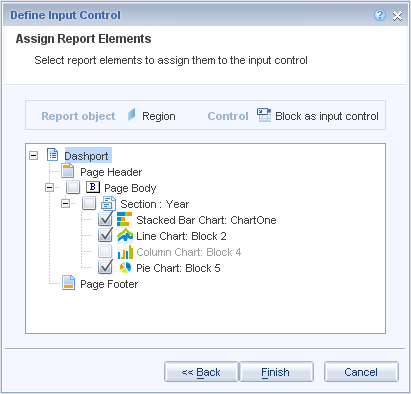
Figure 3
Check only the dependencies that should receive the element link filter
When an element link is added, a small icon appears in the upper-right corner of the component. Figure 4 shows a column chart that contains an element link
Dynamic Chart Titles
Another new feature in Web Intelligence 4.0 is Dynamic Chart Titles. Dependency charts of an element link are the perfect type of objects for using them. The title in Figure 4 for the pie chart is set up to change based on the selection made in the Column chart. If the East column is selected, the title of the pie chart reads Sales Revenue by State in East Region.

Figure 4
Icon in the upper-right corner indicates the presence of an element link (left chart); meanwhile, a dynamic title displayed as a result of clicking a bar in the column chart (right chart)
Follow these steps to write a formula in the Chart Title area to produce a dynamic title (Figure 5).
- Right-click the chart and select Format Chart
- Click the Title option on the left side of the window
- Edit the formula to include the object used in the element link created in the Column Chart
- Launch the Formula Editor for assistance in writing the formula

Figure 5
Add a formula to create a dynamic title
5. Hierarchical Navigation
Hierarchical navigation is also present in the report panel. Data tables are expandable and collapsible and charts can display hierarchical information.
Figure 6 shows the Query Panel that’s connected to a BEx data source. Drag a hierarchy into the Result Objects pane then click the downward arrow of the hierarchy object to launch the Member Selector menu. Use the Member Selector to mix and match specific values in different hierarchical levels.

Figure 6
Expand member values in a BEx hierarchy
6. Analysis Views as Data Sources
Analysis Views as data sources provides the capability to view a defined subset of multidimensional data created from a subset produced in an Analysis Workspace. This feature benefits Analysis Workspace users who need to view and analyze data in a way that only Web Intelligence can deliver.
7. Data Preview in the Query Panel
Previewing data in the query panel before it’s returned is a simple new addition that can potentially save a significant amount of time for power users performing ad hoc analysis. Rather than refreshing a query and then waiting to review the data, users can display a sample of the result objects while they are still in the query panel.
8. Copy and Paste Report Elements from One Report (and Document) to Another
Being able to copy report elements (charts and tables) from one report to another is a convenient new feature for report developers. You can copy and paste report elements that also include the objects assigned to them.
In Web Intelligence 4.0, copying a chart or data table then pasting it into another report brings everything with it when it’s pasted. This includes the chart, visual formatting on the chart, objects, variables, and even the query.
The ability to copy and paste charts from one report to another makes life much easier for report developers. Visual standards remain intact in these scenarios and compound reports sourced from multiple data sources are easier than ever to create.
9. Hide Feature for Adding Dynamic Visibility to Report Elements
The hide feature is one of my favorite new enhancements in Web Intelligence 4.0 because it allows for dynamic visibility to be applied to charts and data tables. Use this feature to create layers of chart objects that are only visible when certain conditions are met.
To add this feature, right-click a chart or data table and select Hide. Figure 7 shows the three choices available when you click the Hide option:

Figure 7
Three options for Hide
- Selecting Hide simply hides the component. The only way to make it visible again is to switch to the Design – Structure Only mode. (This mode can be accessed from either Reading mode or Design – With Data mode.) Next, right-click the chart and select Show.
- Selecting Hide when Empty sets the chart to be hidden when no values are available for the chart. This is generally caused when filters are added to a report or the data retrieved doesn’t return the information needed to populate the chart. Rather than see an empty chart, use this feature.
- Lastly, the Hide When… feature is used to write a formula and force the chart to be hidden when certain conditions are met. Click Hide When, then enter a formula in the provided box. Use the Formula Editor to create a conditional formula with the assistance from the available objects, functions, and operators in the formula editor.
10. Fit to Page with Scale to Page
Many Desk Intelligence users have been asking for the Fit to Page feature to be added to Web Intelligence. It has finally been added and is presented in the form of Scale To Page. You access the Scale To Page sub-tab by clicking the Page Setup tab. The default settings are for the width and height to be set to Automatic. Change these settings to 1 pages to force the report to scale to a single page. Figure 8 shows these settings on the Scale To Page sub-tab within the Page Setup primary tab.

Figure 8
Select 1 pages for the Width and Height settings to scale the report to a single page
11. Change Default Style of Report in Feature Pack 3
Feature Pack 3 introduced a new method of maintaining visual styles in a report for easily reproducing styles. Consistency and adherence to a defined set of visual standards is almost always required when a series of reports is customer facing. Use this new capability to define, modify, and select an extensive list of visual attributes with only a couple of clicks.
To change a default style, click the Properties tab in the Report Panel of a Web Intelligence report, then click Document. The Document link launches the Document Summary window and provides several selectable options. Look for the Default Style option located at the bottom of the window for changing the style of the current reporting document. This option is shown in Figure 9.

Figure 11
Option to change the default style
Click Change Default Style to either import a new style or export the existing combination of styles. Figure 10 shows these options.

Figure 11
Import or export a style
- If Import Style is selected, a browser window opens and allows you to navigate locally to select a Cascading Style Sheet (CSS) file.
- Click Export Style to save all the visual attributes in the current report into a single CSS file. You can save this file to a shared drive, email it to other users, or publish it to the BI launch pad for easy distribution to other users.
Once you export a CSS file, you can edit it in Notepad or another text editing program. This methodology allows you to make changes manually to visual report attributes such as font, font size, and color rather than making the changes in the report panel.