Learn how to run the trace functionality (transaction ST01) to resolve error messages about missing authorizations.
Key Concept
A system trace is a standard SAP functionality available in all versions that you can use for recording internal SAP system activities. A system trace can be either a replacement or an alternative for the SU53 report (the primary method for analyzing missing authorizations), and it should be run only after the SU53 report has been run a few times but the user still keeps getting error messages on missing authorizations. System traces are helpful in problem-solving scenarios because they allow you to figure out all your missing authorizations with one single report.
The problem: An employee keeps getting error messages about missing authorizations. The reason is that the user’s authorizations have not been defined properly in the common authorizations concept, which is the concept that includes all authorizations-related requirements for your company’s users. The user needs the authorizations, but you’re not sure which authorizations the user is missing. You have performed the other usual methods for tracking missing authorizations, including an SU53 (display authorization check) report, which is the primary method for analyzing authorization checks or an access-denied error. There is one last option however – use the trace functionality (transaction ST01).
When you use the system trace, you let the users keep their original authorizations and trace their work for a certain time period in which they carry out the responsibilities that they have in the SAP system. After this period is over, you can analyze the trace records. The system trace shows all the steps the user has taken so you can determine which authorizations the user is lacking (because there are different error codes for different types of missing authorizations), and which authorizations the user has to successfully complete the required tasks. Bear in mind, however, that the system trace is a little more complex than the SU53 report. I recommend running the SU53 first, and should it fail, I then recommend using the system trace.
Note
Due to the complexity of system traces, they should only be used by specialists working mainly with authorizations (for example, global or regional authorizations teams).
How to Turn on the Trace
Please note that you must carry out all the steps I explain below or the system trace won’t work.
Step 1. Define the user ID you want to trace. Use transaction ST01 to access the System Trace screen. By default, the trace is switched off. Click the General Filters button (Figure 1).
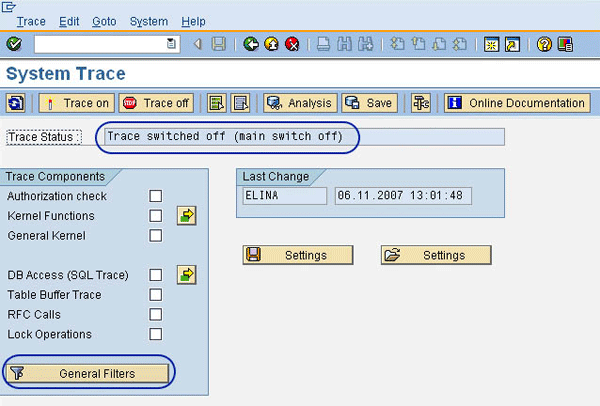
Figure 1
The main system trace screen with the trace switched off
Then, the system shows the System Trace: General Filter screen (Figure 2). In the Trace for user only field, enter the user ID you want traced (in my example, I made this TESTUSER). Press F2 or click the enter icon (the check mark at the bottom left hand screen).
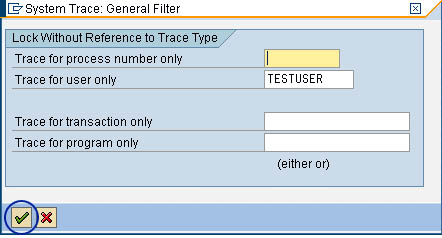
Figure 2
The user ID to be tested
The System Trace screen comes back up showing your user ID in the Last Change field (Figure 3).

Figure 3
The system trace screen with the trace switched on
Step 2. Set the filter for an authorization check. Place a check in the Authorization check box (Figure 3). This enables you to specify the trace components. In this specific case, the user chooses the Authorization check to run a trace on the user’s authorizations. The goal is to list all the missing authorizations for the chosen user.
Step 3. Set the system trace. Click the Trace on button (seen at the top in Figure 1). Once you click the button, the Trace Status changes to, “Trace switched on (main switch on).”
Step 4. Refresh the trace. You need to refresh the trace to ensure that there are no older trace records available for the analysis. Click the refresh icon.
Run the Actions to Check
Now that you’re logged on in the system and have switched the trace on, you can perform the system trace.
Step 1. Run the actions. Have the user run the actions that led to the error message. Then, have the user inform you as soon as the error message appears. Once the user has informed you that he or she has received the error, have the user stop working in the system until further notice from you. Be sure to note the time when the user began and the time he or she received the error message.
Step 2. Switch the trace off. Click the Trace off button at the top of the System Trace screen. The Trace Status changes to, “Trace switched off (main switch off).”
Step 3. Run the analysis. Click the Analysis button in the middle of the top of the screen in Figure 1. The system brings up the Options for Trace Analysis screen (Figure 4).
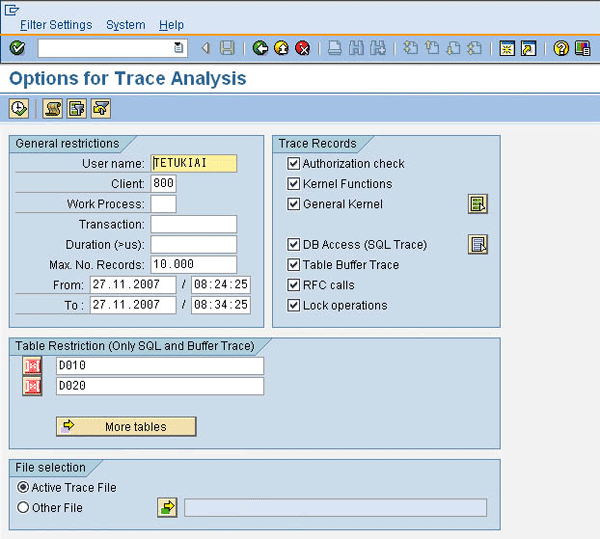
Figure 4
Specify the trace details
Next, you need to change two values in two fields. The system defaults to the user ID of the person carrying out the test (in my example, me, TETUKIAI), so first you need to change the user name to the user ID traced (in my example, TESTUSER, the user with the errors). The system also defaults to the date and time the trace last ran. You need to enter the dates you want traced in the From/To fields (the day and time the user received the error — usually the same day and time you run the trace). You can see in the From/To fields in Figure 4 that the system defaulted to November 11, 2007. Enter the time when the user was working and received the error message. In my example, TESTUSER worked for 10 minutes (from 8:24 to 8:34) when he or she reported the error message to me. Click the execute icon or press F8 to start the reporting. The analysis now shows the Trace Display screen (Figure 5).
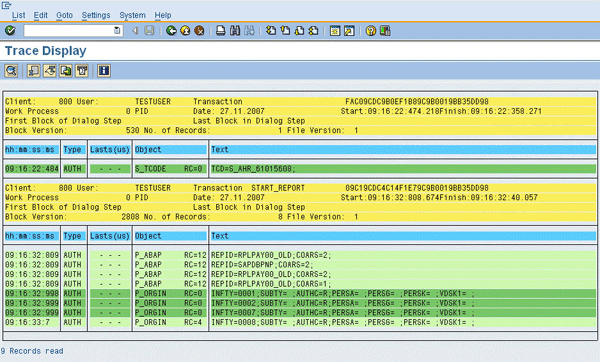
Figure 5
Details of the system trace analysis
How to Read the Trace Analysis
Be sure to log all analyzed authorizations so you can combine them into the required authorizations for this user.
The results of the authorization check show:
- Authorization object checked
- Return code (specifies the status of the authorizations)
- Text (including the authorization object with the field contents either included in or missing from user’s authorizations)
The return code RC=0 (dark green stripes) means that the check at this point was successful.
You can display any of these records in detail by double-clicking the record. For example, if you double-click S_TCODE the system shows that the authorization check on object S_TCODE was successful, and that the authorization value S_AHR_61015608 in field TCD was checked (Figure 6).

Figure 6
Details of TESTUSER’s trace
Authorization object S_TCODE includes the information (list) of all transaction codes that are included in a role. This means that the user who has been assigned this role can start each transaction that is listed in S_TCODE. The authorization object S_TCODE includes only one field, TCD. The field values for this field are always transaction codes. In this specific case, the field value (and thus transaction) is S_AHR_61015608. This transaction is required to start the SAP standard report "Payments and deductions."
With each action, the system shows the following information:
- Check type: authorizations (specific authorizations to which the system defaults with the trace analysis)
- Authorization object
- Return code
- Text (valid authorizations required to run the specific stop)
Any other return codes (they appear in light green in Figures 7 and 8) mean that an error occurred:
- 4 means that the user value has an authorization for the authorization object, but the values checked are not assigned to the user
- 12 means that the user does not have any authorizations for the authorization object
- 16 means that no profile is entered in the user master record

Figure 7
User missing some authorizations

Figure 8
Same user in need of other authorizations
In this case, Figures 7 and 8 say that there are missing authorizations for different authorization objects. In Figure 7, the traced user is missing authorizations to authorization object P_ABAP. In Figure 8, the same user is missing authorizations to authorization object P_ORGIN. According to Figure 8, no read (display) access to infotype 0008 (basic pay) exists, while in Figure 7 multiple authorizations are missing for authorization object P_ABAP. You can check any of these records in detail by double-clicking the record.
Continue running the trace and analyzing results until all the user’s actions have been traced and analyzed. After all actions have been carried out and analyzed, you can specify the missing authorizations for the user.
After all the missing authorizations have been listed (according to the trace functionality), you need to decide whether the missing authorizations should be assigned to the user or not. It is possible that the user should not even have the missing authorizations. That is, the actions causing the error messages are not within the user’s scope of responsibilities.
If the user has been working in the system according to his or her responsibilities and the trace shows missing authorizations, there are at least three options to choose from to provide the user with the missing authorizations. First, you can assign the user an existing role that includes all the missing authorizations. Second, you can maintain the existing role with the missing authorizations. Or third, you can create a whole new role, including the missing authorizations (according to the authorizations concept) and assigning the proper role to the user.
Tips for System Trace
- Always remember to deactivate the trace after carrying out all the actions. If the trace is not deactivated, the system keeps tracing all the actions that the specific user makes in the system, including ones that have nothing to do with the actions that were causing the errors.
- Set filters so that your resulting report is smaller and easier to read. If no filters are used, the system shows the results of all possible trace results for your specific user. Because the idea is to check the existing or missing authorizations, I advise you to set the filter to Authorization Check. If the idea is to trace something else, then the filter should be placed accordingly.
- The administrator can always execute the trace for others, if the administrator is assigned wide-enough authorizations
- Always test the trace result again separately with the newly created authorizations. After analyzing the trace results and specifying any missing authorizations, you should either include the missing authorizations in an existing role or create a new role with the missing authorizations. You should assign missing authorizations (in either an existing role or a new role) to the user (whose authorizations were analyzed with the trace), who needs to test the new authorizations to see if everything works as it should or if any authorizations are still missing.
Tero Tukiainen
Tero Tukiainen is the managing partner of SAPORT Consulting Inc, which he founded in 2009. He is an SAP HR-certified consultant who has specialized in SAP security and authorizations since 2000. Tero has spoken at SAP HR conferences in both Europe and the US since 2005.
You may contact the author at tero.tukiainen@saport.fi.
If you have comments about this article or publication, or would like to submit an article idea, please contact the editor.