Manager/Project Management
SAP Solution Manager 7.0 has reports and functionality that can assist project managers and business owners with identifying and maintaining process changes that can be leveraged in a global template. Explore the capabilities and limitations of these features in SAP Solution Manager 7.0 and discover how to augment the capabilities using audit procedures. Learn how to use SAP Solution Manager to aid in the process of updating the enterprise global template based on changes that have occurred as a part of ongoing application life cycle management.
Key Concept
The use of the global template is becoming more common as SAP Solution Manager’s features mature and as organizations seek to reduce the cost of deploying SAP solutions globally. In essence, the global template is meant to house the key business processes that an organization wishes to standardize across the entire enterprise. However, it is almost inevitable that these processes require changes to support individual geographies or business units. This is where the combination of the SAP Solution Manager template project, implementation project, and solutions come into play. These work together to provide your organization with the flexibility to adapt to the demands of a global enterprise supporting local needs, while tracking and determining the impact to other regions or the global template.
Productive solutions require ongoing maintenance. This maintenance comes mostly from three primary categories or groups of changes to the solution. These include break fixes, application of Support Packages and SAP Notes, and periodic releases of functionality enhancements requested by the business. It’s the third group of changes that most likely provides opportunities for incorporation into a global template, but that does not imply that the other two shouldn’t also be continuously monitored for implications to the global template functionality. The need to identify and incorporate changes into the enterprise global template is a natural part of an ongoing application life cycle management process.
As part of ongoing quality assurance, the enterprise should perform periodic reviews of the productive solution compared to the content of the global template. In SAP Solution Manager 7.1, you can do this process via the automated features in the Compare and Adjust functionality. In prior releases, however, this process is far more manual.
I’ll show you the processes and procedures for performing this comparison in SAP Solution Manager prior to 7.1. However, my example assumes that you’re on SAP Solution Manager 7.0 with Support Package 18 and enhancement package 1 or higher.
I’ll explore how to:
- Compare a solution to the project from which it was created
- Incorporate the changes back into the source project (roll-in)
- Compare a template project with an implementation
- Incorporate changes in the implementation into the template (roll-in)
Compare a Solution to the Project from Which It Was Created
This procedure requires gathering data from both the solution and the project from which the solution was created. Multiple projects may need to be included in your analysis, but for this example, there is only one comparison project.
To identify changes to the solution relative to the global template you can download reports into Microsoft Excel and use the Excel function VLOOKUP() and other data processing and sorting techniques to identify changes. For this example, the solution was created from a project and then subsequently changed.
Note
Other audit processes can be used to identify changes in the solution, such as reviewing change request logs or holding interviews with business process owners and IT resources. These alternative approaches can give you insight into some subtleties that a programmatic approach wouldn’t. However, these approaches are not as systematic as using a tool such as Excel to analyze the actual content of the solution relative to its contributing project. In a best-case scenario, both systematic and the other audit approaches described above could be used to be as thorough as possible in the identification of changes to the solution.
Regardless of the approach used to determine the changes, it is important to capture the exact names of the structure elements, transaction codes, and documents as they appear in the solution to aid in the search for the context of the changes as well as incorporating new documents into the project from the solution.
Use transaction SOLAR_EVAL. To get everything possible, you’ll need to run and download both the Transactions and Documentation reports under the Solution section (Figure 1).
Note
You can only do comparisons on transactions and documents in a solution in SAP Solution Manager prior to version 7.1.

Figure 1
Transaction SOLAR_EVAL main screen with the Project section collapsed to show options for the Solution reporting
Now let’s look at how to run and download the information for the documentation. Repeat the process for the Transactions. Figure 2 shows the selection options to get the Business Process Hierarchy (BPH) in its entirety with all the documentation displayed on the report. Set the inputs as shown in Figure 2 and click the execute icon.

Figure 2
Select Display Completely so the entire BPH will be included in the report and not just the nodes with documentation assigned
When the report is displayed, click the expand all icon  to review the report content (Figure 3). After reviewing the list, click the export to Excel icon
  to save the list to an .XLS file.
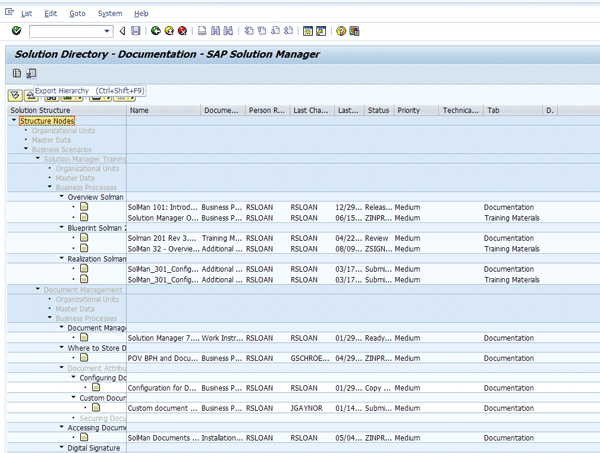
Figure 3
Solution documentation list for all nodes in the solution with or without documentation
Repeat the process above for the transactions, and save to an Excel sheet.
Next, run the transaction SOLAR_EVAL report for the Configuration > Assignments > Cross-Tab Analysis for the project you wish to compare to the solution (Figure 4). In this example, the solution was built from project IBMJUMP30. Figure 5 shows the input parameters for the SOLAR_EVAL report that you’ll use to generate the .XLS file for comparison to the solution .XLS sheets. Note that the Documentation and Transactions check boxes are selected.
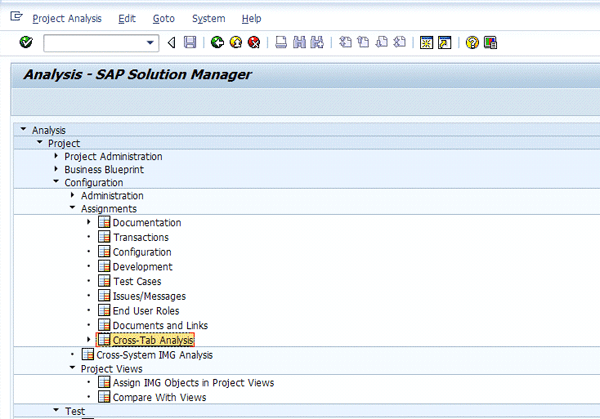
Figure 4
Cross-Tab Analysis for the configuration phase

Figure 5
The Cross-Tab Analysis selection screen for project IBMJUMP30
Since the SOLAR_EVAL reports in SAP Solution Manager 7.0 can only generate lists for documents and transaction codes for a solution, it doesn’t make much sense to clutter the project report with the other options from the cross-tab analysis.
Figure 6 shows the list expanded fully. Click the export to Excel icon to export the list to an Excel sheet.

Figure 6
IBMJUMP30 project with transactions and documentation listed for all nodes
Now comes the real work. You need to perform an analysis of the data in Excel to identify changes in the solution relative to the project. For a detailed discussion on how to perform such an analysis, see my article "Analyze Changes in a Solution for Support of Roll-In of New or Changed Processes."
Once you’ve completed your analysis and have identified the changes that are relevant to the global template, you need to incorporate or roll in the changes from the solution to the template project. Remember, it is important that your analysis capture the exact names of the BPH structures, transactions, and documents to use the search capabilities during the roll-in process.
Incorporate the Changes Back into the Source Project (Roll-In)
In SAP Solution Manager 7.0, importing changes made to a solution into a project is a completely manual process. In the next few subsections, you’ll see how to find the proper context for the BPH structure changes to be placed into the project as well as how to apply changes for the transactions and documentation.
BPH Structure Changes
To determine the context of the BPH for any structure changes your analysis has identified, follow the process described in my quick tip, "Determine the BPH Context in a Solution or Project." Once you've identified the context for any new or changed BPH structure elements that need to be imported from the solution, perform the following steps:
- Use transaction SOLAR01 and select the global template (BPH_DEMO) project
- Navigate to the BPH context where the changes are imported from the solution (Figure 7)
- On the Structure tab, change the Source to Solution
- Click the selection help icon
 to choose the appropriate structure content from your solution (Figure 8)
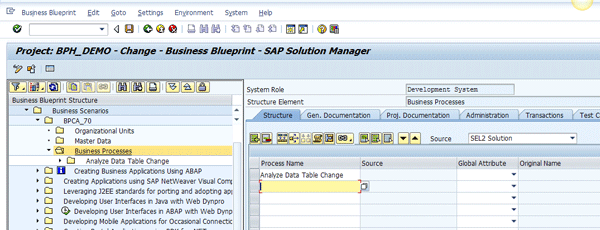
Figure 7
Structure tab with Source set to Solution
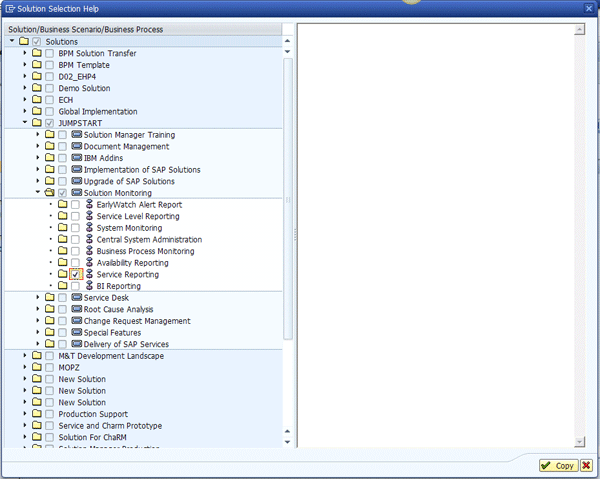
Figure 8
Selection help with Solution, Scenario, and Process opened and selected for BPH node import
Documents
The analysis may reveal that you have a new document on the solution that needs to be assigned to your project. It also may reveal that a document has changed. If the document has changed, then you’ll need to review the document and determine the best course of action for updating the document content in your project. If you have determined that there is a new document on the solution and want to add it to the global template project, follow this procedure.
Step 1. To add the document to the template, use transaction SOLAR01 (or SOLAR02) to open the global template (e.g., BPH_DEMO).
Step 2. Navigate to the BPH node where the new document is to be assigned. Click the binoculars icon to perform the search function in the structure window. Look for the structure text identified in the spreadsheet. The structure texts are housed in columns labeled Level 3 for Scenarios, Level 5 for Processes, and Level 6 for Steps. If the search doesn’t find anything in the structure, it means that there’s been a new structure element added in the solution. You’ll need to add the new structure element into the project. Do this from the Structure tab with the source set as solution. For more about this, see the previously referenced quick tip.
Step 3. On the General Documentation tab, click the insert icon  to add a new document. In the resulting pop-up screen, select Link to a Solution Manager Document and click the green check mark icon (Figure 9). In this example, I use Link to a Solution Manager Document so that any future changes to the document in the solution are automatically reflected in the project. If you want to have a copy of the document that represents the point in time of the roll-in, use the Copy of Solution Manager Document option instead.

Figure 9
Select Link to Solution Manager Document
Step 4. The Find Documents Pop-Up appears (Figure 10). Enter your Solution name and clear the Project field and the name of the document you wish to assign to the project. Click the execute icon.

Figure 10
Enter the Solution name and the Title of the document from the analysis spreadsheet
Figure 11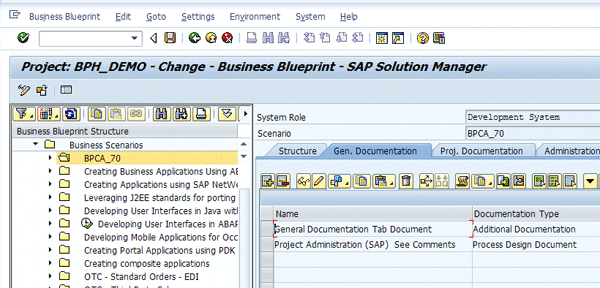
Figure 11
Document assigned to the BPH node
Transactions
To import the transaction changes from the solution to the global template (BPH_DEMO), use transaction SOLAR01. As with the documents, the transactions analysis may have revealed additions or deletions of transactions. The changes that can be made to an existing transaction assignment are not revealed by the analysis because the standard attributes (e.g., status, person responsible) for the Transaction tab are not included in the reporting.
Use the procedure in my quick tip to determine the context of the BPH for the transaction assignment if there is a new BPH node needed. Otherwise, use the structure search in transaction SOLAR01 to locate the position in the BPH for updating the transaction assignments. For transaction assignments not related to BPH structure changes, simply navigate to the structure element and manually apply the identified changes on the Transactions tab.
Compare a Template Project with an Implementation
When comparing an implementation project to a template, SAP Solution Manager can provide much greater assistance than it can when comparing to a solution. For this procedure, use the compare and adjust features in transaction SA_PROJECT_UPGRADE. This feature has been available since SAP Solution Manager 3.1, but has been improved with the later releases of SAP Solution Manager.
Background and Fundamentals
Let's look at some prerequisites. For the compare and adjust features to work to their fullest potential, it is important that a few rules are followed when building implementation projects. The implementation must have been built by copying structures into your project from one or more of the following sources:
- The Business Process Repository (BPR)
- A scenario template from a template project using the Scope tab in transaction SOLAR_PROJECT ADMIN
- Another project structure, using the input help on the Structure tab in transaction SOLAR01 with the source set to Project
- A complete project, using the copy function in transaction SOLAR_PROJECT_ADMIN
Note
For more about these techniques, go to the SAP application help for report SA_PROJECT_UPGRADE_ONLINE.
Recommendations
Let me make three recommendations:
- Use scenario templates whenever possible to bring in content to an implementation project. This ensures no lower-order processes or steps are inadvertently left out. You can de-scope them in the implementation if they are not relevant, and they will be ignored during the compare and adjust process.
- Use the General Documentation tab for all documentation that is on the template and the Project Documentation tab in the implementation to document changes to processes. This makes the documentation from the template available in the implementation project as a read-only document. This prevents your team from having to switch between multiple projects to look at the template documentation.
-
Try to limit the teams to their respective projects. For example, one team owns the global template and other teams own the implementation projects. You can keep them separated via authorizations. Build the authorizations around the projects themselves, then assign them to the team members as needed.
Analyze Changes
Once the implementation project is built and the project team has made modifications over time, you can use transaction SA_PROJECT_UPGRADE to identify the changes. This function is one part of the overall compare and adjust capabilities of SAP Solution Manager. Transaction SA_PROJECT_UPGRADE is the compare part of the functionality and runs across the entire project as a background job.
There are two types of change analysis you can run:
- New Version of Original: This mode tells you if the source from which you copied your implementation content has changed while you were working on the implementation. Use this mode to check for changes in the global template or other source that may affect your implementation. This is a good process to execute periodically to avoid last minute surprises that could affect your implementation timeline.
- Current Version in Project: Use this mode to identify everything that has changed in the implementation project since it was first created. Keep in mind that the reference or baseline kept for the implementation is stored at the node level of the implementation project’s BPH. This means that you can run this mode at any time throughout your implementation life cycle to see what has changed even if the changed node was brought into the project some time after the original implementation project was built.
Once the SA_PROJECT_UPGRADE analysis is complete, the BPH structure elements (or nodes) as well as individual tabs on the structure are marked with an indicator if there has been a change.
In the New Version of Original mode, a yellow exclamation mark is used to identify items in the implementation project that may be affected by changes to the source for those project items. For example, a change in the transaction assignments in the source template has occurred since the template was brought into the implementation project.
In the Current Version in Project mode, a blue info icon is used to identify changes in the implementation project that have occurred since the content was copied into the project.
Now let’s look in more detail at comparing a template project with an implementation in New Version of Original mode.
Compare in New Version of Original Mode
This procedure is used to alert the implementation project manager of any changes to the global template that may have occurred during the course of the implementation project. I’m including it in this article as a cross-check for project managers when determining opportunities for a roll-in from the implementation. By using this function, implementation project managers can determine if their localizations are affected by changes to the global template, and present opportunities for inclusion in the global template via a process reconciliation back to the global template. The importing of the changes from the global template into the implementation project are outside the scope of this article.
For this procedure, there are two projects in the same SAP Solution Manager system:
- BPH_DEMO: Template project containing the enterprise standard processes or the global template. The global template was built by copying information from the BPR and from manual augmentation as the processes were developed.
- BPH_DEMOI: Implementation project containing a subset of the global template. This project was created by copying content from the BPH_DEMO global template project in transaction SOLAR01 (or SOLAR02) by setting the source to Project when on the Structure tab of the project.
Since the creation of the implementation BPH_DEMOI, changes have been made to the BPH_DEMO global template. Running transaction SA_PROJECT_UPGRADE on the BPH_DEMOI project in the New Version of Original mode alerts the project manager to changes that were made to the global template (BPH_DEMO) may affect the BPH_DEMOI implementation.
Figure 12 shows the initial selection screen for transaction SA_PROJECT_UPGRADE with the options selected to perform the analysis in New Version of Original mode. Note the following:
- Comparison is being run for all tabs and the BPH structure
- Only the team members identified in the Team Members selection are able to see the change markers in the project in transaction SOLAR01 (or SOLAR02)
- The analysis is running on the implementation project (BPH_DEMOI) as compared to its source, the global template (BPH_DEMO)

Figure 12
Initial selection screen of transaction SA_PROJECT_UPGRADE running in New Version of Original mode
In this example, only one source is used (BPH_DEMO) for content in the implementation project BPH_DEMOI. It is possible for an implementation to take content from many sources at the same time. Since SAP Solution Manager stores the source identifiers at each node of the BPH in the implementation, the comparison knows which source to use for comparison for each BPH node. The use of multiple sources in the implementation project does not affect how the procedure in this example is to be executed.
When you execute the report, SAP Solution Manager performs a check on the SAP products used by the BPH structure elements. If your SAP Solution Manager system has multiple logical components created for the same SAP products, you get a pop-up asking to choose the logical components applicable to the analysis (Figure 13). Use the drop-downs to select the appropriate logical component for the checked product.
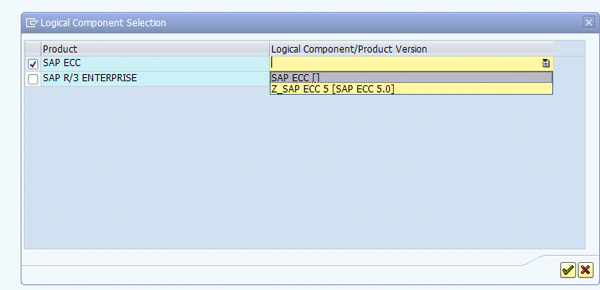
Figure 13
Alternate product and logical component selection pop-up
Note
SAP Solution Manager performs a like-product check. If there is more than one SAP product that is a match for a logical component selected in either the global template (BPH_DEMO) or the implementation (BPH_DEMOI) the multiple products are listed. You may then choose to use the alternate product. You still need to be sure to assign the correct logical component for the product chosen.
Once you’ve selected products and assigned logical components (if needed), then SAP Solution Manager generates a background job to perform the analysis (Figure 14).

Figure 14
Background job created by transaction SA_PROJECT_UPGRADE
Incorporate Changes in the Implementation into the Template (Roll-In)
Once the background job is complete, go into transaction SOLAR01 for the BPH_DEMOI project to see where there have been changes in the global template (BPH_DEMO) project that may affect the implementation project.
In Figure 15, you can see that some of the BPH nodes have been highlighted with the yellow exclamation icon. This indicates that there has been a change on the global template (BPH_DEMO) since the content was copied into the implementation.
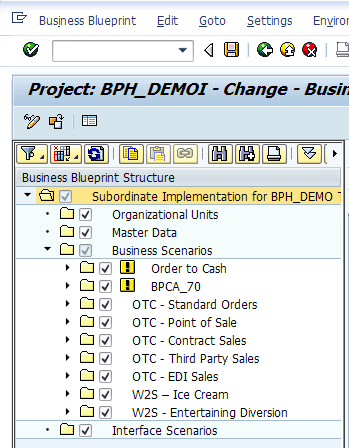
Figure 15
Icon on nodes affected by changes to the global template (BPH_DEMO)
The yellow exclamation icon only appears for users selected when running transaction SA_PROJECT_UPGRADE. If you are one of the chosen team members and you do not see the icon, it is because no changes have occurred on the template project that affect the implementation, or your user settings for displaying the comparison mode information are turned off. Follow menu path Settings > User Specific to check the setting. Figure 16 shows how the user settings should be set to view this information.

Figure 16
User-specific settings for viewing comparison information when transaction SA_PROJECT_UPGRADE is run in New Version of Original mode
By navigating the BPH nodes highlighted with the yellow exclamation icon, implementation and global template owners can determine if there have been concurrent changes during the implementation project. If so, there needs to be a reconciliation performed if the localization within the implementation is to be incorporated into the global template.
Figure 17
Figure 17
Changes have been made in the Gen. Documentation tab of the global template for the Order to Cash scenario
Note
This procedure does not show changes that have occurred in the implementation project since the content was copied from the global template. That information is revealed in the next procedure.
Click the Gen. Documentation tab and then click the adjust to original icon  to see the details of the changes (Figure 18).

Figure 18
Details of changes to documentation on the Order To Cash scenario
Figure 19 shows that a change has been made to the transaction assignments for the business process step Check Stock.
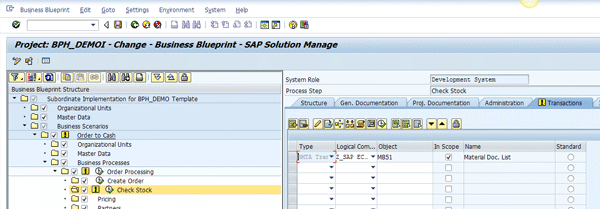
Figure 19
Alert to changes in transaction assignments
Figure 20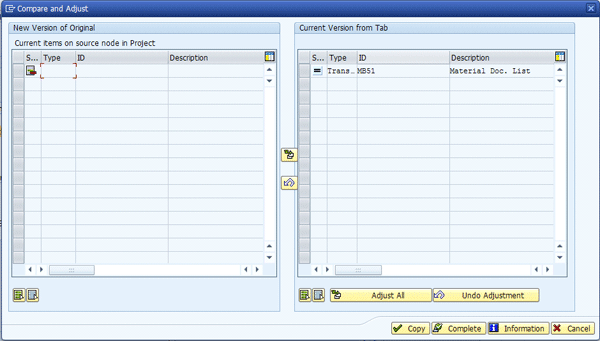
Figure 20
Transaction changes details
Figure 20Compare in Current Version in Project Mode
This mode is for helping implementation and global template project managers identify which processes were changed (localized) during the implementation project. Many of the detailed steps of running the procedure are the same as above, so this portion only focuses on the differences.
Begin with transaction SA_PROJECT_UPGRADE as before, but choose the Current Version in Project radio button instead (Figure 21).

Figure 21
SA_PROJECT_UPGRADE run for the implementation project (BPH_DEMOI) in the Current Version in Project mode
Once the background job is complete, go to transaction SOLAR01 to see the highlighted changes in the implementation project. Figure 22 shows the implementation project BPH_DEMOI in transaction SOLAR01 with the information indicators active. Note the change in the indicator type. In this mode, the information indicator  is used as opposed to the yellow exclamation mark. As before, if the information indicator does not appear on any of the structure nodes, it is due to the same two potential reasons as in the previous procedure.
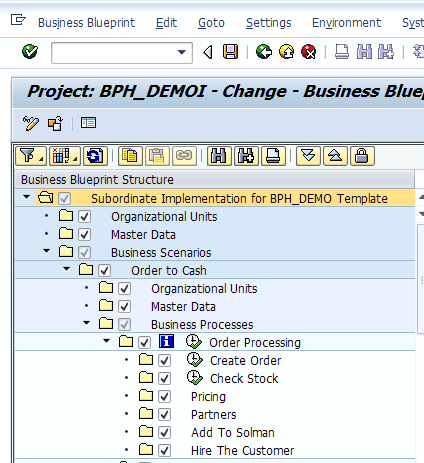
Figure 22
BPH structure of implementation project (BPH_DEMOI) with information indicators for nodes that have changed since content was brought in from the global template (BPH_DEMO)
Figure 23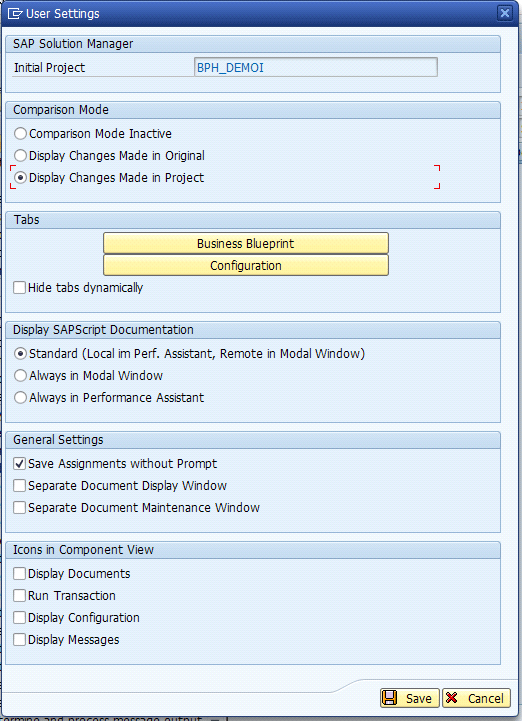
Figure 23
User settings to activate the display of changes made to the implementation project
Figure 24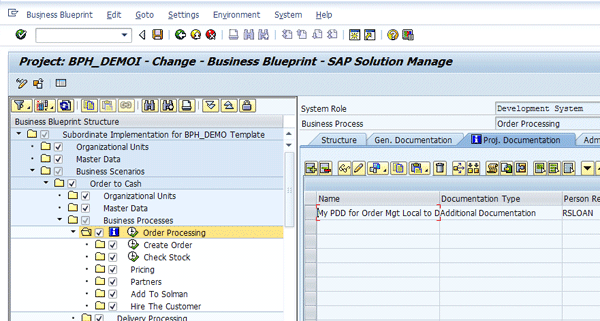
Figure 24
The project documentation has been added on the BPH node since the node was imported from the global template
Figure 25
Figure 25
Adjust to Original details for changed project documentation
If the changes are to be imported to the global template, use transaction SOLAR01 on the template BPH_DEMO project with the source set to Project. Follow the same steps used when importing content from the solution to import content from the implementation project (BPH_DEMOI) to the template (BPH_DEMO). As with the solution, you need to manually reconcile changes to document content.
While I have not covered every possible combination of changes within and between projects and solutions, the combinations and procedures should prepare you for most of your project needs. You now should be able to better manage your global rollouts and the roll-in of localizations made during implementation as well as those that have occurred as part of ongoing steady state support.
Note
I did not cover importing content from upgrade or maintenance projects as the processes are the same as with implementation projects.
D. Russell Sloan
D. Russell Sloan is a specialist in project and program governance for IBM. He focuses on the use of SAP Solution Manager for global rollout projects for IBM’s largest customers, having worked with SAP software since 1996. Russell has degrees in accounting and information systems and has been a team and project leader for SAP projects for more than 14 years. He has been developing and deploying software systems for over 30 years.
You may contact the author at solmanruss@gmail.com.
If you have comments about this article or publication, or would like to submit an article idea, please contact the editor.