See how to define a business role in customizing, assign it to a position in an organizational model, and then analyze its content.
Key Concept
Business roles and authorizations are prerequisites for SAP CRM upgrades or cutovers. This means that during the user acceptance test, users should test each business scenario using appropriate profiles and authorizations based on their business roles. Underestimating those basic prerequisites results in slow upgrade or cutover activities and generates subsequent troubleshooting.
Business roles and authorizations have often been underestimated during the execution of an SAP CRM project such as an upgrade. It is not unusual to see projects going live without a complete matrix of the users’ business roles and authorizations based on their latest organizational model. This results in a slow start-up and additional workarounds to enable users to complete their daily tasks.
I’ll provide a quick reference on how to create business roles and associated authorizations to reflect company requirements that should be ready and validated during the business acceptance test. I show how to:
- Define a business role (copying an existing role) in customizing
- Assign a business role to an organizational model
- Update a business role
- Test a business role
This process results in a faster production start-up as all the previous implementation phases benefit from it. The information is useful for anybody working in SAP CRM security. This article is based on SAP ERP Central Component (SAP ECC) 6.0 and SAP CRM 6.0. However, you can also use it with other releases (i.e., SAP ECC 5.0, SAP CRM 5.0, and SAP CRM 7.0).
Components of a Business Role
In Figure 1, you can see the main components of the business role. The business role, more than simply a security feature of SAP CRM, determines the profiles of the user interface (UI) and what is visible on the UI.

Figure 1
Components of the business role in SAP CRM
Business roles are used to encapsulate the content defined for a UI. You can assign them to organizational units or positions in the organizational model, or can determine them implicitly based on the transaction PFCG (profile generator) role. Transaction PFCG roles contain authorizations for business roles. For the purposes of this article, I will focus on assigning the roles to organizational units or positions.
The users or business partners (i.e., employees) are assigned to a position. Assignment to user level is not possible. Also consider the following:
- If a business role is assigned at the organizational unit level, then all users within the organizational unit use the same business role
- If a business role is assigned at position level, then all users assigned to the same position use the same business role
Here are some examples of standard business roles delivered in SAP CRM:
- SALESPRO (sales professional)
- SERVICEPRO (service professional)
- MARKETINGPRO (marketing professional)
- Web Channel (ECO-MANAGER)
- IC_AGENT & IC_MANAGER (standard Interaction Center [IC] agent and manager)
- IC_SSC_AGENT (shared service center agent)
You can define a business role in customizing using transaction code CRMC_UI_PROFILE or by following IMG menu path Customer Relationship Management > Business Roles > Define Business Roles. To use SAP CRM, a user needs to be assigned to a business role. You perform the determination of the business roles in the following order:
- Check if a single business role is assigned via transaction SU01 in the SAP back-end system, using the user parameter CRM_UI_PROFILE. This setting overrules any other role assignments.
- Check if there are business roles assigned via SAP CRM organizational management
- If neither 1 nor 2 is the case, the system determines the PFCG roles assigned to the user and checks if they are linked to a business role. If they are indeed linked, these business roles are used.
Let’s give an overview of each element that composes a business role:
Organizational Model
The organizational model definition is the first activity to perform in configuration. You can define the organizational model either in CRM Web UI or via SAP GUI by following menu path Customer Relationship Management > Business Roles > Define Organizational Assignment.
You can assign the user or business partners to multiple positions in the organizational model. If users are assigned to multiple positions with different business roles, they get a screen to select the desired business role when logging in to the SAP CRM Web GUI.
Tip!
During the testing phase, you can use parameter CRM_UI_PROFILE via transaction code SU3 (maintain the user parameter) to assign a business role directly. In this case, the assignment within the organizational model is not taken into account because the assignment of the business role is only used for a quick test during the testing phase. However, I don’t recommend this practice in a live system because in production, the organization model should always be updated, reflecting the company set-up and drive authorizations.
Navigation Bar Profile
Navigation bar profiles are collections of logical links, work centers, work center link groups, and direct link groups. They are assigned to a business role and represent the structure of the navigation bar displayed on the UI.
You can find the customizing options related to the navigation bar profile in the business role customizing, in which you can handle the following main changes:
- Hide work center pages or links that you do not need
- Have work centers made available automatically, which are not available in the navigation bar profile, that link to the business role
- Define which frequently used links should appear in the second-level navigation
- Decide to provide access to shared lists of all logical links, work centers, work center link groups, and direct link groups
- Activate or deactivate work center group links and direct group links
You can assign the same navigation bar profile to different business roles.
Transaction PFCG Role ID
Authorizations are combined in profiles, which are assigned to a user’s master record.
Transaction PFCG is used to maintain the authorization profiles and then authorizations are assigned to users in transaction SU01 (user master data). For each business role, SAP delivers a transaction PFCG role with the required authorization objects. The standard SAP CRM business role names have the following schema: SAP_CRM_UIU_* .
Tip!
If you run SAP CRM 5.0 and plan to update to SAP CRM 2007 or SAP CRM 7.0, SAP Note 1259665 provides information on how to migrate existing authorization roles (in transaction PFCG).
There are also additional elements that compose a business role:
Configuration Settings to Implement Authorizations
SAP CRM users must be assigned to appropriate authorization roles to determine the activities and transactions they can carry out. Assigning authorization roles to users results in the system performing background checks on the users’ permissions, restricting the tasks they can carry out.
In every CRM environment, users should only access menus and transactions relevant to their roles. Because SAP CRM is mostly executed in the Web layer, the Web-based application authorization must match back-end user authorizations.
SAP delivers a set of authorization SAP CRM roles; however, several authorization objects have been assigned full authorization values because they are based on customizing and master data. This means that certain functions are enabled that may not be used in the Web application. Also the permission levels these functions give to users may not meet your company’s requirements. To improve security, SAP therefore recommends that you copy the standard roles, rename them, and modify them before use.
Creating Business Roles
You need to create both a new user role in SAP CRM and an SAP CRM WebClient UI business role. The business role refers to the user role.
Step 1. Create a Transaction PFCG Role ID
You can create a new user role in SAP CRM using the SAP GUI via menu path SAP Menu > Architecture and Technology > System Administration > User Maintenance > Role Administration > Roles. You can also use transaction PFCG. For my example, I copied the standard business role SAP_CRM_UIU_SRV_PROFESSIONAL to the custom role Z01_CRM_UIU_SRV_PROFESSIONAL (Figure 2).

Figure 2
Create a role
In Figure 2, click the Copy All button. Then the system shows all components of the new role that is copied from the standard SAP role (Figure 3).

Figure 3
Components of the new role
At this stage, the user can modify the characteristics of the new role based on the company’s requirements. On the Authorizations tab, select Change Authorization Data. The system displays the authorization objects contained in the authorization role. Click the generate icon  and change the profile name if necessary due to your company’s business requirements. The system creates a profile.
If the delivered transaction PFCG roles aren’t sufficient because your own business roles contain different applications or business objects, several features are provided to easily create authorization roles or profiles and assign them to users. Create users with transaction SU01. Use a trace in transaction SU22 (choose external service and UIU_COMP) to determine all necessary authorization objects for your business role. You can maintain default values in transaction SU24 if the default values delivered by SAP don’t fit your needs. For more information about trace options, refer to SAP Notes 551478 and 449832.
Use report CRMD_UI_ROLE_PREPARE and transaction PFCG to assign all required authorizations to the related transaction PFCG role. Use transaction PFCG to define the authorization values and to generate the authorization profiles. Use report CRMD_UI_ROLE_ASSIGN to make the user assignment easier:
- This report assigns transaction PFCG roles to the user based on user assignments in SAP CRM organizational management. Positions in organizational management in turn are assigned to business roles.
- It may be necessary to add some special authorizations manually to your users with transaction SU01.
Tip!
SAP recommends using only transaction SU01 to improve security because transaction SU05 does not support the assignment of authorizations to transaction SU05 users or single sign-on functionality. Transaction SU05 does not exist anymore in SAP CRM 7.0 or SAP ERP Central Component (ECC) 6.0. In fact, transaction SU05 users are based on the anonymous service user concept, whereby the service user has full application functionality. Then you can migrate existing transaction SU05 users to transaction SU01 users in Customizing for Customer Relationship Management under Web Channel > Basic Settings > Internet User > Internet User Settings.
Step 2. Create a New Role
In customizing, create new business role Z01SRVPRO (01 Service Professional) and assign the newly created user (PFCG) role to it. Follow menu path SAP Menu > Architecture and Technology > Configuration > Customizing (transaction code /nSPRO). Then choose SAP Reference IMG > SAP Implementation Guide > Customer Relationship Management > Business Roles > Define Business Role. Mark the entry SERVICEPRO and choose the copy as icon for Z01SRVPRO. Specify the details as shown in Figure 4.
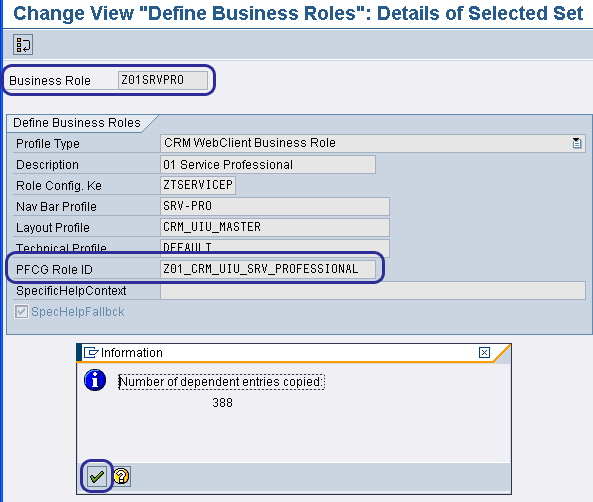
Figure 4
Create a business role
Click the green check mark and copy all. Confirm the next dialog and save your settings.
Step 3. Assign the Business Role and User ID to Positions
You should have two users available to follow this step. Assign both your CRM logon user CRM-01 and the newly created business role Z01SRVPRO to the existing position (01Position) in the organizational model. CRM-01 is another user I created previously in SAP CRM and the corresponding SAP ECC back-end system. Follow IMG menu path Customer Relationship Management > Business Roles > Define Organizational Assignment. It is a best practice to assign users to positions as opposed to business roles directly when implementing SAP CRM security.
First assign the business role Z01SRVPRO to the position 01Position. This type of relationship is established by creating an infotype. To do so, find 01Position using the Find by Search Term functionality, then choose menu path Go to > Detail object > Enhanced object description (Figure 5).

Figure 5
Create an infotype
Select the line for Infotype Business Role and click the create infotype icon. The system proposes the screen and information message shown in Figure 6. Enter Z01SRVPRO as the Business Role, enter its validity period, and save the entry.
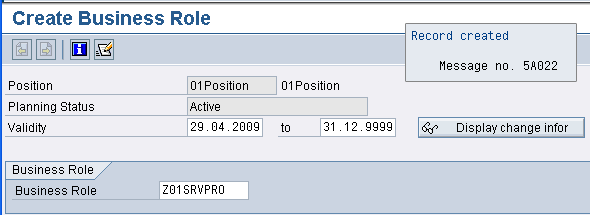
Figure 6
Link the business role with the position
Assign the user CRM-01 to 01Position. Find the user CRM-01 using the Search Term functionality and select the user CRM-01. To create an organization model, from the CRM Web GUI, follow menu path Create > Organizational Model (Figure 7).
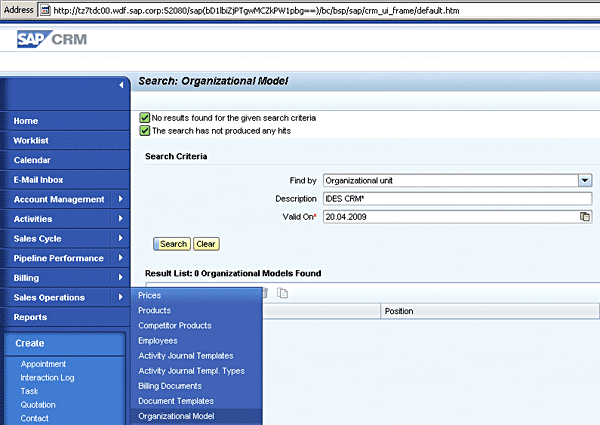
Figure 7
Create an organizational model
To update an organizational model, the user can place the cursor on the name of the model and right-click to assign it to the 01 Position (Figure 8).
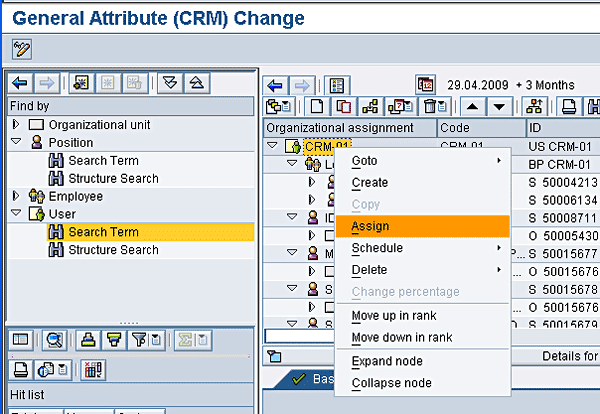
Figure 8
Assign the user ID to a position
Choose Holder as shown in Figure 9.

Figure 9
Assign user ID to the position Holder
Click the green check mark to verify the assignment you have just made in the previous steps (Figure 10).
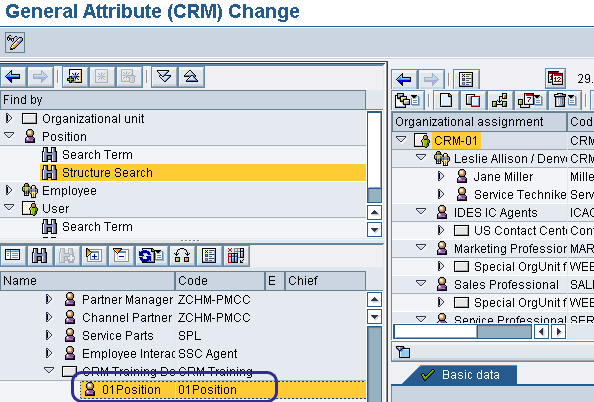
Figure 10
Verify the assignment made in the organizational model
Now you have user CRM-01 assigned to the company’s organizational model via 01Position and the user’s role Z01SRVPRO assigned to 01Position, as reported in the left part of Figure 1. This is exactly the configuration you need, so you can confirm your entry and save your settings (Figure 11).

Figure 11
Save the assignment made in the organizational model
Step 4. Update and Test a Business Role
To update the newly created business role Z01SRVPRO to meet company requirements, you can revise the following information:
- The navigation bar profile
- The role configuration key
- The layout profile
-
The technical profile
Walking Through an Example
Let’s apply what I’ve discussed. I’ll modify the navigation bar profile and the role configuration key, and will talk about the layout and technical profile.
Create a Navigation Bar Profile
Within the navigation bar customizing you have access to shared lists of all logical links, work centers, work center link groups, and direct link groups. Additionally, in the business role customizing you can hide the work center pages or links that you do not need, or you can define which frequently used links should appear in the second-level navigation.
Let’s apply some changes in the business role created in Figure 4, deactivating the work centers calendar and email in the business role Z01SRVPRO. You can do so with changes in the business role and also by adapting the navigation bar profile. To do so, follow menu path SAP Menu > Architecture and Technology > Configuration > Customizing > SAP Reference IMG SAP Implementation Guide > Customer Relationship Management > Business Roles > Define Business Role.
In the proposed screen, enter Business Role Z01SRVPR0, go into the work center details, and deactivate the options CT-CALENDAR and SRV-EMAIL (Figure 12). Then save your entries.

Figure 12
Deactivate work centers in the business role
Usually you want to add a work center typically belonging to a professional figure (e.g., marketing) and not the role itself. To do so, you have to create a new navigation bar profile.
To define the navigation bar profile, follow IMG menu path Customer Relationship Management > UI Framework > Technical Role Definition > Define Navigation Bar Profile. Select navigation bar profile SRV-PR0 and copy it (Figure 13). Look for Nav Bar Profile in the middle of the figure.

Click the save icon to save the new navigation bar profile Z01NBPROF (Figure 14).
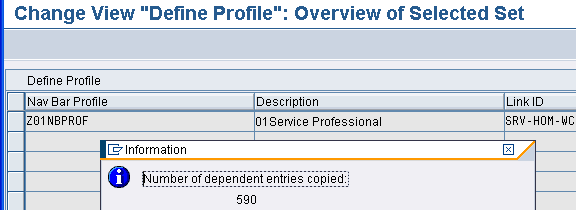
Figure 14
Save the new navigation bar profile
Create your own work center ZWS_MK_01 by copying the existing work center MKT-MKT (Figure 15).

Figure 15
Create with reference the new work center
Click the save icon to save the new work center ZWS_MK_01 (Figure 16).
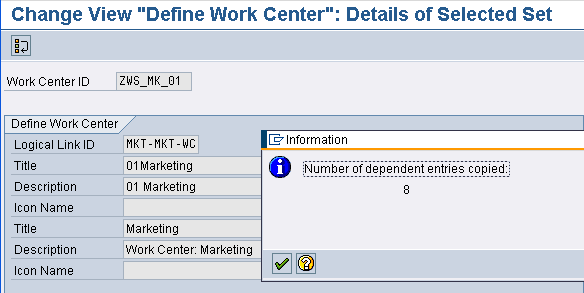
Figure 16
Save the new work center
Add a new created work center to the navigation profile Z01NBPROF by clicking the New Entries button (Figure 17).
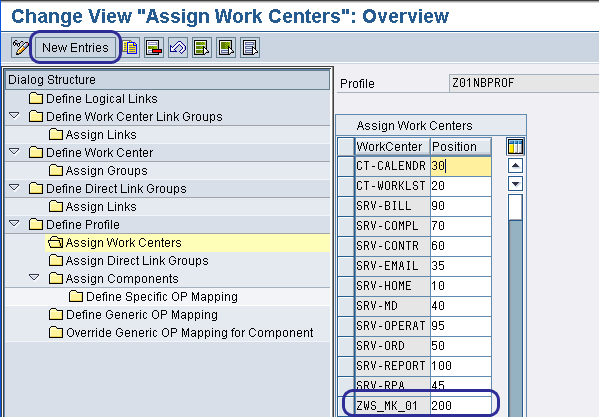
Figure 17
Assign custom work centers to the navigation profile
To test your settings, replace the original navigation bar profile with your newly created one. Go to the customizing of your business role and replace the navigation bar profile. Follow IMG menu path Customer Relationship Management > Business Roles > Define Business Role. Select business role Z01SRVPRO, choose Details, specify the Nav Bar Profile Z01NBPROF, and save your entries (Figure 18).
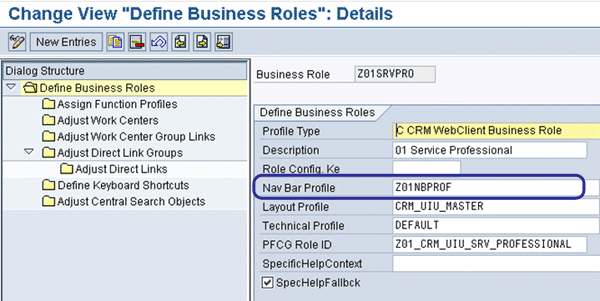
Figure 18
Assign the navigation bar profile to the business role
Restart your SAP CRM WebClient UI and select the business role Z01SRVPRO (Figure 19). Use user ID CRM-01.

Figure 19
Use the new business role in SAP CRM
Then run the SAP CRM WebClient UI again using your profile and use the option Complaints & Returns. Three entries are available: Complaints, Returns, and In-House Repairs (Figure 20). By using each option, a corresponding search page comes up.
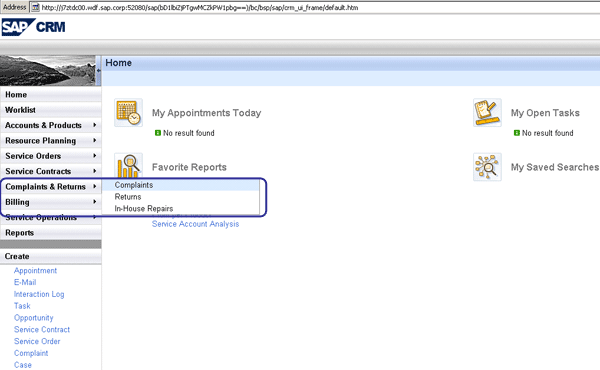
Figure 20
New options available in the SAP CRM WebClient UI
To test your settings, use transaction CRMC_UI_PROFILE.
Create Your Own Technical Profile
The technical profile controls some browser-related settings. It can enable or disable the following functions:
- Disable P-R-G (Post-Redirect-Get), which enables the use of the browser’s back button
- Disable Frame Swap, which reduces screen flickering noticeably
- Disable AJAX (Asynchronous JavaScript and XML), which reduces full screen server roundtrips
- Disable Server Optimization, which optimizes server performance
- Control the memory threshold that determines when a new session is started. This value represents the server memory footprint in megabytes. The restart mechanism checks if the current memory consumption is higher than the threshold specified in the technical profile of the business role. If the consumed memory is higher than the threshold, the current session finishes and a new session starts.
- Specify the dialog delay in milliseconds. With this value you define how long it takes until the Please wait... dialog is displayed if the Disable Fields check box is activated.
- Define a URL, such as https://sap.com
To define the layout profile, follow IMG menu path Customer Relationship Management > UI Framework > Technical Role Definition > Define Technical Profile. For my example, I used the standard defaulted technical profile DEFAULT.
Create Your Own Layout Profile
The layout profile controls the assignment of components (BSP Programs) to the static areas of the UI. It doesn’t control the logo itself or the picture in the navigation bar. This can be influenced in the skin configuration.
The header area is a static, non-scrolling area of the application that is only rendered once per session. It is at the top of the screen and consists of different header components (e.g., logo area, global function area, and others). This layout of header components is the default header implementation for the header frame. The footer area is a non-scrolling area at the bottom of the screen that is only rendered once. The work area has a work area header and a work area subheader. The work area header is a non-scrolling area that spans the width of the application. The work area subheader is a non-scrolling area that spans only the width of the work area.
The navigation bar contains subareas or components defined in the layout profile. It can consist of 1 to n subcomponents. The DEFAULT layout profile provides the following subareas:
- Picture
- Menu area
- Shortcut area
To define the layout profile, follow IMG menu path Customer Relationship Management > UI Framework > Technical Role Definition > Define Layout Components. For the example in this article, I used the standard default layout profile CRM_UIU_MASTER.
Create Your Own Configuration Key
As an example of the available system’s functionalities, I’m going to create a new configuration key to use to make the Search Term field in the customer master record mandatory as shown in Figure 21. To define a new layout profile, follow IMG menu path Customer Relationship Management > UI Framework Definition > Define Role Configuration Key. Click the New Entries button, specify the Role Confi Key Z01RCK, and save your data.

Figure 21
Define new role configuration
I’m going to update a characteristic of the business partner that represents the customer’s account. To do that, use the appropriate component, which in this case is BP_HEAD. To update it, start the Component Workbench by using the corresponding customizing IMG activity, enter the name of the Component representing Accounts, and click the Display button. Follow IMG menu path Customer Relationship Management > UI Framework > UI Framework Definition > Configure User Interface (Figure 22).
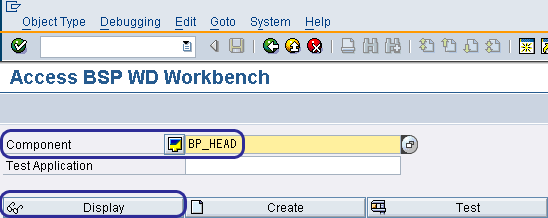
Figure 22
Display component BP_HEAD
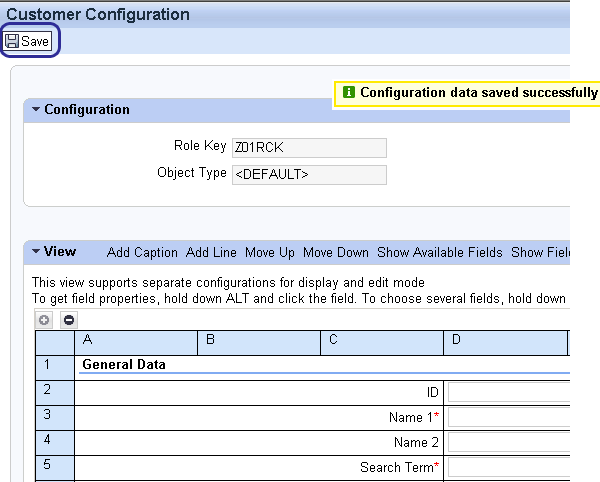
Then modify the characteristics of the field Search Term, making it mandatory. To do so, navigate to Views > BP_HEAD/AccountDetails. Double-click this view and choose the Configuration tab (Figure 23).
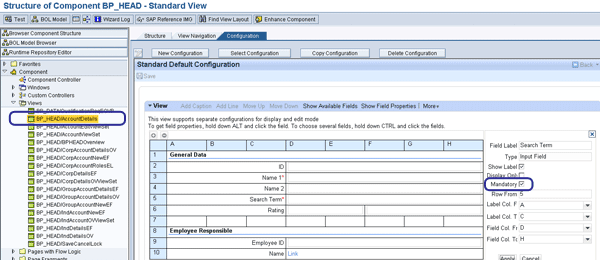
Figure 23
Modify the characteristics of component BP_HEAD
After making the appropriate changes, save your modifications, which in my example is to make the field Search Terms mandatory (Figure 24).
Tip!
To get the technical information of the account object within the WebClient UI, place your cursor on the field Name1. Obtain the technical information by pressing F2. A pop-up screen shows the following information:
- Component: BP_HEAD
- View: Account Details
- Context Node: HEADER
- Attribute: STRUCT.NAME1
To test your settings, replace the original role configuration key with your newly created one. Go to the customizing of your business role and exchange the role configuration key. Follow IMG menu path Customer Relationship Management > Business Roles > Define Business Role. Then mark the business role Z01SRVPRO, choose Details, and specify the Role Config. Ke. as Z01RCK. Save your entries (Figure 25).
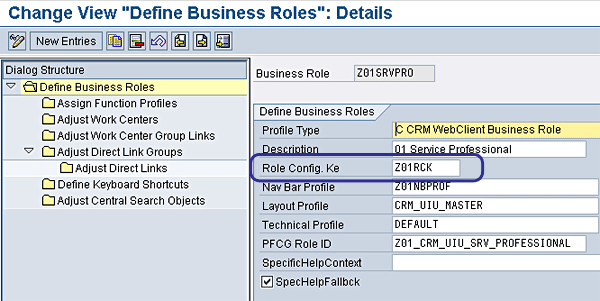
Figure 25
Assign the role configuration key to the business role
Restart the CRM WebClient UI and select business role Z01SRVPR0. Change the user’s account to 01Stockmann and test your settings (Figure 26).
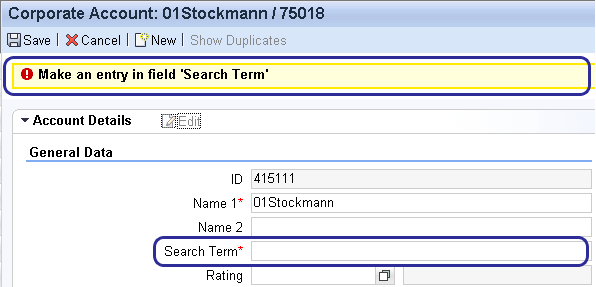
Figure 26
Test the configuration
As you can see, the Search Term field is now mandatory, which is just an example of the available functionality. The connection between the mandatory field and a user’s profile is accomplished via the role configuration key, which is part of the business user’s role as we initially discussed in Figure 1.

Gaetano Altavilla
Dr. Gaetano Altavilla is a senior SAP practice manager. His focus is on pre-sales, delivery of SAP application solutions for large international corporations, and SAP knowledge management in Europe, the Middle East, and Africa (EMEA).
In his 18 years of SAP application experience working for many multinational companies, such as Procter & Gamble and Hewlett-Packard, he has covered a wide range of ERP logistic areas, focusing on the MM, WM, SD, LES, PP, PP-PI, PLM (QM, PM, PS) modules, as welll as CRM (TFM), SRM (EBP), SCM (SAP APO), and MES (ME) components.
Dr. Altavilla holds a degree with first-class honors in mathematics from the University of Naples and is certified in many SAP modules: SAP Logistics Bootcamp, SAP MM, SD, LE (SHP/WM/LE), PP, PLM (PM, QM, PS), SRM, CRM, SCM (APO), SCM (TM), FI, CO, and Solution Manager. He also has experience in ABAP/4 and application link enabling (ALE) and IDocs. He has participated in numerous industry conferences, such as the SAP Skills Conference in Walldorf at SAP SE.
You may contact the author at Gaetano_altavilla@hotmail.com.
If you have comments about this article or publication, or would like to submit an article idea, please contact the editor.


