Find out how SAP updated the open hub concept in SAP NetWeaver 7.0. Then see how to set up an open hub in four steps.
Key Concept
Open hub service is the idea that your SAP NetWeaver BI system can be the core of your data cleansing, storage, and distribution needs. Using SAP NetWeaver BI as a hub lets you easily distribute cleansed data to downstream systems that have specific data needs. For example, it might be necessary for SAP NetWeaver BI, as the hub, to feed data to a secondary legacy business information system or other custom application. Going through SAP NetWeaver BI ensures a controlled distribution and consistent data distribution across systems.
Although the concept of an open hub, a controlled extraction from SAP Net-Weaver BI, is not new, the process to implement it has changed significantly with SAP NetWeaver 7.0. Now you can realize open hub distribution with only minor extensions to your core SAP Net-Weaver BI extraction, transformation, and loading (ETL) knowledge because the support for open hub is so tightly integrated in the product.
Other ways to export data involve using the LISTCUBE transaction or broadcasting. LISTCUBE is mostly a back-end tool to review the data loaded in the InfoCube. It does not permit you to manipulate or schedule the data. BEx Broadcaster also lacks options that allow you to manipulate data. Furthermore, you cannot export the data to a comma separated value (CSV) file or database table for analysis. When the task involves a significant amount of data that you need to export to a file or table, and you want to be able to manipulate the data, use the open hub process.
In BW 3.x, using open hub service involved transaction RSBO and required two objects. The first object, an open hub destination, contained the settings to define an output table or file to the hub service. The second object, the InfoSpoke, was an object to store the settings to link a source BW object (e.g., an InfoCube of data) to the destination. You also needed Business Add-Ins (BAdIs). In SAP NetWeaver BI 7.0, you no longer need an InfoSpoke or BAdIs. The open hub destination is now just another target in the ETL process.
In SAP NetWeaver BI 7.0, InfoPackages move the data to the persistent staging area (PSA). DTPs transfer it from point to point inside SAP NetWeaver BI, executing transformations to manipulate and cleanse the data. I’ll show you the four-step process to build the necessary objects to accomplish your controlled extraction from SAP NetWeaver BI 7.0 using an open hub.
Note
For more details on the new transformations and the associated Data Transfer Process (DTP), you can attend SAP education classes BW310 (BI - Enterprise Data Warehousing 7.0) or DBW70E (BI – Delta Enterprise Data Warehousing SAP NetWeaver 2004s).
Process Overview
Figure 1 provides an overview of the open hub process. After you set up the open hub destination, you then activate it to use it in the enhanced ETL process. To transform the data during the ETL process, you use an object called a transformation. You then create a DTP to schedule and execute the transformation. The DTP then moves the data to a CSV file on the application server or to a database table on the database server, depending on your settings.
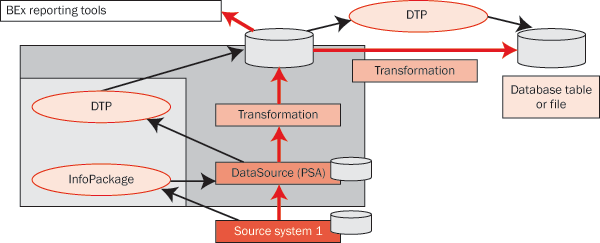
Figure 1
ETL and extraction from SAP NetWeaver BI to an open hub destination
Note
The open hub process works for the standard DataStore object, which is the most common type. If you want to use direct update or write-optimized DataStore objects, test them first to make sure they work with the open hub process. For example, you may encounter issues with delta processing.
The open hub setup in SAP NetWeaver BI 7.0 involves the following four steps:
Step 1. Create the open hub destination
Step 2. Define the transformation
Step 3. Create the DTP
Step 4. Schedule the extraction
Now let’s go into the details of each step.
Step 1. Create the open hub destination. In transaction RSA1, you can access a new modeling section called Open Hub Destinations. Assuming that you already have an InfoCube or other SAP NetWeaver BI object with readable data, the first step you need to take is to create the open hub destination. Follow menu path RSA1>Modeling>Open Hub Destination (Figure 2). Right-click on the desired InfoArea and select the Create option. In my example this is called Group 00: Instructor.

Figure 2
The destination, DTP, and transformation
The initial screen prompts you to choose a template for the fields you want to use to define the destination. The template choice drives your initial set of fields. This saves time by helping you generate fields for your destination. However, you can add or delete fields in the template as needed. In my example, I wanted to extract fields from the NEDSCUBE InfoCube, so I selected NEDSCUBE as the template. Other options for templates include SAP NetWeaver BI objects, such as a DataStore object (formerly operational data store [ODS]) or master data.
After you select your template, the Open Hub Destination Display: Overview screen appears (Figure 3). In the Destination tab, you can select a CSV file, a database table, or a third-party system as the Destination type. In my example, I selected a CSV file (FILE File) and then the Application Server check box, so the system uses the CSV file on the application server I am logged into. If you opt not to select this check box, you can use a CSV file on a drive accessible by your PC. This is useful if you are not allowed to store files on the server.
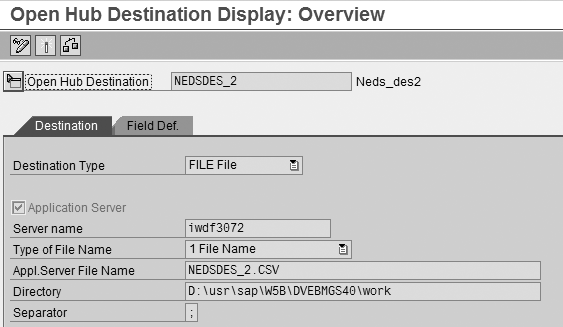
Figure 3
Set up the destination file on the Destination tab
Although CSV is the only file format available, you can choose the separator by indicating your preferred one in the Separator field. Usually I use a semi-colon, but if the actual data contains a semicolon, I pick a different separator.
For the database table option, you can choose the key for the table and how the system retains data. For more information on this option, visit https://help.sap.com/saphelp_nw70/helpdata/en/e3/ e60138fede083de10000009b38f8cf/frameset.htm.
The other items you must assign in the Destination tab include the File Name, file Directory, and Type of File Name. In my example, I set the file name type to 1 File Name. Although less straightforward, the 2 Logical File choice may work better for you if you need a history of all the different files downloaded over time. You can use variables when naming this logical file path and can create the physical file names dynamically in this path. The variable feature allows the system to change the file settings automatically when you transport your newly created destination if you use a server name variable as part of the logical file’s path. To find out more about logical files and to use this option, consult the person responsible for archiving at your company.
The last option for the destination is a third-party system. With this option, when you extract the file to the destination, the system triggers a third-party ETL tool to then process it further and load it to the actual destination system.
After you finish entering the general data, you need to define the template fields to complete the open hub destination. In Figure 3, click on the Field Def. tab to view the fields from the object you selected as the template, in my example, the InfoCube (Figure 4). If you don’t need any additional fields, you are finished with this step.
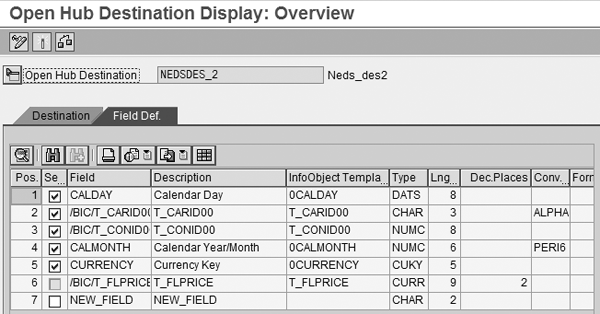
Figure 4
Define the fields in the open hub destination
Otherwise, you can delete fields that your downstream applications don’t need or add new fields that the system should derive upon extraction. When adding new fields to the destination table or file, the technical field length and type you define are the most important settings. For my example, I added a new field called NEW_FIELD that was not available either in the InfoCube or in SAP NetWeaver BI 7.0 as an InfoObject. To add the field, I supplied the field length (Lng…) and Type information.
Step 2. Define the transformation. After you set up the open hub destination, find either the hub object or the source object (in my case, an InfoCube) in the Data Warehousing Workbench. Right-click on the object to access the context menu and select Create a transformation. Complete either the source or the target, depending on which object you started from — in my example, I completed the target destination. When you finish, the screen in Figure 5 appears.
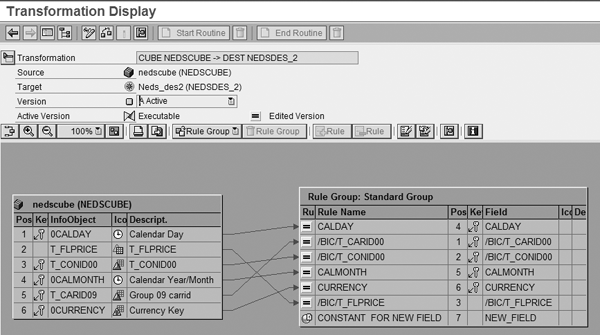
Figure 5
The transformation between the InfoCube (source) and the open hub destination (target)
If the destination matches the source, the system proposes field mappings automatically. For the NEW_FIELD field that I added, I had to assign some logic for the system to derive it. As with other transformations in SAP NetWeaver BI 7.0, I could choose direct assignment, constants, logic with ABAP, or user generated formulas. This can be as simple or complicated as necessary to meet the requirements. To access the rule details, double- click on the rule name. For my example, I assigned the constant NF to the new field.
Step 3. Create a DTP. The DTP’s job is to execute the transformation and copy the data from the source (the InfoCube, in my example) to the destination. Figure 6 shows the main configuration screen for the extraction, which you access by right-clicking on the object in the flow and selecting Create DTP. You create the DTP in the standard way in SAP NetWeaver BI 7.0. For more information about this process, see Nathan Genez’s article, “How to Migrate to the New DataSource Concept in SAP NetWeaver 2004s,” (Volume 5, Number 4) in the BW/BI Expert knowledgebase.
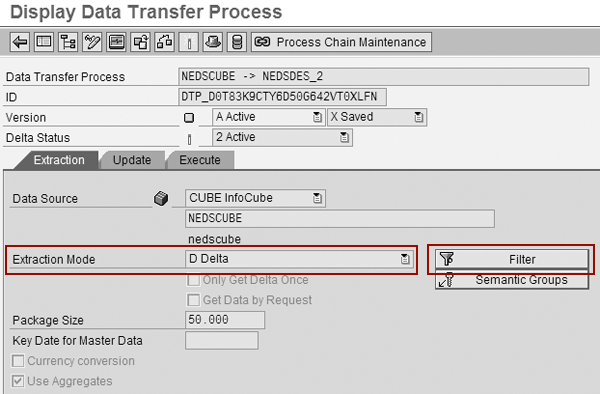
Figure 6
DTP Extraction tab
Two areas in Figure 6 are worth a special note. First is the extraction mode, D Delta (default) or Full. With the D Delta setting, the system sends only load requests that the destination hasn’t received previously. In Full mode, the system extracts the records in the source even if the system has extracted them previously. You need to know what the downstream system needs before you set up the DTP.
Another key area is the filters that you can access by clicking on the Filter button. With filters you can create 10 separate DTPs with a filter for each of the company codes in the corporation. For example, you could set the filters so that each DTP generates a separate file to output through FTP to a different collection agency.
Step 4. Schedule the extraction. Figure 7 shows the Execute tab in which you schedule the extraction outside of a process chain. However, you should include the DTP as an element in the process chain that fills the InfoCube or in a dedicated process chain for downstream feeds to make sure it happens routinely.

Figure 7
DTP execution in a process chain
Click on the monitor icon in Figure 7 to view the execution results in the DTP monitor (Figure 8). Although you see success indicated by the square icon, the monitor says No More Data Available because repeated running of the DTP does not yield new exported records when you use the delta extraction settings.
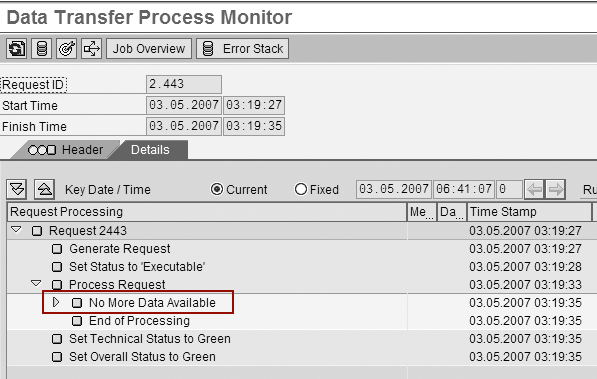
Figure 8
DTP monitor
When you execute the DTP and check it in the monitor, you can then go to transaction AL11 and click on the magnifying glass icon to view the extracted files (Figure 9). Note that the directory and file are the ones from the destination, in my example, Worknedsdes_2.csv. In the file, I have the derived constant NF as well as the data from the InfoCube (Figure 10).
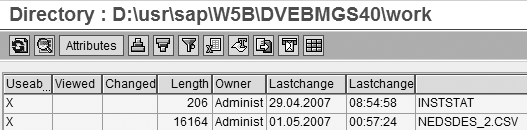
Figure 9
Transaction AL11 (files on the server)
20061104;3184.08 ;JL;00000408;200006;JPY;NF
20061104;1998.00 ;LH;00000400;200006;EUR;NF
20061104;726.00 ;LH;00002402;200006;EUR;NF
20061104;726.00 ;LH;00002407;200006;EUR;NF
20061127;1833.03 ;DL;00000106;200006;USD;NF
20061127;1268.82 ;DL;00001699;200006;USD;NF
20061127;1268.82 ;DL;00001984;200006;USD;NF
20061127;1998.00 ;LH;00000402;200006;EUR;NF
20061128;1833.03 ;UA;00003516;200006;USD;NF
|
| Figure 10 |
The file output |
Ned Falk
Ned Falk is a senior education consultant at SAP. In prior positions, he implemented many ERP solutions, including SAP R/3. While at SAP, he initially focused on logistics. Now he focuses on SAP HANA, SAP BW (formerly SAP NetWeaver BW), SAP CRM, and the integration of SAP BW and SAP BusinessObjects tools. You can meet him in person when he teaches SAP HANA, SAP BW, or SAP CRM classes from the Atlanta SAP office, or in a virtual training class over the web. If you need an SAP education plan for SAP HANA, SAP BW, BusinessObjects, or SAP CRM, you may contact Ned via email.
You may contact the author at ned.falk@sap.com.
If you have comments about this article or publication, or would like to submit an article idea, please contact the editor.