When you need a structured report for regulatory and statutory reporting, consider using a method based on creating data sets in SAP ERP Central Component (SAP ECC). It is more flexible and requires less maintenance than the traditional approach of creating a hierarchy/financial statement version in SAP ECC using transaction OB58 and then loading it to SAP NetWeaver BW using the standard business content extractor.
Key Concept
A set groups data to define data hierarchies. A set links together specific values or ranges of values under a set name. These values exist within one or more characteristics (e.g., general ledger account) of a database table. You can use sets to group together values within a particular characteristic. Creating a set is basically creating building blocks for a set hierarchy with different levels of information.
General ledger (GL) reporting using the standard financial statement version (FSV) of a company’s chart of accounts is a standard practice. An FSV of the GL hierarchy is a significant part of any regulatory and statutory reporting (to some extent operational reporting too). The most critical factor for regulatory and statutory reports is that they be presented in a more structured approach than operational or general reports. Any company having a standard FSV across the organization using this GL hierarchy does not completely satisfy SAP NetWeaver BW reporting requirements using the traditional one in transaction OB58.
The traditional approach requires creating the FSV in SAP ERP Central Component (SAP ECC) and then extracting it to SAP NetWeaver BW using standard extractors. It has major drawbacks from a reporting standpoint in that it:
- Is not flexible in terms of changes to the accounts structure, which requires a transport all the time
- Cannot reuse GL accounts multiple times
- Requires additional maintenance in SAP NetWeaver BW using link node
- Needs manual intervention to fix errors
- Affects service level agreements for data load completion
Any change to the FSV in the form of removing existing accounts, creating new accounts, or changing the structural format affects the link nodes (ID) on the SAP NetWeaver BW side. (The link node ID concept is beyond the scope of this article.) This is an inevitable and never-ending task affecting the ability of the business to submit reports on time.
Another method is based on the data sets created in SAP ECC by cloning the standard extractor. These sets are primarily used by process and functional teams to validate data using Report Painter. A custom extractor approach using the set concept on the similar lines of a standard extractor is an easier approach. It becomes particularly significant when a business needs a structured report. The set concept provides the following benefits:
- It’s flexible in terms of making changes quickly and then migrating them to QA as it uses the uploading of sets functionality
- No maintenance of master data or tables
- Efficient, unique structuring of values according to individual needs
- GL accounts can be used multiple times
- No maintenance in SAP NetWeaver BW
- Every report can be structured in a different fashion
- No manual intervention is required
- Different FSV versions can be created for different groups in the organization
The other important feature of the traditional FSV is the sign reversal functionality that is critical to businesses to reverse the revenue/expenses accounts in the reports for display purposes. You can also achieve sign reversal functionality with the custom set, which is an advantage as it mimics the standard FSV functionality.
In the custom approach, the extractor handles the duplicate nodes or accounts with a different node ID, making it free from data load failure on the SAP NetWeaver BW side. Using sets, all changes from SAP ECC smoothly flow into SAP NetWeaver BW.
Configuration Steps
Configuration steps and implementation scenarios follow. They show how you can use any fields in the set tables for the sign reversal functionality.
Step 1. Find the Standard DataSource
Find the standard DataSource to be cloned, 0GL_ACCOUNT_T011_HIER, in the ROOSOURCE table in the Active version. Use transaction code SE16 and then enter table name ROOSOURCE. Press Enter. Click the display icon  or press F7 (Figure 1).
 Figure 1 Display the relevant DataSource to copy and click the details |
Enter into debugging mode by entering /h in the Command field and pressing Enter twice. Once the debugger is switched on, scroll down to the code elseif code = ‘INSR’ (Figure 2).
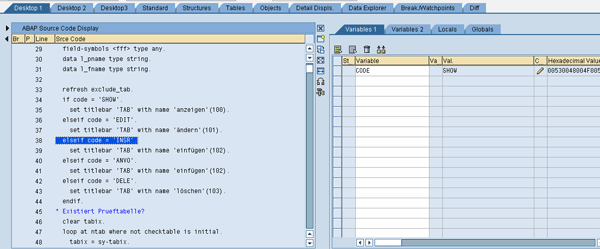 Figure 2 Look for elseif code = ‘INSR’ |
Double-click the variable CODE from the line you found and change the value from SHOW to INSR (Figure 3). Press F8.
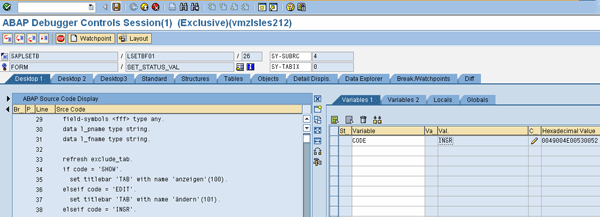 Figure 3 Change the value for the Variable CODE on the right section under the Variables 1 tab |
The debugger screen takes you back to the ROOSOURCE table details of the DataSource 0GL_ACCOUNT_T011_HIER in edit mode. This allows you to create your own name for the cloned DataSource. Enter a name other than the standard name in the DataSource field (Figure 4). Click the save icon. In this case I named it XGL_ACCOUNT_T011_HIER.
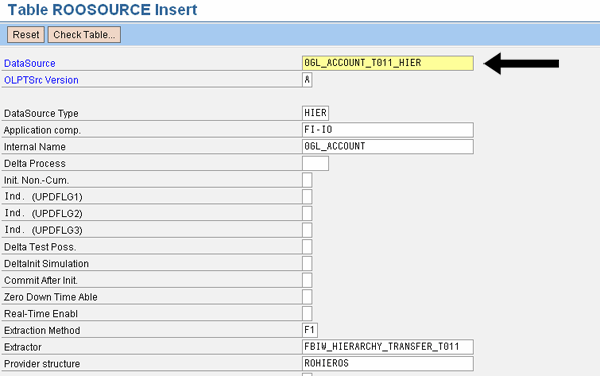 Figure 4 ROOSOURCE table shows a new DataSource can be inserted with any naming convention |
Replace the original Extractor value FBIW_HIERARCHY_TRANSFER_T011 with a custom function module (Figure 5). You can create this new function module by copying the standard one, and then you can modify it later. You can replace this Extractor field value while modifying the DataSource name. You also could update the database record for the field value with the new function module using an UPDATE statement with a simple ABAP program.
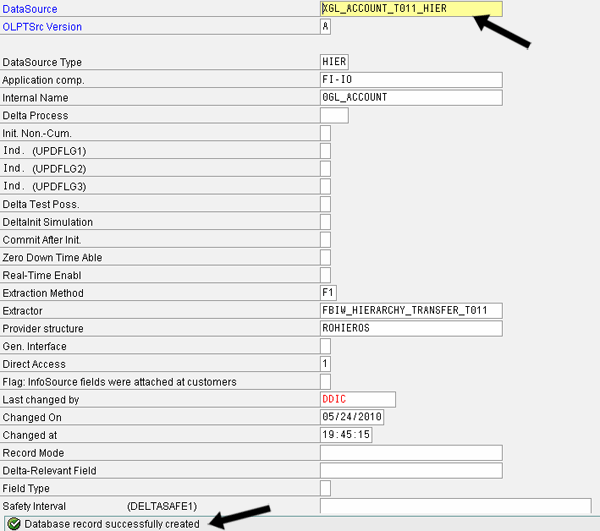
Figure 5
Generation of the new DataSource
Replace the Extractor value either during the first step of DataSource cloning or through an UPDATE ABAP statement (Figure 6). This function module holds the code to retrieve the sets in a hierarchy along with the sign reversal function.
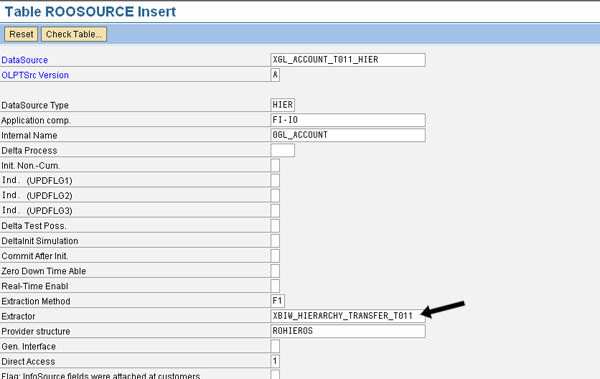
Figure 6
Replace the value of Extractor with the custom extractor
Repeat the above steps for the ROOSOURCE table and create the record in the two hierarchy tables: ROOHIECOM and ROOHIECAT. In the ROOHIECAT table, update the Hierarchy Class Type and Hierarchy API fields with 0000 and GSBH_HIERARCHY_CATALOG_SETS (Figure 7). This is also an important step that allows the InfoPackage on the SAP NetWeaver BW side to choose different sets to be extracted into the BW side. Do not change any other field values. As the new DataSource is created and replaces the field values in the tables, the standard DataSource content remains untouched and does not change its field values.
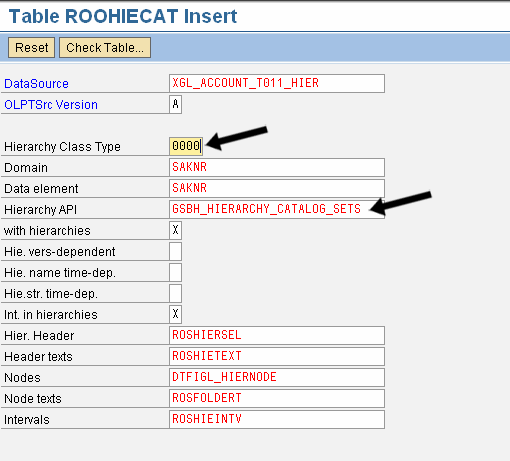
Figure 7
Replace the Hierarchy Class Type and Hierarchy API values
This function module is a standard code used to select the sets available in SAP ECC to be loaded in SAP NetWeaver BW. Now the DataSource is cloned and ready for use. Check whether the DataSource is active by using transaction code RSA6 (Figure 8).
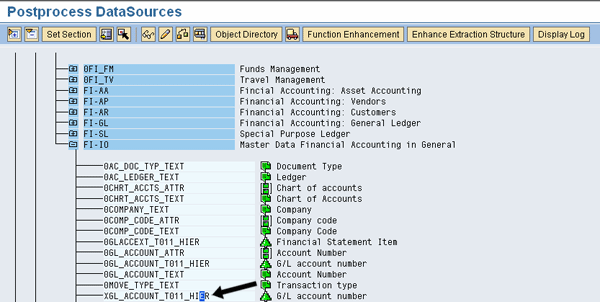
Figure 8
The new DataSource is active as shown by its availability on the list
Step 2. Modify the Function Module
Modify the function module XFBIW_HIERARCHY_TRANSFER_T011 used in table ROOSOURCE with the custom logic to populate the relevant fields (described later in the article). The custom logic is based on the derivation from SET definition tables. Table 1 shows a sample set hierarchy. When a set is created using transaction code GS01 in SAP ECC, the set data (relevant for this hierarchy extraction) is stored in the following tables:
- SETNODE: Contains details about subsets within sets (e.g., in Table 1, Set Name X_X0001_H is the SETNODE under which are subsets).
- SETLINET: Contains a short description of each set line used in the main set. A set line comprises of individual sets grouped under a single set.
- SETLEAF: Contains all the leaves of a subset and line numbers within a subset
- RWSLINE: Contains subnodes or leaves of a subnode along with their line number and sign reversal indicator
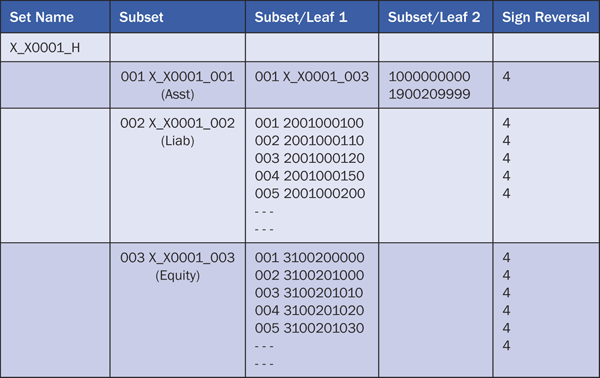
Table 1
Sample hierarchy set structure
The standard set function module GSBH_HIERARCHY_TRANSFER_SETS, which transfers sets-related data into a hierarchy structure format (to an internal table), is called in function module XFBIW_HIERARHCY_TRANSFER_T011. The import and export parameters are mapped the same as in standard code.
Once the EXPORT parameter retrieves the data structure, use this as an input to the custom logic. The logic is based on the parent ID, set name, line ID, set class, subset name (in the tables: SETLEAF, SETNODE, RWSLINE) to populate the sign reversal from table RWSLINE using the field PRTCLASS. If the PRTCLASS for a corresponding set name and line ID has a value of 4, then the sign reversal function is activated with the value X. In this case, I have used the value 4 to indicate the node value or the GL account value to be reversed. You can use your own value depending on the configuration setting for this field.
Below is the step-by-step logic used to retrieve the sign reversal information:
- Find the parent ID from the export parameter structure for the node name.
- Take the parent ID node name and the record node name. Look into table SETLEAF, in which the parent ID node name = SETNAME AND VALSIGN = I AND VALOPTION = EQ, and structure node name = VALFROM.
- If the condition in step B finds a match, then do the condition for the record in structure SETLEAF-SETNAME = RWSLINE-SETNAME AND SETLEAF-LINEID = RWSLINE-LINEID. Then, for the structure node name, update the field value of PLUMI with the value in the field PRTCLASS of the table RWSLINE (PLUMI = RWSLINE-PRTCLASS).
- If the condition in step B fails, then take the parent ID node name and the record node name. Look into table SETNODE, in which parent ID node name = SETNAME AND SETCLASS = 0000.
- If step D finds a match, then do the condition for the record in the structure SETNODE-SETNAME = RWSLINE-SETNAME AND SETNODE-LINEID = RWSLINE-LINEID AND SETNODE-SETCLASS = RWSLINE-SETCLASS. Then, for the structure node name, update the field value of PLUMI with the value in the field PRTCLASS of the table RWSLINE (PLUMI = RWSLINE-PRTCLASS).
- After updating the PRTCLASS into the structure, if the value of the field is 4, then convert it to X to mimic the standard hierarchy DataSource.
Note: Structure refers to the DataPacket that contains the data from the set structure.
Unlike the standard FSV DataSource, the set does not have the GL account values compounded with the chart of accounts. The logic to compound the chart of accounts and replace the InfoObject value can be performed as per SAP Note 134975 (BW hierarchy extraction of FI-SL sets). This note correction instruction provides the details of the logic and also information about the extractor using sets. Now the DataSource is ready for SAP NetWeaver BW extraction of the hierarchy.
Step 3. Replicate the DataSource
Replicate the DataSource in SAP NetWeaver BW using transaction code RSDS. After replicating the DataSource, create transfer rules and the mappings in transaction RSA1 (Figure 9). The InfoObject is ready for the set extraction into SAP NetWeaver BW.

Figure 9
Dataflow in SAP NetWeaver BW
Sets are created using transaction code GS01 in SAP ECC. I am not going to show how to create sets but will discuss the use of a set for SAP NetWeaver BW extraction. The functional team provides the information on the set to be used. Go to transaction code GS03, enter the Set Name (Figure 10), and click the hierarchy maintenance icon. In my example, I am looking at the set YSI_GL_ACCOUNTS.

Figure 10
Enter the Set Name
The set definition is displayed in a hierarchical fashion (Figure 11).
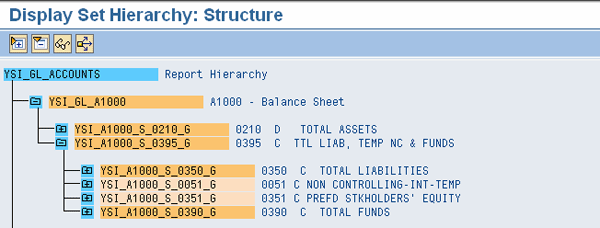
Figure 11
Set hierarchy structure display with all the text nodes and GL accounts for a balance sheet report
To display the set with the details about subordinate sets and sign reversal information, press F3 or go back to transaction GS03. Enter the set name and press Enter, which takes you to the subordinate sets (Figure 12). Double-click each set line to display the details. I am using the field FGr, which is used for the sign reversal activation for a particular line, node, or account. If any of the set lines has a value of 4, then that line is marked as X in the actual hierarchy.
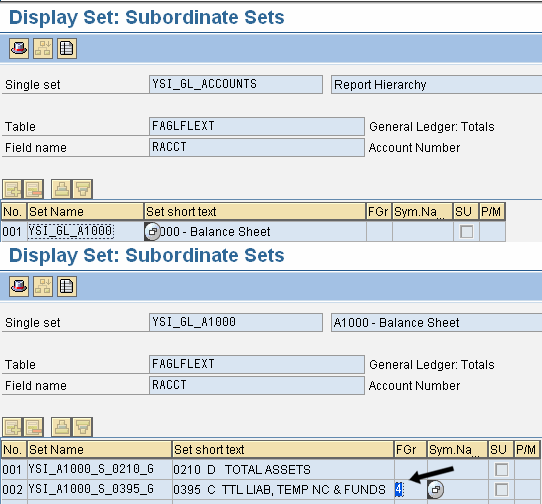
Figure 12
Double-click the line YSI_GL_A1000 to get to the additional sets under this node
On the SAP NetWeaver BW side, look for this set in the InfoPackage selection for the hierarchy extraction (Figure 13).
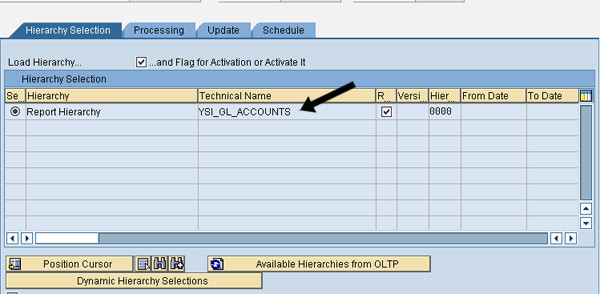
Figure 13
Set hierarchy selection in the InfoPackage for BW extraction
The hierarchy in SAP NetWeaver BW looks like a standard FSV with the text nodes, GL accounts, node ID, chart of accounts compounding to the GL account, GL account text description, and sign reversal functionality (Figure 14).
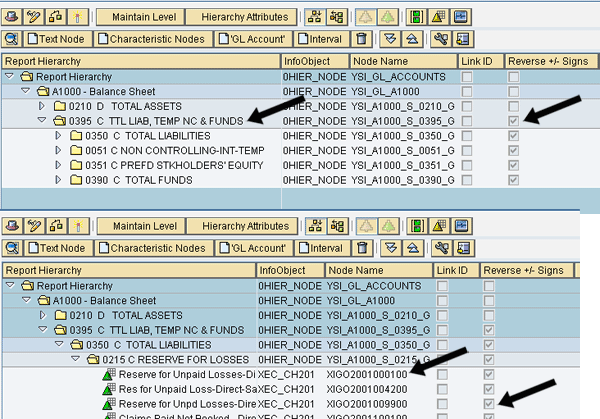
Figure 14
GL account hierarchies with Text Node, Node Name, account description, and reverse sign
It looks exactly like an FSV. The only difference is that you extract it out of a set.
Step 4. Set SAP NetWeaver BW Reporting Requirements
As you have just extracted a GL account hierarchy based on a set in SAP ECC, the next step is to satisfy the SAP NetWeaver BW reporting needs. In the standard FSV, cash accounts are organized in two different nodes in different hierarchical levels under ASSETS (Figure 15).
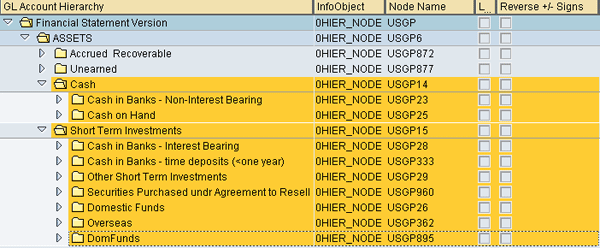
Figure 15
Cash accounts under ASSETS are at two different nodes under different hierarchy levels
The Reserve for Unpaid Losses & Loss Adjustments under LIABILITIES is structured in different nodes (Figure 16) under different categories such as Losses, Unpaid Losses, and Loss Adjustment Exp (loss expenses), which does not satisfy reporting needs.

Figure 16
Liability accounts in a different hierarchical format
For balance sheet reporting, the requirement is to have all cash accounts under a single node with different descriptions (Figures 17 and 18). For liability accounts, the requirement is to have all the Reserve for Unpaid Losses & Loss Adjustments nodes under two different nodes as losses and losses expenses (Figures 19 and 20) instead of multiple nodes. With the standard FSV, this reporting requirement cannot be accomplished considering that different groups of the organization use the same FSV. As mentioned earlier, you can achieve this requirement with the link node ID but this requires ongoing maintenance on the SAP NetWeaver BW side. However, with this set concept the hierarchies can be restructured any way based on the reporting requirements. You can reuse the same set of accounts in a different structure for any additional reporting needs.
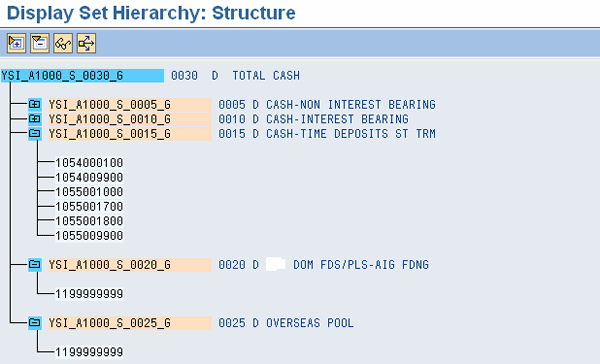
Figure 17
Set structure of cash accounts in SAP ECC
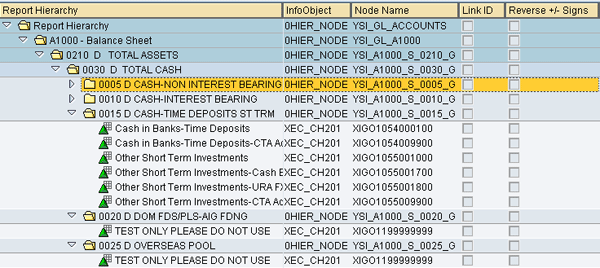
Figure 18
All cash accounts under a single parent node and restructured to satisfy the reporting needs showing set in SAP ECC and hierarchy in SAP NetWeaver BW

Figure 19
Set structure of losses and loss expenses accounts

Figure 20
Reserve for loss accounts are divided into losses and expenses and restructured under liabilities for the reporting needs showing set in SAP ECC and hierarchy in SAP NetWeaver BW
You can execute a simple report based on this set hierarchy on a GL account using the transactional data available in SAP NetWeaver BW. Create a balance sheet report in the BEx Query designer to display assets and liabilities having the GL account in rows and some key figures to display the result set. Execute the report either in BEx Analyzer or in SAP NetWeaver Portal, depending on your reporting tools. The report then displays the results for cash accounts (Figure 21) and liability accounts (Figure 22) with the set hierarchy.

Figure 21
Run the report and expand the assets node to display the cash accounts
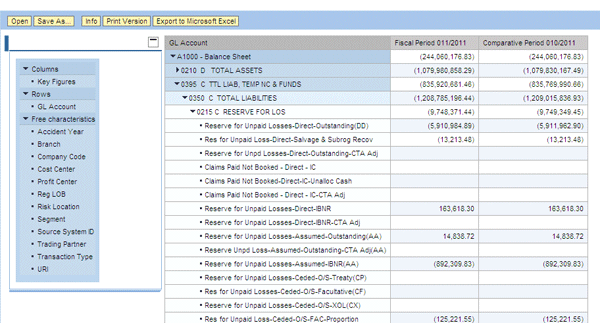
Figure 22
Expand the liability node to display reserve for losses and expenses in two different levels
You can reuse GL accounts in a set, which is not possible in a standard FSV (Figure 22). This gives a one-stop place for the process team to own and maintain all sets with no issues resulting from multiple hierarchies. The functional team has the ability to upload the sets from a file into a different environment and perform modifications accordingly, rather than to enter each manually (using the link node ID concept). On the SAP NetWeaver BW side, all you need to do is to extract the hierarchy on a daily basis. Depending on the reporting requirements, you can use a different node in the set on the report and make changes accordingly.

Figure 23
Balance sheet accounts reused in nodes for two different reports
Balachandra Prathi
Balachandra Prathi is an SAP NetWeaver BW and SAP BusinessObjects consultant with more than seven years of full life cycle implementation experience in different business areas. For the last few years, he has worked in the financial services area.
You may contact the author at chanduinau@yahoo.com.
If you have comments about this article or publication, or would like to submit an article idea, please contact the editor.


