Manager
Learn how to set up a test automation framework in SAP Solution Manager 7.1 and integrate a third-party test tool, such as HP QuickTest Professional. After that, see how to prepare a managed system for test automation.
Key Concept
The test automation framework allows you to create and execute automated test cases with third-party tools within the business process context. This means that test cases are assigned directly to the business process or process steps of the business process hierarchy in SAP Solution Manager. It is integrated with the different test management capabilities, and almost all the test tools and functions are provided in SAP Solution Manager 7.1, which supports the entire testing process.
For any business to enable competitive advantage, it is essential to test a business application before the actual release. In doing so, the application has to perform equally well in every platform and scenario. The solution to this lies in adapting a test automation framework that helps businesses move from manual to automated testing in a convenient, reliable, and cost-efficient way for SAP and non-SAP applications. With it, automated testing is an evolving field that draws maximum benefits with minimum effort, offers a capability to increase test coverage, and increases the effectiveness of resources, reliability of the applications, and return on investment.
You can set up an automated test by integrating HP QuickTest Professional (QTP) via the extended Computer Aided Test Tool (eCATT) infrastructure in SAP Solution Manager 7.1 for functional tests that cover the whole testing cycle of end-to-end business processes. In this way, the test automation framework uses the system data already available in the system landscape documentation in Solution Manager.
For the process shown below, you need the following prerequisites:
- Solution Manager 7.1 Support Package 1
- QTP, including SAP Add-In
- Managed systems considered for testing available in Solution Manager landscape management
- SAP GUI 7.20
- Business process documentation
To set up a test automation framework, you need to perform these six steps:
- Step 1. Configure eCATT in Solution Manager
- Step 2. Install QTP on your client
- Step 3. Register the third-party test tool in Solution Manager
- Step 4. Define a test case type for automated tests in Solution Manager
- Step 5. Create business partners
- Step 6. Prepare the managed system for test automation
Step 1. Configure eCATT in Solution Manager
The following steps are required to be performed in Solution Manager because when executing the automated test using QTP or eCATT, the system uses the eCATT functionality. I am assuming that all prerequisites are met and SAP GUI is installed on the front-end computer.
Enable eCATT Scripts
To allow execution of eCATT scripting, log in to Solution Manager with your user name and password. Use transaction code SCC4 and press Enter. The Display View Clients Overview screen opens (Figure 1). Select the Solution Manager client number and double-click it.

Figure 1
Double-click the client number
The Change View Clients Details screen appears to make sure that you are in display mode. Scroll down at CATT and eCATT Restrictions and select eCATT and CATT Allowed (Figure 2). Click the save icon. By saving the changes, you have enabled eCATT scripting. At the bottom of the screen you see a message that the data was saved. Click the Exit button to go back to the user menu screen.
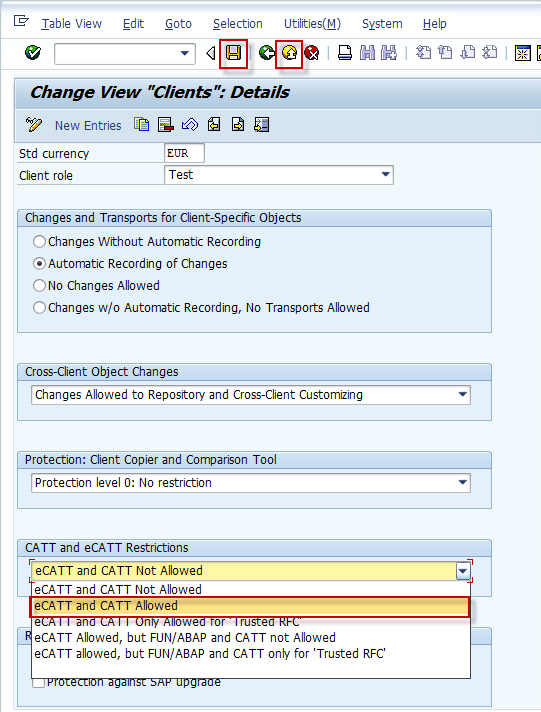
Figure 2
Allow eCATT and CATT scripts
Once the eCATT script is enabled, SAP GUI scripting should be activated on the front-end computer. To enable scripting in SAP GUI, from the SAP toolbar click the customize local layout icon and select Options… (Figure 3).

Figure 3
Customize the local layout
This brings up the SAP GUI Options window (Figure 4). In the Accessibility & Scripting node, select Scripting. Then under User Settings, select the Enable scripting check box. Click the Apply button and then click the OK button.

Figure 4
Enable SAP GUI scripting
Note
Do not select Notify when a script attaches to SAP GUI or Notify when a script opens a connection. It is recommended that notifications are disabled before starting SAP GUI because in accessibility scenarios SAP GUI scripting is used.
Generate a User and Assign Roles
To generate a user, use transaction code SE38 and press Enter. The initial screen of the ABAP Editor appears (Figure 5). In the Program field, enter ECATT_GENERATE_ET_USER and click the execute icon.
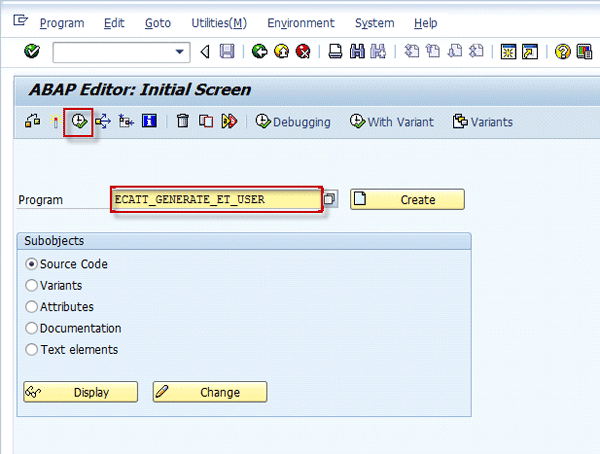
Figure 5
Execute the program
On the next screen, the user ECATT_ET_USR is created automatically (Figure 6).

Figure 6
User ECATT_ET_USR is generated
Assign Roles to the User
To assign the role to the user, use transaction SU01 and press Enter. On the next screen, enter a user name and click the change icon (Figure 7).

Figure 7
Enter a user name
On the Maintain User screen, under Role Assignments, enter the Role name SAP_ECET and press Enter so the role is assigned to this user (Figure 8).

Figure 8
Assign a role to the user
Note
Make sure that status of the SAP_ECET role is green.
Step 2. Install QTP on Your Client
To install the QTP client on your computer, first download the complete installer package from SAP Service Marketplace by going to https://service.sap.com/swdc. Now that the required installer package is downloaded, double-click the Setup.exe file to start the installation wizard process. The setup window opens (Figure 9). Click QuickTest Professional Setup to start.

Figure 9
Set up QTP
On the next window, the setup finds the prerequisite programs that must be installed before you can install HP QuickTest Professional 11.00 (Figure 10). Click OK to begin installing the listed software required.
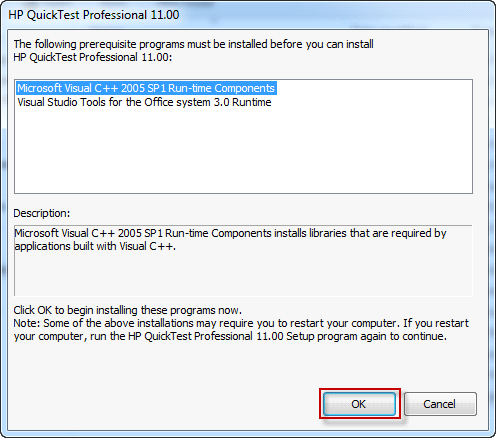
Figure 10
Install prerequisite programs
Then accept a license agreement for Microsoft Visual C++2005 by clicking OK (Figure 11). Perform the same step to install other prerequisite programs by following the on-screen instructions.

Figure 11
Accept the license agreement
Once you have installed all the listed prerequisite software, the installer opens (Figure 12). Click Next to continue.

Figure 12
QTP installer
Then the license agreement screen opens. Read and accept the terms of the license agreement by clicking I Agree (Figure 13). Once you accept the agreement than click Next to continue.
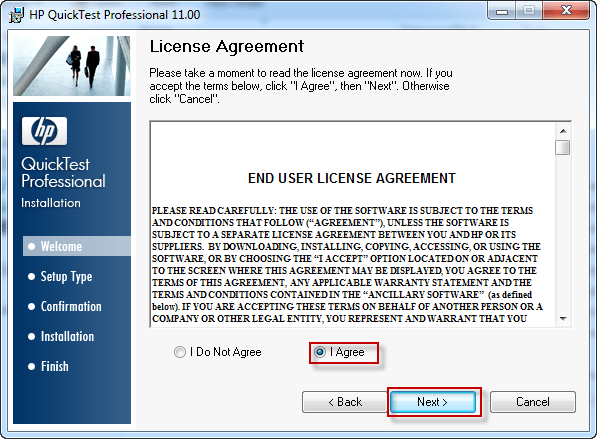
Figure 13
Accept the license agreement
The Customer Information screen appears (Figure 14). Enter your name and the name of your company and click Next to continue.

Figure 14
Enter customer information
At the Custom Setup screen, select the QuickTest add-ins (e.g., Java Add-in and SAP Solution Add-in) you want to install (Figure 15). When you select SAP Solution Add-in, first expand it and make sure that the subfeature SAP eCATT integration is also selected. Once you select the add-ins, click Next to continue.

Figure 15
Select the SAP Add-in
In the Select Installation Folder screen, choose the location you want to install QTP and click Next to continue (Figure 16).

Figure 16
Select the installation folder
Once you select the installation folder, the Confirm Installation screen opens (Figure 17). Click Next to confirm and continue.

Figure 17
Confirm the installation
The QTP installation process begins. Once it is done, the completion screen opens and you click Finish to exit (Figure 18).

Figure 18
Installation completion
The additional installation requirements appear (Figure 19). Select the required installation or configuration of listed software to work with QTP. Click Run to install or configure your selections.

Figure 19
Additional installation requirements
Since the License Installation Wizard was selected, the license type screen opens (Figure 20). Select the License Type and click Next to continue.

Figure 20
Select the license type
Since the Seat license was selected the welcome screen opens (Figure 21). If you already have the license key, click Next to continue.

Figure 21
License installation welcome screen
The license key screen opens. Enter the license key that you have in the box and click Next (Figure 22).
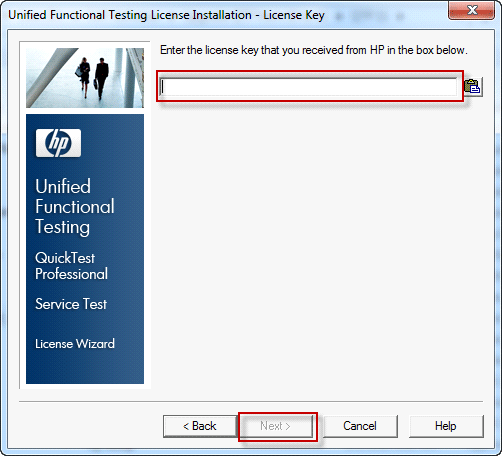
Figure 22
Enter the license key
The install summary screen opens (Figure 23). Click Next to continue.

Figure 23
Click Next
The finish screen opens stating the license key was successfully installed (Figure 24). Click Finish to exit.
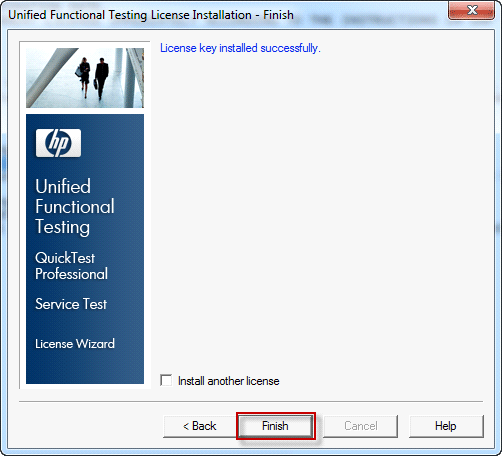
Figure 24
Confirm the license is installed
The installation of additional requirements continues. Once installation finishes, the screen reopens with a check mark next to the options that were successfully installed or configured (Figure 25). Click Close to exit.

Figure 25
Additional installation requirements completed
Install Patch QTPSAP 00042
Once you install QTP, you need to install patch QTPSAP 00042 because the license key only works in conjunction with this patch. Patch QTPSAP 00042 supports the QTP4SAP license for Solution Manager users. To install, first download the complete RAR file from SAP Service Marketplace. Then double-click the Setup.exe file, which starts the installation wizard process. The Setup window opens. To start, click the Install button (Figure 26).

Figure 26
Install QTPSAP 00042
The setup installer opens (Figure 27). Click Next to continue.

Figure 27
Click Next
The Confirm Installation screen opens (Figure 28). Click Next to confirm.

Figure 28
Confirm the installation
The installation of QTP begins. Once it is done, the completion screen opens (Figure 29). Click Finish to exit.

Figure 29
Installation completed
Configure QTP
Once QTP is installed in your computer, launch the QTP client. Go to Tools and select Options (Figure 30).
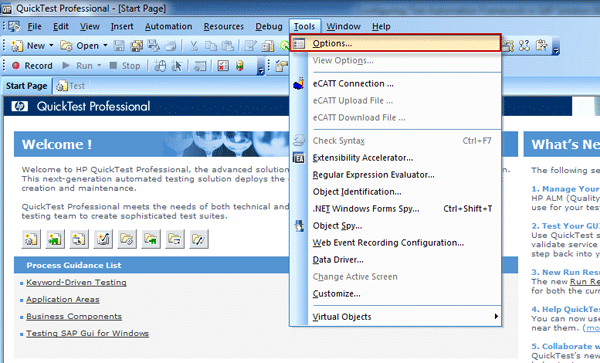
Figure 30
Configure QTP
The Options window opens (Figure 31). On the General node, make sure that you select the Automatically parameterize steps using Test Parameters check box.
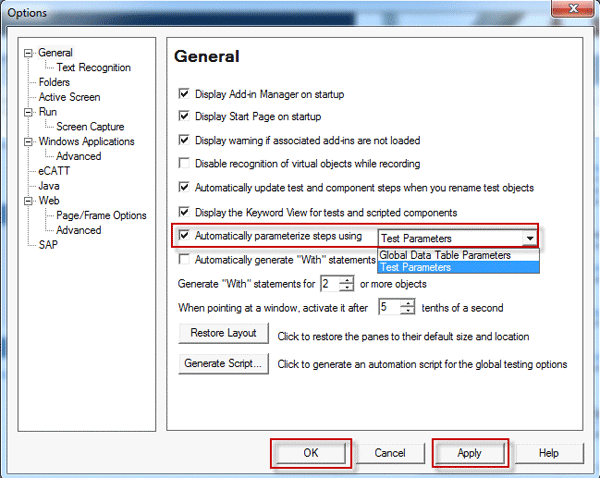
Figure 31
Parameterizing steps using test parameters automatically
Select the Run option on the left, and then select the Allow other HP products to run tests and components check box (Figure 32).

Figure 32
Enable other HP products to run tests and components
Step 3. Register the Third-Party Test Tool in Solution Manager
To create automatic test cases, you need to register a third-party tool in the Test Management Work Center. The Test Management Work Center is the central place for all functions for creating, managing, preparing, evaluating, and executing tests. To register the third-party test tool, go to the Test Management in Work Center tab by calling transaction code SOLMAN_WORKCENTER (Figure 33).
Note
For end user roles for test management, refer to SAP Solution Manager Security Guide. Use
https://service.sap.com/instguides and follow menu path SAP Components > SAP Solution Manager > Release 7.1 > Security Guide SAP Solution Manager > End-User Roles for Test Management.

Figure 33
Test Management Work Center
In Test Management, go to the Administration view and click the Register 3rd Party Test Tool link (Figure 34).

Figure 34
Register the third-party test tool
On the next screen, add the external test tool by clicking the New Entries button (Figure 35).

Figure 35
Add the external test tool
Enter all the required data of the external test tool, and make sure that you select W/o Password and W/o Database (Figure 36). The required data to be entered always depends on the external test tool and its version.

Figure 36
Add external test tools
Once you fill out all the required data and click the save icon, the Prompt for Workbench request dialog box appears (Figure 37). Click the create icon.
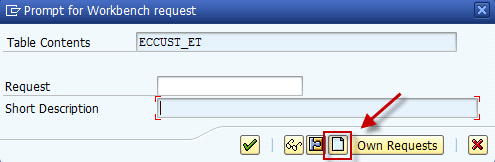
Figure 37
Workbench request
The Create Request window opens (Figure 38). Enter a short description and click the save icon.
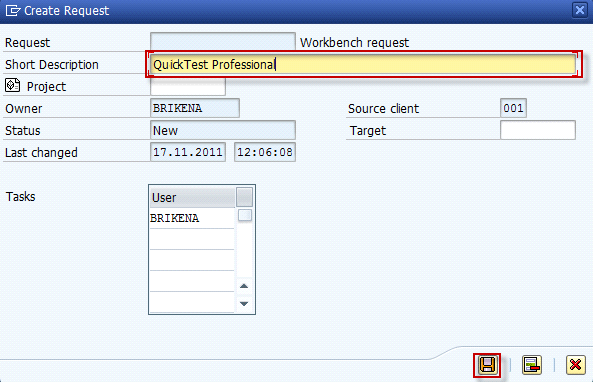
Figure 38
Create the request
You return to the Prompt for Workbench request window with the information automatically filled (Figure 39).
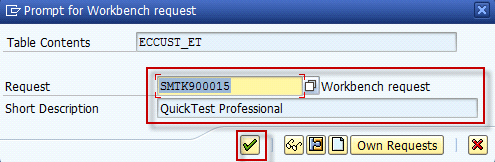
Figure 39
Request created
Click the green check mark icon and the external test tool is registered (Figure 40). Click the back icon to go back to the Test Management Work Center.

Figure 40
External test tool registered
Step 4. Define a Test Case Type for Automated Tests in Solution Manager
To register the third-party test tool, go to the Test Management in Work Center tab by calling transaction SOLMAN_WORKCENTER. In Test Management, go to the Administration view and click the Test Case Types Settings link (Figure 41).
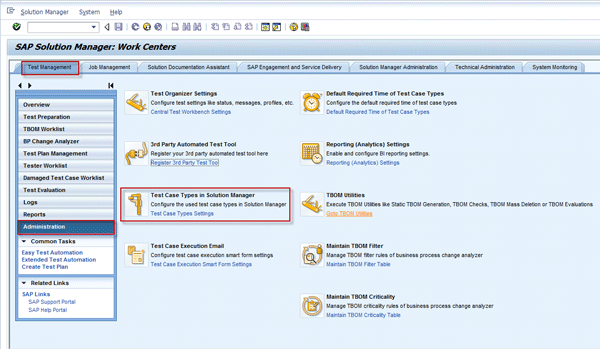
Figure 41
Test case type settings
On the next screen, activate the test configuration third-party test tool (Figure 42). In Solution Manager 7.1, you can now activate only those entries that are applicable for your company.

Figure 42
Activate test case types in Solution Manager
Activating the test case type means that on the Test Cases tab in the configuration screen (transaction SOLAR02), only the Test Case Types that are activated are shown (Figure 43).

Figure 43
The test case type is activated
Step 5. Create Business Partners
You need to set up a business partner for each user who is involved in error message handling for damaged test cases. The possibility to auto-generate business partners for users is provided in Solution Manager and managed systems connected to Solution Manager.
To create business partners, use transaction BP_GEN. In the resulting screen, click the Add button (Figure 44).
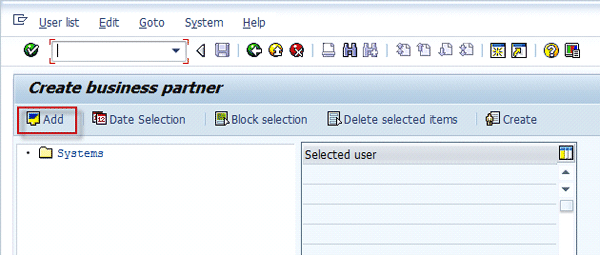
Figure 44
Create the business partner
In the next screen, select the system for which you want to generate a business partner, and then click the green check mark icon (Figure 45).
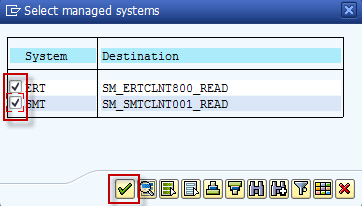
Figure 45
Select systems for business partner creation
It takes you back to the business partner creation screen, and under Systems you now have the selected systems. To select a system user, expand a system and double-click the user that you want for business partner generation (Figure 46).

Figure 46
Systems user for business partner generation
On the right of the screen, you see the user. Click the appropriate user to bring up the screen in Figure 47. Click the Create button to confirm the creation of business partners.

Figure 47
Confirm business partner generation
The business partner creation process then starts. Once the process is done, at the bottom of the screen you get a message that business partners that have been successfully created. Repeat the same process for all users for whom you want to generate a business partner. For maintaining business partners, use transaction BP for any changes.
Step 6. Prepare the Managed System for Test Automation
The following steps must be performed in your managed SAP ERP Central Component (SAP ECC) system to run automated tests. Make sure that the latest Solution Tools Plug-in (ST-PI) add-on is installed on your managed system so the Business Process Change Analyzer can work. Also, all managed systems are required to have kernel version 4.6x or 7.xx to use a dynamic technical bill of materials (TBOM) recording.
Enable eCATT Scripts
To allow the execution of eCATT scripting, log in to your managed SAP ECC system with your user name and password. Use transaction SCC4 and press Enter. You then perform a similar process to what I showed you before. In the screen that opens, select the SAP ECC client number and double-click the client number (e.g., 800) (Figure 48).

Figure 48
Change view clients overview
In the resulting screen, make sure you are in display mode and scroll down to CATT and eCATT Restrictions and select the eCATT and CATT Allowed option (Figure 49). Click the save icon. By saving the changes, you have enabled eCATT scripting. At the bottom of the screen, you see a message that the data was saved. Click the Exit button to go back to the user menu screen.

Figure 49
Allow eCATT and CATT scripts
Once the eCATT script is enabled, SAP GUI scripting should be activated on the front-end computer. To enable scripting in SAP GUI, from the SAP Toolbar click the customize local layout icon and select Options… (Figure 50).

Figure 50
Customize the local layout
In the window that appears, click the Accessibility & Scripting folder and then click the Scripting option (Figure 51). Under User Settings, select the Enable scripting check box and click the Apply button. Then click the OK button.

Figure 51
Enable SAP GUI scripting
Note
Do not select Notify when a script attaches to SAP GUI or Notify when a script opens a connection. Notifications should be disabled before starting SAP GUI.
Generate a User and Assign Roles
To generate a user, use transaction SE38 in SAP ECC and press Enter. In the resulting screen, enter the Program ECATT_GENERATE_ET_USER and click on the execute icon (Figure 52).

Figure 52
Execute the program
On the program ECATT_GENERATE_ET_USER screen, the user ECATT_ET_USR is created (Figure 53).

Figure 53
User ECATT_ET_USR is generated
To assign the role to the user, in SAP ECC use transaction SU01 and press Enter. On the next screen, click the change icon (Figure 54).

Figure 54
Enter the user
In the next screen, click the Roles tab. Under Role Assignments, enter the role name SAP_ECET and press Enter (Figure 55). Now the role SAP_ECET is assigned to this user. Make sure that the status of the SAP_ECET role is green.

Figure 55
Assign the role to the user
Brikena Berisha
Brikena Berisha graduated with a degree in finance and international business from California State University of San Bernardino in 2006. She has more than five years of consulting experience in project management, including project implementations and upgrades, testing with SAP Solution Manager 7.0 and 7.1, SAP Quality Center by HP, QTP by HP, and SAP TAO. Brikena is a consultant at CoreALM Consulting Company, specializing in SAP consulting, in particular application lifecycle management, SAP solutions, and third-party solutions that are integrated with SAP Solution Manager.
To contact the editor, click here.
You may contact the author at brikena.berisha@corealm.com.
If you have comments about this article or publication, or would like to submit an article idea, please contact the editor.