Understand the technical architectural design, setup, and implementation of SAP Fiori in the SAP GRC environment as it relates to SAP Access Control, SAP Risk Management, and SAP Process Control applications. SAP Fiori provides a friendlier and intuitive user interface to access these SAP applications.
Key Concept
SAP Fiori for SAP solutions for GRC is a product that allows you to personalize and simplify the user experience (UX) for your SAP GRC applications. SAP Fiori offers a role-based, consumer-level user experience across different functional tasks and devices, including mobile devices.
SAP Fiori provides a user-friendly and intuitive interface to access some capabilities of the SAP GRC products—SAP Access Control, SAP Risk Management, and SAP Process Control. This is in line with SAP’s strategy for improving the user experience especially in this digital age with the use of mobile devices on the increase.
The SAP Fiori launchpad is the basis of all SAP Fiori user interfaces (UIs), and it provides fundamental functions for SAP Fiori apps such as logon, surface sizing, navigation between apps, and role-based app catalogs. End users access the SAP Fiori apps from the SAP Fiori launchpad. The specific UIs for the apps are delivered as SAP GRC application-specific add-on products that must be additionally installed on the front-end server.
I discuss the following topics:
- Understanding the technical components and prerequisites for implementation of SAP Fiori for SAP GRC solutions
- Activation of Open Data Protocol (OData) services
- SAP Fiori authorization concept
- Related IMG customization activities
- The look and feel of the SAP Fiori applications for the SAP GRC solution
- Tips, tricks, and recommendations
Understanding the Technical Components and Prerequisites for Implementation of SAP Fiori for SAP GRC Solutions
The SAP Fiori (SAP Fiori 1.0 for SAP solutions for GRC) functionality for SAP Access Control, SAP Process Control, and SAP Risk Management is delivered via the ABAP Add-On UIGRC001 shown in
Figure 1. You access it via menu path SAP Easy Access > Status > Product Version.

Figure 1
The system status screen showing SAP Fiori 1.0 for SAP solutions for the GRC software component
Note
The Add-On UIGRC001 is not specific to SAP Access Control. It contains
content for SAP Risk Management and SAP Process Control as well.
A typical SAP Fiori landscape for SAP GRC applications consists of the following components (
Figure 2):
Client: The client end provides the run-time environment to run SAP Fiori apps such as browsers and it must support HTML5.
ABAP front-end server: The ABAP front-end server is where the infrastructure components to provide an SAP Fiori application-specific UI for the client and to communicate with the SAP GRC back-end system are installed. The UI components and the gateway are based on SAP NetWeaver ABAP. The central UI component is a framework that provides the common infrastructure for all SAP Fiori apps. SAP Gateway is an important component that provides the communication path between the client and the SAP GRC back end based on OData services. It provides back-end data and functions processed via HTTPS requests for OData services.
ABAP back-end server: The ABAP back-end server is where the SAP GRC system components that provide the business logic and the back-end data, including users, roles, and authorizations, are installed.

Figure 2
Components of the SAP Fiori system landscape for SAP GRC solutions
SAP Fiori applications for SAP Access Control, SAP Process Control, and SAP Risk Management are listed below.
SAP Access Control:
- Access Approver
- Access Control User
- Access Risk
- Check Request Status
- Compliance Approver
- Mitigation Control
- Request Access
- Request Access for Others
- Role
SAP Risk Management
- Enterprise Risk Report: Risks, Heat Map, and World Map
SAP Process Control
Note
The SAP Process Control Fiori app is relatively new and is only
available from SAP GRC 10.1 Support Package 14. Furthermore, the minimum
UI level for product version SAP Fiori 1.0 for Process Control is UI
Add-On 2.0 for SAP NetWeaver Support Package 04 (or its equivalent
Support Packages of higher product versions [i.e., SAP NetWeaver 7.50]).
For more information about SAP Fiori applications, consult the SAP
Fiori apps reference library at
https://fioriappslibrary.hana.ondemand.com/sap/fix/externalViewer/.
Activation of OData Services
Each SAP Fiori app consists of front-end components (such as the UI) and back-end components (such as the OData service). The transactional apps, which are updating data in the SAP GRC system, use OData services as the communication channel. These OData services need to be activated and associated with a system alias for the corresponding SAP Fiori application to work. To assign a system alias to an external technical service and consequently activate the service, follow menu path SPRO > SAP Reference IMG > SAP NetWeaver > Gateway > OData Channel Administration > General Settings > Activate and Maintain Services. Alternatively, you can use transaction code /IWFND/MAINT_SERVICE. The system displays the screen in
Figure 3.
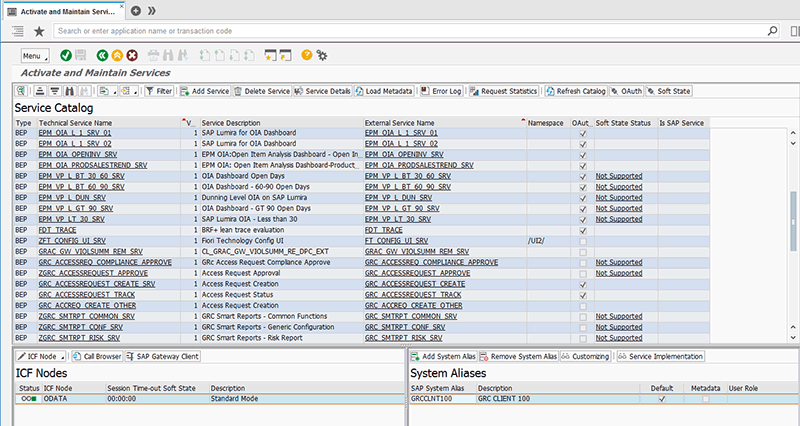
Figure 3
The initial screen for the maintenance of OData services
Select the service you need to activate as shown in
Figure 4.

Figure 4
The initial screen to maintain a system alias
Click the Add System Alias button and
Figure 5 appears.

Figure 5
The initial screen for the assignment of a system alias to the OData service
Click the New Entries button. In the screen that appears, maintain the applicable fields such as Service Document Identifier and SAP System Alias, as shown in
Figure 6.

Figure 6
Assignment of a system alias to the OData service
Click the save icon.
Figure 7 appears with a status message.

Figure 7
Confirmation for the saving of the system alias maintenance activity
Click the back icon. In the next screen (
Figure 8), click the small triangle in the ICF Node button.
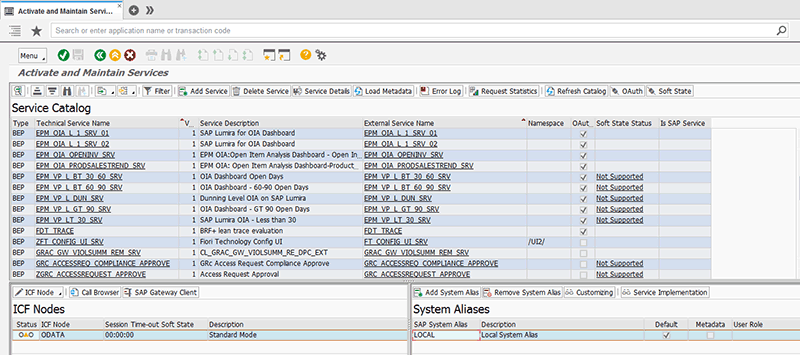
Figure 8
The initial screen for the activation of the ICF node
From the drop-down list of menu options in
Figure 9, click the Activate option. (The OData service calls a corresponding ICF service that needs to be activated in order for the service to launch in the browser/Fiori.)
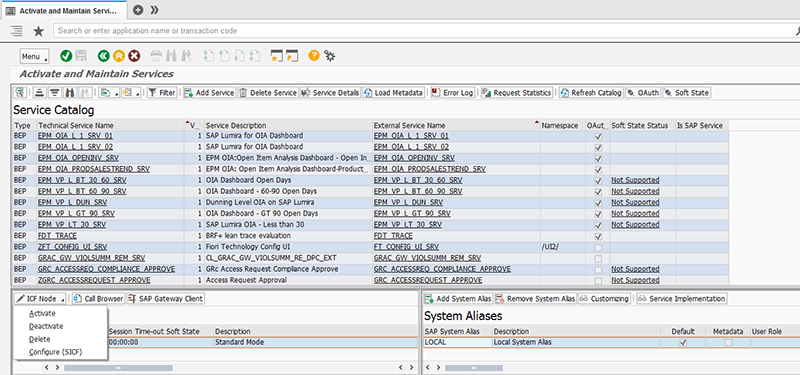
Figure 9
Menu option to activate the ICF node for the OData service
The status message in
Figure 10 appears.

Figure 10
Status message for the activation of the OData service
Which OData services to activate depends on the SAP Fiori application that you want to deploy. The OData services section under the Configuration tab in the SAP Fiori app library details the corresponding services for each application. The SAP Fiori app library can be accessed via
https://fioriappslibrary.hana.ondemand.com/sap/fix/externalViewer/#.
SAP Fiori Authorization Concept
Knowledge of catalogs and groups is central to understanding the SAP Fiori authorization concept. Hence, it is important that I explain these concepts first.
Catalog: This is a set of apps that you make available for one role. Depending on the role and the catalog assigned to the role, the user can browse through the catalog, choose apps from this catalog, and add them to the entry page of the SAP Fiori launchpad.
Group: This is a subset of the catalog that contains the apps visible on the SAP Fiori launchpad entry page. Which tiles are displayed on a user’s entry page depends on the group assigned to the user’s role. In addition, the user can personalize the entry page by adding or removing apps to pre-delivered groups or self-defined groups.
Roles (transaction code PFCG): Contains references to catalogs and groups and provides users with access to the apps in these groups and catalogs.
You can access the SAP Fiori administration interface where catalogs and groups are maintained by executing transaction code /N/UI2/FLPD_CUST in the SAP command line or via the URL
https://<servername>:<Port>/sap/bc/ui5_ui5/sap/arsrvc_upb_admn/main.html?scope=CUST#.
The system displays the screen in
Figure 11 showing the catalogs (with GRC used as the filtering criterion).
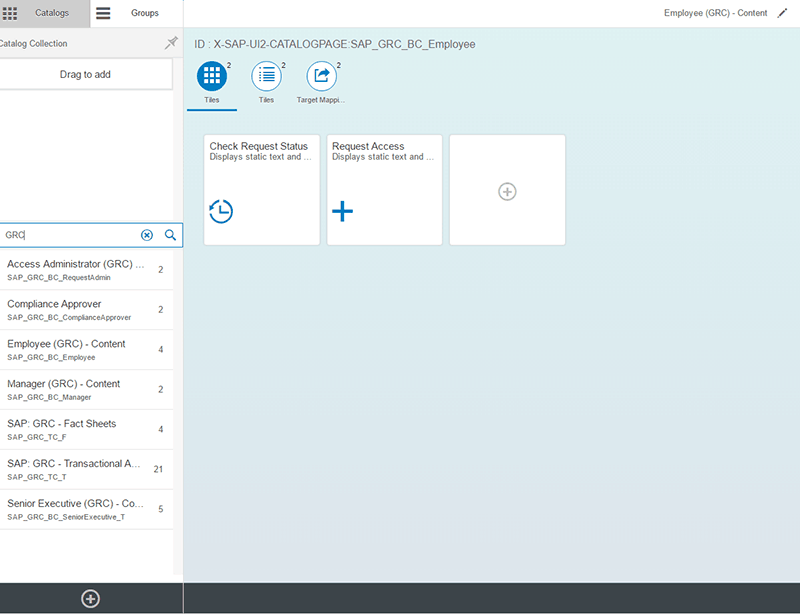
Figure 11
Administrative SAP Fiori maintenance screen for catalogs
Click the Groups section and
Figure 12 appears showing the Groups (with GRC defined as the filtering criteria).

Figure 12
Administrative SAP Fiori maintenance screen for Groups
Typically, an SAP Fiori role contains the following authorizations:
- Fiori Groups
- Catalogs that contain the tiles in the Groups
- Authorizations to render the SAP Fiori launchpad
- Authorizations for OData services for each tile or app
- Back-end authorizations for functionality executed by each tile or app
SAP delivers standard roles that can be copied to the customer’s namespace and modified as required. The following SAP PFCG roles are examples of the delivered SAP Fiori for SAP GRC solutions roles:
- SAP_GRC_BCR_COMPLIANCE_APPRVR: Compliance Approver (GRC) - Apps
- SAP_GRC_BCR_EMPLOYEE: Employee (GRC) - Apps
- SAP_GRC_BCR_MANAGER: Manager (GRC) - Apps
- SAP_GRC_BCR_REQUESTADMIN: Request Administrator (GRC) - Apps
- SAP_GRC_BCR_SENIOREXECUTIVE_T: Senior Executive (GRC) – Apps
To use SAP Fiori, a set of minimal authorizations needs to be granted to a user in addition to the application-specific roles. SAP delivers the standard role SAP_UI2_USER_700. It contains the minimal authorizations as shown in
Figures 13 and
14. These minimal authorizations are accessible via transaction code PFCG. This role typically gives access to transaction code /UI2/FLP (used to launch the SAP Fiori application) and baseline OData services—INTEROP, LAUNCHPAD, and PAGE_BUILDER_PERS.

Figure 13
Menu details for the standard base role for the SAP Fiori application

Figure 14
Authorization objects details for the standard base role for the SAP Fiori application
Note
If you are using the default role (or a copied version to customer
namespace), ensure that you add the following additional authorization
objects to the SAP Fiori genenric end-user role: S_PB_CHIP and
/UI2/CHIP/. Otherwise, the tiles do not show up in the SAP Fiori
launchpad due to missing authorizations.
Execute transaction code PFCG. In the screen that appears (
Figure 15), enter a name for the role.

Figure 15
The initial screen for the creation of a role
Click the Single Role button. In the screen that appears, provide a description for the role as shown in
Figure 16.

Figure 16
Definition of the role description
Click the Menu tab, and in the pop-up screen (
Figure 17), click the Yes button.

Figure 17
Dialog box for role save confirmation
In the next screeen (
Figure 18), click the small triangle in the Add Transaction field to display a drop-down list of options (
Figure 19). Click the SAP Fiori Tile Group option.
![]()

Figure 18
The initial screen for menu maintenance

Figure 19
Menu options for role menu maintenance
In the screen that appears, use the input help option (F4) to select the Group ID you want to add to the role as shown in
Figure 20.

Figure 20
Addition of an SAP Group to the role menu
Click the green checkmark icon.
Figure 21 appears.

Figure 21
Confirmation that the SAP Fiori group is added to the role menu
Click the drop-down arrow by the SAP Fiori Tile Group.
Figure 22 appears.

Figure 22
The initial screen to add authorizations to a role menu
Click the SAP Fiori Tile Catalog option. In the next screen (
Figure 23), click the SAP Fiori tile catalog you want to add to the role using the input help (F4). The catalog is a set of apps that you make available for one role. Depending on the role and the catalog assigned to the role, the user can browse through the catalog, choose apps from this catalog, and add them to the entry page of the SAP Fiori launchpad.

Figure 23
Addition of an SAP Fiori tile catalog to the role menu
Click the green checkmark icon, and in the next screen (
Figure 24), click the SAP Fiori Tile Catalog drop-down triangle.

Figure 24
Confirmation of the addition of the SAP Fiori tile catalog to the role menu
This action displays the screen in
Figure 25. Click the Authorization Default option. (This option provides authorization to access the OData service to be able to launch the tile in the Fiori page.)
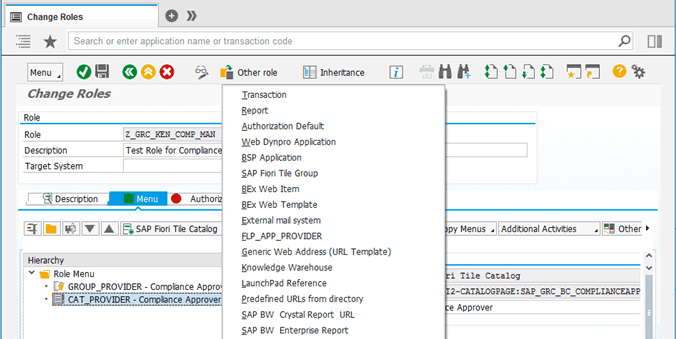
Figure 25
The initial screen to add authorizations to the role menu
After you click this option,
Figure 26 appears.

Figure 26
The initial screen to add an authorization default option
In the Authorization Default field, change the option Transaction to TADIR Service as shown in
Figure 27.

Figure 27
The initial screen to add the TADIR Service authorization default type
Change the Obj. Type value of WDYA Web Dynpro Application to IWSG SAP Gateway: Service Groups Metadata as shown in
Figure 28.

Figure 28
The initial screen for the definition of an object type for the TADIR Service authorization default
Click the first row under the TADIR Service column and use the input help (F4) to display the allowed options. Select the service you want to add to the role as shown in
Figure 29.
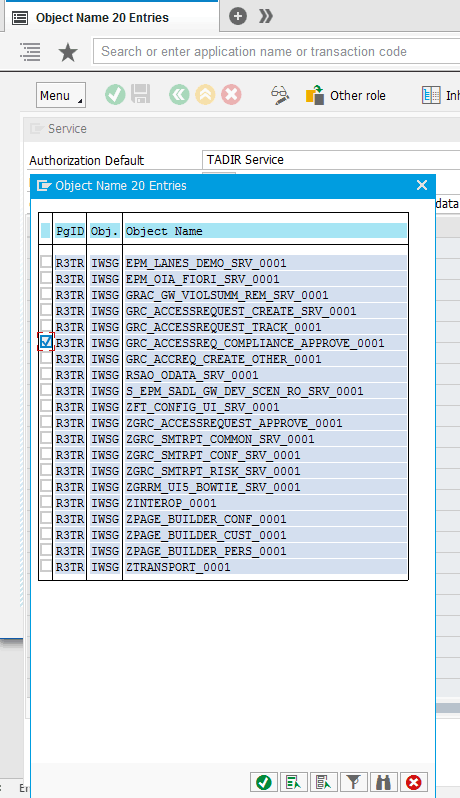
Figure 29
The initial screen for the selection of an object type for the TADIR Service
After you click the green checkmark icon, the system displays the screen in
Figure 30.
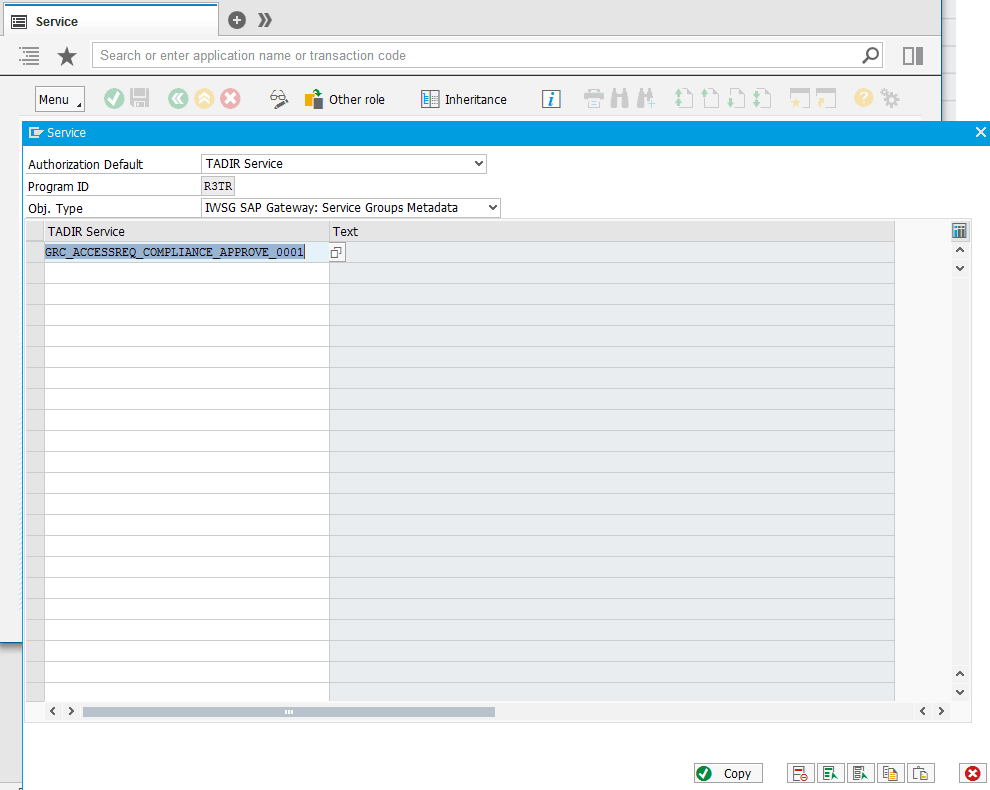
Figure 30
Definition of the TADIR Service
Click the Copy button to add the OData service authorization data to the role menu.
Figure 31 appears.

Figure 31
Confirmation of the addition of OData service authorization to the role menu
Now click the Authorizations tab and generate a profile name by choosing an option in the Profile Name field (
Figure 32).
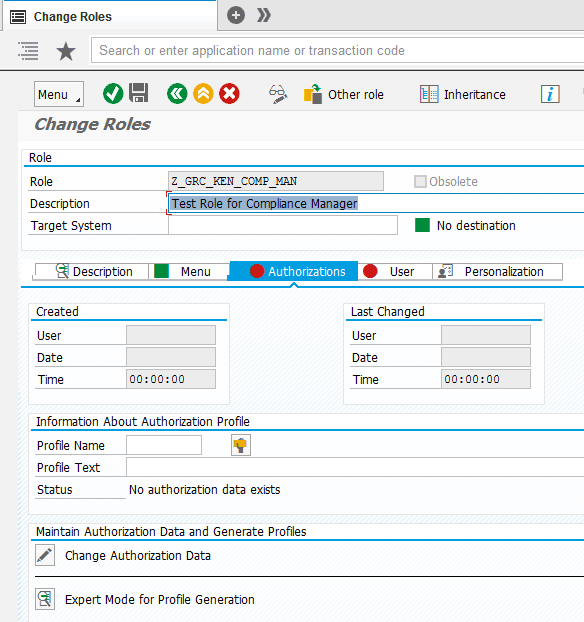
Figure 32
The initial screen to define the profile name
Click the edit icon by the Change Authorization Data field (
Figure 33).
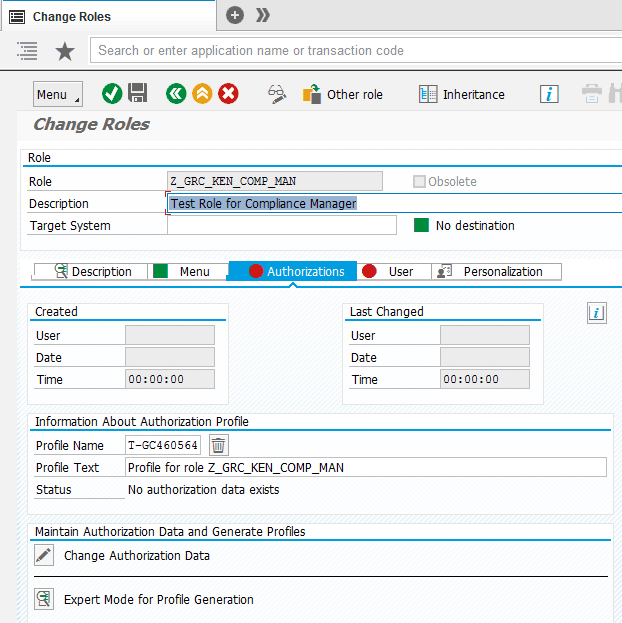
Figure 33
Definition of the profile name
In the pop-up screen (
Figure 34), click the Yes button.

Figure 34
Confirmation dialog box to save the role definition
This action displays a note in the next screen (
Figure 35).
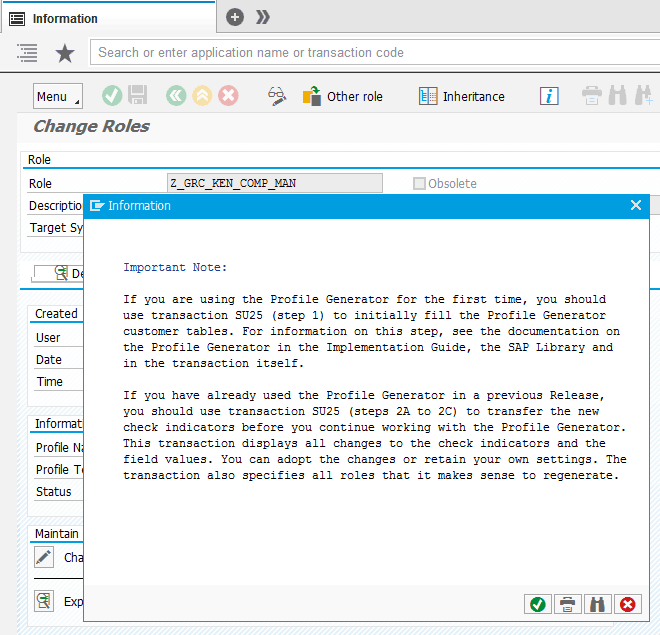
Figure 35
Information dialog box for role maintenance
Click the green checkmark icon to go to the screen in
Figure 36.

Figure 36
Authorization details of the role
Click the save icon.
Figure 37 appears.
![]()

Figure 37
Confirmation of the save operation on the role
Click the save icon to generate the profile option. After you click the save icon, a status message appears at the bottom of the screen (
Figure 38).

Figure 38
Confirmation of profile generation
Related IMG Customization Activities
It is possible to perform a number of customization activities related to SAP Fiori applications in the SAP GRC system. These include:
Maintenance of custom fields: This customization activity allows you to specify any custom fields that you want to include in the Fiori application Request Access. This can be performed via the IMG node - SAP Reference IMG > SAP Customizing Implementation Guide > Governance, Risk and Compliance > Access Control > User Provisioning > Fiori Access Request > Maintain Custom Fields.
Maintenance of document maintenance for texts: This customization activity allows you to define texts that display in the Fiori application Request Access. For example, you can define your own greeting text to display on the initial screen of the Fiori application. This can be performed via the IMG node - SAP Reference IMG > SAP Customizing Implementation Guide > Governance, Risk and Compliance > Access Control > User Provisioning > Fiori Access Request > Document Maintenance for Texts.
Maintenance of request parameters: This customization activity allows you to define options about configurable parameters for the Fiori application access request such as business process, request types, and employee types. This step can be performed via the IMG node
- SAP Reference IMG > SAP Customizing Implementation Guide > Governance, Risk and Compliance > Access Control > User Provisioning > Fiori Access Request > Configure Request Parameters.
Note
The respective IMG node provides detailed documentation about how to configure these functionalities.
Execute transaction code SE61. The screen in
Figure 39 appears. The Document Class needs to be General text. Document class provides functionality to change the wording on screens.
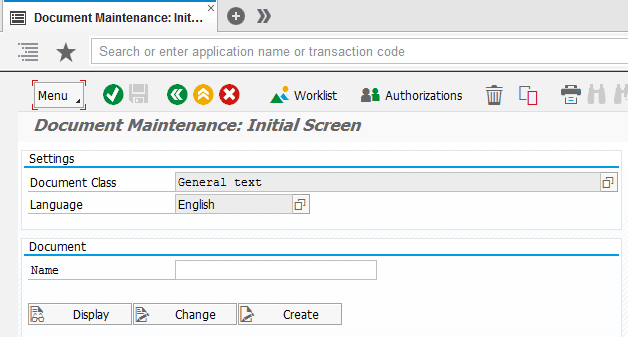
Figure 39
Initial screen for document text maintenance
The applicable standard document name is GRFN_SMART_REPORTS_WELCOME, so you can make a copy of it by entering it in the document Name field and clicking the copy option.
Figure 40 appears.

Figure 40
The initial screen to copy document text
Enter a custom name as shown in
Figure 41 in the To section.
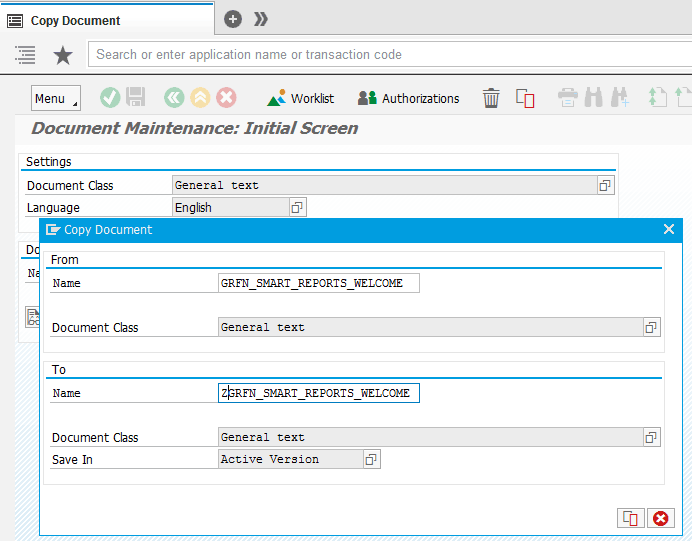
Figure 41
Definition of a custom document class
Click the copy icon.
Figure 42 appears with a status message confirming the copy operation.

Figure 42
Confirmation of the document copy operation
With the new custom name in the Document Name field, click the Change button.
Figure 43 appears.
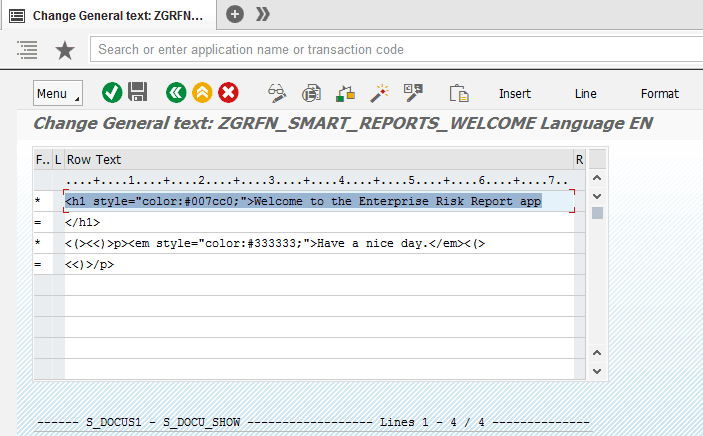
Figure 43
The initial screen to edit document object text
Replace the text section. For example, change Have a nice day to THIS IS OUR WELCOME PAGE! as shown in
Figure 44.

Figure 44
Maintained text of the document object
Click the save and activate icon.
Figure 45 appears.
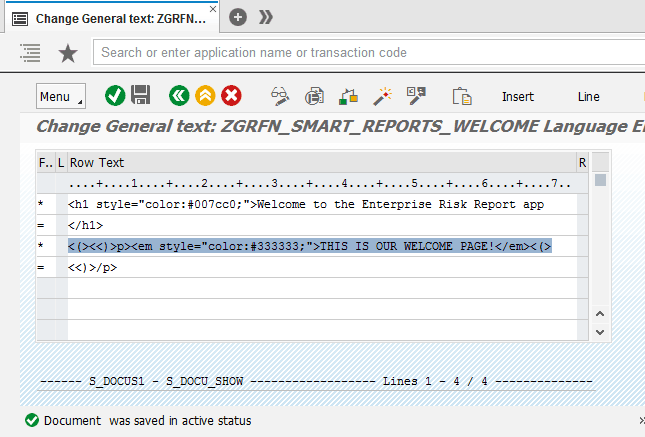
Figure 45
Confirmation of saving and activation of the custom document object text
To map the message class to the custom document created initially, navigate to the IMG and follow menu path SAP Reference IMG > SAP Customizing Implementation Guide > Governance, Risk and Compliance > General Settings > Workflow > Maintain Custom Notification Messages.
Figure 46 appears.
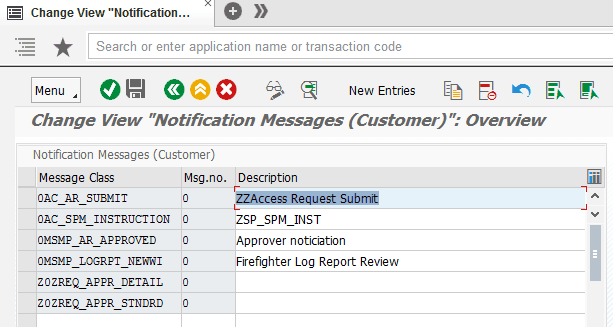
Figure 46
The initial screen to maintain notification messages
Click the New Entries button. In the screen that appears, carry out the following as shown in
Figure 47:
- In the Message Classs field, enter the value 0FN_SMART_REPORTS
- In the Subject field, enter a text, for example, TEST – Welcome Page
- In the Docu. Object field, enter the name of the document object created earlier, ZGRFN_SMART_REPORTS_WELCOME

Figure 47
Creation of a new entry for the message class
Click the save icon.
Figure 48 appears with a status message confirming the save operation.

Figure 48
Confirmation of the Save operation
The direct SAP Fiori URL to acess the enterprise risk report application homepage is
https://<servername>:<port>/sap/bc/ui5_ui5/ui2/ushell/shells/abap/FioriLaunchpad.html?sap-sec_session_created=X#Risk-displayReport&/risks. Before changing the standard text in the document object, the home screen looks like
Figure 49.

Figure 49
Enterprise Risk Report screen before changes are made to the standard document object
After you change the text in the document object, the home screen looks like
Figure 50.

Figure 50
The Enterprise Risk Report screen after changes to the standard document object
The Look and Feel of the SAP Fiori Applications for the SAP GRC Solution
Let’s attempt to navigate around the SAP Fiori applications for SAP GRC solutions. To launch the SAP Fiori launchpad, execute transaction code /UI2/FLP or you can access the URL
https://<server name>:<port>/sap/bc/ui5_ui5/ui2/ushell/shells/abap/FioriLaunchpad.html.
Figure 51 appears.

Figure 51
The log-on screen to the SAP Fiori launchpad
Click the Log On button.
Figure 52 appears.
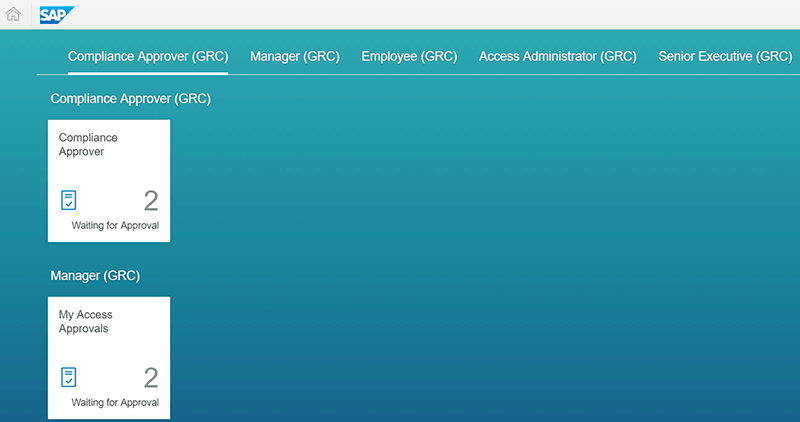
Figure 52
The home screen of the SAP Fiori applications for SAP GRC solutions
Click a tile, for example, Compliance Approver (GRC), to launch the capability of the application.
Figure 53 appears.

Figure 53
The initial screen for approving an access request
Choose an item, for example, Request 143.
Figure 54 appears.

Figure 54
The initial screen to approve or reject an acccess request
You can choose to Approve or Reject the request via the radio buttons. With the Approve radio button checked, click the Submit button. In the screen that appears, enter a comment in the Approval Comments dialog box as shown in
Figure 55.

Figure 55
Confirmation dialog box for approval comments
Click the OK button.
Figure 56 appears with the approval decision status message.

Figure 56
Status message for successful processing of the access request approval
Figure 52Figure 57

Figure 57
Risk management SAP Fiori tiles
Click a tile, for example Heatmap, and the risk portfolio appears (
Figure 58).

Figure 58
SAP Risk Management Heat Map in SAP Fiori
Tips, Tricks, and Recommendations
Troubleshooting: There are several ways to troubleshoot issues with SAP Fiori applications. The F12 key is very useful to debug or troubleshoot SAP Fiori issues. As shown in
Figure 59, pressing F12 in the browser where the SAP Fiori application is running displays the right pane. It contains information that can help in troubleshooting any issues encountered within the browser.
Note
Depending on the browser, the troubleshooting pane might open up in a
different area with different tab headings. For example, in Internet
Explorer, the pane appears at the bottom of the browser.

Figure 59
F12 showing the option to debug and troubleshoot directly within the browser
Figure 60 is a zoomed excerpt of
Figure 59 to highlight the error details: “No authorization to access service ‘ZINTER……”

Figure 60
Error details
Furthermore, the SAP Gateway error log accessible via transaction code /IWFND/ERROR_LOG is useful in analyzing the details of errors encountered during the configuration and operation of the application. For example, in
Figure 61, the log shows an authorization failure associated with a user accessing the SAP Fiori application.

Figure 61
Sample SAP Gateway error log
Also, transaction codes ST01 and STAUTHTRACE can also be used to perform tracing just like in a typical SAP ABAP environment.
Number of line item limitation: The SAP Fiori application for SAP Access Control does not allow for more than 100 line items in an access request. This is designed to accommodate the use of the application on mobile devices.
Gateway setup: SAP Fiori requires SAP Gateway to process OData services and messages. SAP Gateway can be deployed using the embedded or hub model. An embedded model is in the target system back end (SAP GRC), whereas the hub model has a separate gateway system. SAP recommends that the Central Hub Deployment of SAP Gateway be adopted. This model allows for the installation of the SAP Gateway independent of consumer technologies in a standalone system, either behind or in front of the firewall. This model facilitates the separation of back-end components from front-end components. When you are deploying an SAP Fiori application for use from the external organization network, SAP recommends that SAP Web Dispatcher be set up in the demilitarized zone (DMZ). Furthermore, SAP strongly recommends the use of Web Application Firewall capabilities in the reverse proxy or using an additional Web Application Firewall as a first line of defense, especially when consuming SAP Fiori analytical apps or search capabilities over the Internet.
Browser support: SAP Fiori does not support all browsers (and versions); hence, it is important to ascertain that browser compatibility is thoroughly reviewed before deployment. The supported browsers can be accessed via SAP Note 1716423 (SAPUI5 Browser Support). SAP Note 2047814 (Fiori for Business Suite: IE9 Limitations) provides information about the limitations of Internet Explorer (IE) 9 when used to access an SAP Fiori application.
Review applicable SAP Notes: It is important to check and review applicable SAP Notes to check if you need to perform the installation of specific SAP Notes that contain fixes for known errors. SAP Note 2170223 (General Information: FIORI UI Infrastructure Components Q3/2015, Q4/2015 and Q1/2016) provides information about some specific SAP Fiori-related issues.
Uninstallation of the SAP Fiori 1.0 for GRC solutions: Most SAP ABAP Add-Ons cannot be uninstalled, but that limitation does not apply to the SAP Fiori 1.0 for SAP solutions for the GRC Add-On. Generally, to uninstall ABAP Add-Ons, the following prerequisites must be satisfied:
- The system is based on SAP NetWeaver release 7.00 or higher
- You have installed at least SPAM/SAINT version 0053
- You use a kernel with at least release 7.20
- The transport tool tp has at least version 380.07.22
- The transport tool R3trans has at least the version from AUG/06/2013
More specifically, for uninstalling SAP Fiori 1.0 for SAP solutions for the GRC Add-On, you have to ensure that:
- The standard SAP Fiori roles provided with the software component are not assigned to any users in the system. You can check this via transaction code SUIM or execute transaction code PFCG in the system for these roles. Delete all assignments if applicable.
- You have not created any customer roles (transaction code PFCG) that references standard SAP Fiori app roles. If you have done that, delete these assignments.
- You have not created any customer SAP Fiori launchpad roles or catalogs that refer to the standard SAP Fiori roles or catalogs, respectively.
Note
Refer to SAP Note 2176696 (Uninstallation of the Fiori UI Component
UIGRC001 100 from the Product version SAP FIORI FOR SAP GRC 1.0).
Kehinde Eseyin
Kehinde Eseyin is a security architect. He holds a bachelor’s degree in computer science. He has about 12 years of IT security, governance framework, IS risk, and compliance experience gained by working in numerous global organizations. Over the years, he has demonstrated competencies in security design, information assurance, cyber security, data privacy, threat and vulnerability management, penetration testing, business architecture, project management, IT audit, IS controls framework, and identity and access management.
You may contact the author at
eseyinok@gmail.com.
If you have comments about this article or publication, or would like to submit an article idea, please contact the
editor.


