The Business Unit Analyst role shipped in mySAP ERP 2005 replaces the spreadsheets and distribution lists that used to organize the process of gathering and monitoring the submission of budget data with a collaboration room. Learn how it is designed specifically to select the managers who need to plan, send out workflow tasks to these managers, track the responses, and monitor and approve the planning data.
Key Concept
Collaboration rooms are virtual team rooms within SAP NetWeaver Portal that enable users to organize themselves in teams and projects independent of their physical locations. Access to the room itself and the pages and applications within the room is controlled by roles, meaning that you can give the administrator and business unit analyst access to different pages and applications from the managers. They can use the room to share information for the participating roles, such as access to guidelines or policies, and to initiate and track workflow tasks.
Collaboration rooms are delivered as part of SAP NetWeaver. In mySAP ERP 2005, based on SAP NetWeaver 2004s, a room template is delivered for budgeting that has been enhanced with information contained in ERP Central Component (ECC) for the purposes of organizing a planning round. Unlike collaboration rooms that exist entirely in the portal environment, the planning round also exists in ECC and requires the latest edition of ECC for the customizing settings relating to the planning process.
Express Planning is a Web application with a roadmap that guides the manager through a series of planning steps. You can start Express Planning by including a URL for the Web application in an email and sending it out to the managers. However, out-of-date distribution lists and clumsy spreadsheet-based status reports can make tracking a struggle. Here’s a way to use standard functions in SAP NetWeaver to initiate and track Express Planning using a collaboration room.
The easiest way to think of the budgeting process is as a kind of survey in which managers are invited to take part. The process of gathering the budget data involves sending out the survey to each manager, together with his own Express Planning instance (or data entry sheet). The entry sheet contains the steps you want him to plan and the reference data you are able to provide to prepare that plan. As each manager submits his response, the analyst is notified that planning data is available for checking and approval. The survey also tells the analyst which managers have yet to submit and allows him to send out reminders to tardy managers. Figure 1 shows a simplified version of the process, with Mike de Wolf sending a survey out to two managers, Gary Dahl and Lucy Jones.

Figure 1
Overview of planning process
In SAP terms, the survey is a Planning Round that users who are assigned to the role Business Unit Analyst can create from the work center planning. The Planning Round is modeled as a collaboration room in SAP NetWeaver with a one-to-one relationship between the Planning Round in the ECC and the collaboration room for planning in SAP NetWeaver Portal.
Note
Depending on the planning services selected, Express Planning can work with Cost Center Accounting (CO-OM-CCA) and Personal Management (PA) in ERP Central Component (ECC) and planning applications in SAP NetWeaver Business Intelligence (BI) and Strategic Enterprise Management (SEM). For more information on Express Planning, see part 1 of this series, “Express Planning Gives Managers Access to Plan Data in Multiple Systems, in the January 2006 issue of SAP Financials Expert.
Set Up the Planning Round
When the business unit analyst selects the service Create Planning Round in the planning work center, shown in Figure 2, he is guided by a roadmap through the process of creating the planning round or collaboration room for his planners. SAP delivers a room template as portal content that contains the roles, pages, and iViews needed for Express Planning. The portal content administrator can copy and adjust them to add further room parts or additional roles as required. The business unit analyst would follow these steps:
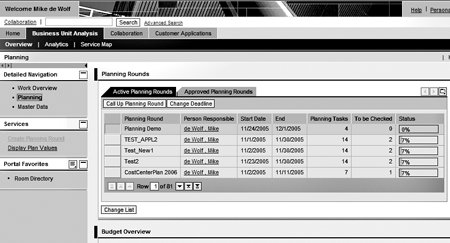
Figure 2
Planning work center for the Business Unit Analyst, showing the service Create Planning Round and providing access to existing Planning Rounds
Step 1. Enter a name and description for the Planning Round, together with a start and end date and a link to Express Planning (Figure 3). While you can enter whatever name, descriptions, and dates you require in step 1, you need to know how Express Planning is customized to make entries in the fields Express Planning Scenario and Express Planning Instance, as they provide the link back to the Express Planning Customizing I talked about in my last article.
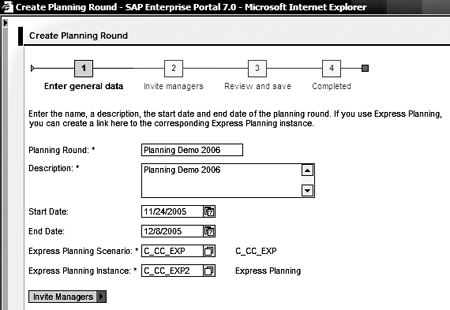
Figure 3
Enter data to identify the planning round later and a link to Express Planning Customizing
The Express Planning Scenario describes the steps and substeps to be planned and the Express Planning Instance the versions and fiscal year to which the planned data is written when the managers submit their planning data and the system updates the data in ECC. A table in ECC stores the parameters with reference to the planning round. A Web service transfers the name and description of the planning round to the collaboration room along with the name of the user who created the planning round (Mike de Wolf in my example).
Step 2. Select managers. The Invite Managers screen generates a distribution list for the planning round, by reading the names of the responsible managers from the cost centers for which the business unit analyst is responsible (Figure 4). In other words, as the analyst calls this step, the system checks his personalization parameters to determine which cost centers he is responsible for and then reads the cost center master data to determine the user names of the responsible managers.
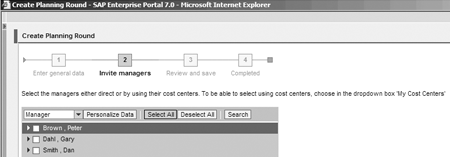
Figure 4
Select the managers based on the user names in the cost center master data
The Responsible Manager is a new field in the cost center and profit center master records in the latest version of ECC. It allows organizations to enter a user name for each manager. This may sound like a field that should have been around for years. However, in the standard delivery, the person responsible was a character field and if an organization wanted to enter a user name rather than just text, it had to create its own field as an extension. Having the user name in the ECC allows the Web applications in the portal to display the user name as an attribute in applications displaying profit centers or cost centers and, more importantly, to offer collaboration services for these portal users.
Note
mySAP ERP 2005 assumes that managers complete Express Planning themselves. The ability to delegate parts of Express Planning to another user is planned for mySAP ERP 2007.
These services include viewing whether the manager is logged on to the portal, assigning a task to the manager, or sending an email. Note that a reverse user mapping takes place in this step. This involves checking that the user name in the ECC is the same as the portal user. The system issues an error message for user names that the system cannot map to portal users. It makes things a lot simpler if your managers have the same user names in both ECC and the portal.
In the case of Express Planning, when the planning round is created, the system automatically writes the user names of the cost center managers selected here to the planning round and assigns them to the role of manager within the collaboration room. You can add and remove managers within the collaboration room, but if your cost center master records are up to date, you should not need to update the distribution list.
If you prefer to select based on the cost centers themselves rather than the manager names, you can switch to the Cost center view using the drop- down list box you saw in Figure 4. The two views are set up in Customizing so you can choose whether you want to use one or both views when you set up the hierarchy settings for the role. I’ll show you how to make these settings later in the article.
Step 3. Review and save. A list of all parameters appears to allow the analyst to make any changes necessary before choosing to save (Figure 5). Here you can see that two of the four managers are responsible for several cost centers. If you make a mistake, you can use Previous Step to navigate back and make any changes.
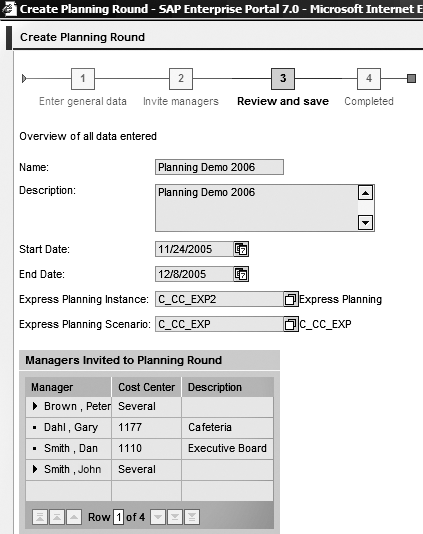
Figure 5
Review and check the data to be transferred to the planning round prior to save
When the business unit analyst chooses the Save button (at the bottom of the screen), the system creates a collaboration room for the planning round using a Web service that reads the room template for planning in SAP NetWeaver Portal. This template includes three portal pages: Overview, Documents, and Member Maintenance, but organizations wishing to use additional pages, such as Frequently Asked Questions, can add these room parts to the template as required.
To navigate directly to the planning round from the confirmation screen, choose Display Planning Round, shown in Figure 6. Alternatively, the new planning round appears in the planning work center, shown in Figure 2.
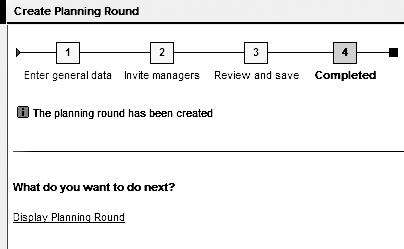
Figure 6
Confirm completion of planning round and access the link to the newly created planning round
Note
mySAP ERP 2005 assumes that all Express Planning activities in the planning round are approved by a single user, the business unit analyst. Role-differentiated abilities for reviewing and approving Express Planning activities by multiple users from within the collaboration room are planned for SAP ERP 2007.
Figure 7 shows the portal pages in the initial planning round, before any tasks have been sent out. The three pages are shown under Detailed Navigation. You can use Documents to include links to documents in Knowledge Management, such as planning guidelines and policies, and Member Maintenance to add any stakeholders to the planning round whose names could not be selected automatically via the cost center master records. You can also see in the iView Contacts and Collaboration Services that the planning round contains three roles:
- Administrator: responsible for the collaboration room
- Business unit analyst: the user name of the user who created the planning round
- Managers: the user names of all the cost center managers selected
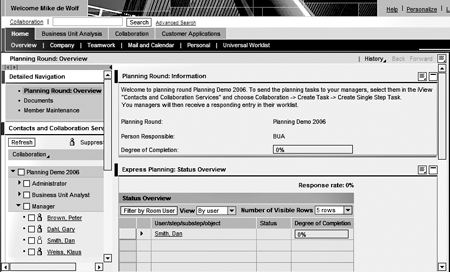
Figure 7
Display the planning round either via the link from the roadmap or the list of planning rounds in the planning work center
You may add additional roles to this list, such as approving manager or cost accountant.
Create Tasks and Mails to Initiate Planning
The Degree of Completion in Figure 7 (under Planning Round: Information) is currently 0%, because no tasks or emails have been sent out. Now I will use standard functions within the collaboration room to send out tasks to the managers and track the responses. The advantage of having roles in the planning round is that you can select all portal users assigned to the manager role by selecting Manager and then choosing Collaboration>Create Task>Create Single-Step Task as shown in Figure 8.
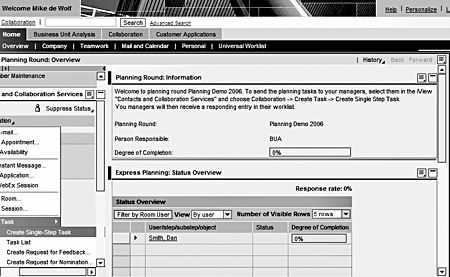
Figure 8
Create a workflow task for all users with the role Manager
When you create a task like this, the system transfers the user names of the managers to the tasks (Figure 9). When the analyst clicks on Send, each of these portal users receives a workflow item in their worklist containing a link to the planning round. You can configure your room template to determine how much of the planning round they can see by setting the page settings for each role under Member Maintenance. The minimum would be to allow managers to display only Express Planning as a page within the collaboration room with no access to the other pages. You could also provide access to the Documents page, though it is worth remembering that a lot of instructions can be included in Express Planning itself. You will almost certainly limit access to the Overview page with its status monitoring functions to the administrator and business unit analyst.

Figure 9
Creating a workflow task for multiple users with reference to the collaboration room Planning Demo 2006
Figure 10 shows the details of the workflow task in the manager’s worklist. By clicking on Go to Room Express Planning Demo, the manager, Gary Dahl, can navigate to the Express Planning page in the collaboration room and submit his planning data as I described in my last article.
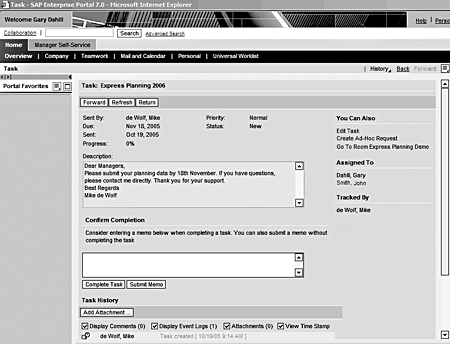
Figure 10
Manager’s workflow task, including link to room Express Planning Demo
If your managers prefer to receive their planning tasks as emails rather than workflow items, you can proceed as described above. Instead of choosing Create Single-Step Task in Figure 8, choose Send e-mail. The system copies the selected managers as recipients to the email and automatically generates a link to the collaboration room within the email. Instead of receiving a workflow item, the managers receive an email that provides a link to the collaboration room in which they are to perform their planning. The steps in Express Planning are the same in both cases. Note that the business unit analyst should create this email within the collaboration room. If he creates the email directly in his email client, then he has to enter the URL to Express Planning manually, which could result in errors.
Approving and Monitoring Planning
Now, let’s assume that the managers have completed their planning data and look at the functions available to the business unit analyst for checking and approving this data. The collaboration room itself provides functions for tracking tasks sent out to multiple users within the worklist in the planning round. You can see in Figure 10 that Mike de Wolf (the business unit analyst) tracks the task and he finds this work item both in the planning round and in the universal worklist.
Additionally, the planning work center (shown in Figure 2) includes a column To be Checked so that the business unit analyst does not even need to go into the planning round if none of the managers has yet responded to his task. Additionally, the planning round includes an iView Express Planning: Status Overview. Express Planning includes so many steps and substeps that you probably want to view the status of individual steps (such as headcount or cost element planning) or individual planning objects (such as cost centers or organizational units) in addition to the task itself. Figure 11 shows the planned data By user. You can then drill down to the individual planning steps and planning objects. Alternatively, you can choose the data view By planning steps to access, for example, all Primary Cost Planning data for all managers or By planning object to access all data by cost center, organizational unit, or order.

Figure 11
Planned data shown by user: drill down to individual objects and steps
Clicking on Primary Cost Planning takes the business unit analyst into that planning step, where he can reject or approve the plan either for individual cost centers or for the whole planning step. He can enter a comment to explain his decision to the individual manager (Figure 12).
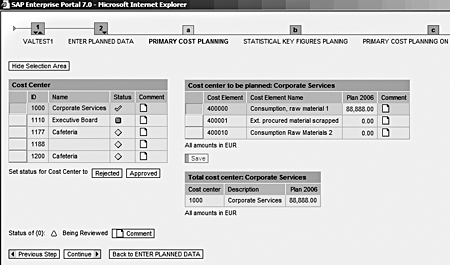
Figure 12
Review details of planning step
Most changes are initiated when the business unit analyst rejects the plan. Individual managers carry out these changes in accordance with the comments made by the business unit analyst. However, if the business unit analyst needs to make across-the-board changes to the planning data without involving the managers, he can use the existing CO planning transactions and Business Planning and Simulation (BPS) planning applications to manipulate the planned data directly. You access the applications within the portal by choosing Display Plan Values. The functions available for storing different plan versions are dependent upon the type of planning application (CO or BPS) and are not affected by Express Planning. Figure 13 shows how to access these applications within the planning work center.
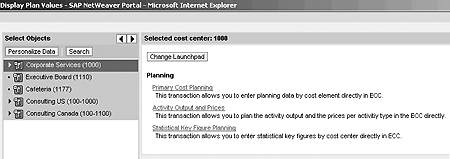
Figure 13
Access data directly from the portal through Display Plan Values
Customizing Steps for the Planning Round
That completes the steps in SAP NetWeaver Portal. Now I’ll walk you through the steps in the implementation guide for planning in ECC to show you how to set up what you have seen in the screens so far.
As with all roles, the first task is to personalize the cost centers for which the business unit analyst is responsible. If you do not do this, the lists shown in Figures 4 and 13 will be empty. To maintain these cost centers, follow menu path Integration with Other mySAP.com Components>Business Packages/Functional Packages>Business Unit Analyst Service (mySAP ERP) >Personalization. The easiest way to do this is to derive the entries in the personalization tables from the cost centers that the user is currently authorized to display. However, a BAdI that allows customers to make additional checks or changes for the areas of responsibility of the users determined by program FPB_GENERATE_PROFILE_CCMD or FPB_GENERATE_PROFILE_HRORG is offered in the implementation guide.
Then you need to check the hierarchy settings for the two views you saw when creating the planning round in Figure 4. Follow menu path Integration with Other mySAP.com Components>Business Packages/Functional Packages>Business Unit Analyst Service (mySAP ERP)>Hierarchy>Set Hierarchy and select Business Unit Analyst: Planning Sessions (Figure 14). Choose whether you want to see the names of the managers as I did, the names of the cost centers, or both, by setting check boxes on the folders Manager and My Cost Centers. You can also provide the option to drill down further, so that if the business unit analyst clicks on a name in Figure 4, he sees the assigned cost center by setting the check box Subnodes Cost Center. Similarly, if you have activated the My Cost Centers view, you can provide the option to display the cost center group to which the cost center belongs and the name of the manager.
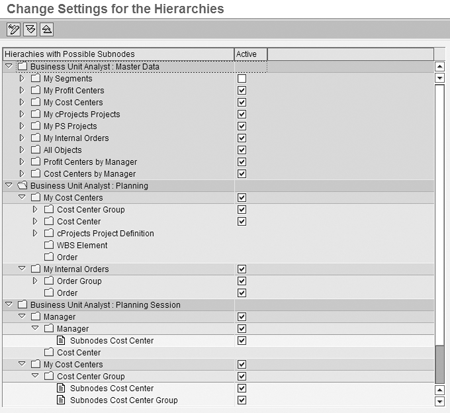
Figure 14
Figure 14 Change settings for hierarchies
You can use the same hierarchy to provide selection options for reporting on planning, as you saw in Figure 13, so Business Unit Analyst: Planning includes further hierarchy nodes. These nodes only make sense when you have completed the next step, namely defining the reports and planning transactions to be started for these nodes.
To set up the applications to be displayed in Display Plan Values shown in Figure 13, prepare a list containing the appropriate reports and transactions. Follow menu path Integration with Other mySAP.com Components>Business Packages/Functional Packages>Business Unit Analyst Service (mySAP ERP) >Planning>Compile Planning Activities (Figure 15) . Each folder represents a node chosen in the previous customizing step. If one of them is missing in your system, go back to Figure 14 and adjust one of the check boxes. Choose one of these nodes and enter those planning transactions and reports that your analysts need, in addition to the Planning Round and Express Planning. In my example, I’ve provided access to transaction KP06 (Cost Element Planning) in ECC.

Figure 15
Set up your list of planning transactions
Janet Salmon
Janet Salmon joined SAP in 1992. After six months of training on R/2, she began work as a translator, becoming a technical writer for the Product Costing area in 1993. As English speakers with a grasp of German costing methodologies were rare in the early 1990s, she began to hold classes and became a product manager for the Product Costing area in 1996, helping numerous international organizations set up Product Costing. More recently, she has worked on CO content for SAP NetWeaver Business Warehouse, Financial Analytics, and role-based portals. She is currently chief product owner for management accounting. She lives in Speyer, Germany, with her husband and two children.
You may contact the author at janet.dorothy.salmon@sap.com.
If you have comments about this article or publication, or would like to submit an article idea, please contact the editor.