Find out the eight steps to design a query using BEx Web in SAP NetWeaver BI 7.0. Along with explaining how SAP NetWeaver Portal is now part of the process, these steps introduce new concepts, such as themes, portal desktops, and BEx reports.
Key Concept
Cascading Style Sheets (CSS) is a standard internet technology that enables Web-based formatting. Used with HTML, CSS allows designers to have more control over the output of their reports when compared to the formatting options in BEx Web Analyzer, the Excel-based option for query design. You can use CSS to determine formatting options, such as color and object placement. Furthermore, you can use multiple links to separate CSS pages on a single HTML page, allowing you to have one style for print and one style for on-screen viewing. Although CSS is the underlying technology, SAP often incorporates it through tools found in SAP NetWeaver Portal, Web, and BEx Query Designer.
In SAP BW 3.5 and earlier, you controlled the formatting options by linking the BEx Web template directly to Cascading Style Sheets (CSS). In SAP NetWeaver BI 7.0, SAP NetWeaver Portal takes over the function of assigning the style sheets through portal themes, which ultimately drives the Web output format. This makes it easier for administrators to keep a consistent look and feel across the whole user experience, regardless of the Web template author.
However, to format the Web output, you need to use two Web technologies: HTML for content and CSS for formatting. Although CSS is the underlying technology for formatting, SAP NetWeaver Portal packages CSS under portal themes. This means that end users never work with CSS.
Themes change the output of the tagged object on the BEx Web template. This means that a BEx Web template on my portal might have pink subtotals and blue data rows, while on your portal the subtotals are green and the rows are purple. You can find the themes in the portal desktops, which include layout features as well as style options. SAP NetWeaver Portal (not CSS) rules define the logic of which theme is available and the default theme for each portal user.
Here are the eight steps you need to take to customize your Web-based BEx query results. Note that this article assumes working knowledge of Web Application Designer (Web AD). The first six steps explain how to set up the formatting for BEx Web. Steps 1 through 5 relate to BEx Web templates, while step 6 refers to the new BEx Report. The final two steps target how you can use the themes. These steps fall under the portal administrators’ domain, so I’ll just mention them briefly. If you are unfamiliar with CSS, refer to the sidebar “CSS Basics”.
Step 1. Modify the underlying style
Step 2. Change the settings for exceptions
Step 3. Change the output in the CSS Style tab
Step 4. Apply CSS syntax for advanced formatting
Step 5. Modify the style commands for specific BEx Report areas
Step 6. Select the portal theme
Additional steps for the portal administrators are:
Steps 7 and 8. Link the portal theme to a desktop/Assign the desktop to the user
Note
Style rules can be on the page, directly attached to the HTML code, or linked to the HTML code via a style sheet stored separately from the page. Given this, the steps in this article all change the style rules, just via different methods.
Step 1. Modify the Underlying Style
First you need to modify the style associated with specific cells or structure elements (e.g., rows or columns) using limited SAP NetWeaver BI query settings. This step involves setting the key figure properties to Highlighted Display (Figure 1), which I explained in the first article of this series. The Highlighted Display setting changes the selector, and thus the default format that the portal theme applies to the HTML code. This alters the underlying CSS class assigned to this key figure. Subsequently, you can change the actual output format in the Web by adjusting the defaults for this style (via themes in step 6).
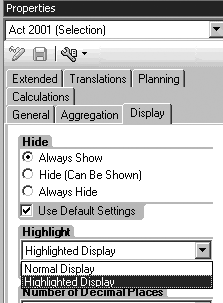
Figure 1
Change the query key figure properties to Highlighted Display
Step 2. Change the Settings for Exceptions
These settings alter the way the system displays the exceptions. SAP NetWeaver BI 7.0 offers many options for visualizing exceptions via the Web. In previous releases of SAP BW and in BEx Web Analyzer, you could highlight exceptions only with colors. In BEx Web Analyzer in SAP NetWeaver BI 7.0, you can use symbols instead, as Figure 2 shows. In this example, the up arrows indicate good exceptions (higher than the expected sales volume). The down arrows indicate bad exceptions (lower than the expected sales volume). The right arrows indicate marginal exceptions (sales that are close to what you expected but trending badly).
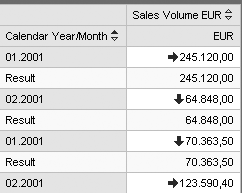
Figure 2
Exceptions indicated by arrows
SAP NetWeaver BI 7.0 provides two ways to change the exception output to symbols in BEx Web Analyzer. The first method involves the exception wizard, which you can use if you created the exception using the exception wizard. The second method involves changing the exception properties, which you should use in other cases when the Web template designer is the driving factor in deciding to use symbols.
For this first method, access the exception wizard in the BEx Web Analyzer Settings tab, located on the right side of the Web Analyzer. In step 4 of the wizard, click on the Add button for the exception Web item and select Symbol for the visualization (Figure 3).

Figure 3
Exception wizard for the visualization of exceptions
The second option to configure symbols is using a setting on the Analysis Web item, which you use to build the Web template in Web AD. The item’s Data Provider must obtain data from a query with exceptions to use this method. Figure 4 shows the Analysis Web item properties for ANALYSIS_ITEM_1. You can select symbols, colors, or other options during the design of the BEx Web template when using Analysis Web items.

Figure 4
Change the Analysis Web item to show exceptions as symbols
Step 3. Change the Output in the CSS Style Tab
CSS allows you to assign formatting style rules to the HTML template easily without needing to know all the syntax. To access these options, insert the HTML table into your layout view of the BEx Web template, right-click on the HTML item, and then click on the CSS Style tab (Figure 5). Then click on the style that you want to change (backgroundColor in my example) and directly enter your revision (RED in my case).

Figure 5
CSS style commands
When you change styles in Figure 5, your SAP system generates the CSS code behind the scenes and adds the code to the Extensible Hypertext Markup Language (XHTML) code on Web AD. (Note that XHTML code is just HTML code plus some additional allowed tags.) Although you do not need to know CSS syntax to change the style rules, it’s easier if you know a little CSS syntax, which allows you to enter your style rules directly. I’ll discuss how to do this next.
Note
To find out more about the BEx Reports and Web AD, consider attending the SAP Education BW306 class “BI - Enterprise Reporting, Query and Analysis (Part II)” for SAP NetWeaver BI 7.0.
Step 4. Apply CSS Syntax for Advanced Formatting
In this step, you use style commands inside your BEx Web template to override the defaulted look and feel of the Web items or other HTML tags. The direct access to the code provides complete access to the vast formatting options in standard CSS. You can also add watermarks, make objects blink, or change more basic formatting features.
However, with a little knowledge of CSS syntax, you can apply the rules directly to the XHTML code in Web AD’s design screen (e.g., style = “BACKGROUND-COLOR: red”), as shown in Figure 6. To learn more about the CSS syntax options, refer to https://w3schools.com/css/css_reference.asp.
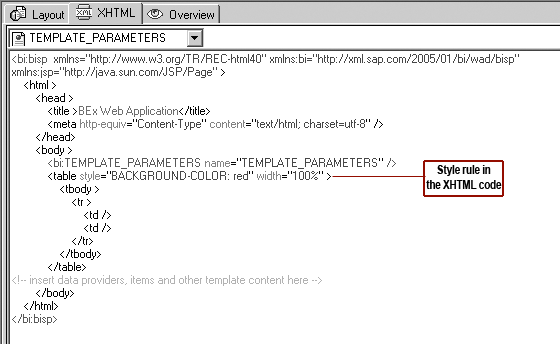
Figure 6
The XHTML code including style commands
Step 5. Modify the Style Commands for Specific BEx Report Areas
In SAP BW 3.5, you had only one tool to customize Web pages with BW data — Web AD. SAP NetWeaver BI 7.0 offers the new BEx Report, which allows you to change the color, row size, column size, and cell placement, as well as to add additional body text, cell text, headers, and footers to specific areas of your report output. The system executes all these options via style rules behind the scenes.
Figure 7 shows the design screen for BEx Report. Access this screen by following menu path Start>Programs> Business Explorer>BEx Report Designer. This GUI allows you to format columns, cells, background colors, and totals. You can also add other features to improve the look of the report.
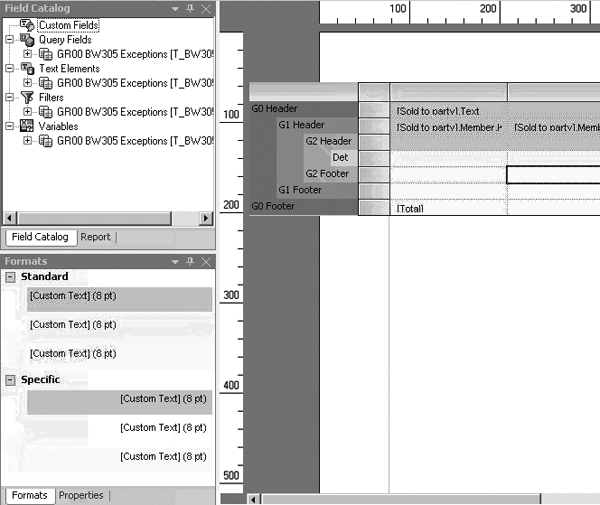
Figure 7
BEx Report design GUI
Step 6. Select the Portal Theme
As I mentioned, portal themes use CSS as their underlying technology. Figure 8 shows a user employing BI_THEME_A. By clicking on the Personalize link, you can select a theme from the list. This allows you to easily change the look and feel of your portal experience.
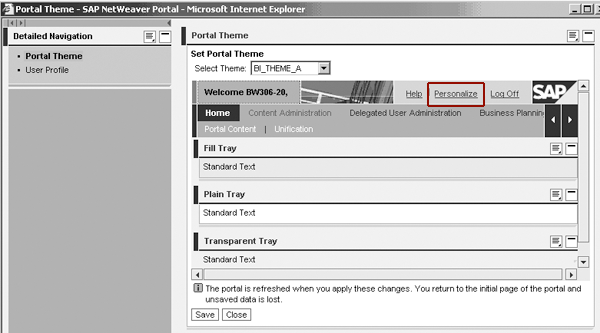
Figure 8
Select a theme
This user also has a default framework page that contains the layout for the iViews and high-level links. Both the theme and default framework page are linked in a portal desktop, which I’ll discuss in the next step.
Steps 7 and 8. Link the Portal Theme to a Desktop/Assign the Desktop to the User
You can review the concepts for modifying the look and feel of the portal and the SAP NetWeaver BI content in the document, “How to Create a New Portal Desktop,” which you can find on the SAP Developer Network (SDN) at www.sdn.sap.com. Enter the title in the Search box to download the document.
My focus is more specifically on how to change themes to affect the format of SAP NetWeaver BI objects. Figure 9 shows the theme editor and the Analysis Web item (e.g., tables). Portal administrators use this theme editor to change the underlying style sheet. The administrators normally start with an SAP-supplied theme, copy it, and then change the copy. In this example, I show how the portal administrator can change the color for a given exception, which in this case is a bad exception.
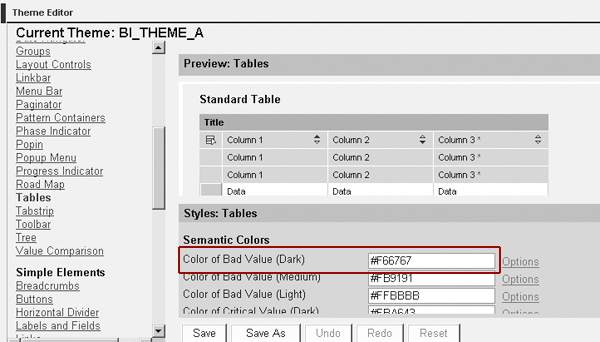
Figure 9
Change the color of a bad exception to dark blue (#F66767)
The next step is to find the object category for which you want to change the default. Select the object category from the list on the left side of the screen in Figure 9. In my example, I want to change the Tables section within the grouping Complex Elements. This table section refers to data tables, including the Web Analysis item.
Click on the Options link next to the value you want to change. In my case, I changed the Color of Bad Value (Dark) to dark blue (#F66767). Figure 10 shows the updated theme.

Figure 10
The bad exception appears as dark blue
You have three options to connect the CSS rules to your HTML code. You can assign CSS style rules to each component of the HTML output directly or via a CSS styling rule connected to a selector that is defined on the page (as in my example). For either of these options, you can enter the code on the XHTML tab in Web AD.
However, the third option is best. For this you use a separate style sheet linked to your HTML code page with the following syntax:
These two lines of code link to your style sheet with all the rules. The HTML code then obtains the style rules (e.g., selectors and declarations) as listed, one after each other, on the YOUR STYLES SHEET.CSS style sheet. These control how the system displays each tag to the user.
Note
To learn more about the underlying technology of CSS, refer to
www.w3.org/style/CSS/learning. You can also read chapter 2 of the book Cascading Style Sheets, Designing for the Web, by Håkon Wium Lie and Bert Bos (Third Edition, 2005, Addison Wesley Professional, ISBN 0-321-19312-1).
In some cases, another CSS feature called inheritance might be called into action. With inheritance, if you have a set of styles on a separate CSS sheet that makes H1 red, and your page has H1 as green, the system chooses the style closest to the actual HTML code, so the output is green. This is a nice feature built into the underlying technology of CSS. It allows query designers to overwrite corporate standard colors and formats if necessary.
CSS Basics
To better understand CSS, let’s look at an example.
Figure 1 shows the HTML code and corresponding output. This is a simple page but it includes HTML tags and embedded CSS style rules. On this page the CSS syntax is the line. CSS uses terms such as selector (e.g., H1 and H2) and declaration, which its property (e.g., color) and value (e.g., blue) define.

Figure 1
HTML code with a style command
Ned Falk
Ned Falk is a senior education consultant at SAP. In prior positions, he implemented many ERP solutions, including SAP R/3. While at SAP, he initially focused on logistics. Now he focuses on SAP HANA, SAP BW (formerly SAP NetWeaver BW), SAP CRM, and the integration of SAP BW and SAP BusinessObjects tools. You can meet him in person when he teaches SAP HANA, SAP BW, or SAP CRM classes from the Atlanta SAP office, or in a virtual training class over the web. If you need an SAP education plan for SAP HANA, SAP BW, BusinessObjects, or SAP CRM, you may contact Ned via email.
You may contact the author at ned.falk@sap.com.
If you have comments about this article or publication, or would like to submit an article idea, please contact the editor.


