Learn about the standard process for many common HR activities and how they differ in SAP ERP HCM versus SuccessFactors. This article directly compares both systems and the manner in which the exact same activity is performed, and how they differ.
Key Concept
Business processes for creating new positions, hiring employees, and updating employee data in are handled by Employee Central in a SuccessFactors system and by the Organizational Management and Personnel Administration modules in an SAP ERP HCM on-premise system.
The same business processes are performed in SAP ERP HCM on-premise systems and SuccessFactors Employee Central. Here, I show the different ways to execute these identical processes in the two different systems, SAP ERP HCM on-premise versus SuccessFactors Employee Central. I take a look at three common HR activities—creating a new position, hiring an employee, and updating employee data—and show how they are handled in the two systems. I also review the details of performing those activities, and provide a comparison of the two systems.
Tips!
To understand this article, readers should be familiar with either
SAP ERP HCM or SuccessFactors Employee Central—ideally, with both. To
learn more, you can take the SAP class for Employee Central,
THR81 SuccessFactors Employee Central Academy, which covers the functionality in detail. For on-premise SAP ERP HCM beginners, a good place to start is
WNAHR1 Core Business Processes in HCM.
For more information about these or any other SAP classes, visit the SAP training website at: https://training.sap.com/.
For more information about Employee Central, see the following HR Expert articles:
“An Introduction to Position Management in SuccessFactors Employee Central,” by Jyoti Sharma
“9 Important Factors to Consider When Implementing Employee Central Globally,” by Prashant Rastogi
“How to Effectively Migrate Data to Employee Central,” by Rodrigo Cabeza
“Integrating SuccessFactors Employee Central with SAP ERP HCM On Premise,” by Priynk Gautam
Note
I created a short video to accompany this article, which includes
step-by-step instructions for how to complete these processes in both
SAP ERP HCM and SuccessFactors Employee Central. Click
here to view the video:

.
Creating New Positions in SAP ERP HCM and SuccessFactors
One of the most common activities at every company is the need to create a new position. Before hiring someone new to the organization, the first step is the creation of the new position. This is because the person who fills the new position could be someone inside the organization, in which case recruiting and finding a new employee from outside may not be necessary (unless there is a need to backfill the position that the internal person is vacating). Storing position information and creating/updating/deleting positions is an activity that any HCM system needs to be capable of doing regardless of the technology behind it. In this article I look at how it is done in an on-premise SAP HCM system, and then take a look at how the same business process would be done in SuccessFactors Employee Central.
Note
In this article I do not cover any security or authorizations that are
needed in either SAP ERP HCM or SuccessFactors. I also assume basic
knowledge of navigation in SAP ERP HCM and Employee Central.
Creating a New Position in SAP ERP HCM
To create a new position in SAP ERP HCM, log on to the system. Once you are logged on, execute transaction PPOME and a screen that looks like Figure 1 opens.
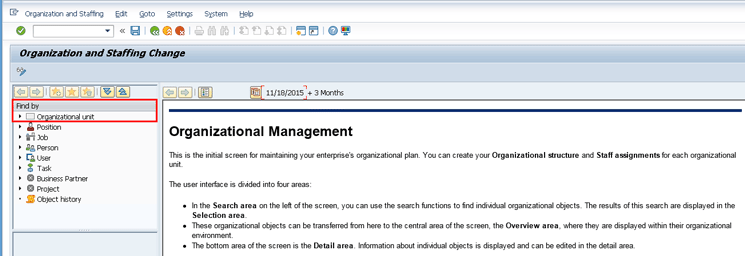
Figure 1
Default screen for transaction code PPOME
Next, navigate to the appropriate place in the organizational unit where the new position is going to be created. You can use the Find by section (on the left of the figure) and expand the Organizational unit option to search. Or you can search by term by selecting Structure Search (Figure 2). This opens up a visual representation of the organizational unit (at the bottom of the figure) upon which you can base your search and search within an organizational structure—in this case, 20 Payroll.
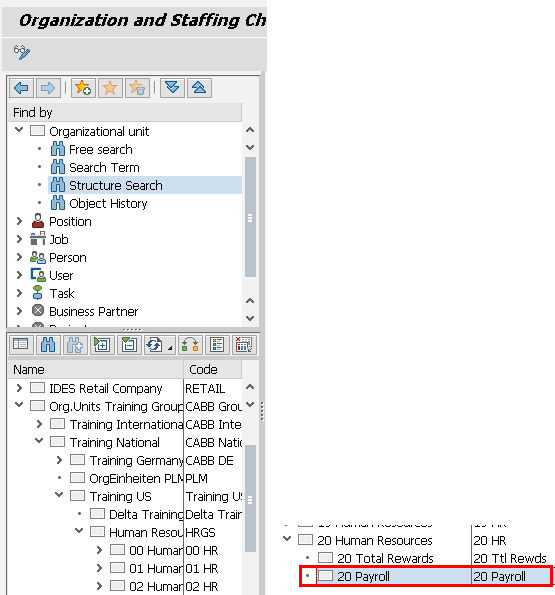
Figure 2
Search the organization unit in transaction code PPOME using Structure Search
Once you find (or create) the organizational unit in which you want to put the new position, double-click the organizational unit (in this case, 20 Payroll). This populates the current structure of the organizational unit, as shown in Figure 3. The organizational unit shows any existing positions within it (on the top of the figure) and the section at the bottom shows the details of the organizational unit.
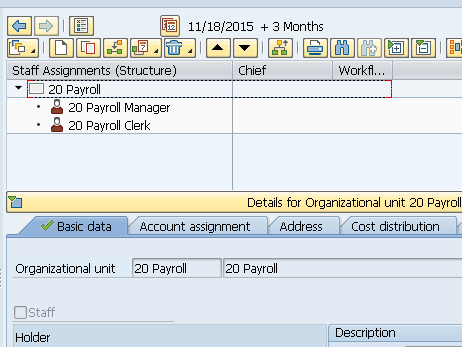
Figure 3
The structure of an existing organizational unit in transaction code PPOME
Right-click the parent organization unit in which you want the position be located (in this case 20 Payroll) and select Create from the context-menu options (Figure 4). This opens a pop-up screen that asks you what kind of relationship you want to create for this organizational unit. Select Incorporates, click the green checkmark icon, and a new position is added to the organizational unit.
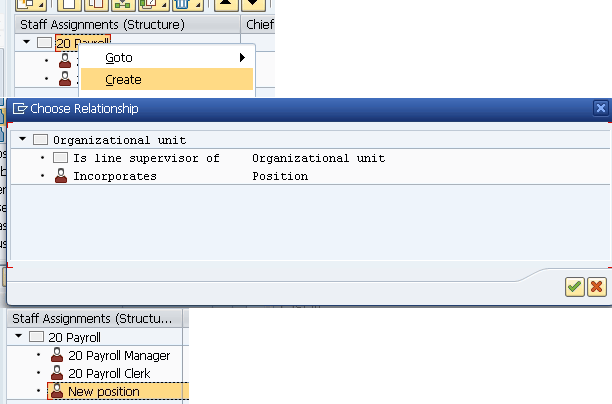
Figure 4
Create a new position
In the screen that reopens (Figure 5) you can now fill in the details for this new position.
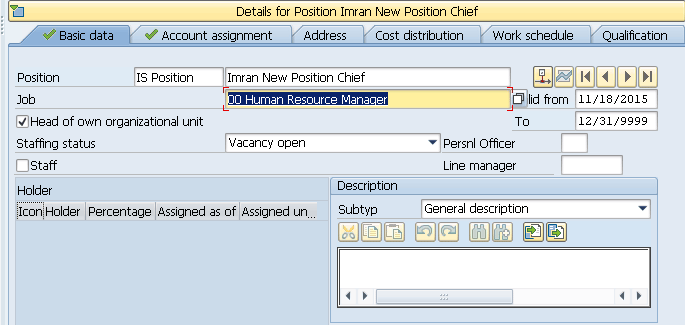
Figure 5
The details for the new position created in transaction code PPOME
In Figure 5 you can enter all sorts of data about the position in the different tabs. Some of the common things to enter for the position include:
- Its validity dates (when it is valid, from and to)
- Name and description
- The job under which this position is classified
- If the position is the head of the organizational unit
- If there are multiple cost centers, which one the position should go towards
- The work schedule for this position (e.g., full time or part time)
- Any necessary qualifications for this position
Once you’ve made the required selections, click the save icon and the new position is created in the SAP ERP HCM system as shown in Figure 6.
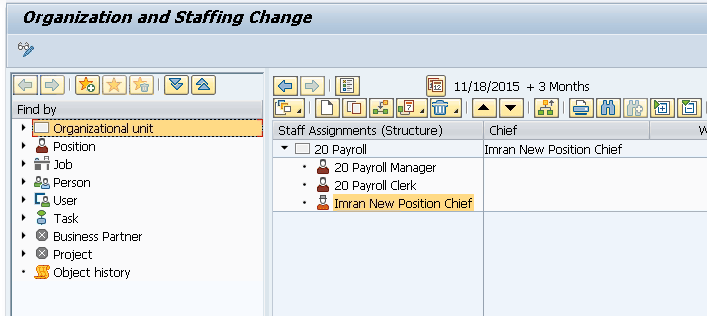
Figure 6
The new position is created and added to the options in transaction code PPOME
Creating a New Position in Employee Central
Now let’s take a look at how the same process is done in SuccessFactors Employee Central.
Log on to your Employee Central instance and navigate to Company Info (Figure 7). Click the Position Org Chart. From here you can search either for existing people or positions to find where in the organization structure you want to create this new position.
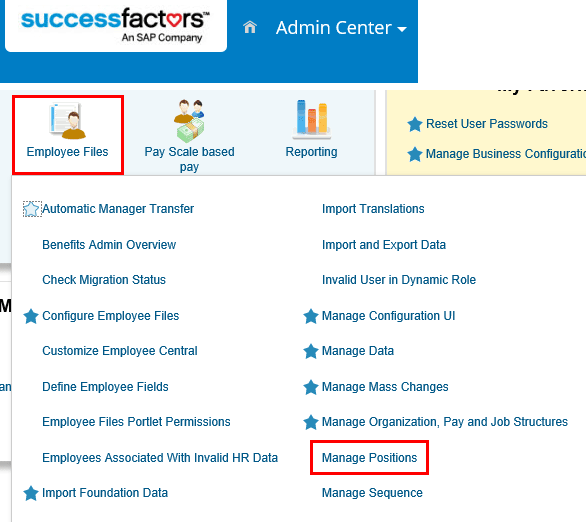
Figure 7
Navigate to Position Org Chart to add a new position
Once you find the person or position under which you want to create the new position, double-click to open it. A pop-up window opens with options for adding the new position (Figure 8).

Figure 8
Manage positions
In this case, click Add Lower-Level Position and a new screen opens in the middle (Figure 9) where you can fill in the appropriate details for this new position.
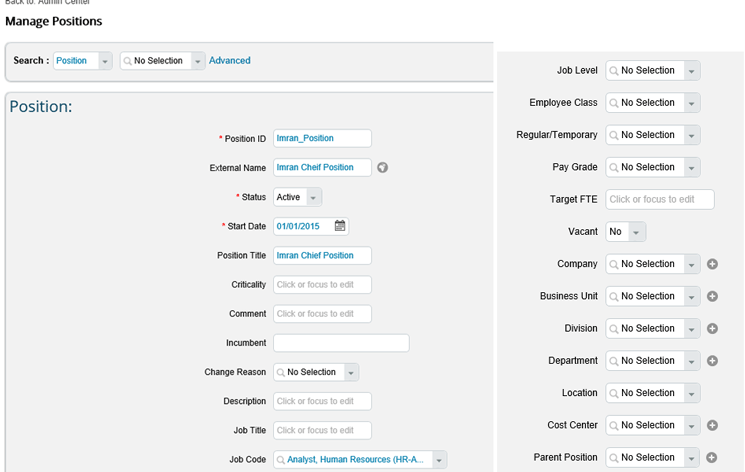
Figure 9
Add the appropriate details for the new position in Employee Central
Once the relevant information has been entered, click the Save button to view your changes. (If there is any required workflow for the new position you are notified before saving and the workflow will be sent to the appropriate approvers.) Notice that the parent position has been filled in based on where you told the system to create this position.
To find and view any existing positions in Employee Central, including the one that you just created, navigate back to Company Info (from Figure 7) and select the Position Org Chart. Here you can search for any position in the organization, including the newly created one (Figure 10).
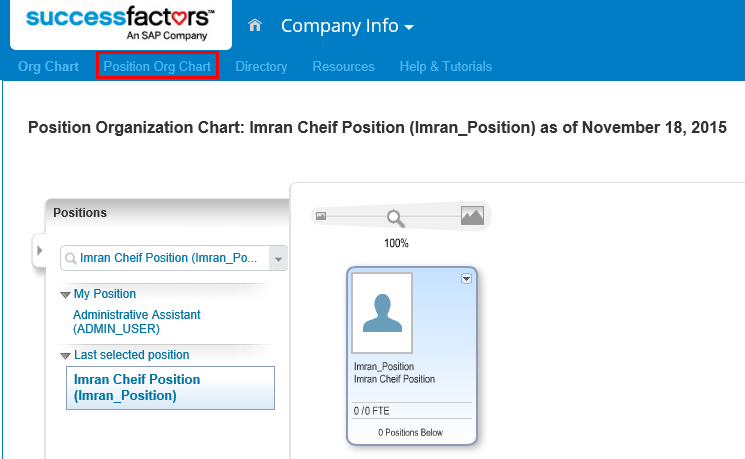
Figure 10
The position organizational chart in Employee Central
You have now successfully created and viewed the position in Employee Central.
Hiring New Employees in SAP ERP HCM and SuccessFactors
The next common HR activity that I tackle is hiring a new employee into your HR system. This is obviously one of the most common HR activities. To achieve this, you have to collect the data about the new employee and enter it into the system. It is possible to have this process automated—to pull in data from your recruiting system or via an interface—but for the purposes of this article I am going to show how to manually go in and hire someone in SAP ERP HCM as well as Employee Central. Once again, I will start by going through this process in SAP ERP HCM first.
Hiring a New Employee in SAP ERP HCM
Log on to the SAP ERP HCM system and navigate to transaction code PA40 – Personnel Actions (Figure 11). It is important to understand that transaction code PA40 is not just for hiring new employees. It is also used for any action that your company may run for employees (for example, when an HR administrator needs to make changes to an employee’s position).
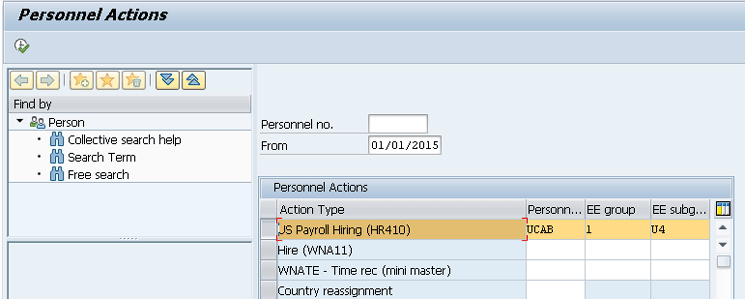
Figure 11
Transaction code PA40 main screen for the hiring action
Here you can see a field for personnel numbers, a field for the date of the action, and then a list of Personnel Actions configured in your system. Enter a date in the From field and select the action that you want to execute.
The system also has three fields where you enter more data about the new employee: Personn… (personnel area), EE (employee) group, and EE subg… (employee subgroup). The personnel area typically defines the location where the employee will be working. The employee group defines what type of worker the new employee is (e.g., active, temporary, intern, or expatriate). The employee subgroup defines how the employee is paid (e.g., hourly or a monthly salary).
When you’ve made your desired entries, click the execute icon  (not shown). The system then takes you one by one into the different infotypes that store information about the employee and you can save each detail one by one. The data that is pulled back is completely configurable to your organization as is the order.
The first infotype is typically infotype 0 where you can enter the position for this employee as well as more information about the reason for this hiring (if you want to collect that data). To search for possible values, select the field and press F4. For example, if you are searching for a position, select the Position field and press F4 (Figure 12).
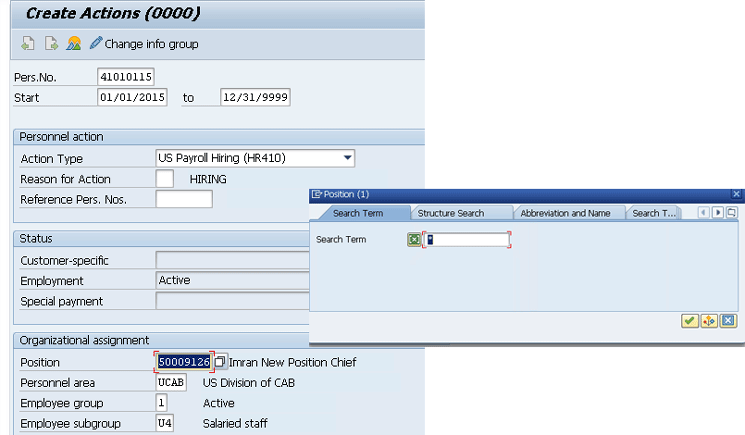
Figure 12
Search for a position in infotype 0
Once you have finished entering the data for this infotype, click the save icon (not shown) and the system automatically takes you to the next infotype to fill in information. I will not go through them all, but here are some of the other most common infotype screens that you will go through in this process. (The system can default values for you automatically via the configuration of features or user exits but that is beyond the scope of this article.)
- Infotype 1 – Organizational Assignment data
- Where you are located
- Payroll Area
- Position/Job/Org Unit
- Infotype 2 – Personal Data
- Infotype 6 – Addresses
- Address
- City
- State
- Zip Code
- Infotype 7 – Planned Working Time
- Work Schedule
- Part time status
- Infotype 8 – Basic Pay
- Period Salary
- Annual Salary
- Infotype 9 – Bank Details
- Payment Method
- Bank Account Number
- Routing Number
It is worth noting that every time you save a record, the system creates the record in the database for that employee, one by one (e.g., for each infotype). Once you have finished, you are taken back to the main transaction code PA40 screen as shown in Figure 13, but this time you see header information about the new hire.
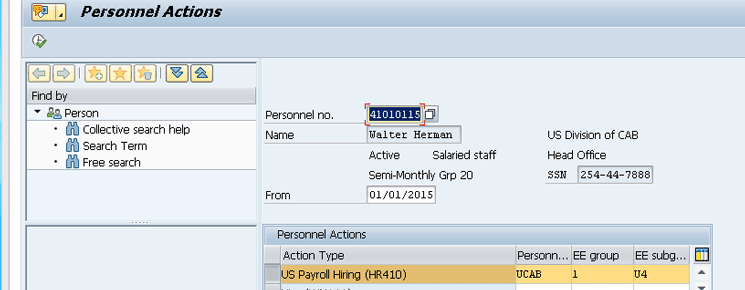
Figure 13
Completion of hiring action in SAP ERP HCM
Hiring a New Employee in Employee Central
Let’s take a look at how to do the same process in Employee Central. You can hire an employee via an import process in Employee Central for mass hiring, but I am going to go through the activity of hiring one employee as an administrator to explain the steps.
First, log on to your Employee Central instance and then navigate to the Admin Center (Figure 14). Select Update User Information and then Add New Employee.
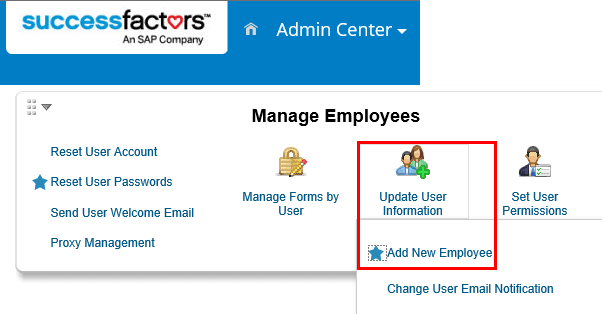
Figure 14
Navigate to hire a new employee in Employee Central
In the screen that opens (Figure 15) you see the main screen for hiring a new employee. As with SAP ERP HCM, the Employee Central system initially prompts you for the hire date as well as for information about the employee’s place in the organization.
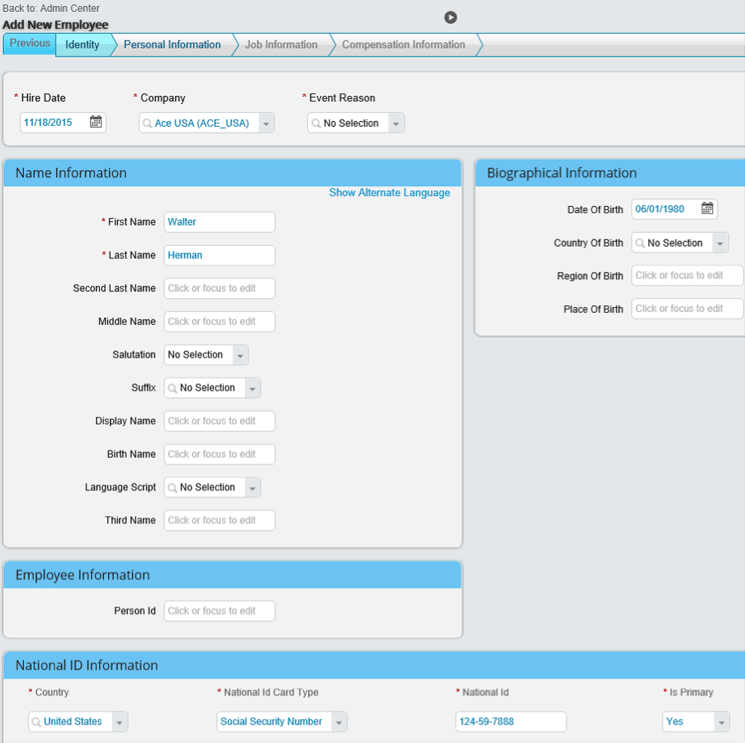
Figure 15
The initial new hire screen
Note
One difference in Employee Central is that you can default values for
the user via rules (such as a Social Security number being required for
US employees), but the details for doing this are beyond the scope of
this article.
The system takes you through the process of collecting all the data that is needed for the new hire. This is not grouped together in infotypes as in SAP ERP HCM, but rather in larger groups to help you locate specific information. For example, the Identity group holds employee information such as:
- Name
- Date of birth
- Social Security number
- Country of birth
- Event reason
The next group is Personal Information, and it contains:
- Gender
- Marital status
- Address
- Email
- Phone number
- Ethnicity
- Dependents
Next, you gather Job information about the employee’s place in the organization, such as:
- Department
- Legal entity
- Location
- Cost center
- Manager
- Position
- Work schedule
- Hire date and other employment details
Finally, you enter the employee’s compensation information, such as:
- Salary
- Salary frequency (annual or monthly)
- Bonus information (if required
As you go through the process you can keep track of your progress by looking at the bar on top of the screen (like the one shown in Figure 16). Click the Next button to move forward or you can jump from one section to the next by selecting different tabs. This allows you to easily go back and forth between the tabs if you need to update or correct any data. Once you are done, click the Save button to complete the new hire. This updates all the data at the same time rather than individually, per each infotype, as it is done in SAP ERP HCM.

Figure 16
The new hire navigation bar in Employee Central
Updating Employee Data in SAP ERP HCM and SuccessFactors
The last common activity that HR has to perform is updating employee data once the employee is in the system. This could be increasing an employee’s salary effective as of a certain date, or moving an employee within the organization. For some data, such as bank account information, it is usually preferred that employees use Employee Self-Services and update this information themselves, but, for the purposes of this article, I show how to do this as an HR administrator. In the following sections, I show how to update an employee’s salary in both systems.
Updating an Employee’s Salary in SAP ERP HCM
Log on to the SAP system and navigate to transaction code PA30 – Maintain HR Master Data, as shown in Figure 17. Then either enter the personnel number or click the highlighted icon to search for an employee. If you click the icon to search, you can search for the right employee by using a variety of employee attributes, such as name, Social Security number, or organization assignment data.
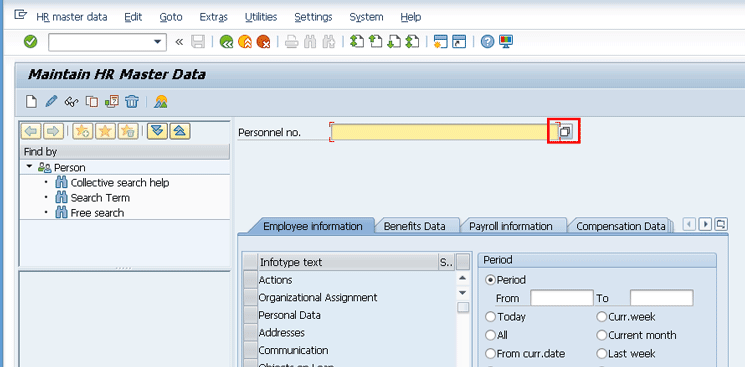
Figure 17
The default screen for transaction code PA30
Once you find the personnel number you see a screen like the one in Figure 18 where the header is filled with the data about that employee. At this point, you need to know the infotype number that you want to update. If you don’t know it, you can search for an infotype by using the Infotype field (at the bottom of the figure). Simply click the blank field and press F4. In this case, you want to update infotype 8 (Basic Pay), so select it and click the change icon  at the top of the screen. (Also notice that there are different tabs that logically group similar infotypes—for example, Employee information, Benefits Data, Payroll information, and Compensation Data. These are configurable tabs.)
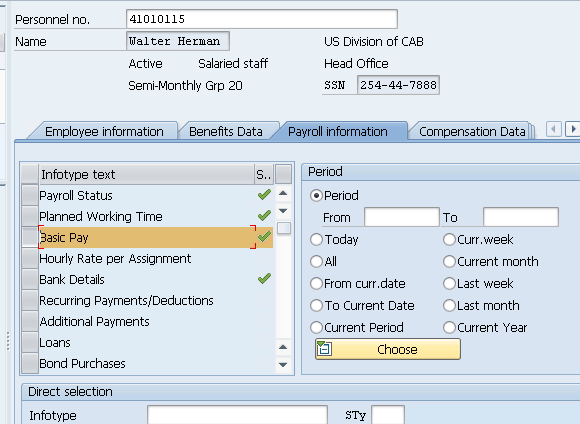
Figure 18
The completed transaction code PA30 screen
In the next screen that opens (not shown) select the appropriate infotype and then click the overview icon  to see all the existing records for this infotype. This opens a screen like the one in Figure 19, where you have a few different options.

Figure 19
Overview of infotype 8 screen
If the existing record is wrong, you can correct it using the change icon  . If you want to create a new record, you can do so by using the create icon . Finally, you can copy the existing record and create a new one from it using the copy icon
  . This last option is commonly used if you want to keep most of the fields from a previous record, and just need to change one or two values.
In this case, you want to change this record because it has been wrong all along, and you want to update it with a new annual salary of $60,000.00. Select the record and click the change icon (Figure 19). This opens the screen in Figure 20 where you can update the field for annual salary. Once you’ve made your changes, click the save icon to save them.
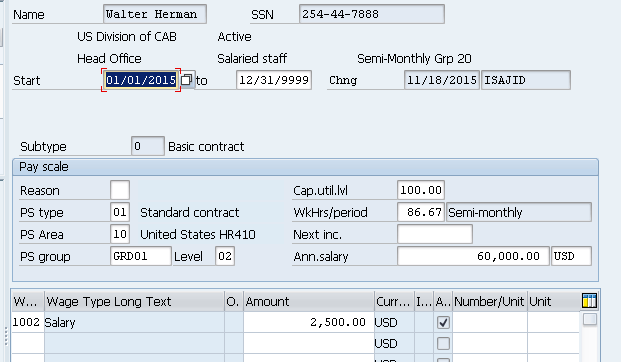
Figure 20
Change the employee’s salary in infotype 8
Updating an Employee’s Salary in Employee Central
Let’s now take a look at how to do the same process in Employee Central. Again, for my example I am updating an employee’s salary.
In any screen in Employee Central, simply enter the name of the employee or their personnel number in the top right search field to begin a dynamic search. Press Enter and the system brings up a screen like the one in Figure 21.
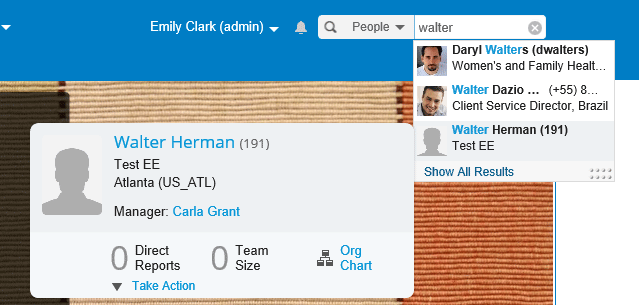
Figure 21
Search for an associate in Employee Central
Select the employee’s name (in this case, Walter Herman) and a screen opens with their public profile (Figure 22). Click the down arrow next to Public Profile and select Employment Informat… from the drop-down options that open, since this is the grouped data that you want to update in this step.
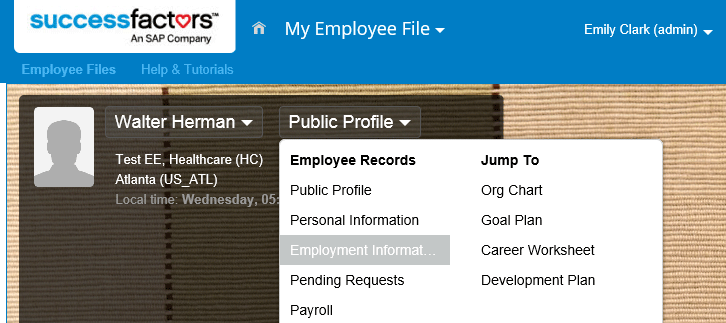
Figure 22
Navigate to the employee’s employment information in his public profile
This opens the employee’s Employment Information page (Figure 23). If you wanted to create a new record for any of this employee’s data, you would select Take Action and then, using the drop-down options that open, tell the system what action to take—Change Job and Compensation Info, Spot Bonus, Employment Details, and so on.
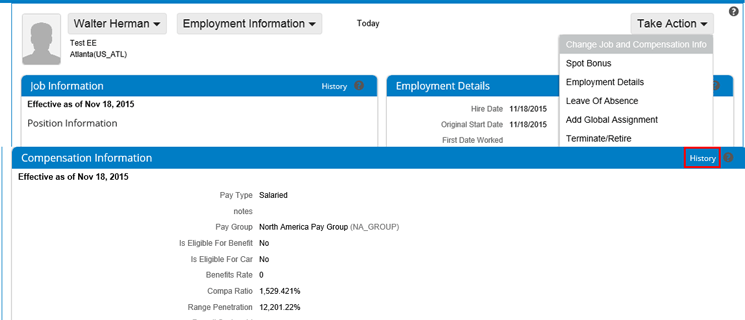
Figure 23
Update the employee’s employment information
If you want to change the historical record that was already created, navigate to the appropriate area (in this case, Change Job and Compensation Info) and click the History button (highlighted in the figure).
This results in a screen that shows all the historical records for this employee’s compensation information (Figure 24). To make changes to any of these historical records, click Take Action and select Make Correction from the drop-down options.

Figure 24
Make corrections to historical compensation records
This opens a screen like the one in Figure 25 where you have the option to make changes. In this example, I updated the employee’s salary information. Note how the system shows the old salary amount crossed out, so you can clearly see what is being changed. You also see any calculated fields (such as Compa Ratio), which are automatically calculated and updated.
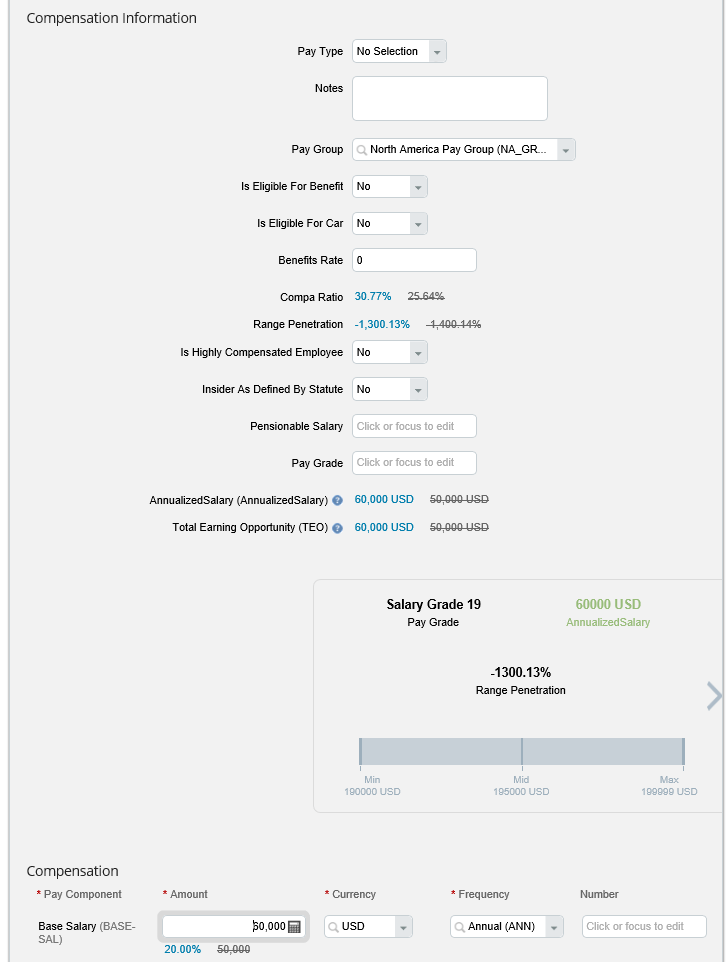
Figure 25
Update the employee’s annual salary in Employee Central
Once you have finished updating the data, click the Save button at the bottom of the screen (not shown) to update the employee’s data in Employee Central.

Imran Sajid
Imran Sajid is a Senior Education Consultant at SAP based in the Atlanta, GA, area. At SAP, he focuses on teaching classes in the HCM area within both SAP and SuccessFactors. Previously, Imran was a consultant who implemented and provided post-go-live support for more than a dozen different client systems spanning many industries, including manufacturing, automotive, retail, information systems, the public sector, and energy. He is the author of the book entitled, The Payroll Control Center for SAP ERP HCM and SAP SuccessFactors, as well as a frequent contributor to SAP Experts, where he has published almost a dozen articles. Imran is also frequent blogger on SAP Community Network (SCN). He graduated from the Georgia State University Robinson College of Business with a degree in Computer Information Systems. Imran can be found on Twitter @ImranSajidSAP.
You may contact the author at Imran.Sajid@sap.com.
If you have comments about this article or publication, or would like to submit an article idea, please contact the editor.


