Gain an understanding of supported and unsupported functionalities in the SAP Access Control system. See how to configure the system correctly to achieve your defined business requirements.
Key Concept
Myth often refers to certain assumptions or thoughts about the capability of a tool or product, either positive or negative, with or without an empirical basis of fact or technical explanation. A detailed explanation about the reasoning and concept behind the truth, coupled with validated tips and tricks, goes a long way toward demystifying the product. Therefore, it is important to clarify common assumptions about the SAP Access Control system that are untrue and to provide guidance on how to meet specific business requirements during an implementation project and operation of the system.
It is commonplace for users not to optimize the capabilities of a system, which happens mostly because of ignorance rather than from the absence of a business need. Acute knowledge of the strengths and weaknesses of the software product gives insight into how to map business requirements to the capability of the SAP Access Control 10.x solution.
Therefore, in this article, I discuss important customization settings, transaction codes, and standard ABAP programs that are invaluable for the administration, operation, and support of an SAP Access Control 10.x system. Setting appropriate values for configuration parameters can be challenging as a result of lack of understanding of how these configuration parameters work independently, the dependencies on other configuration parameters, or the wider customization settings. Addressing this common concern is the crux of this article.
This is the first part of a series of two articles on this subject. In this article, I cover the following topics:
- Client copy operation
- Dashboard report and browser settings
- Workflow path with no assigned stage
- User details based on multiple data sources
- Threshold for access request line items
- Deletion of access request
- Risk analysis for locked and expired users
Client Copy Operation
Myth: There is no difference between client 000 and client 001, so you can use any of the clients as the source client when you perform a client copy after the installation of SAP GRC foundation software component (GRCFND_A*).
Truth: Some customizing settings are client dependent and so after the installation of the SAP GRC foundation add-on, they only exist in client 000. You need to copy or import them into your productive clients as desired.
Trick: There are differences between the content of client 000 and 001, especially in the context of available SAP Access Control content. When the underlying SAP NetWeaver ABAP stack on which the SAP GRC foundation shared component is installed, the following clients are created as standard – clients 000, 001, and 066. All client-specific customizing exists by default in client 000.
While the client copy operation is optional (unlike for SAP Process Control and SAP Risk Management) when deploying SAP Access Control-only functionalities, organizations typically create new clients as part of the system administration policy to preserve the integrity of the standard clients. You can miss important SAP Access Control contents when your source client is not client 000.
One of the important content elements that can be missing in the context of SAP Access Control are pre-delivered SAP Business Rule Framework Plus (BRFplus) rules for SAP Access Control applications such as request mitigation policy, request multiple rule set, HR triggers, user defaults, service level agreements (SLAs) for access request management, and SLAs for emergency access management.
These applications must exist in the BRFplus workbench and then must subsequently be maintained in customizing by mapping the BRFplus applications to their corresponding function IDs if you wish to implement any of the SAP Access Control applications. You can check your system for the existence of BRFplus applications via the BRFplus workbench by following menu path Workbench > Open Object. In the screen that displays, enter the function ID of the desired application and click the Search button. If the BRFplus application exists, you get a screen similar to
Figure 1.

Figure 1
BRFplus workbench showing the search result for SAP Access Control application function ID - 80E0ED08B0561DDFA5AB2E0DEBA5402B (HR triggers)
If you perform the search for the same application function ID in a system in which the application does not exist,
Figure 2 displays with the message No objects found which match the search criteria.
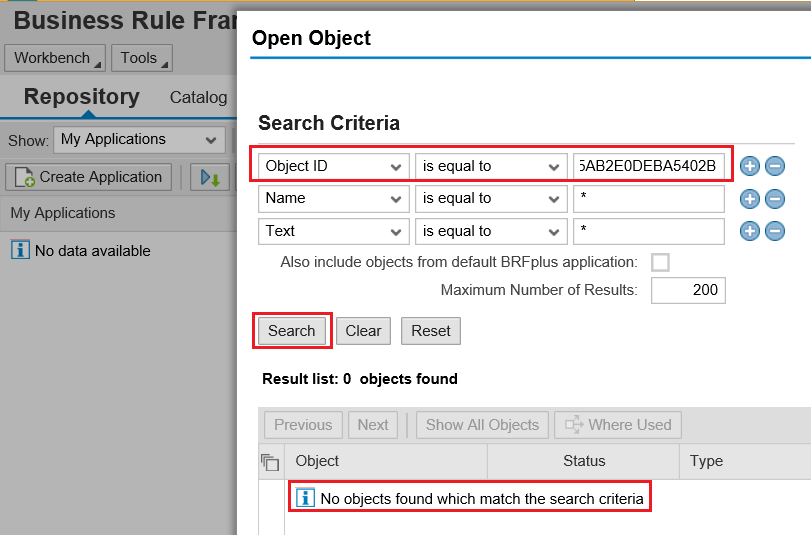
Figure 2
BRFplus workbench showing no results for SAP Access Control application function ID - 80E0ED08B0561DDFA5AB2E0DEBA5402B (HR triggers)
This probably explains why the default follow-on customizing that is the mapping of application to function ID is also different in both clients.
Figure 3 shows the IMG node where pre-delivered BRFplus rules are maintained. Access it by following menu path SPRO > SAP Reference IMG > SAP Customizing Implementation Guide > Governance, Risk and Compliance > Access Control > Maintain AC Applications and BRFplus Function Mapping. It shows the difference between the default configuration settings in client 000 and 001 in the IMG node for application ID mapping to the function ID.

Figure 3
Default application mapping with BRFplus function ID for SAP Access Control applications in clients 000 and 001
One transaction code that I have found useful for comparing customizing settings between clients is SCU0 (Customizing Cross-System Viewer). This can be handy when troubleshooting some related customization issues such as missing configuration settings between different clients. You can compare the customizing settings (for example, Maintain AC Applications and BRFplus Function Mapping IMG node) of the logon client (such as client 001) with the comparison client (such as client 000) by following the procedure below.
Enter transaction code SCU0 into the command line and
Figure 4 displays.
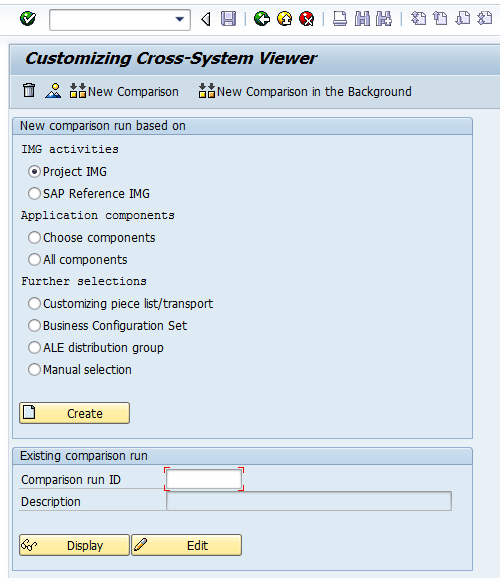
Figure 4
The initial screen for the Customizing Cross-System Viewer
Select the SAP Reference IMG radio button (
Figure 5).
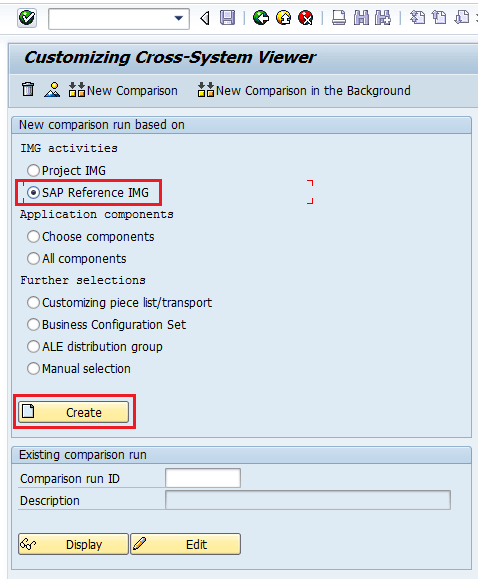
Figure 5
Selection of the IMG activity to compare
After you click the Create button,
Figure 6 displays.

Figure 6
Dialog box for the selection of the IMG activity
Select the Select activities radio button (
Figure 7).

Figure 7
Selection of the option to choose a specific IMG node
Click the green checkmark.
Figure 8 displays.

Figure 8
The selection screen for the IMG node to compare
Break up the IMG node tree until you get to the node you want to compare. In my example, I compare Maintain AC Applications and BRFplus Function Mapping. Select the corresponding check box as shown in
Figure 9.

Figure 9
Selection of the specific IMG node to compare
Click the green checkmark.
Figure 10 displays.
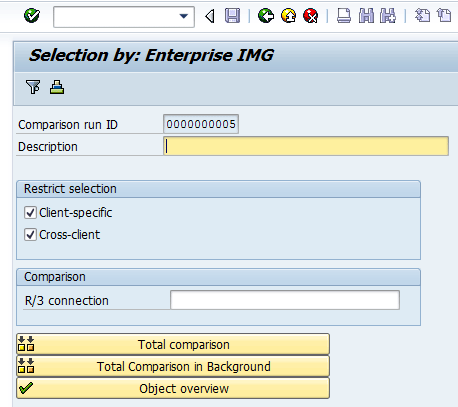
Figure 10
The initial screen for the comparison run attributes definition
Enter a value in the Description field and the R/3 connection name of the Comparison client as shown in
Figure 11. The R/3 connection field is used to define the target client relevant to the comparison run. The target client must have a corresponding Remote Function Call (RFC) destination entry maintained in transaction SM59 (Configuration of RFC Destinations).

Figure 11
Definition of comparison run description and RFC destination of the comparison client
Click the Total comparison button.
Figure 12 displays with the output of the comparison run showing that there are six entries in the comparison client, whereas there are no entries in the logon client.

Figure 12
Result of the client comparison
Click the check box corresponding to the object (
Figure 13).

Figure 13
Selection of the comparison run object
Choose the Comparison button and
Figure 14 displays.

Figure 14
Dialog box confirming the limitation of entries to compare
Click the No button.
Figure 15 displays with the actual entries that are in the comparison client and not in the logon client.

Figure 15
Entries that were evaluated during the comparison run
Double-click any of the entries and
Figure 16 displays providing more details about the comparison result entry (for example, Entry only exists in comparison system/client).

Figure 16
Detailed view of the entry in the comparison run
From the foregoing, if the source client of your productive client is not client 000 when you performed the client copy operation, you can always import missing content from client 000 by performing an XML file export. Then you import it into the target client for missing SAP Access Control applications. Refer to SAP Note 1637515 for step-by-step instructions on how to export and import the XML file. SAP recommends that you copy from client 000 when you are creating a new client to use for SAP Access Control.
Dashboard Report and Browser Settings
Myth: The browser settings adopted by a user do not have any impact on the display (or otherwise) of dashboard reports.
Truth: The browser settings adopted by a user go a long way toward determining if a user is able to display dashboard reports irrespective of the successful configuration of related activities at the SAP Access Control system level.
Trick: The display of the dashboard-centric reports is updated when the batch risk analysis job is executed. However, you need to install an Adobe flash player in the first place on the client machines to be able to see the pie chart and bar charts reports available under the Reports and Analytics work center. You also must configure the system correctly for risk analysis.
Additionally, ensure that the Shockwave Flash Object is activated in the browser as shown in
Figure 17. You can see that the Status is Enabled.

Figure 17
Activation of the Shockwave Flash Object
If Shockwave Flash Object is not installed or is disabled, you see a blank screen with the following error message: The Flash control is not responding. Possibly the Java plug-in of the browser is deactivated or not installed (
Figure 18).

Figure 18
Blank screen displayed with error message when the shockwave is not activated
Furthermore, it is important to ensure that the zoom level of Microsoft Internet Explorer browser is set to exactly 100% (
Figure 19) to avoid performance issues.

Figure 19
Zoom setting of Microsoft Internet Explorer
Figure 20

Figure 20
A dashboard report showing access risk violations
You can drill down into the report by clicking the corresponding area in the dashboard (for example, FI00 highlighted in
Figure 20) to show more information (for example, about the access risk violation data) as shown in
Figure 21.

Figure 21
Drilled-down access risk violation report showing the violation count per system
Choose any of the values in the violation count column to drill down more into the actual risk IDs as shown in
Figure 22. When you are analyzing a batch risk analysis result, it is commonplace to check the Last Updated On field on the drilled-down report. Note that the Last Updated On field is not necessarily the last date and time at which the dashboard report was executed. It reflects the last time the batch risk analysis job was run in which a change in the risk analysis data was detected.

Figure 22
Drilled-down access risk violation report showing last updated time
To know when the batch risk analysis was last executed, refer to the monitor batch risk analysis IMG node. Access it by following menu path SPRO > SAP Customizing Implementation Guide > Governance, Risk and Compliance > Access Control > Access Risk Analysis > Batch Risk Analysis > Monitor Batch Risk Analysis (
Figure 23).
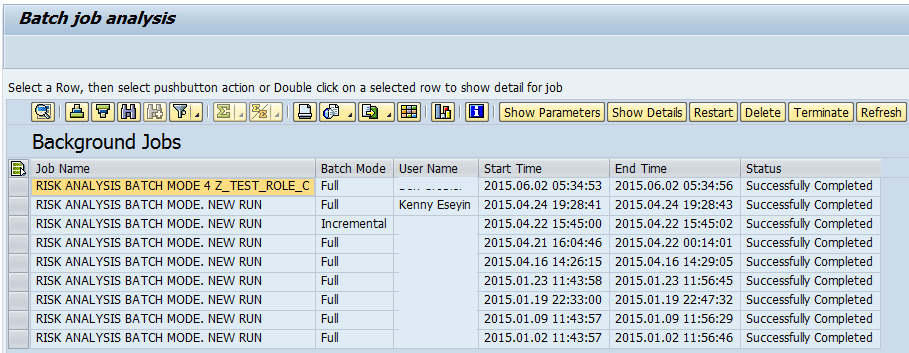
Figure 23
Monitoring of a batch risk analysis job
The risk analysis result displayed when executed in the Access management work center is real time, while the result displayed for risk analysis executed via the reports and analytics work center is based on the data updated when the batch risk analysis job was last executed. To ensure that you are reporting risk correctly in the dashboard, execute the batch risk analysis job successfully to update the data accordingly.
To enhance system performance, a good practice is to exclude objects to ensure better performance of the system. Objects exclusion for batch risk analysis can be maintained via the job scheduling interface (
Figure 24). To access this interface, follow menu path SPRO > SAP Customizing Implementation Guide > Governance, Risk and Compliance > Access Control > Access Risk Analysis > Batch Risk Analysis > Execute Batch Risk Analysis.
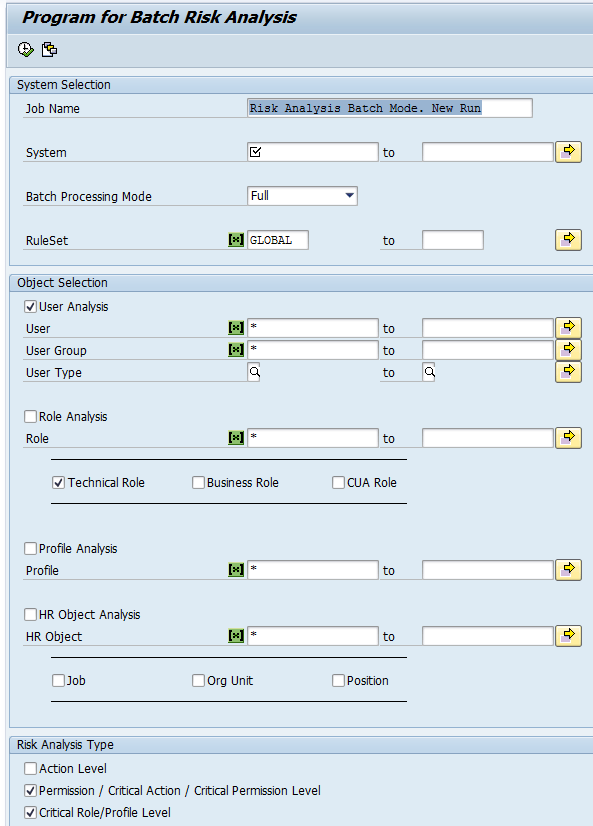
Figure 24
Batch risk analysis selection criteria
Objects can also be excluded from the batch risk analysis via the objects exclusion IMG node available via menu path SPRO > SAP Customizing Implementation Guide > Governance, Risk and Compliance > Access Control > Access Risk Analysis > Batch Risk Analysis > Maintain Exclude Objects for Batch Risk Analysis (
Figure 25).
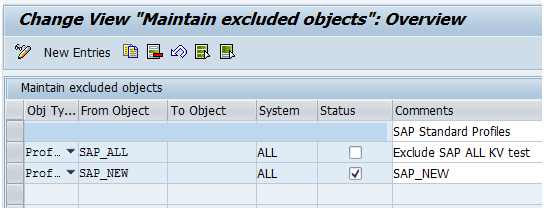
Figure 25
Maintenance of exclusion object list
Workflow Path with No Assigned Stage
Myth: A workflow path must always have at least a stage assigned before the workflow process version can be activated successfully.
Truth: You can set up and successfully activate a workflow process version with a path that has no assigned stages.
Trick: The workflow functionality in version 10.x uses the multi-stage multi-path (MSMP) concept that provides support for multi-tiered routing and approval matrices. This is not to say that every workflow process must have multiple paths and multiple stages associated with it.
In fact, a couple of business scenarios require you to set up a workflow path without associating a stage to it. This business scenario implies that you do not want an approval decision to take place at that stage of the workflow path. For example, to send the access request to the appropriate workflow path (for roles with approvers and roles without approvers), it is not sufficient to just set configuration parameter 2038 (Auto approve roles without approvers) to Yes. Actually, a routing rule (at the line item level) needs to be configured that sends the roles not needing any approval to a configured workflow path that contains no stage. For this scenario, the routing needs to be defined on the stage before the role-owner stage, such as the risk owner or manager approval stage.
I illustrate the above concept using an access request with two roles, one with an approver and the other without an approver in the role master data.
First, I examine the common mistake users make. That is to define a path with a stage that uses the default role owner agent ID (GRAC_ROLEOWNER) as shown in
Figure 26 and to expect the configuration parameter 2038 that is set to Yes to handle the scenario if an approver is not maintained against the role master data.

Figure 26
Path and stage settings for incorrectly configured role owner (no role approval process owner)
Say an access request is then submitted for a role (for example, VS::FI_AP_CHANGE-REVERSE_INV) that has an approver maintained in its master data and for another role (for example, VS::FI_AP_ACCOUNTANT) that does not have an approver maintained in its master data. In that case, the error message No agent found, cancelling path... is displayed, as shown in
Figure 27.
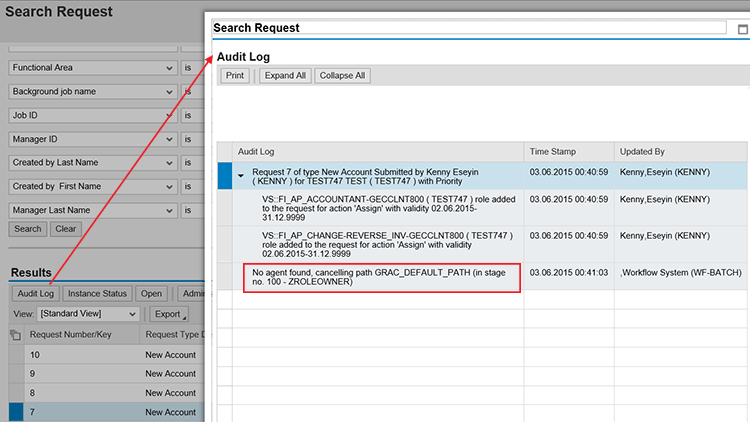
Figure 27
Error message displayed when detour logic for a role without an approver is not correctly maintained
To show the correct way to configure this typical scenario, I use a requirement that adds a bit of complexity to this business case. If the role owner stage is the first stage in the path, you encounter a technical challenge with the definition of the routing rule because the routing rule cannot be configured on the role owner stage itself.
The detour condition needs to be evaluated before the workflow process gets to the role owner stage. Therefore, you might want to define a dummy approval stage in which you have a routing rule logic evaluated to send the access request to the right workflow path. (Roles with approvers go to the path with approvers, and roles without approvers go to a path without approvers.) In this business scenario, you can set up a dummy escalation condition that moves the access request to the next stage of the workflow path after a minute.
First, I create two workflow paths with the first path having two stages (
Figure 28) and the second path having no stage assigned (
Figure 29).

Figure 28
Workflow path with two stages assigned
You will observe that the stage 110 is a dummy stage that has escalation set to 1 minute, after which the workflow task skips to the stage 120. More importantly, the default routing rule GRAC_MSMP_ROUTE_NO_ROLEOWNER is maintained on the dummy stage. That is where the system evaluates the attribute (approver in my example) of the role and determines which line item moves to the next stage (stage 120 where the default rule GRAC_ROLEOWNER is configured) and which line item entry needs to move to a new path.

Figure 29
Workflow path with no stages assigned
Notice in
Figure 29 that the path has no stage assigned, which means no approval decision will occur at this stage. In
Figure 30 I show the route mapping table. It tells the system to redirect the line item in a request to path Z_NO_APPROVAL from the standard path GRAC_DEFAULT_PATH (stage 110) when the rule result value of the default routing rule - GRAC_MSMP_ROUTE_NO_ROLEOWNER is NO_ROLEOWNER (i.e., approver not maintained in the role master data).

Figure 30
Route mapping table for initiator rule and routing rule
Figure 31 shows the audit log of the copy of the access request described earlier showing that the role with approver is now pending with the approver maintained in the role master data, while the role without an approver has been processed automatically. It also shows information about the escalation of the access request on the dummy stage that I created.

Figure 31
Audit log of the access request for a correctly configured workflow process
Basically, you need at least two stages in a path to activate the routing functionality. If you need to send a workflow item to another user within a single-stage workflow path, then use the forward option. Depending on the workflow process, you can further control to whom a workflow item can be forwarded. For example, configuration parameter 4012 (Default users for forwarding the Audit Log workflow) allows you to define the recipients (any GRC user or firefighter controllers defined in the SAP Access Control owners table) of a forwarded firefighter-related workflow item. The forward dialog box provides the option forward with return, in which case a request is sent to a user for information and the request is returned back after the user provides the information.
Furthermore, the escalation functionality used in my business example allowed me to specify the threshold for a request to be idle (in minutes) before the escalation process begins. Escalation normally moves an access request to the next stage after the defined timeline is exceeded. The frequency within which background job SWWHDEX is executed influences the configuration of the escalation timelines. The frequency to set for an SWWHDEX background job must be based on the escalation timeline defined in the stage settings of the approval workflow path. The corresponding program on which this background job works is the ABAP report RSWWDHEX.
The default frequency for the execution of this program is three minutes. The frequency for the execution of this program should be lower than the timeline defined for escalation in stage settings. For example, if you set up escalation to occur every five minutes after a workflow request has been created, then background job SWWHDEX, which controls workflow escalations and deadlines, must be set to execute at least every five minutes so that there are no delays to the configured escalation timelines.
Not adding a stage to a workflow path does not prevent you from successfully activating a workflow process version. The commonplace reason for a workflow process version activation error is that stage settings are not maintained at all (as shown in
Figure 32) when a stage is newly added to a workflow path.

Figure 32
Unmaintained stage task settings
Figure 33 shows a typical error that comes up when stage settings are not maintained for a workflow path and you try to save the workflow path by clicking the Save/Simulate button.

Figure 33
Typical error displayed when stage task settings are not maintained
Hence, before a workflow process version is activated, it is good practice to first perform a simulation to identify any potential error with the workflow process definition. A workflow process can be activated via the front end by following menu path SPRO > SAP Customizing Implementation Guide > Governance, Risk and Compliance > Access Control > Workflow for Access Control > Maintain MSMP Workflows or via customizing via menu path SPRO > SAP Customizing Implementation Guide > Governance, Risk and Compliance > Access Control > Workflow for Access Control > Generate MSMP Process Versions. Unlike the former option, the latter option allows you to force the generation of workflow versions even with errors. Note that this is not recommended and all errors should be resolved before workflow processes are generated.
Note
Step-by step-instruction on how to configure the workflow in this
section is beyond the scope of this article. If you need more
information about the workflow concept in SAP Access Control, consult
the following articles:
User Details Based on Multiple Data Sources
Myth: You can restrict the connector from where the system checks for user details for a standard access request and a template-based access request.
Truth: Restriction on the system considered for user details is only relevant to standard access requests. It does not work for template-based access requests.
Trick: The data source for user details is defined in customizing via menu path SAP IMG under Governance, Risk, and Compliance > Access Control > Maintain Data Sources Configuration. You can configure the system to restrict the connector in which user details are searched by setting the parameter 5023 to Yes or No. If set to No, then the first connector in the sequence definition is the sole connector where user details information will be picked. If the parameter is set to Yes, then the system scans down the sequence of connectors to fetch the complete user details. This parameter only works for standard access requests; it does not work for template-based access requests.
To ensure the right information is pulled in from the connectors into the SAP Access Control system, it is essential to successfully execute the appropriate synchronization jobs in the right sequence for the different connectors defined as the data source. Scheduling multiple background sync jobs (for example, repository and authorization) for different connectors at the same time can lead to deadlock issues and performance bottlenecks at the database level.
Instead, schedule a single repository sync job as a background job using a variant that contains all the connectors, and do not schedule background jobs individually for different connectors running at the same time. If you must run a repository sync job for each connector separately, use the after job option when scheduling the background job so that one job completes before the other starts. Furthermore, SAP recommends that you use as few connectors as possible to avoid possible performance issues. The system might have to scan through all the connectors if multiple connectors are configured as the data source for user details.
Threshold for Access Request Line Items
Myth: There is no way to control the threshold for the number of line items an access request can have at the point of creation.
Truth: A threshold can be defined for the maximum number of line items that can be in an access request during creation.
Trick: When you create an access request with too many line items for systems or roles, you might receive a timeout error message. To control this scenario in which users create an access request with too many line items, you can define a threshold for the number of line items to be contained in the access request in customizing.
To increase or decrease the check on the number of roles or system that an access request can have, you need to maintain the Max. Li per Request field of the SAP_GRAC_ACCESS_REQUEST MSMP workflow process via transaction code GRFNMW_CONFIGURE (
Figure 34).

Figure 34
The initial screen for workflow process maintenance
Note
Transaction code GRFNMW_CONFIGURE must be used with care and acute
understanding of what is to be achieved as its misuse can lead to data
inconsistencies in the system.
Switch to change mode by clicking the pencil icon.
Figure 35 displays.

Figure 35
Change mode of the workflow process maintenance screen
Highlight SAP_GRAC_AR process type and double-click the maintain process global settings (Not Versioned) folder. In the screen that displays, enter a value for MSMP Process ID (SAP_GRAC_ACCESS_REQUEST) as shown in
Figure 36.
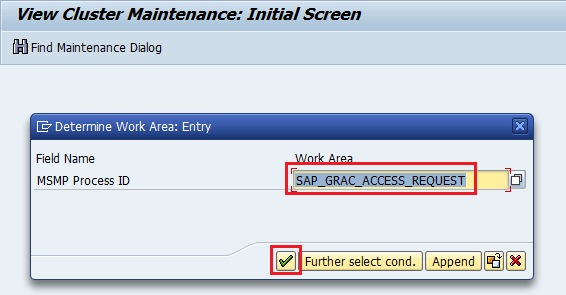
Figure 36
MSMP process ID assignment in workflow process maintenance screen
Click the green checkmark icon. In the screen that displays, enter a threshold value (for example 5) in the Max. LI per Request field (
Figure 37) and click the save icon.

Figure 37
Threshold value definition for line items in an access request
To demonstrate the impact of this setting; I attempt to create an access request with six line items.
Figure 38 shows the error displayed when the threshold value defined for line items in an access request is exceeded.

Figure 38
Error displayed when the defined threshold for a line item is exceeded
For a user access review (UAR) access request, the number of lines in the UAR request is controlled by the configuration parameter 2008 – Number of line items per UAR request.
Deletion of Access Request
Myth: You can delete an access request completely from the system as part of the system maintenance activities.
Truth: An access request cannot be deleted from the system. The best you can do is to cancel the request. This is to enforce audit and traceability requirements in the system.
Trick: As there is no functionality to delete an access request in the system, the closest option is to cancel an access request. To cancel an access request, you usually have to provide a reason. An access request can be cancelled via the Search Request quicklink in the Access Management work center as shown in
Figure 39.

Figure 39
Cancellation of an access request
You can delete an access request by clicking the Cancel Instance button after selecting the request you want to cancel. An access request can also be cancelled via the program GRFNMW_MANUAL_INSTANCE_CANCEL (
Figure 40).

Figure 40
The initial screen for the cancellation of an access request
This approach to manual cancellation of an access request is useful if you want to delete or remove a workflow item from an approver’s work inbox—for example, if the workflow item cannot be processed for whatever workflow issues or errors occur. To use the manual cancellation program, the administrator must be able to identify the external key or external key display of the access request. Only a request with the status DECISION PENDING or RUNNING can be cancelled.
Furthermore, program GRFNMW_BATCH_STALE_REQUEST can be used to cancel and abort requests for all the supported workflow processes. The initial screen with the value definition for the different selection criteria is shown in
Figure 41.

Figure 41
The initial screen for an MSMP stale request batch program
The period in days is used to capture when the request was last updated and not when the request was created. If you put an X in the Cancel field and click the execute icon, the system filters the result for workflow instances that can be cancelled, as shown in
Figure 42. If you choose False, the system filters the result and displays a report for the requests that cannot be cancelled.

Figure 42
Stale request report showing the status of different instances
To cancel the workflow instances based on the defined filters, select the Abort if could not cancel check box and click the execute icon as shown in
Figure 43.
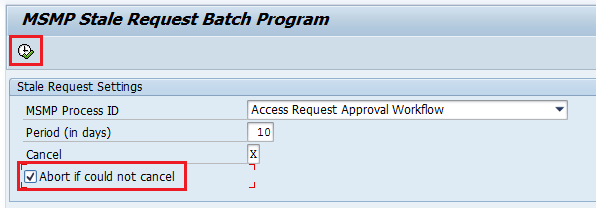
Figure 43
Selection criteria definition for stale request cancellation batch program
Figure 44 displays the output report with the status now showing CANCELLED.

Figure 44
Stale request cancellation report
Note that even though the program cancels or aborts a request, notifications are not sent even though the audit log captures the workflow item as closed. This is good to know, especially for a business requirement that requires a notification to be sent when an access request closes.
Risk Analysis for Locked and Expired Users
Myth: You need to activate the configuration parameter 1028 (Include Expired Users) and parameter 1029 (Include Locked Users) for expired and locked users to be considered in ad hoc risk analysis, respectively.
Truth: Configuration parameters 1028 (Include Expired Users) and 1029 (Include Locked Users) drive the inclusion or exclusion of locked and expired users in the batch risk analysis job-based dashboard reports and not ad-hoc risk analysis.
Trick: To consider locked and expired users in ad hoc risk analysis, you have to explicitly define the appropriate value in the Include Users selection criteria. The possible values are Locked, Expired, and Locked and Expired, as shown in
Figure 45.

Figure 45
Possible values for the Include Users selection criteria in ad hoc risk analysis
If you run the risk analysis without defining these selection criteria, then locked users and expired users are not considered in the ad hoc risk analysis even if you have maintained configuration parameters 1028 and 1029 as Yes. To ensure you get appropriate results when you execute ad hoc risk analysis, always successfully sync the user master in your landscape.
One of the tables updated when you run the user synchronization job is table GRACUSERCONN. Table GRACUSERCONN contains details about the status of users, including locked and expired status in the INACTIVE and EXPIRED columns, respectively, as shown in
Figure 46. The output of the table shows that users AATEST1 and AATEST2 are locked and expired, respectively. The content of table GRACUSERCONN forms part of the attributes evaluated when a risk analysis report is executed.

Figure 46
Inactive and expired users in table GRACUSERCONN
This table does not distinguish between the lock types (for example, 64 – locked by administrator; 128 – locked due to failed logon attempts). Therefore, irrespective of the reason why a user is locked, the system considers the user as locked when the risk analysis report is executed. Therefore, this table is a good place to start when troubleshooting issues related to risk analysis not showing up correctly for locked and expired users.
In
part 2 of this series on SAP Access Control, I address myths related to front-end printing, multiple access requests per user per system, making changes to access request forms in the approval screen, change log activation and reporting, the NetWeaver Business Client (NWBC) launch page, ruleset for risk terminator, role deletion in the back-end system, user default settings in the personal object worklist (POWL), and the risk analysis result screen when no violations exist.
Kehinde Eseyin
Kehinde Eseyin is a security architect. He holds a bachelor’s degree in computer science. He has about 12 years of IT security, governance framework, IS risk, and compliance experience gained by working in numerous global organizations. Over the years, he has demonstrated competencies in security design, information assurance, cyber security, data privacy, threat and vulnerability management, penetration testing, business architecture, project management, IT audit, IS controls framework, and identity and access management.
You may contact the author at
eseyinok@gmail.com.
If you have comments about this article or publication, or would like to submit an article idea, please contact the
editor.


