Accounts receivable (A/R) is a communications process that is the lifeblood of any company. If your collections process isn't running smoothly, you are putting your company at risk. Consider the typical problems of an A/R department. Deductions, underpayments, on account payments, and aged receivables keep collection specialists busy year-round. The author describes an enhancement in Release 4.6 that speeds up this process.
Key Concept
In the past, when you wanted to clear open items, you had better be ready to take the process all the way through to posting, because saving your work beforehand wasn’t an option. New functionality available since Release 4.6C allows invoices and credits to be assigned and saved in what SAP calls an assignment of open items. This assignment has a unique number assigned to it via payment advice numbers. It can be displayed, edited, downloaded, and finally used in a clearing transaction.
In the past, if you wanted to propose to clear open items in the Accounts Receivable module from a customer's account by netting invoices with credits, you would, for example, have to download the open items into Excel from either a report or a query, sorting and manipulating the ones you wanted to net. This would typically be a time- consuming analytical process to make sure you found all the open items. You would then correspond with the customer proposing this netting and wait for the reply. Once a reply was received, and assuming the proposal was accepted, you would have to go back into the system and reselect all the open items previously identified. You did double work just by having to look for the open items again.
New functionality available since Release 4.6C called assignment of open items enhances this process by allowing you to save the work you have done to identify what you want to clear or net. The results are retrievable so you can pull them up at a later point. This differs from traditional clearing methods (e.g., using transaction F- 32), which do not allow you to save your work before the posting. I will give you two business scenarios that display the functionality and then I will look at what configuration steps are necessary.
The New Functionality
The assignment of open items functionality (transaction FB15) allows you to view all receivables, payments on account, partial payments, and credit memos on one screen (Figure 1). Users can change the screen layout with standard ABAP List Viewer (ALV) functionality. You can assign open items together and save the assignment for future use. You can download the saved assignment into MS Excel, MS Word, Business Objects, or Crystal Reports.

Figure 1
Assignment of open items screen via transaction FB15
You can use payment advice numbers that are generated when an assignment is saved for future use, and you can clear open items directly from this transaction. If an assignment is unbalanced (i.e., you want to clear a number of transactions that don't balance to zero), this transaction launches F-30 (transfer with clearing) to enable the clearing process. Now I'll use two scenarios to introduce this functionality.
Scenario 1: You have multiple invoices and credits that you want to assign and clear. You want to be able to save this assignment and download it to be sent to your customer. Later, you want to pull up your saved assignment and edit it before performing a clearing.
First, select all the open items you want to assign by selecting the rows on both sides of the screen. Hold down the Ctrl key to select each row in the tables. Make sure you see the whole row highlighted. Only when the whole row is highlighted have you successfully selected the row (Figure 2).
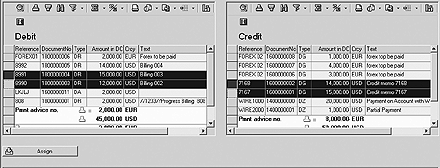
Figure 2
Both sides of the transaction showing the selected open items
Next click on the Assign button. Note that all the open items that have been assigned have been moved to the bottom of the screen under the Assigned items section (Figure 3). Note also the total at the bottom of the screen.
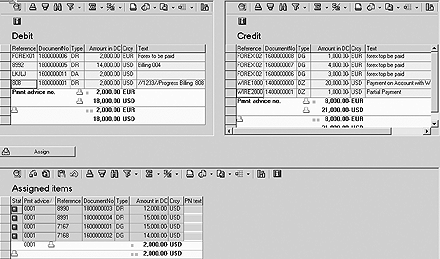
Figure 3
All the items selected have moved down from the top of the screen to the bottom
Note
You can integrate email connectivity with your customer master record to send email to your customer contact contained in the customer master record. You will need help from your Basis team to configure email connectivity. In addition, you need to maintain the customer master record Correspondence tab for the contact's email address on the Change Customer: Company Code Data screen (KNB1- INTAD). You also must maintain your email address on your personal profile. Explaining how to set up this functionality is beyond the scope of this article, as it involves more Basis than FI/CO configuration.
The red icon at the bottom left corner means that this assignment hasn't been saved. When you save this assignment, the icon turns yellow and a payment advice number is generated (Figure 4). This number allows you to retrieve this assignment in another transaction (i.e., F-30 [transfer with clearing]) if you want to edit it or make changes.
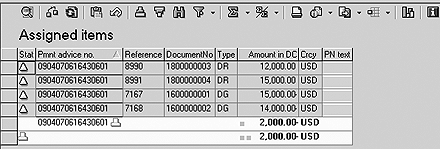
Figure 4
Icons (under Stat) mean that assignment has been saved
The confirm icon at the top of the screen only confirms a specific assignment. Since you can have more than one assignment at a time, you also have the choice of the confirm all icon, which allows for all present assignments to be confirmed. When you click on the confirm or the confirm all icon, the assignment changes status to confirmed with a green icon. Note that this is a process step and not a system requirement. You can just as easily process an assignment that has been saved (yellow icon) as you can one that has been confirmed (green icon). Figure 5 displays the assignment you just saved in a confirmed state.

Figure 5
Icons indicate the assignment has been confirmed
At this point, you can export this assignment to Excel and send it to your customer. To do this, click on the Export button and choose the application to which you want to export the assignment. Once this is done and saved, you can send it to the customer via email for review.
You now receive word back from your customer, who has requested changes. Since you can't edit the assignment without losing all your work, you use the payment advice number generated earlier and edit the assignment in transaction F-30. You enter the information shown in Figure 6.
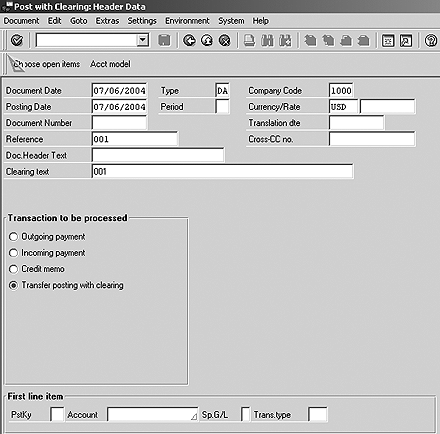
Figure 6
Select Transfer posting with clearing
Click on the Choose open items button. Enter the Account number 11 and Pmnt advice no. 0904070616430601. The payment advice number can also be selected from the drop-down box.
Tip!
Say you have a partial payment on an invoice, and this invoice was selected for clearing. However, the partial payment was omitted. When a clearing from FB15 is executed, the system activates the partial payment, informing the user of its existence. The user can either leave it there, clear it, or deactivate the partial payment to exclude it from the clearing.
Click on the Process open items button. Figure 7 on the next page displays all the open items previously selected in the assignment that are already active. The outstanding balance of 2,000 is Not assigned and awaits further processing.
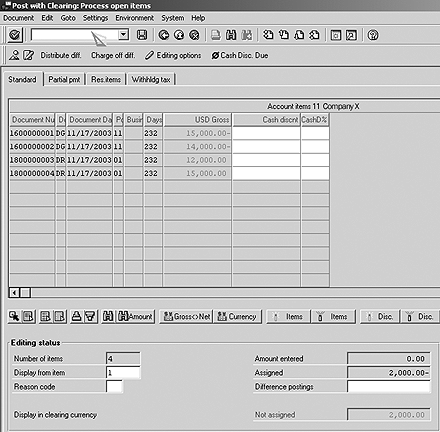
Figure 7
Open items are automatically selected and active
You have saved the work done previously without having to reselect all the open items again, saving a lot of rework. At this point, if the customer has asked for open items to be included or excluded from the clearing, you can use standard F-30 functionality to finalize the transaction.
Scenario 2: You have multiple invoices and credits that you want to assign and clear from your customer's account. Since the assignment nets to zero, you want to be able to clear it immediately and perform this function from the FB15 transaction. First, select the open items as before and assign them. The result of this assignment should be similar to what you see in Figure 8, with a net zero balance assignment.
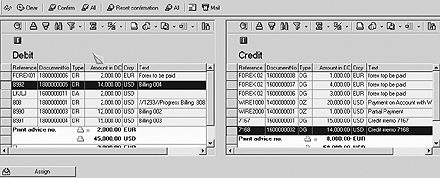
Figure 8
Select and assign open items
Next click on the Assign button. The items on the top of the screen move down to the assigned area of the screen, as shown in Figure 9. Note that the assignments have been confirmed and all open items net to zero.
At this point, you can clear these open items straight from this transaction. When you click on the Clear button, this transaction launches transaction F-30 (transfer with clearing) to clear the open items and generate a cle

Figure 9
Open items net to zero

Figure 10
Select a row and click on the Clear button to enable a clearing

Figure 11
Clearing document generated
Configuration Steps
This functionality is ready virtually out of the box, and you don't have to perform a lot of configuration. Follow these two steps:
Step 1. Define the advice type. From the IMG, you can access the Define Payment Advice Types screen using menu path SAP Customizing Implementation Guide>Financial Accounting>Accounts Receivable and Accounts Payable>Business Transactions>Incoming Payments>Incoming Payments Global Settings>Payment Advice Notes(Incoming)>
Define Payment Advice Types or via transaction OBCQ. Add the entry shown in Figure 12 if it's not already there.

Figure 12
Payment advice type defined
Step 2. The next step — defining the document type — is optional. When R/3 performs a clearing automatically, you can define which document type is to be used. The document type here is typically already defined, and I suggest you keep the default. However, if you ever need to change this default, you can use menu path SAP Customizing Implementation Guide> Financial Accounting>Accounts Receivable and Accounts Payable>Business Transactions>Open Item Clearing>Define Posting Key for Clearing Open Items or launch transaction OBXH. Double-click on Transfer posting with clearing.
Enter the document type you want to use for the clearing (Figure 13), and you are done. Note that this document type is defaulted for transaction F-32 (clear customer) as well.

Figure 13
Enter document type for the clearing
Shamshir Karim
Shamshir Karim is a senior consultant with Clarkston Consulting, a nationally recognized management and consulting firm that creates successful business strategies and implements technology solutions. Shamshir has been working with SAP since 1994, focusing on the FI/CO modules with emphasis on business process design, re- engineering, and cross-module integration to FI/CO. Shamshir graduated with honors from Bristol University, England, with a degree in computer science.
You may contact the author at skarim@clarkstonconsulting.com.
If you have comments about this article or publication, or would like to submit an article idea, please contact the editor.


