Learn how to activate an alternative set of Web applications to maintain the master data in SAP Managerial Accounting (CO). Configure them to meet your organization’s needs, showing only the fields you actually use and positioning the various screen parts so that users can focus on what’s important.
Key Concept
The technology behind the new master data applications is the Floor Plan Manager. There are two levels of configuration for the user interfaces built using the Floor Plan Manager. The first allows administrators to adapt the screens to remove fields that their organizations don’t use. The second allows end users to personalize their screens still further. The idea is that the business layer remains stable. Therefore, none of the other applications that use master data are affected because they read from the SAP tables as normal, whereas the user interface layer can move with the times. In the past, SAP advised against modifying user interfaces because the data entry screens were linked with the flow logic that handled the data transfer behind the scenes. Such a change was considered a modification, with all the associated fears. More recently, SAP has separated the user interface layer from the business layer for some transactions, meaning that the database and business layers (tables CSKS and CSKT, in the case of the cost center master records) remain stable, but the user interface layer can be adapted.
Although experienced SAP controllers are generally comfortable with the master data transactions in Cost Center Accounting, new controllers are likely to view these transactions with some trepidation because of their outdated user interfaces. I explain how to activate an alternative set of Web applications to replace the following transaction codes:
- Cost center maintenance (KS01-KS03)
- Internal order maintenance (KO01-04)
- Activity type maintenance (KL01-3)
- Associated cost center hierarchies (OKEON and KSH1-3)
- Internal order groups (KOH1-3)
- Activity type groups (KLH1-3)
The new master data applications are available from SAP Enhancement Package 6 for SAP ERP 6.0. As with all new functions in the enhancement packages, start testing by activating the business function FIN_CO_CCMGMT (CO, Cost Center Management) in the Switch Framework. To activate the business function, choose transaction SFW5, select the folder Enterprise Business Functions, and then scroll down to FIN_CO_CCMGMT (Figure 1).

Figure 1
Settings for business function CO, Cost Center Management in the Switch Framework
Unlike other business functions that immediately cause changes to the menu structure and individual screens, the new user interfaces are alternatives and do not affect the existing transactions. Upon activating the business function you notice a couple of new menu items in the IMG. To explore the contents of the business function, the best place to start is in Role Maintenance (transaction PFCG) where you find three new roles:
- SAP_CO_INTERNAL_CONTROLLER (internal controller)
- SAP_CO_COSTCENTER_MANAGER (cost center manager)
- SAP_CO_PROJECT_PLANNER (project planner and estimator)
The master data transactions are included in the role SAP_CO_INTERNAL_CONTROLLER. Therefore, I focus on the internal controller role, although I also look at SAP_CO_COSTCENTER_MANAGER when I discuss change requests. To view the details of the new role, choose transaction PFCG (Role Maintenance), enter the name of the role, and choose Display Legend. Navigate to the Menu tab. In the screen shown in Figure 2 you see the details of the new master data transactions for the cost center, cost center group, internal order, internal order group, activity type, activity type group, and so on. Administrators need to assign this role to their users so that the users can test the new applications. Going forward, you probably want to assign the new applications to your existing master data maintenance roles by copying the relevant folders between roles. If you are doing this, also consider copying the Worklist folder, the contents of which I discuss later.
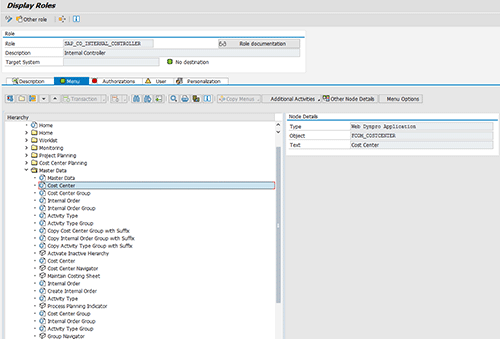
Figure 2
Settings for the Internal Controller role, showing the Master Data folder and Web Dynpro applications for master data maintenance
Technical Settings for Master Data Applications
At this stage, clicking the items in the role does not take you anywhere because you are still missing some technical settings to activate the Web Dynpro applications in your system. To make the Web Dynpro applications listed in the role usable, you need to activate the relevant Web Dynpro services. Choose transaction SE38 and execute report RSICF_SERVICE_ACTIVATION. When you are prompted to enter a technical name, enter WEB DYNPRO ABAP (Figure 3).
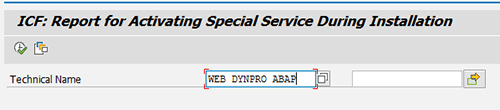
Figure 3
Settings for Web Dynpro ABAP in report RSICF_SERVICE_ACTIVATION
Now use transaction SICF to activate the services for each of the master data applications you intend to use. To find the new master data applications, execute transaction SICF, enter fcom* in the Service Name field, as shown in Figure 4, and press F8 to execute.
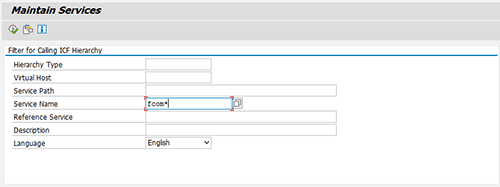
Figure 4
Find the services for the master data applications
The system generates a list of all the services in the FCOM package (Figure 5).
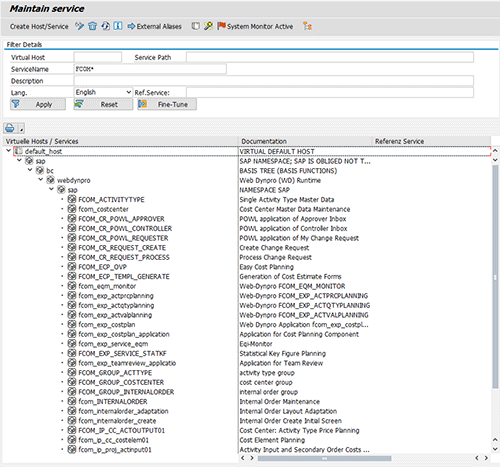
Figure 5
Web Dynpro Services for master data maintenance
Start by selecting and activating the following services (I discuss some of the others later) by choosing Service/Host > Activate in the menu (the menu was cropped from the screenprint used for Figure 5):
- FCOM_ACTIVITYTYPE
- FCOM_COSTCENTER
- FCOM_GROUP_ACTTYPE
- FCOM_GROUP_COSTCENTER
- FCOM_GROUP_INTERNALORDER
- FCOM_INTERNALORDER
- FCOM_INTERNALORDER_ADAPTATION
- FCOM_INTERNALORDER_CREATE
- FCOM_MASTERDATA (scroll down to see this one)
I explain why there are two configurations for the internal order later.
You are almost ready to start testing. You also need to activate the launch of these applications in the SAP NetWeaver Business Client. Repeat the last step, search for NWBC, and activate the service NWBC_LAUNCH (Figure 6).

Figure 6
Web Dynpro Service for launching the applications in SAP NetWeaver Business Client
The Web Dynpro applications are now active. Your final step is to determine which controlling area your controllers should use by entering the relevant controlling area in the user settings Choose System > User Profile > Own Data. Click the Parameters tab and enter the Set/Get Parameter CAC for the controlling area and the number of your controlling area (Figure 7). If it’s not shown enter this parameter manually, but because it dates back to the early days of SAP R/3, you may find that it is already set for your user. You also notice that I have a new parameter, FPM_CONFIG_EXPERT, that allows you to configure the user interfaces in this test system. I discuss this interface later.
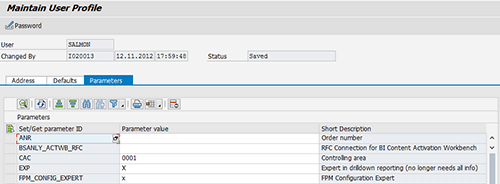
Figure 7
User settings CAC for controlling area and FPM_CONFIG_EXPERT for configuring the Web applications
Test the Master Data Applications
You are now ready to perform your first test. If you haven’t already installed SAP NetWeaver Business Client, use transaction NWBC to call all the roles currently assigned to your user in HTML. Figure 8 shows my roles. Of course, if you are using the SAP NetWeaver Business Client, you can use this client to access your roles as I did in my previous article, “How to Enhance the Experience of End Users Working in Financials Using Entry Pages and Side Panels.” You can find instructions for installing and operating this client in SAP Note 1029940.

Figure 8
An example of roles in SAP NetWeaver Business Client
To access the role menu shown in Figure 2, choose SAP_CO_INTERNAL_CONTROLLER. This takes you to the screen shown in Figure 9. You can set various themes that affect the look of your screens (this time I am using the Corbu theme), so yours might look slightly different. The chosen theme won’t affect the functions discussed in the article.

Figure 9
Master data applications in SAP NetWeaver Business Client
Now let’s explore the first of these applications to see how to create and change cost centers in the new environment. Choose the Cost Center link shown in Figure 9. All new applications begin with a search application such as the one shown in Figure 10. Here I’ve searched for all the cost centers assigned to my user in this test system. If this is a search result that I use regularly, I can save the results of this search by entering a name in the Save Search As: field. I can access my cost center in display mode by clicking the link in the results list.
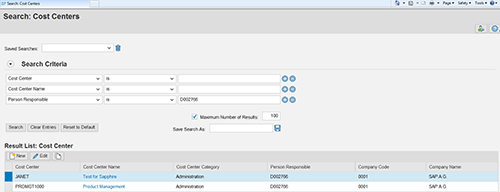
Figure 10
Search for cost centers
To change the cost center, choose the Edit button. To create a new one, select the New button, and to create a new cost center with reference to the selected cost center, click the copy icon. If you want to search according to different criteria, choose the + button and select another field such as controlling area, company code, business area, cost center category, user responsible, profit center, or department and enter the relevant search criteria.
I select the details for the cost center PRDMGMT1000. The default screen appears (Figure 11). If you’re moving from an existing environment, be assured that all the existing fields in the cost center, including those activated using user exit COOMKS01, are available in the new application. SAP has also moved the texts from table CSKT to the panel Translation and Long Text so that you can maintain texts in multiple languages in one session. This feature brings the cost center master data in line with account maintenance in FI, thereby facilitating processes for controllers working in multiple countries.
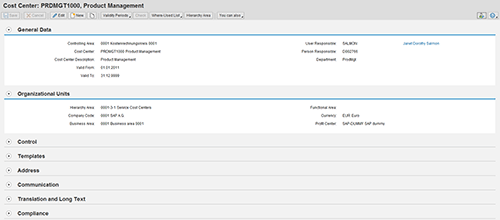
Figure 11
Cost center details (delivered configuration)
You also find access to familiar functions such as:
- Validity periods. You use this function to create data slices for those master data assignments such as the name of the manager or the assignment to a profit center that change over time.
- Where-used lists. You use this function to check, for example, the assets linked with the cost center, the activity types assigned to the cost center, the assessment cycles, distribution cycles, reposting cycles, and settlement rules that include the cost center internal orders and work breakdown structure (WBS) elements in which the cost center is defined as the responsible cost center, on the appropriate buttons.
Configure the Master Data Applications
The secret of the configuration for the new applications is the Floor Plan Manager, which manages the layout of each of the blocks in the screen shown in Figure 11. Each of these blocks is a user interface building block (UIBB) in the Floor Plan Manager. You can move these UIBBs about the screen as you see fit. You can change the sequence of the UIBBs or hide some completely. You can access the pop-up shown in Figure 12 using the personalization icon (top right) in Figure 11. In the pop-up screen, you can hide the UIBBs that you don’t use regularly, add hidden UIBBs, and decide whether the UIBBs are to be stacked on tabs or shown one under the other.

Figure 12
Personalization settings for cost center (end user view)
In my example (shown in Figure 13), I’ve hidden the Control block, the Templates block, the Address block, and the Communication block by using the delete icon in the Personalization pop-up screen shown in Figure 12. The blocks are not actually deleted, but rather hidden. You can return them to the screen using the add icon. Once you have removed UIBBs, you find that the Add icon becomes active, even though the button is still inactive in Figure 12. . Also consider using the arrows to change the sequence of the blocks or the Stackable button to return to the more familiar tabbed structure of classic SAP ERP screens. These settings only affect my user. Administrators worried about users hiding fields in which they need to enter data can disable the personalization function in the administrator view.

Figure 13
Cost center details following personalization
If you return to Figure 7, you recall the FPM_CONFIG_EXPERT parameter. This parameter determines whether you can change the settings for the screen for your user only as I just did or create new application configurations that change the look of the screen for your entire organization (if the flag is active you see an additional icon in the top right of Figure 13).
To explain all the possibilities available in the Floor Plan Manager, I would need to write a separate article. Figure 14 shows the configuration settings for the cost center. You reach this screen using the icons in the top right of the previous screen (in another system – in which I have change authorization for Web Dynpro configuration). The original transaction offers two fields with almost the same meaning: User Responsible and Person Responsible. The chances are that one of these fields is superfluous in your organization, so consider removing that field from the user interface. This offers a great opportunity to clean up your user interfaces, particularly for master data such as the internal order, which has more than 200 fields in its basic form, of which often as few as 20 are actively used.
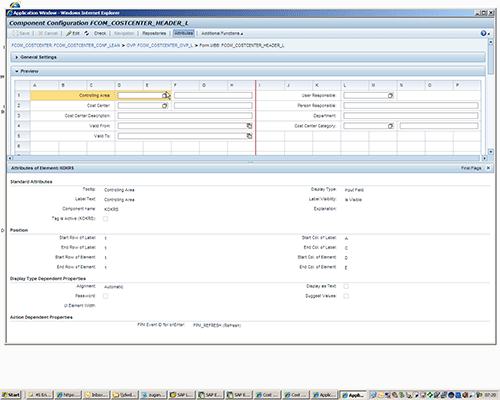
Figure 14
Floor Plan Manager settings for a cost center (administrator view)
You may recall that I mentioned that there were two Web Dynpro configurations for internal order maintenance in Figure 5. One of these includes all the UIBBs for the internal order, and the other is a slimmed-down version in which some of the UIBBs are hidden. The activity type has far fewer fields, but a handful of cryptic ones that often aren’t in active use and can confuse new controllers. Once you have slimmed down your master data, rest assured that the configuration can be transported normally from your development system to your productive system.
I now look at the new cost center hierarchy application to find out what has changed there.
Cost Center Hierarchies and Groups
You can access cost center hierarchies and cost center groups using the Cost Center Group link shown in Figure 9. The new application doesn’t distinguish between the cost center standard hierarchy (the one assigned to the controlling area and to which all cost centers must belong) and the cost center groups (any groups of cost centers) as the old transactions did. Instead, it provides access to both from the same Web application. Again, the first screen (shown in Figure 15) is a search screen with obvious parallels to the one shown in Figure 10. If you need further selection options, you can again choose the + button. If you are used to working with selection variants to make complex selections, note that selection variants are available in the screen shown in Figure 15. You can call the old consistency checks by selecting the Check and Help button. Additional functions are available for checking the consistency of standard hierarchies on the Standard Hierarchy button.
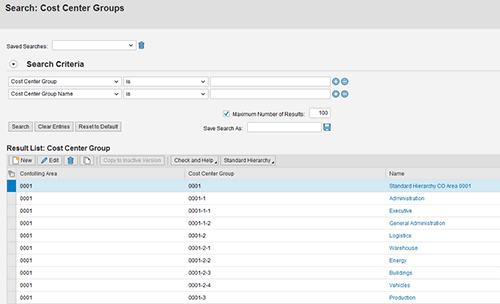
Figure 15
Search for cost center groups
Now you need to build the tree structure that you plan to use in reporting and to select related cost centers (e.g., as receivers for an allocation). Click one of the links in the result list in Figure 15. In my example I chose node 0001-3 (Production) by clicking the Production link. The user interface has been completely redesigned to make tree maintenance and the assignment of cost centers easy. If you have large hierarchies, you can enter node names in the Find box (my example is so trivial you don’t need to, but, real trees can have thousands of nodes).
One challenge of group maintenance in the past was that the cost centers were time dependent, but the trees were not. One minor change to the user interface is that the new default is to display the tree structure on the current key date (Preview on Key Date). If you want to select a wider time frame, you can do this by choosing the Set Preview Period button (Figure 16). If you have multiple data slices for one cost center within this time frame (perhaps there has been a change of manager), you see a cost center node in the hierarchy for each slice.

Figure 16
Cost center group maintenance
You also notice a new button called Select Hierarchy Version in Figure 16. The idea behind this button is that you can prepare your reporting hierarchies for organizational changes before they happen. To create a new version in anticipation of a reorganization, follow IMG menu path Controlling > Cost Center Accounting > Master Data > Cost Centers > Define Hierarchy Versions. Enter a new version. In my example, I enter a version JS1 to be released on 01.02.2013 (Figure 17).
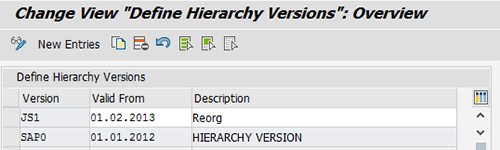
Figure 17
Define a hierarchy version
What I can now do is to return to Figure 16 and make my existing hierarchy inactive by assigning it to this version. This results in the tree structure (technically a set) being copied from one set class to another. Although the tree is assigned to this set class, I can make whatever changes are needed, but it can’t be used for reporting, planning, and so on. Once you are ready to use the hierarchy, you can use the function Activate Inactive Hierarchy to copy the tree back into the set class used for live data. From then on it is available for active use. I recommend that you schedule the activation of very large hierarchies to run at a time when system load is low.
Change Requests
With regard to the subject of organizational changes, another shift since the early days of SAP R/3 concerns the more stringent governance requirements around master data changes. With this in mind, SAP has added a change request to the cost center maintenance application. You find the new request on the You can also button shown in Figure 11. From this button you can initiate a change to an existing cost center or request a new cost center. In Figure 18 I decided to change a cost center as you can see by the request type. When the request is saved, the system generates an ID for the request, enabling you to track its whereabouts and progress in SAP ERP.

Figure 18
The initial screen of a change request
To access the form in which you can enter the required changes, click the Continue button. I initiate a simple change, requesting that a new manager replace me as the cost center responsible (Figure 19). Each of the fields in the form is connected with a field in the underlying application, so the system checks that the data you enter is valid before you can submit the form.

Figure 19
The form within the change request
If you need to submit additional textual information, scroll down to the Comment block shown in Figure 20 and enter a note.
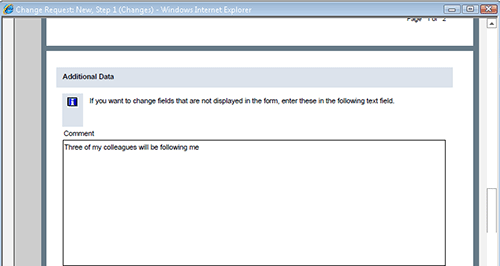
Figure 20
Notes within the change request form
You are now ready to submit your form. Instead of using SAP Business Workflow to determine who should authorize the change request, the mechanism used here is simple. All change requests are stored in the following worklists:
- The worklists for the requester contain requests submitted by that user (My Change Requests).
- The worklist for the approver contains submitted requests awaiting approval. This Web Dynpro application is included initially in the Cost Center Manager role.
- The worklists for the controller contain approved requests awaiting processing and completed worklists. This Web Dynpro application is included in the Internal Controller role.
Before you can use any of these three worklists, refer to the list of Web Dynpro services that are shown in Figure 5 and activate the following services:
- FCOM_CR_POWL_APPROVER
- FCOM_CR_POWL_CONTROLLER
- FCOM_CR_POWL_REQUESTER
For the change request itself, also activate these two services:
- FCOM_CR_REQUEST_CREATE
- FCOM_CR_REQUEST_PROCESS
I now use the Cost Center Manager role that I referred to earlier to select and approve the change request. Figure 21 shows the approver worklist (Change Requests for Approver) within the cost center manager role. You also notice a second worklist showing those requests submitted by this user (My Change Requests).
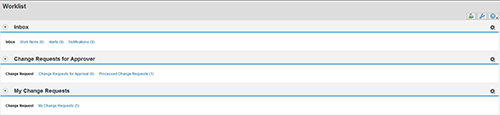
Figure 21
Worklist for change requests within the cost center manager role
Users cannot approve their own requests, but to demonstrate the principle, I approve one of the requests submitted by a colleague by choosing one of the requests in the list shown in Figure 22.
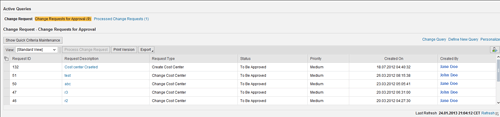
Figure 22
List of requests pending approval
Within the change request the approver can read the information entered in the form together with any notes and attachments. When satisfied, approve the request using the Save and Approve button shown in Figure 23.
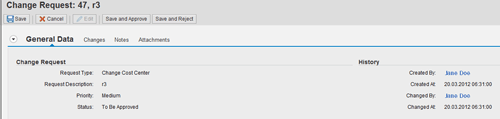
Figure 23
Approve a change request
This results in a change to the status of the change request. The approved change request now appears in the controller’s worklist. In the case of a simple field change, the name of the new manager is passed to the cost center maintenance application. The controller then saves the change, updates the status, and the job is done.
However, note that the worklist includes two views: one for requests requiring processing and another for completed change requests. These views ensure that you can satisfy compliance requirements for proper change management around cost center changes. Figure 24 shows the list of all completed change requests. Clicking the request takes you into the form with details of why the change was necessary.

Figure 24
The list of completed change requests
Janet Salmon
Janet Salmon joined SAP in 1992. After six months of training on R/2, she began work as a translator, becoming a technical writer for the Product Costing area in 1993. As English speakers with a grasp of German costing methodologies were rare in the early 1990s, she began to hold classes and became a product manager for the Product Costing area in 1996, helping numerous international organizations set up Product Costing. More recently, she has worked on CO content for SAP NetWeaver Business Warehouse, Financial Analytics, and role-based portals. She is currently chief product owner for management accounting. She lives in Speyer, Germany, with her husband and two children.
You may contact the author at janet.dorothy.salmon@sap.com.
If you have comments about this article or publication, or would like to submit an article idea, please contact the editor.