Use the little-known SAP standard report RSTXPDFT4 to create a PDF version of any SAP report output. You can then easily store, transfer, or email the PDF file to other team members or even to employees or external bodies. This saves you time and protects your output from users who might inadvertently change the data while trying to format it.
Key Concept
A spool file is SAP’s way of temporarily storing data to print within the system. If you save a document to your spool file instead of immediately printing it, you can access the print job at a later date, or you can have someone else print it for you. By saving your file as a spool file, you make it possible for someone else to print that file in another location (e.g., someone in the printing department with access to a payslip or color printer).
One of the great aspects of SAP’s HR suite is its reporting capability. However, many users find it difficult to transfer their reporting outputs to other users. Users often end up downloading their output to Microsoft Word or Excel and must then reformat it. Besides being a drain on time, this method also allows another user to change data in the report. This can become a problem when members of other departments ask you to email reports or when employees ask for copies of their past payslips or end-of-year summaries.
Luckily, I have a solution. Using a simple SAP standard report, you can turn any report into PDF files and then easily email or transfer them without worrying about corrupting or changing the information. Users can also send employee payslips to mortgage approvers and other interested parties using this method. To demonstrate the reporting capabilities, I am going to take you through the steps to generate an employee’s payslip and turn it into an email-ready PDF file.
Step 1. Generate a remuneration statement. As shown in Figure 1, you first need to generate the employee’s remuneration statement. In the United Kingdom, use transaction code PC00_M08_CEDT to complete this step.

Figure 1
Generate a remuneration statement
The transaction code you use depends on your country code; users in the US should use PC00_M10_CEDT. Once you successfully generate the remuneration statement, the output should look like Figure 2.
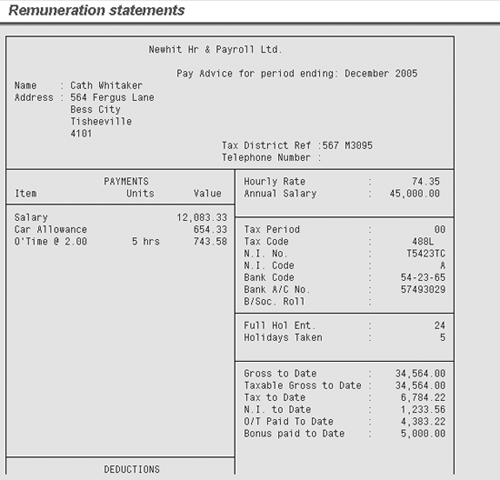
Figure 2
The remuneration statement
Step 2. Send the statement to your spool file. Click on the Print button and, instead of sending your file to the printer, generate a print spool file (or spool request — a spool request turns into a spool file when you view or download it). To print the remuneration statement to the spool file, change the existing print properties. Click on the Properties button (shown in Figure 3) of your Print Screen List.
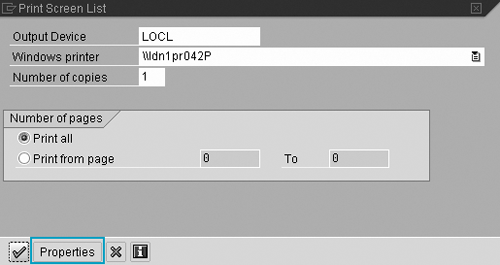
Figure 3
Click on the Properties button in the Print Screen List
Double-click on the Time of printing field (as shown in Figure 4). A selection field appears in the lower half of the screen (Figure 5). Select the option Send to SAP Spooler Only for now. This generates an SAP spool file containing your remuneration statement.

Figure 4
Change the print spool settings
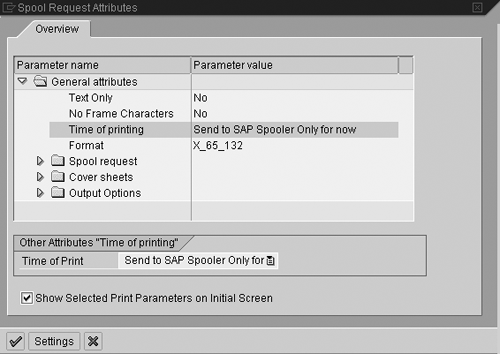
Figure 5
Change the time of printing and add the option to the initial print screen
Another field that appears gives you the option to add the Time of Print field to the initial print selection screen (shown in Figure 3). If you check the box beside this field, every time you click on the Print button, the initial print selection screen gives you the option to change the Time of printing selection. Once you complete both of these steps, click on the green check mark icon in the bottom right of the screen. This takes you back to the Print Screen List. As shown in Figure 6, the Time of Print field is now on the initial print selection screen. Click on the green check mark icon to generate your SAP spool file.

Figure 6
The updated Print Screen List with Time of Print button
Once you click on the icon, a confirmation message appears at the bottom of the screen (Figure 7). Note the spool request number (in this case 31926). You use this number later as the key to generate your PDF file.

Figure 7
The spool request confirmation message
Step 3. Turn your spool request into a PDF file. Now you need to run a program to turn your spool request into a PDF file. To do this, use transaction SE38 and enter the program name RSTXPDFT4 as shown in Figure 8. Then, click on the execute icon or press the F8 key to run the program.
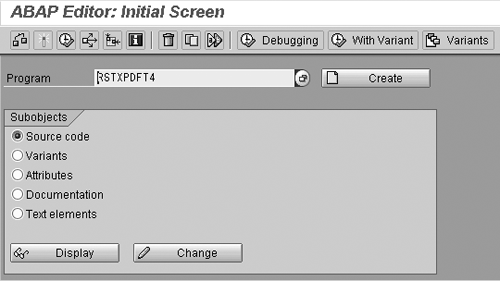
Figure 8
Run program RSTXPDFT4
Note
If you forget the spool file number or miss the message, you can view your spool list from within any transaction by selecting System>Own Spool Requests from the SAP menu path. This shows you a list of all your spool requests and their spool numbers.
When you execute the program, it shows you the selection screen (Figure 9). Type your spool request number in the field and type the file path and name where you want to save your PDF. Next, check the box next to Download PDF file. Finally, click on the execute icon or press the F8 key.
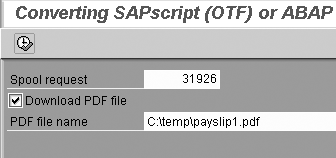
Figure 9
The selection screen after you execute the conversion program
The system then shows you the file location and name and asks for your confirmation (Figure 10). Click on the Save button and the system creates a final PDF, as shown in Figure 11.

Figure 10
Confirm PDF location file name

Figure 11
PDF remuneration statement
When you send your new PDF to others, they can open it with Adobe Reader, a free program available online at www.adobe.com/products/acrobat/readstep2.html.
Greg Newman
Greg Newman is originally from New Zealand, and has been implementing and supporting HR and Payroll systems since 1999. He has worked on numerous SAP HR and Payroll implementations for Great Britain, the Republic of Ireland, Australia, New Zealand, and several other international rollouts. Currently Greg is a managing consultant working for Newhit HR and Payroll Solutions in England.
You may contact the author at greg.newman@saphr.com.
If you have comments about this article or publication, or would like to submit an article idea, please contact the editor.