Learn how to create, edit, and update picklists and cascading picklists in SuccessFactors systems. Also, learn how to configure the picklists’ permission in the administration tools.
Key Concept
Picklists are the data files that can be configured to create drop-down lists in some SuccessFactors modules, such as Employee Profile, Employee Central, Succession Planning, and Recruiting. Cascading picklists reduces long lists of picklist values to a more manageable size by linking the picklist values to a parent value in another field.
I show you how to update your SuccessFactors system with new picklists and cascading picklists based on these new picklists. This method helps you manage and organize your picklists in a more efficient and helpful way. To illustrate my points I use the Geographic Mobility field option in the employee transfer record in SuccessFactors as my example. With this functionality, SuccessFactors gives employees the option to record if they are willing to be transferred from one job location to another. In addition, employees can select which specific regions to which they are willing to be transferred. With this example, I show how you can easily create picklists and cascading picklists to achieve your company's goals. This method can be used for a variety of options (e.g., employee address, education, or certification), but I focus on the Geographic Mobility option.
First, I explain what a picklist and a cascading picklist are. In this example I link the picklist ID region to the picklist value (
Figure 1) to cascade the picklist (
Figure 2). I configure what values are in which region (West, East, South, and North in my example).

Figure 1
Example of picklist values

Figure 2
Example of cascading picklists
In
Figure 1 I add the possible picklist region drop-down values (5144, 5094, 5145, and 5146) to the picklist IDs. This action creates the drop-down options under each district in the region for the picklist. Based on these settings, for example, the West region (5144) contains the cascading district values for region 5144 (e.g., Washington, Oregon, California, and Nevada, shown in
Figure 2). The system generates these option IDs, and they are unique identifiers for the picklists. Therefore, in this example, the region is the picklist, and the district is the cascading picklist.
Why Use Picklists?
Picklists are the definitions used for the drop-down options for fields in a Live Profile in SuccessFactors. They are used to validate the background and personal information data for employees. They are also reportable options that can be used in ad hoc search reports and talent reports. Using picklists enables users to reduce data entry errors (saving time and effort) and also standardizes the entries.
Note
My instructions apply to all releases of SuccessFactors and are release independent.
- Access picklist management. In this step you give users permission to access the picklists so that they can manage them.
- Export the picklist file and edit the picklist. Exporting the picklist is a process in SuccessFactors that allows users to download the field values from the system. In this article, this refers to downloading the existing picklists from the SuccessFactors system to the user's local hard drive, where users can make changes to the picklist values.
- Import the modified picklist file. Importing the picklist is a process in SuccessFactors that allows users to upload a modified file into the system. In this article, this refers to uploading all the new cascading picklists’ values from the user’s local drive back into the SuccessFactors system.
- Create cascading picklists. In the downloaded file, you can create parent-child relationships. This means that you can assign child values (the cascading picklist) to the existing picklist (the parent value). You also can create a new set of picklists (parent value) and create a cascading picklist (child values) to the value.
In SuccessFactors terminology, export means to download a file from the SuccessFactors system to your local hard drive. Import means to upload a file from your local hard drive into the SuccessFactors system.
Step 1. Access Picklist Management
There are two ways for accessing picklist management permissions:
- Through administrative privileges
- Through role-based permissions
Here’s how you can configure these two options.
Option 1: Administrative Privileges
The first step in managing the picklists is to give users access to the picklists to make changes. You can access this through the administration tools screen by following menu path Administration Tools > Set User Permissions > Administrative Privileges. In the screen that appears click the System Properties link (
Figure 3).
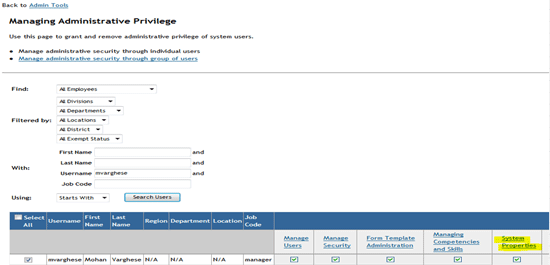
Figure 3
Access the administrative privileges screen
In the permission page (
Figure 4), you can modify, create, and import or export picklists for the selected user or a group of users. If you need to give access to a picklist to a large number of users, you can group them by using a filter, such as location, district, or job code. In this way, all users with the same job code, for example, get permission to add, modify, or delete these picklists. In this example I give permission to an individual user to access the picklists. Select the Picklists column check box (highlighted in yellow in
Figure 4) and click the Save Admin Permission for Selected Users button.

Figure 4
Get permission to access the picklists
Option 2: Role-Based Permissions
Role-based permission allows you to add as many roles as needed for your company to perform their activities. Role-based permission provides each role with a different access level.
These are two steps for creating role-based permissions:
- Create a new permission group
- Create a new permission role
First, I show how to create a permission group. You can this via the administration tools screen. Follow menu path Administration Tools > Set User Permissions > Manage Permission Groups, which opens the screen in
Figure 5.
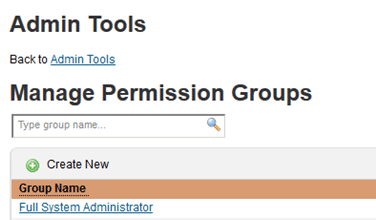
Figure 5
Manage the permission groups
To illustrate this step I create a Full System Administrator group, and I assign one user (role) to this group based on the User Name (
Figure 6). This can also be based on other, multiple attributes— parameters such as job, location, division, or department. For the purpose of this article I make this a simple rule (e.g., based on user ID [admin]). This means that the user with the user ID admin is part of this permission group.
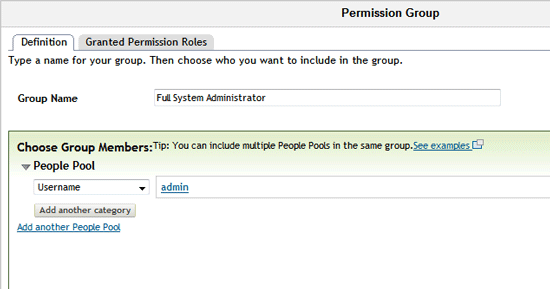
Figure 6
Assign people to the permission group
Next I show how to create a permission role; for this I create a Full System Administrator role and give it the required permission. You can access this through the administration tools screen by following menu path Administration Tools > Set User Permissions > Manage Permission Roles (
Figure 7).

Figure 7
Create a permission role
Permission can be given as follows. Click the new Permission Role name link (in this case, Full System Administrator). This opens the Permission settings screen (
Figure 8). On the left of the screen, under Permission Role Details, click the Permission… button and all the possible transactions that can be assigned to this role are displayed (in the middle of the screen in
Figure 8). Since you want to grant access to picklist management, click the Manage System Properties option. In the screen that opens on the right, select the Picklist Management and Picklist Mappings Set Up check box. Then click the Save Changes button and the Full System Administrator role has permission to access picklist management.
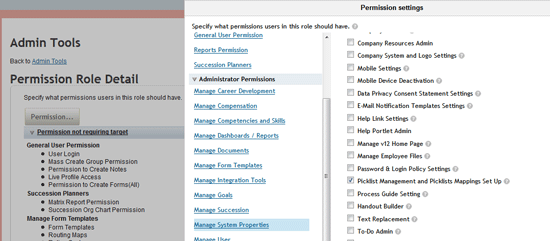
Figure 8
Assign permission to the role
As the last step in this process you want to assign the permission role you created to a group. In this example, you need to assign the Full System Administrator role to the permission group Full System Administrator. Follow menu path Administration Tools > Set User Permissions > Manage Permission Role, which opens the screen shown in
Figure 9. Click the Add… button to assign the Full System Administrator role to the permission group Full System Administrator and then click the Done button to save your changes.
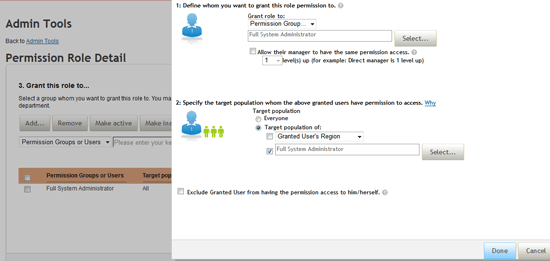
Figure 9
Assign the permission role to the group
Note
Role-based permissions cannot be configured in the instance unless this
is made available in the Provisioning system. This can be achieved by
the implementation partner team.
Step 2. Export the Picklist File
In the previous step you gave permission to the user to get access to the picklist. In this step, you change the existing picklist, so first you need to export (download) the existing picklist from the SuccessFactors system. Follow menu path Admin Tools > Company Setting > Picklists Management. In the screen that appears you can export (or import) the picklists (
Figure 10).
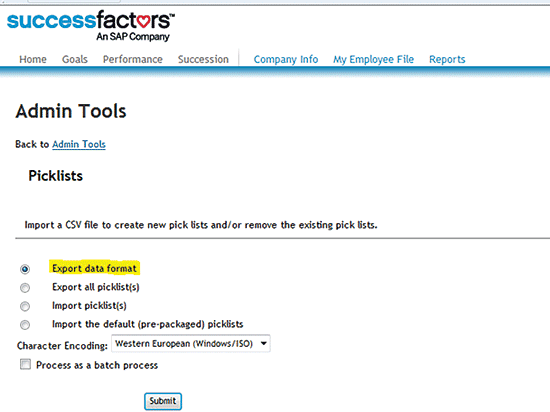
Figure 10
Import (or export) your picklist file
In this example, you export the picklist. Select the Export data format radio button and then click the Submit button. This action downloads the picklist to your local PC or laptop. Once it’s been successfully downloaded, you can locate the file where it is saved on your computer.
Figure 11 shows the file I have downloaded for this exercise.

Figure 11
Picklist is downloaded into an Excel formatted spreadsheet
Note
It is a good practice to version-name each file as there are often multiple downloads and uploads and version control helps you identify the correct files to modify and upload.
Double-click the name of your downloaded picklist file (
Figure 11) to open the Excel picklist spreadsheet shown in
Figure 12. Here you see the regions and the districts that are listed in the picklists. In this spreadsheet you can make changes to your picklists to create the cascading picklists functionality.

Figure 12
Example of a downloaded picklist Excel file
You can make changes to the file that was exported from the SuccessFactors system. Once the changes are made you can save your new picklist, and this file can be imported (uploaded) into the system.
Before you import your picklists, you have the chance to make changes to your picklists. Your options are:
- Change the labels. You can change the label of your picklist by editing the appropriate language directly in the .csv file. Users may want to change the existing label or may want to correct a data entry error using this method. Users can change labels simply by overwriting the old label with the new label in the existing file and saving the change (Figure 13).

Figure 13
Change your picklist label
- Add a new item. You can add new items to the picklists by adding an additional line item. For example, you can add a new district or region to your list (e.g., the region could be South and the district could be Albany) simply by entering the appropriate fields (e.g., ^picklistId, minValue, maxValue, value, status, and labels).
- Change the order. You can reorder the rows in your picklist items; for example, they can be in alphabetical order or by region.
- Delete items. Delete any field from a picklist. First, change the status of the picklist item to be deleted. Simply type DELETED in the status column of the picklist work sheet (Figure 14) and save your new .csv file. I recommend that you do this when a mistake has been made to a picklist during setup. Deleting an item breaks any links to or from any data using that item. Once the item is deleted, you can start over again, and you don’t have to worry about any incorrect or broken links in the system.

Figure 14
Delete a picklist value
- Mark an item obsolete. Make a picklist ID obsolete by changing the status. This can be done simply by typing OBSOLETE in the status column of the picklist worksheet (Figure 15). This action keeps the data you previously selected intact, but does not display the entry in the drop-down options for anyone to select moving forward. The difference between doing this and deleting an item is that when it’s marked obsolete it still shows up in past individual records, but it is no longer a drop-down option for current and future picklists. When an option is deleted (as discussed previously), it is treated as if that value were never an option, and breaks all the links to the data.

Figure 15
Make a picklist value obsolete
Import Picklists
Once you make the changes to the .csv picklist file, you can import it into the system.
Figure 16Figure 17

Figure 16
Import the picklist files

Figure 17
Confirmation that your new picklist template file has been successfully imported
Step 4. Create Cascading Picklists
A quick fix to speed up the picklist functionality is to reduce the number of drop-down options by cascading the picklist files to reduce the long list of drop-down values to a manageable size. You can do this by creating a parent–child relationship in the picklist .csv file.
Note
Once you choose the parent field value, it automatically displays the appropriate child value, but it can't be entered the other way around (e.g., you can't choose the child value to display the parent value).
Table 1

Table 1
Example of picklist values with parent and child drop-down options
In this example I use the geographic mobility function of the SuccessFactors Succession Planning module to show how to cascade picklists. Note that you can share picklists d across modules. The SuccessFactors Succession Planning module is delivered with a standard picklist that you can export (download) and modify.
There are two steps for creating a creating a cascading picklist. First, you create the parent value and then you create the child value to attach to it. I discuss how you can do both in the following sections.
Create the Parent Value
Here you want to add the new picklist values (the parent values) to the .csv file that was previously exported (downloaded) from the system (step 2).
Figure 18 shows the list of the parent values I want to create. The ^picklistId value in row 1 under column A is the field name for the regions (parent values): East, West, North, and South, in this example. Leave the OptionId value in row 1 under column B blank as this is generated later by the system. After you update the file with the new picklist values, you can import it into the system.

Figure 18
The .csv file with the picklists’ values
After you update the picklist file with your new parent values, you import it back to the SuccessFactors system (
Figure 19). Select the Import picklist(s) radio button and choose the No radio button option as at this point you are only editing the picklist, not importing it. Then click the Browse… button and select the .csv file you want to import from local system where it is saved. Click the Submit button to import it. After you import (upload) the new file, it replaces the existing file with the newly modified or updated file in the SuccessFactors system.

Figure 19
Import the picklist .csv file
Once the file is imported a status message appears in the next screen that lets you know that you have successfully imported your edited picklist file with the new parent values (
Figure 20).

Figure 20
Message telling you that that your new picklist file has been successfully imported
Figure 21Figure 21Figure 16

Figure 21
Newly created picklists
Create the Child Value
Now it's time to create the parent–child (cascading picklist) .csv file (for linking the parent value to the child values). When creating the child .csv file, you must link the child values with the parent values. In the Excel spreadsheet shown in
Figure 22, create the ^picklistId district (child) that comes under the region (parentOptionId). You created the parent previously and already know the system-generated option ID for the parent file. When creating the child file, leave the OptionId field blank for the district and link the appropriate parentOptionId values with the child.

Figure 22
The new cascading picklists with parent and child linked .csv files
Next, you need to link the parent value to the child value. In this example, the parent ID option for East is 5143, so you want to link all the districts that need to fall under the East region to this parent ID. Add Ohio, New York, Pennsylvania, and Washington, DC, to the East region. This you do by modifying the .csv file that was downloaded from the system (
Figure 22).
Follow the same steps (listed in step 2) to export the new .csv file into the system (
Figure 23). The figure shows the new values for the regions and districts that were imported using the new .csv file. (e.g., each region shows the appropriate districts linked to it).

Figure 23
The new cascading picklists with the linked region and district values
Configure the Data Model
Figure 24

Figure 24
Data model .xml code for mobility
After you enter the new code in the data model, you can save the new code in the provisioning system. This action results in the final output of the configuration in the front end for the users (
Figure 25)
. Users can use this newly configured functionality to select whether they are willing to relocate, and the regions and districts to which they are willing to relocate.

Figure 25
The cascading picklist view in the front end
Mohan Paul Varghese
Mohan Paul Varghese is an Advisory Manager with PwC based in Seattle, WA. He has been helping clients implement SAP ERP HCM on-premise/in the cloud for more than 15 years. He has been involved in large, full-scale SAP ERP HCM implementations using the breadth and depth of SAP modules. Prior to PwC ,Paul worked with SAP, Accenture, and HP.
You may contact the author at
Mohanpaulv@hotmail.com.
If you have comments about this article or publication, or would like to submit an article idea, please contact the
editor.


