Learn how to leverage the rules engine within SuccessFactors Employee Central. Configuring rules within Employee Central can be very useful for projects to be able to meet unique and company-specific requirements within their organization. Having a good understanding of the rules engine and its capabilities allows project teams to accelerate their understanding of the capabilities and provide how-to solutions for requirements more effectively.
Key Concept
The SuccessFactors Employee Central rules engine is a configurable capability that is delivered within the SuccessFactors platform, allowing companies to define customer-specific functionality within the cloud HR solution to give them field-level defaults, calculations, and warning or error messages as needed. Once implementation teams gain a good understanding of what is possible through configuring the rules engine, they can fast-track the ability to do fit or gap analysis on requirements gathered and facilitate additional requirements as they arise.
As companies migrate to SuccessFactors Employee Central, it is very important for project team members to have a clear understanding of the delivered capabilities of the rules engine in SuccessFactors. The rules engine within SuccessFactors Employee Central allows companies to configure system functionality and behaviors that are tailored to their own specific requirements. The rules engine allows companies to create company-specific validations and rules tied to the fields and screens within Employee Central.
SuccessFactors Employee Central delivers several standard fields to companies both globally (e.g., applicable for all countries) as well as at the localized-country level (to satisfy country-specific legal compliance, payroll, and country regulations), and these fields can act either independently or based on logic derived from rules. Many companies leverage the delivered fields, but also have company-specific requirements about how these fields will be used within Employee Central. For example, the rules engine is commonly used to default values to a field based on what the user has entered (for example, defaulting an employee to be flagged as full-time if the standard hours for an employee are greater than or equal to 40 hours a week), providing validations and company-specific messages based on certain criteria, or even to dynamically change the characteristics for a specific field based on the type of employee being hired. Having a good understanding of the basic capabilities of the rules engine is critical to be able to properly gather requirements and build a solution based on them.
Tip!
There are several standard rules that come with Employee Central. To see the delivered rules within the environment, go to Administration Tools, Company Settings, and then Configure Business Rules.
Figure 1 illustrates how to access the rules engine.

Figure 1
The rules engine in the Administration Tools screen
When reading or writing a rule within SuccessFactors, there are three main sections to consider (labeled in
Figure 2):
- Rule Attributes
- If conditions. (The screen in Figure 2 doesn’t show an If condition as the Always True check box is selected. If the rule is to always be called based on a field trigger, the Always True check box should be selected.)
- Then conditions

Figure 2
Rule to synchronize position data to the employee’s record
For example,
Figure 2 shows a
rule to synchronize Position data to an employee. The Rule ID of the position (Pos2Job) is then related and triggered based on the Position field on the Job Information Portlet.
I discuss each of these sections below in detail.
Rule Attributes
The Rule Attributes section at the top contains the Rule ID, Rule Name, Base Object, and Rule Type. The Rule ID is the unique identifier of the rule and it is used in other areas of Employee Central configuration when you need to set the trigger for the rule. For example, when configuring the Job Information portlet, you need to set the trigger at the Position field to then call the Pos2Job rule based on the field changing. The Rule Name is the label of the rule that is related to the Rule ID.
The Base Object is selected to set whatever object within Employee Central from which the rule is configured. For example, what portlet the rule is going to update or be related to. Using the example in
Figure 2, choosing a Base Object of Job Information allows the rule to be able to update or perform actions based on the fields and functionality of the Job Information portlet.
Finally, the Rule Type is used to allow companies to categorize the different rules within the system. This is not used to drive anything from a configuration perspective (based on the current release), but more to group rules together for reporting purposes (e.g., so companies can categorize their rules).
Figure 3 is the configuration screen in Employee Central for maintaining the values for Rule Types, and where you can configure additional Rule Types.

Figure 3
Configure Rule Types
If Condition
The If section of
Figure 2 contains information on when this rule should be triggered. For example, should the rule only be applicable when certain conditions are met (i.e., trigger the rule only if the Position is a full-time Position), or all the time? If the rule is always triggered, then select the Always True check box.
Then Condition
The Then section contains the actual logic and rules on what the rule will accomplish. For example, update key fields on an employee’s record (as shown in
Figure 2) based on related objects and fields. The rule Pos2Job is showing that the Position Location, Position Business Unit, Position Division, Position Job Classification, Position Job Title, Position Cost Center, and Position Pay Grade fields automatically default to the equivalent fields on the employee’s record (within the Job Information portlet).
Defining and Triggering Rules within Employee Central
When defining rules for an Employee Central implementation, it is important to clearly document the requirements as well as the configuration being put in place. Many companies choose to document the configuration details within the configuration workbooks for a given project. For more information on how best to document configuration, refer to my HR Expert article “
Key Considerations for Establishing a SuccessFactors Employee Central Global Template.” Documenting the configuration of the rules can be placed within the Employee Workbook (for employee-related rules) or Foundation Object Handbook (for position management rules).
Once a rule is configured in the rules engine (as in
Figure 2), the next step is to ensure that the rule is being triggered properly from within the configuration. The triggering of rules is typically handled in the Succession Data Model (this data model is used for configuring at the employee level) or within a Generic Object in Employee Central. A Generic Object is an object in SuccessFactors that is either a user-defined or company-specific object, or a standard object that is not delivered with the data models in Employee Central. A rule can be triggered in one of the following ways:
- OnInit – The rule is triggered once a portlet is initialized (e.g., it’s created from scratch)
- OnChange – The rule is triggered once a field is changed in a given portlet
- OnSave – The rule is triggered once a portlet is saved in Employee Central
- OnView – The rule is triggered once a portlet is viewed in Employee Central
Note
There are two ways to configure the Succession Data Model, either directly in the XML code or in the Administration Tools user interface (UI) in Employee Central.
Leveraging the Rules Engine for Position Management within Employee Central
One of the most common uses for the Employee Central rules engine is for synchronizing fields from a position to an employee’s record (and vice versa). For example, when an employee is hired or transferred into a new position, a rule allows the system to automatically default key fields from the position to the employee-related fields. This is beneficial as it keeps employee and position data in sync as well as helping with data integrity within the system. Employee Central comes with several delivered rules that you can view in the Administration Tools screen of Employee Central.
Figure 2 illustrates a sample position management rule that automatically defaults certain organizational structure (foundation objects) fields to an employee’s record on the JobInfo portlet.
The screen in
Figure 2 shows how to configure a sample rule for Position Management Integration to the employee, but the rule also must be set properly to be triggered. As mentioned above, as the trigger to this rule is when the Position field is updated (or changed), the onChange trigger must be called within the Succession Data Model. To trigger directly within the XML, the <trigger-rule> tag in
Figure 4 should be added to the position HRIS element within the data model.

Figure 4
XML code to trigger a rule (this XML code is part of the Succession Data Model)
Note
It’s important that the rule ID is an exact match to the rule being called in the trigger and the Rule ID that was populated when defining the rule. (For example, matching the upper- or lower-case values.)
Another way to leverage the rules engine within Position Management is when creating or maintaining Positions in the system. For example, a common rule that companies use is to default Position-level fields based on other values defined within the organizational structure. As an example,
Figure 5 illustrates how the system can default the Job Title, Job Level, and Employee Class fields at the Position level based on a Job Code being selected on the Position.
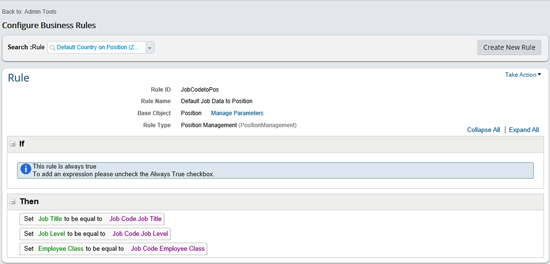
Figure 5
Synchronize the Job Code data to the Position
Figure 5 shows a rule that synchronizes the Job Code data to the Position. The Rule ID of JobCodetoPos is then related and triggered based on the Job Code field on the Position Object. As this rule is related to the Position being updated (rather than an employee portlet or field), the rule trigger needs to be done at the Generic Object level instead of at the Data Model level. Triggering rules at the Generic Object level is done within the Administration Tools UI within Employee Central. Please refer to the Sidebar at the end of this article, “How to Trigger a Rule Within a Generic Object in SuccessFactors Employee Central,” for a step-by-step approach for doing this.
Note
Other common uses to leverage rules on the Position Management side are:
- Setting different workflows based on certain conditions
- Generating company-specific errors or warning messages based on certain fields
- Defaulting a Position ID to be auto-generated by the system
- Defaulting other values on fields related to the Position based on company requirements
Tip!
When you want to leverage an existing delivered rule and customize it to meet your own requirements, it is best to copy the rule and create a new version of it based on a pre-defined naming convention (i.e., all custom rules start with a prefix of Z_.) This gives you a back-up of the original rule to use as a baseline in case you ever have to revert back to the original configuration.
Leveraging the Rules Engine for Maintaining Employee Data within Employee Central
The rules engine is often used often when configuring employee data within SuccessFactors Employee Central. Many implementations like to use the rules engine to either default fields with certain values, override field-level configuration based on certain scenarios (i.e., make a field required by default, but optional for specific situations), and for creating pop-up messages or alerts and validations.
Leveraging the rules engine to default specific values on fields is very common, especially when processing employee transactions. One scenario is to default values based on the country in which the employee is being hired. For example, when hiring an employee into a specific country, a company would want to have the Country and National ID default to what is relevant to the country.
Figure 6 shows how the national ID card (in this case, ESSN) is defaulted when the DEU country (Germany) is selected. This type of default can be leveraged to create other scenarios that are company specific.

Figure 6
Sample rule to set the employee’s national ID card type based on country
Tip!
The Rule Type in Figure 6 comes delivered with pre-defined values that help implementations to categorize their rules. To create additional values (or to maintain existing ones), go to the Configure Object Definitions screen in Administration Tools. Once in this screen, choose Picklists from the Search field drop-down options and then select Rule Type. Maintaining the Rule Type picklist allows you to customize as desired (as shown in Figure 3). Rule Types can be translated into multiple languages if so desired.
Another common use for leveraging the rules engine for employee data is when implementations choose to override the base configuration for field characteristics. Some examples of different field characteristics are configuring fields to be required, optional, hidden, or read only. This can be especially valuable when companies want to create conditional fields to be required based on a different field on the portlet. For example, in the Work Permit portlet in Employee Central, a company may want the Expiration Date Value field to be optional within the system configuration. However, as an exception, a company may want this field to be required for a given country if a certain work permit is chosen for a visa.
Figure 7 shows how to write a rule to accomplish this. With this example, the Expiration Date Value field is required when employees with ARE-Work Visa (e.g., United Arab Emirates visas) work permits are selected.

Figure 7
Sample rule to override the field characteristics for the Expiration Date.Value field (making it required when it is generally configured to be optional)
Note
Overriding field characteristics should only be used as an exception to the normal way the system works. Having too many rules that update field characteristics could negatively impact system performance and cause delays in processing.
As mentioned previously, another way that the rules engine is used within Employee Central is to provide functionality for an implementation to do additional company-specific pop-up messages and alerts or provide validations. This functionality is especially useful when a company wants to create a warning or error message when certain conditions are met. Regarding validations, a common use case is when a company wants to prevent a user from doing a retroactive change on an employee’s address. To do this, a rule could be created to evaluate if the effective date of the change is before the system’s date (
Figure 8). If the rule is deemed true, an error pop-up would then come up to instruct the user to change the effective date to be dated with a current or future date. The pop-up alert would also prevent the user from saving the new date until the conditions are met.
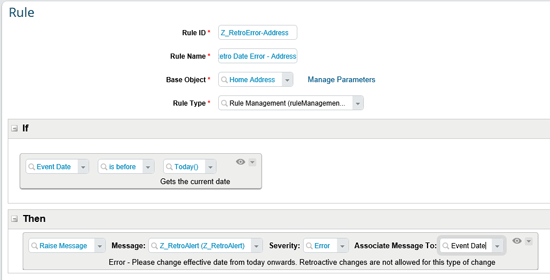
Figure 8
Configure the rule to prevent users from doing retroactive changes to home addresses
When creating validations and alerts, you need to configure the custom messages that the company wants the alert to say.
Figures 9 and
10 show how to create a company-specific message through the Administration Tools page. Go to the Administration Tools page and select the Manage Data option by leveraging the Tool Search functionality
(
Figure 9). Then, from the Create New drop-down options, choose MessageDefinition (
Figure 10, which shows the shows the definition of the Z_RetroAlert message).
Here you can
create a customer-defined message, MessageDefinitions. Customer-defined messages are triggered and shown to users based on the rule conditions. Once you create your specific message within Employee Central and save it, the rule can then be set up as shown in
Figure 8.

Figure 9
Search for the Manage Data screen

Figure 10
The Manage Data screen for a MessageDefinition object
Tip!
If you need help determining whether to configure a pop-up message as an error (prevents user from moving forward) or a warning (user is allowed to move forward), use the Severity field (shown in Figure 8). An error severity type should be chosen when you want to prevent users from saving a transaction with an invalid entry – for example, stopping a user from trying to save an hourly rate for an employee who is paid a salary, not hourly. A warning severity type should be used when you want to alert the user about a validation (or an additional action), but want the system to allow them to save through the message and continue on with the transaction. An example could be to alert the user if they entered a particular value into a field that requires additional approval. This decision is an important one as it determines how the system will react based on what rule is being triggered.
As you can see, using the rules engine in Employee Central can be a useful tool when designing and building the Employee Central solution. The rules engine is commonly used for position management configuration as well as for configuring employee data screens to meet your specific requirements. Implementation teams should review delivered rules that are provided by SuccessFactors and use them to meet their own specific requirements. As these rules can be fairly complex, it is also important to clearly document the rules that are part of the solution within the appropriate project-related documents.
Sidebar: How to Trigger a Rule Within a Generic Object in SuccessFactors Employee Central
Here are some helpful step-by-step instructions for how to trigger a rule within a Generic Object.
Step 1. Go to the Administration Tools page in Employee Central (
Figure A).
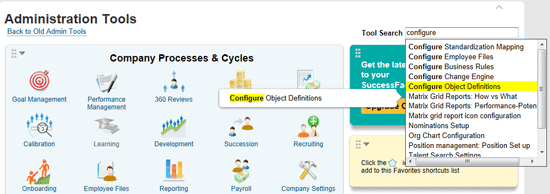
Figure A
Go to the Configure Object Definitions screen from Administration Tools
Step 2. Using the Tool Search field, search for Configure Object Definitions and select the entry. This opens the screen shown in
Figure B.

Figure B
The Object Definition for the Position generic object within Employee Central
Note
You can also navigate to Configure Object Definitions (Figure B) by going to Company Settings > Configure Object Definitions within the Administration Tools UI.
Step 3. Select the Object Definition drop-down option in the Search field, and choose Position in the search field next to it (
Figure B).
Step 4. Next, as shown in
Figure C, click the Take Action option and choose Make Correction from the drop-down options. (Note: You must have the proper security access and be able to edit the Generic Object of the Position.) This opens the object definition (Generic Object) in edit mode where you can make your changes.

Figure C
In edit mode, update the Generic Object
Step 5. In edit mode (
Figure D), click the Details link by the field that should trigger the JobCodetoPos rule (in this case, it’s the jobCode field). Once you click the details link, the Details screen in
Figure E appears.

Figure D
A subset of the Position Generic Object in edit mode
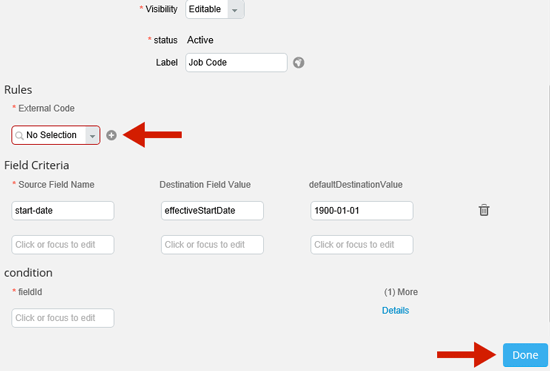
Figure E
The Rules section of the details screen for the jobCode field on the Position
Step 6. Navigate to the bottom of the jobCode details screen to the Rules section (
Figure E). Select the applicable rule that you want to be triggered from the External Code drop-down option. Select the + sign next to the field below External Code to make your change.
Step 7. Click the Done button to save your changes.
Mark S. Jackson
Mark Jackson has been working with SAP ERP HCM for more than 12 years and specializes in SuccessFactors Employee Central and the SAP ERP HCM Personnel Administration and Organizational Management modules. He has had numerous experiences with implementing and leading SAP ERP HCM and SuccessFactors globally and is a subject-matter expert in defining global templates for SAP/SuccessFactors implementations.
You may contact the author at
Mark.S.Jackson@gmail.com.
If you have comments about this article or publication, or would like to submit an article idea, please contact the
editor.


