See how to use SAP HANA Cloud Integration (SAP HCI) to model the invocation of an external Open Data Protocol (OData) service. You apply the Request-Reply step in your integration flow and use the Query Editor to generate the URI for the actual OData invocation.
Key Concept
Several best practices have been developed for the handling of messages within an enterprise service bus. These best practices are known as Enterprise Integration Patterns (EIP). In this article two patterns are used: the Request-Reply and the Content Enricher. The Request-Reply pattern is used for scenarios in which a two-way communication is needed (e.g., when the sender expects a response from its communication partner). The Content Enricher pattern, on the other hand, takes care of extending the sender’s message with additional information (e.g., retrieving it from a database) that is needed for the receiver to work on the data. The Content Enricher pattern is typically used if the source system can’t provide all the information.
SAP HANA Cloud Integration (SAP HCI) allows for the development of sophisticated integration scenarios. In this article I provide an example of such a scenario: a synchronous call to an Open Data Protocol (OData) service for retrieving details of an order for a given order number. The order number is sent by the client to SAP HCI using a standard Simple Object Access Protocol (SOAP) call.
The example dives into the details of the communication with external data sources and how to use them in synchronous scenarios. Finally, I explain the Query Editor, a tool that helps you generate the sometimes quite complex Representational State Transfer (REST) URIs for actually invoking the external OData sources.
Note
URI is a generic term for identifying the name of a resource uniquely
over the network. A URL is a concrete URI for a web address. In this
article when I’m writing about the OData service, I’m using the term
URI. When it is about the invocation of the integration flow, which is
reachable via SOAP using a concrete web address, then I’m using the term
URL.
Note
SAP HCI also provides predefined integration content that helps solve
integration challenges within the SAP ecosystem. You can get the
pre-configured integration content (e.g., the integration between
SuccessFactors and SAP ERP HCM) from the publicly available content
catalog accessible at
https://cloudintegration.hana.ondemand.com.
You can configure the missing technical details of the connection to
and from the participating systems. In this article, however, I am not
relying on predefined content. I make use of SAP HCI’s development
capabilities instead. If you want to learn more about working with
pre-configured content, I recommend the article entitled “
Leveraging SAP
HANA Cloud Integration,” written by my colleagues Sindhu
Gangadharan and Udo Paltzer.
For configuring the integration scenarios you use the web-based tool shipped with SAP HCI. Besides that you can also use the web-based tool for custom development projects when standard content is not yet available.
In my first article about SAP HCI, titled “
Your First SAP HCI Integration Flow,” I introduced you to the world of integration flows and the underlying integration framework (Apache Camel). I showed what integration modeling looks like on SAP HCI. The integration scenario in
Figure 1 depicts the integration scenario in my example. It shows the integration flow covering the following aspects:
- Sending a SOAP request containing an order number from the Sender participant to SAP HCI
- Retrieving the order number from the incoming message and storing it in the message’s header field for later reference, using the Content Modifier step
- Invoking an OData service for retrieving details of that particular order. In essence, the scenario implements a Request-Reply scenario.
- Returning the received data to the client
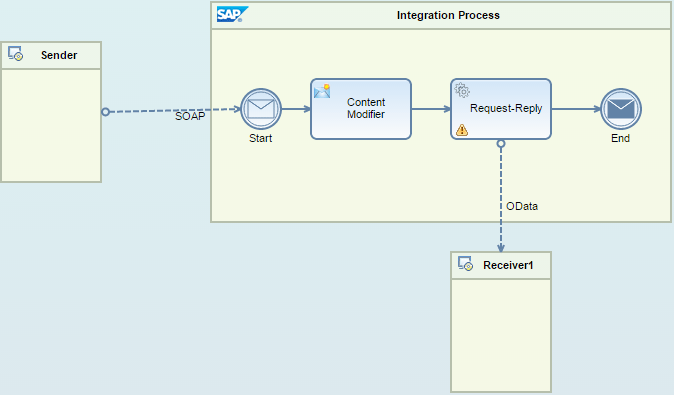
Figure 1
Target integration scenario
The structure of the incoming message is shown in
Figure 2. It is exactly the same message I used in my first article. It contains the order number for which additional data should be retrieved from an external OData service.
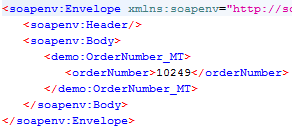
Figure 2
Example message
The Sender pool is configured with the authentication type Basic Authentication, which means that the integration flow is invoked with the caller’s user ID and password. For the message flow between the Sender pool and the Start event, the adapter-specific attribute Address is set to /SPJ_Scenario. This string is later part of the URL under which the integration flow can be invoked. The Content Modifier step is responsible for storing the incoming order number in the message’s header area. Its configuration is shown in
Figure 3.
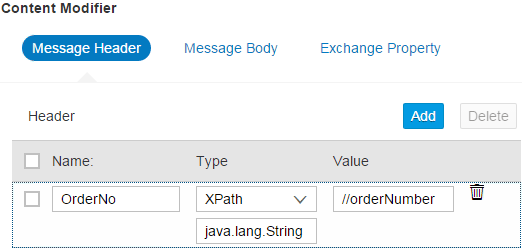
Figure 3
Store the order number in the message's header area under the name OrderNo
Obviously the OrderNo name was chosen as the storage’s name in order to access it later. So far I have covered nothing new. The message has arrived at the integration flow and an important piece of information, the order number, has been stored for later reference. Now the time has come to actually call the OData service.
The modeling environment of SAP HCI provides a dedicated shape for accessing external sources synchronously. It is the Request Reply step located in the sub-menu of the external call icon

on the editor’s palette (
Figure 4).

Figure 4
Model the Request Reply step
Click the Request Reply entry. Move the mouse pointer into the Integration Process pool, and click again to actually position the step on the canvas. The result is depicted in
Figure 5.

Figure 5
The Integration Process pool with the Request-Reply entry added
As the Request-Reply step needs access to an additional system, it is necessary to add the target system as one more additional pool in the process model. You can find the respective Receiver shape in the sub-menu of the palette’s main entry participants (

).
Figure 6 shows more details.

Figure 6
Pick an additional receiver from the palette
This next step is important: Position Receiver1 outside the Integration Process pool close to the Request-Reply step, as shown in
Figure 7.

Figure 7
Position the Receiver1 pool outside the Integration Process pool, but close to the Request-Reply step
Next, connect the Request-Reply step with the Receiver1 pool by using the connection icon

from the Request-Reply step’s context buttons. After dragging the connection to the Receiver1 pool, a dialog automatically opens asking you for the Adapter Type (not shown). Choose OData and you should get something similar to what is shown in
Figure 8.

Figure 8
Connect the Request-Reply step with the Receiver1 pool
Configuring the OData Connection
To actually invoke an external OData source, you need to configure several parameters. After selecting the message flow between the Request-Reply step and the Receiver1 pool (the connection’s color should switch from blue to orange), the parameters are depicted beneath the process diagram. They are shown in
Figure 9. Don’t forget to select the Adapter Specific link of the Channels configuration tab. I now walk you through the configuration fields of that dialog one by one.

Figure 9
The parameters of the OData connection to the external source
- Address: This field contains the service’s root URI of the OData service provider to which you want to connect. In my example, I want to connect to a publicly available service on the Internet. It is one of the OData demo services available for trying out OData connectivity and learning more about how to work with OData services. It is reachable under the URI https://services.odata.org/Northwind/Northwind.svc.
- Authentication: Depending on the OData service, you can choose different authentication types from the drop-down list. Basic Authentication, Client certificate, and None are currently supported. For my example you can leave the None entry as no authentication is required for the test service.
- Operation: OData is based on the HTTP protocol that supports the following main operations: GET, for querying a set of entities or for reading one concrete entity (business object); PUT, for updating an entity; and POST, for inserting data. My requirement is to read exactly one order so I am fine with the GET operation.
- Resource Path: In this field you specify the URI that is appended to the OData service endpoint when connecting to the service provider. You either know this extension by heart (which is rarely the case because of the strict syntax you have to follow and the lengthiness of the string) or you let the SAP system’s built-in Query Editor do the dirty work of creating the resource path for you. Later in this article I explain how to work with the Query Editor to actually create the correct resource path.
- EDMX (Entity Data Model): Here you define the metadata of the service’s data the OData service is working on. For example, it describes the order object in more detail: What are the concrete fields of the order and which relationships to other objects are maintained for the order? It is comparable to the entity-relationship-model in the database world. The Query Editor uses the metadata information to understand how to query and interact with entities in the service. The EDMX file is automatically generated for you when using the Query Editor. However, you can also retrieve the metadata file from an OData service by appending /$metadata to the root URI (mentioned in the Address field bullet, above). In my example, the metadata is available under the URI https://services.odata.org/Northwind/Northwind.svc/$metadata.
- Content Type: This field specifies the format being used to communicate with the service. In most cases it is either Atom or JavaScript Object Notation (JSON). In this case, I am sticking with the Atom entry for my example.
- Page Size: This final field specifies the total number of records that should be returned in the response from the OData service provider. I’m leaving this field empty as I am defining a query that just returns one entry, so no limitation of the response is necessary.
From the description above you can understand the importance of the Resource Path entry compared to the other fields of the OData connection. That’s why SAP provides the Query Editor to accurately formulate the respective string representing the resource path.
Creating the Resource Path Using the Query Editor
Click the Modify button next to the Resource Path input field of
Figure 9 to start the Query Editor. A dialog opens asking you for a system to which the Query Editor should connect. As you haven’t defined any system yet, click the add-system icon

to the right of the System field.
Figure 10 shows more details.
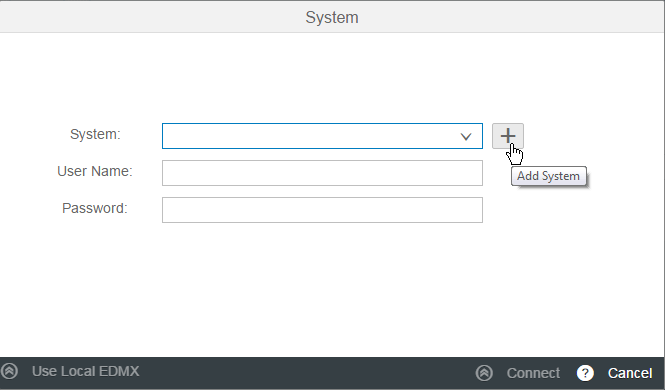
Figure 10
Add a system hosting an OData service
Another dialog opens that allows you to provide the system’s details on which the OData service is hosted.
Figure 11 summarizes the required entries.
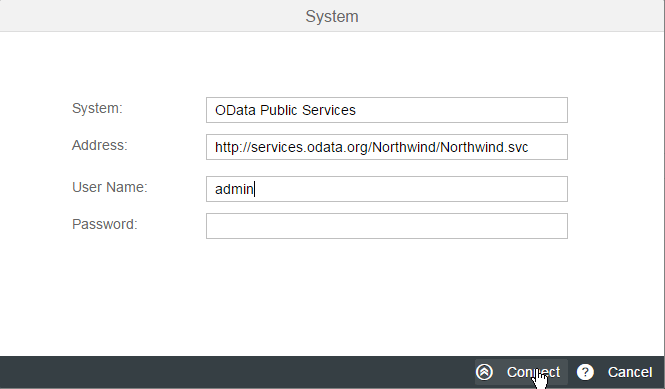
Figure 11
Provide details about the OData service provider
In the System field, enter a descriptive name of the system—something that is meaningful to you and will later remind you of the system to which you are connecting. You can enter any freestyle text here. In this example, I enter OData Public Services. Enter the service’s root URI (discussed above) as the Address. Finally, enter the User Name under which you access the service. In my example, this is admin. That’s it. Click the Connect button to actually set up the connection to the service. Behind the scenes, the Query Editor connects to the service and retrieves its metadata information. Hence, it knows exactly which entities can be accessed and how. Finally, you get the Query Editor’s user interface (UI), shown in
Figure 12.

Figure 12
The Query Editor's UI
The resource path itself is now defined in three steps. The three steps are represented by the three circular icons at the top of the UI. Comparable to a database query, you define:
- Which entity or data object you want to access and how (using the operation and fields icon
 ).
).
- The where clause representing a filter condition (using the funnel icon
 ).
).
- The order-by condition (using the arrows icon
 ).
).
Let’s start with the entity and the operation. As the Query Editor has read the details about the available entities, it can list them as part of the Entity drop-down list options. As you want to read exactly one concrete order, pick Orders from the list. For Operation, stick with the Query(GET) operation. Next, specify the fields that should be returned from the service. As you can imagine, an order can consist of hundreds of fields but most probably you need just a handful for your concrete scenario. Therefore, pick just those fields that are relevant for you.
Click the Fields:’ drop-down list (
Figure 12) and select the required fields by checking the respective check boxes in front of the fields’ names. This information is again retrieved from the service’s metadata information. For the sake of simplicity, choose just the fields OrderID, ShippedDate, ShipName, ShipAddress, ShipCity, ShipPostalCode, and ShipCountry. After finishing your selections, the final result should look like the one shown in
Figure 13.

Figure 13
Define the entity, operation, and fields
Note the string that is being created for you above the circular icons and beneath the Query Editor title (e.g., Orders?$select=ShipCountry,ShipPostalCode,ShipCity,ShipAddress,ShipName,ShippedDate,OrderID). This is the Resource Path I was talking about before. Obviously this string can become quite lengthy and difficult to remember. Hence, it makes sense to let the Query Editor build it. Next continue with the definition of the where clause of your query by clicking the funnel icon. The associated UI is shown in
Figure 14.

Figure 14
Define the where clause in the Query Editor
The table at the bottom can have as many entries as are required to specify your selection criterion. In my example, you just need one line as you are searching for an order with a concrete well-defined order number. Check the OrderID field within the Orders object. This is exactly the entry you find in the Filter by column of the screen. If you start typing the first letter in this field, the Query Editor automatically narrows down the list of available fields of the order’s entity to just the ones containing the typed letter.
Next, define the operator. Here, several logical operators are possible but you only need the eq(uals) operator. Next, you have to answer the question about which value you want to compare the entity’s OrderID field against to find the right order. You want to find the order whose order number was sent to you in the original incoming message from the sender, right? And where did you store that value? Exactly: in the header area of the message under the variable name OrderNo (compare with
Figure 3).
So, in this case, pick Header from the Input Type drop-down list and enter OrderNo into the Value field (
Figure 14). Now you understand why you had to store the number in the message header and how to retrieve it here for the where clause. Notice also the additional string appended to the previous Resource Path. The Query Editor uses the typical notation for accessing Camel variables in the header area, (${header.OrderNo}), which was introduced in my first article.
What is left to complete the Resource Path is the order-by condition. Click the circular arrows icon on the right, and the Query Editor switches to a new page (
Figure 15).

Figure 15
Define the order-by clause
The configuration is pretty straightforward. Just enter the field’s name by which the found entries should be sorted. Again the Query Editor narrows down the fields once you start typing. Obviously you want the list (which later actually consists of exactly one entry) to be sorted by the OrderID. You could also define whether the list should be in ascending or descending order (by unselecting—or selecting—the Desc check box on the screen) but this doesn’t play a role in my scenario.
That’s it! You finally completed the configuration of the OData channel. Click the Ok button to close the Query editor. Once clicked, you see the message in
Figure 16 while closing the editor.

Figure 16
The Query Editor confirms that the EDMX and XSD files are automatically created
The message informs you that two files are automatically created: an EDMX file and an XSD file. The contents of the EDMX file should be clear to you due to the previous discussion. But what is the XSD file good for? Remember that the OData service returns the found entity in the Atom format (compare
Figure 9 and the explanation for the Content Type field). However, SAP HCI continues working with the result in XML format. Hence, the run time requires a description of the resulting XML message that fits to the returned values of the just-configured query. As the Query Editor knows all the details about the selected fields and the format of each field because of the EDMX file, it can generate an associated XSD file representing the returned data of the service in XML format. In the end this helps the engine to map the returned Atom format to the XML format.
The generated Resource Path is added to the respective Edit field of the channel’s configuration. The completed configuration of the connection to the OData service should look like the one shown in
Figure 17.

Figure 17
The completed configuration of the OData channel
What’s left is the completion of the integration flow itself by positioning the Request-Reply step in between the Start and End events. The final result is shown in
Figure 18.

Figure 18
The completed configuration of the integration flow
Next, save and deploy your integration flow. After successful deployment, retrieve the integration flow’s endpoint URL and invoke it via a SOAP client such as SoapUI (see a detailed description about the invocation of integration flows in my first article). As a result, you should get the response message displayed in
Figure 19.
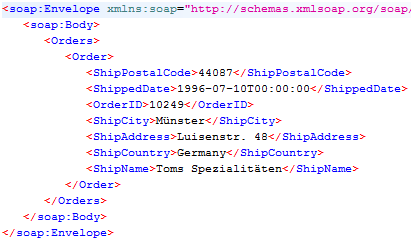
Figure 19
Response message from the OData service formatted in XML
Using the Content Enricher Step
An interesting variant on this scenario is the use of the Content Enricher step inside the route instead of the Request-Reply step. Take a look at
Figure 4 again, which shows the selection of Request-Reply from the palette. Above the Request-Reply entry you find the Content Enricher step. In contrast to the Request-Reply activity, which just returns the response message from the external data source to the caller, the Content Enricher merges the content of the returned external message with the original message. Or, in other words, it converts the two separate messages into a single enhanced payload. You can try this scenario out yourself as it is pretty straightforward to configure. Just replace the Request-Reply step with the Content Enricher step (
Figure 20).

Figure 20
Replacing the Request-Reply step with the Content Enricher step
Note that there is one little but very important deviation from the configuration of the connection between the Receiver1 pool and the Content Enricher activity: the arrow points from the Receiver1 pool to the Content Enricher step. This is the opposite direction compared to the connection between the Request-Reply step and the Receiver1 pool (see
Figure 18 for a comparison). Ensure that you don’t mix up the direction of the arrows. Besides that one change, the configuration is identical. Once it is deployed, you can run the same input message against the newly configured integration flow. As a result you get the output shown in
Figure 21.
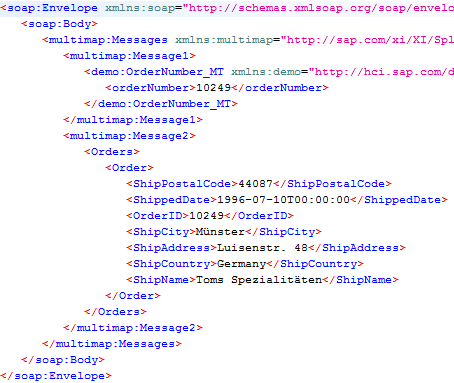
Figure 21
Output after running the integration flow with the Content Enricher step
You can nicely identify the original input message at the top of the reply, followed by the returned detailed message coming from the external OData call. This allows you to choose the pattern that best fits your needs.
I hope this article was an exciting journey through the development of a synchronous scenario invoking OData services using SAP HCI. You learned how to configure the connection to an external OData-based service provider, how to benefit from the Query Editor to construct the sometimes quite complex string for the resource path to actually retrieve the data you are interested in, and how to add a Request-Reply (Content Enricher) step to your message processing pipeline. In my next article of this SAP HCI series I explain how to actually format the message to a desired target format of your choice using mappings.

Dr. Volker Stiehl
Prof. Dr. Volker Stiehl studied computer science at the Friedrich-Alexander-University of Erlangen-Nuremberg. After 12 years as a developer and senior system architect at Siemens, he joined SAP in 2004. As chief product expert, Volker was responsible for the success of the products SAP Process Orchestration, SAP Process Integration, and SAP HANA Cloud Integration (now SAP HANA Cloud Platform, integration service). He left SAP in 2016 and accepted a position as professor at the Ingolstadt Technical University of Applied Sciences where he is currently teaching business information systems. In September 2011, Volker received his Ph.D. degree from the University of Technology Darmstadt. His thesis was on the systematic design and implementation of applications using BPMN. Volker is also the author of Process-Driven Applications with BPMN as well as the co-author of SAP HANA Cloud Integration and a regular speaker at various national and international conferences.
You may contact the author at
editor@SAPpro.com.
If you have comments about this article or publication, or would like to submit an article idea, please contact the
editor.


