SAP NetWeaver BW Workspaces provides an ad hoc modeling environment partly created by the BW back-end global team. It is completed by a company’s advanced analysts. Ned Falk explains what tasks power users need to carry out to incorporate the tool using the Workspace Designer.
If you can train this super-user group in proper BW Workspace design, you kill two birds with one stone. On one hand these users no longer consume gobs of resources with their huge downloads. On the other hand you are enabling your best analysts to reach new levels with huge business benefits. They need to understand the tasks involved to incorporate the tool properly in your landscape. I’ll go over details of the tasks and then tie up some loose ends on workspace technical system requirements and authorizations.
BW Workspace Designer is the Web-based tool for all of the following tasks:
- Reviewing the available global InfoProviders that have been exposed to the Workspace by the BW back-end team
- Building Local Providers (technically, Analytical Indexes) sourced and loaded from files, queries, or data sources
- Combining global InfoProviders with the local ones to create CompositeProviders. This can be done by way of a join or a union, providing flexibility
- Creating simple queries that consume the fields of the CompositeProviders
- Reviewing the status of the BW Workspace and the objects it contains
In the following sections I discuss the details of the BW Workspace Designer. I start off with how the tool can be accessed and how to choose a specific workspace. Next, I cover building and loading the Local Provider. The third section covers building CompositeProviders in the workspace. Finally, I discuss building queries on the CompositeProviders.
Accessing the Web-Based WorkSpace Designer
The BW Workspace designer is a collection of Web Dynpro applications that display data using Web-based technologies including SAP NetWeaver Portal or SAP NetWeaver Business Client (NWBC). For more detail on accessing the Workspace Designer see “
An Introduction to BW Workspaces in 7.3: Increase User Flexibility with Central Oversight.” Transaction NWBC launches the Web-based user interface (UI) for the Workspace Designer starting from SAP GUI, as shown in
Figure 1.

Figure 1
The BW Workspace Designer shown in NWBC
The complete discussion of the configuration and installation of NWBC or SAP NetWeaver Portal is beyond the scope of this article. Because of the PFCG role assigned to the user and the configuration of this role assigned to my user ID, as shown in Figure 2, the user ID I am using only sees this one window and the associated links when accessing NWBC. As you will ultimately see on the Web, the menu is made up of four Web Dynpro applications:
- MY Workspace = RSL_UI_MY_WORKSPACE
- Create Composite Provider = RSL_UI_CREATE_COPR
- Create Local Provider = RSL_UI_CREATE_PROVIDER
- Workspace Tools = RSL_UI_CHANGE_WORKSPACE

Figure 2
PFCG role showing BW Workspace menu options
Moving past the NWBC, the use of the designer is pretty straightforward. Assuming you have the proper authorization, the allowed BW Workspaces appear in the menu option Workspace Tools on the Change Workspace tab. The obvious first step is to choose the radio button next to the Workspace you want to initially design, or later edit. This is shown in Figure 3.

Figure 3
Workspace tools - selecting a Workspace
The second step in my scenario would be to verify that your discussions with the BW back-end team were interpreted accurately. Assuming “you” are playing the part of the “front-end” super analyst, you must first verify that the BW back-end team provided you all the central providers you need to support your BW Workspace goals. To verify this and other questions such as, “Has anyone previously built Local or CompositeProviders in my selected Workspace?” you access the MY WORKSPACE option (
Figure 4). Without showing all the detailed screenprints for each tab, this option provides a summary of the BW Workspace including details about all the existing CompositeProviders and Local Providers in the Workspace. It also provides a summary of some of those BW Workplace settings made by the BW back-end team that I discussed previously.
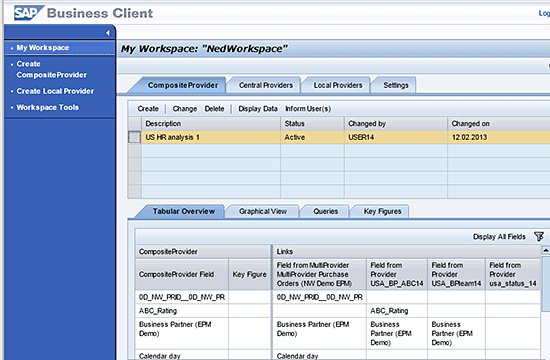
Figure 4
My Workspace
Building and Uploading Local Providers
The next step in most cases would be to load extra data that is local to the Workspace and not in the control of global IT. These Local Providers become Analytical Indexes, also known as HANA column tables, once they are uploaded at the completion of this step. To start this process step, choose the Create Local Provider option (
Figure 5). A popup asks you which type of Local Provider you will be creating. I show the details for the File use case, but be aware that data sources and queries are also possible. A query means that the Local Provider will be sourced from the output of a BEx query, including all the calculation and restricted key figures. If a data source is used, you are essentially using the metadata for a data source as an easy way to get the details on where the data actually resides. This original source data is used to build the Local Provider, not the data from the data source’s persistent staging area (PSA).

Figure 5
Choosing a source for a Local Provider
In the next steps of the most complicated option, a Local Provider of the source File, you must choose the file and define the settings so that it can be properly parsed during upload. The details are shown in
Figure 6.

Figure 6
Choosing a file and related settings for a Local Provider
Figure 7 shows where the details for each field can be defined. You access it using the Edit Columns or Next options buttons, also shown in
Figure 7. The details for each field include the type and most importantly the check box indicating it should behave as a key figure or (unchecked) as an attribute.
You can also access the Propose Type button for an automated way to determine the type, but this is not effective 100 percent of the time, so you should manually review it for accuracy. The system would determine a field called ‘kids y/n’ with values of 1 = yes and 0 = no as a key figure rather than as an attribute.

Figure 7
Local Provider: editing the columns
The end is in sight. Click the Upload button to load the data in the HANA database, and then click the Display Data button, which yields the verifiable data as shown in
Figure 8.
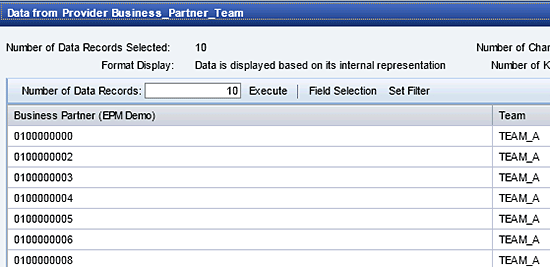
Figure 8
Display data via the Display Data button
Building CompositeProviders
Let’s pretend that all Local Providers have been uploaded by this point. The next most probable step is to combine these into a CompositeProvider. Although it is the most probable next step, it is not absolutely needed. Using the BEx Query Designer, you can directly query against Local Providers, now in the system as so called Transient Providers.
Note
All transient and CompositeProviders can be found in the Query Designer by searching for all the technical names that begin with @3.
Assuming the CompositeProvider route is the way you want to go, access the CompositeProvider link on the BW Workspace Designer UI and you are presented with an option to enter a query (
Figure 9). The query you enter at this point has the effect of assisting you in finding the InfoProviders that need to be included in the CompositeProvider. The system looks for the providers that are used in Query and if possible proposes them to be used in building (joining/union) for the composite.
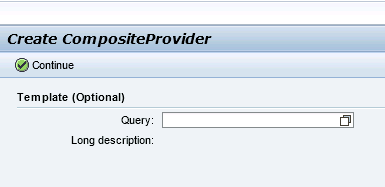
Figure 9
Default query assists in finding the correct linkages
In my case, since a query was not supplied, all the underlying Local and Central Providers that I require must be manually chosen. This step is shown in
Figure 10.

Figure 10
Choosing Local and Central Providers for the CompositeProvider
In the next step, modeling the CompositeProvider, I tackle what can be the hardest task if you decide that a business person should be the Workspace designer. Normally business people do not understand, at least without some training, the idea of inner and outer joins or unions. Again, this part of the tool is targeting the super business analyst, so not being an expert at this should not be a show stopper. This problem may never actually surface or can be fixed easily with training. In the worst case, an IT person can assist the user, at least in the beginning.
The problem may never surface because SAP provides a sophisticated behind-the-scenes technique to determine proper table linkage. Help.sap.com has more details on this logic, but it is one of those many things you don’t really need to know. It works sometimes and other times the linkage proposed is wrong. You can’t change the logic the system uses to try and propose the linkage. The issue is that if the system can’t propose the linkage or it proposes incorrect linkage, how would many super users in complex situations know it is wrong or how to fix it?
Just in case the proposed linkages are not perfect, let’s start the training now. When you select task 2 on the time line in
Figure 10, you are initially proposed a popup to choose another CompositeProvider as a template, which is helpful in determining table linkages. Therefore, if a currently active CompositeProvider exists that uses some of the same providers, you should use it to propose similar joins and unions, maybe 99 percent of the time. Don’t reinvent the wheel. This option is shown in
Figure 11.
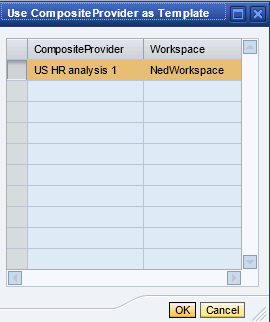
Figure 11
Choose a template
Choosing a template composite makes better proposals. The system still tries to make proposals for the linking of your providers even if you skip this step, based on field names and other means. Either way
Figure 12 shows the screen for linking tables. In the bottom section of the screen you can see a tabular linking table focusing on the composite and how it is linked to the other providers. This summary is the collection of the details of each join/union link that can be accessed in the middle right side of the UI. Also the Generate Proposal button in that section can suggest a starting point.

Figure 12
Modeling joins and unions of the CompositeProvider
You can access a “picture of the linkage” from the Graphical View tab (
Figure 13). It positions the fields available from the CompositeProvider in the middle, with links and link descriptions on the periphery.

Figure 13
Graphical view of linking with Composite Provider in the center
The details screenprint in
Figure 14 is accessed from the buttons called Details of Links (the top button shown in
Figure 12). It shows a field-by-field link definition from USA_BP_ABC14 Local provider to the CompositeProvider. You can also declare a field as a dedicated field, as shown in
Figure 14. This tells the system that you have looked and there is no field on the composite that should be linked to this field but it should be available for display, because the table is linked by another field.

Figure 14
Details of the link
There is more to this process, but the process is not really new. Unions and joins of tables are done in many products, and the process is basically the same based on common industry knowledge. For example, union constants and join types are common industry terms. Knowledge of these terms is important and should be part of the training plan for users of this tool. What most business people can determine is if the data on an output looks right. If it is wrong, and the underlying source data was correct, how it became “wrong” is most likely incorrect linkages. This is when complete knowledge about the common IT practices associated with combining tables with joins and unions is needed. Until this expertise is developed in the power user community, I suggest mentoring by an IT professional.
After the joins/unions have been defined, the next step is simple. As in the case of the Local Providers, the modeler has the option to rename some fields (
Figure 15). These are the field labels that appear later in the BEx Query Designer. If they are unchanged there, they will be the names on the BEx and SAP BusinessObjects output reports.

Figure 15
Editing field labels on a Composite Provider
Creating Composite Queries and Completing the Design Process
The last real step before the mostly administrative Check and Save task is the Create Queries step, number 4, shown on
Figure 15. When this step is selected, the popup to select calculated and restricted key figures appears (
Figure 16). The option appears because, in the very beginning of the process, I chose the option to allow the copying of key figures. This option allows you to selectively copy the calculated/restricted key figures such as net Profit or January Sales that were previously attached to the MultiProvider originally used by IT in setting up your BW WorkSpace. For more information on this step
click here. If these prerequisites were enabled, you can then copy these key figures for use in the query on the CompositeProvider (
Figure 16).

Figure 16
Selecting calculated and restricted key figures from the MultiProvider that IT used to set up the Workspace
After you respond to the popup to copy selected key/restricted figures from the original MultiProvider (if it is supplied previously, as discussed above), you can go to the next step, Create Default Queries. A default query is like any other query, yet since you are not using the Query Designer, your options are limited. You can create a standard query and all the characteristics and then selectively choose the key figures or a reference query.
You select a reference query using the Type of Query drop-down. It is one that references a query that already exists on the MultiProvider that was assigned to the Workspace as defined by IT. Again for more information please
click here. The advantage here is that any changes to the underlying referenced query changes the query for the CompositeProvider. When you choose the type reference, then, as shown in
Figure 17, you need to enter the technical name of a reference query from the MultiProvider. The name is listed in the drop-down box.
Note
To cut out a step in the process, SAP has used the idea of a creating a simple all-encompassing query without needing to access the query designer. This makes it even quicker to deploy the CompositeProvider into SAP BusinessObjects and BEx reports, often without the need to open the BW BEx query designer. I find this feature to be problematic, as you need a query to make sure you have assigned variables to more efficiently feed reporting tools that limit the data set and any additional calculated/restricted key figures that the underlying query should contain.
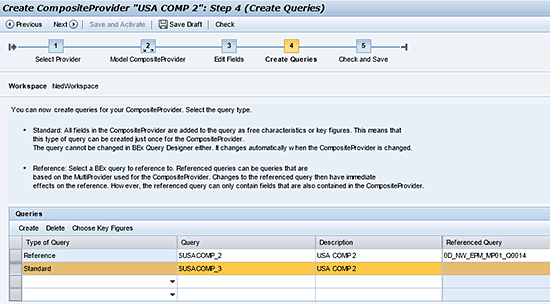
Figure 17
Creating a default query
The final step, Check and Save, and then activating, completes the process of building the CompositeProvider. As this step is nearly identical in execution to that of the Local Provider, I combine the screenprints. The only notable difference compared to Check and Save and then activation of a Local Provider is the summary screen that shows all your prior work in building the composite. At this point, a review of the data for accuracy would be needed to make sure the source data and all linkages give valid information to the users. Because of HANA, it will be fast, but fast and wrong is worthless.
Figure 18 shows the details on the Check and Save screens. It shows the steps of Save Activate and data review for accuracy.

Figure 18
Details on the Check and Save and activate screens
Now that I have a composite, I may want to deploy it via more advanced queries. These queries, plus the standard and reference queries mentioned above, would in turn feed the BEx and SAP BusinessObjects reporting tools. At this point the CompositeProviders and the Local Providers (Analytical Indexes) behave like other InfoProviders when viewed from the perspective of the BEx Query Designer. The only nuance is that these objects show up in a new folder (InfoArea) Workspaces. This feature is shown in
Figure 19.
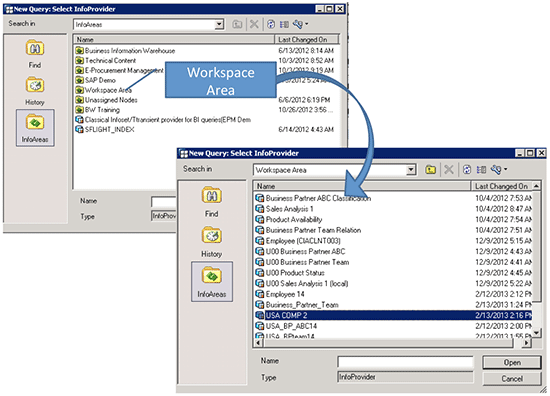
Figure 19
All the providers, both Local and Composite, in this special InfoArea
Software Installation and Authorization for BW Workspaces
>Some installation steps are needed. Technical software installation tasks are normally the responsibility of the infrastructure IT and Basis teams, not BW back-end pros. In addition, for conflict of interest reasons, authorizations are not the responsibility of the BW team, but of an authorizations group. For these reasons please refer to the online documentation.
For more information about NWBC, I recommend the following link:
https://help.sap.com/saphelp_nw73/helpdata/en/46/961aa951b3581ce10000000a1553f7/frameset.htm
For more information about the Office Control, I recommend the following link:
https://help.sap.com/saphelp_nw73/helpdata/en/29/495540d5854ceeaf6b84e0a389c622/frameset.htm
The most current information regarding the basic configuration/installation requirements can be found at
https://help.sap.com/saphelp_nw73/helpdata/en/2a/3f2f6118a446a994edace9bbb528de/frameset.htm
Authorization for BW Workspaces help is located at:
https://help.sap.com/saphelp_nw73/helpdata/en/45/3fb81260454417b9271c80b4860b2f/frameset.htm
From the strategic perspective, work with your authorizations group and consider the naming conventions for workspaces you might later tie to the authorizations. For large companies the name might include a component for the function FI-AP and one for the group within the company that is using it – for example, for the engine division use Eng. If you decide to limit the authorizations, you can use the authorization values *ENG* for engine department users or *FI* for the head analyst of finance, allowing them access to the appropriate BW Workspaces.
For both sides and hands-on training attend the SAP BW 362 SAP training class:
https://training.sap.com/v2/course/bw362-sap-bw-73-on-sap-hana-10-classroom-098-us-en/
Ned Falk
Ned Falk is a senior education consultant at SAP. In prior positions, he implemented many ERP solutions, including SAP R/3. While at SAP, he initially focused on logistics. Now he focuses on SAP HANA, SAP BW (formerly SAP NetWeaver BW), SAP CRM, and the integration of SAP BW and SAP BusinessObjects tools. You can meet him in person when he teaches SAP HANA, SAP BW, or SAP CRM classes from the Atlanta SAP office, or in a virtual training class over the web. If you need an SAP education plan for SAP HANA, SAP BW, BusinessObjects, or SAP CRM, you may contact Ned via email.
You may contact the author at
ned.falk@sap.com.
If you have comments about this article or publication, or would like to submit an article idea, please contact the
editor.


