Learn about integration points of the four capabilities of SAP GRC Access Control in one place.
Key Concept
Risk Analysis is the process by which user access is evaluated against segregation of duties (SoD) rules to determine if the access causes any SoD conflicts.
SAP GRC Access Control is comprised of four separate capabilities:
- Risk Analysis and Remediation (RAR) – Formerly called Compliance Calibrator
- Compliant User Provisioning (CUP) – Formerly called Access Enforcer
- Enterprise Role Management (ERM) – Formerly called Role Expert
- SuperUser Privilege Management (SPM) – Formerly called Firefighter
You can implement each of these as a standalone capability. However, it is the integration of all four that allows a user to realize the full benefit of GRC Access Control.
This article is intended for those users who have already implemented the GRC Access Control capabilities and are familiar with the various functions of each capability. I’ll present a high-level understanding of the various integration points of the four GRC Access Control capabilities. Before getting into the integration, I’ll start with some master data requirements.
To obtain more detailed technical instructions on how to actually perform the integration steps, go to the Business Process Expert Web site at www.sdn.sap.com/irj/sdn/bpx and select Governance, Risk and Compliance on the left side. Under How-to Guides, click on GRC How-to Guides. Under GRC Access Control, you see a document titled SAP GRC Access Control - Application Integration Documentation. For more information, see the sidebar “Key SAP Notes.”
Master Data Requirements
As with all integrated applications, a key component is to ensure that master data is consistent in all applications. GRC Access Control has four main master data components:
- Connectors
- Web user
- Remote function call (RFC) user
- Master data attributes
I’ll explain each in more detail.
Connectors
All four of the capabilities of GRC Access Control have connectors that you need to create to interact with the back-end systems. In each one, the connectors require different information.
However, it is a requirement that the connectors in each of the four capabilities are all named the same. It is best to ensure both the Name and Short Description are exactly the same in all four capabilities. In addition to naming the connectors the same, it is best practice to have the same user ID and password for all of the connectors.
At this time, the number of characters you can use for your connector name differs among the different capabilities. To create consistent connector names, you need to use the smallest maximum allowed from the four capabilities. This is 10 characters in GRC Access Control 5.2.
Figure 1 shows connectors from CUP. The screens for the other components look quite similar. In CUP, you create connectors by following menu path Configuration > Connectors > Create SAP. In RAR, you create connectors by following menu path Configuration > Connectors > Create. In ERM, you create connectors via Configuration > System Landscape > Connectors. In SPM, the menu path is the same as for RAR: Configuration > Connectors > Create.
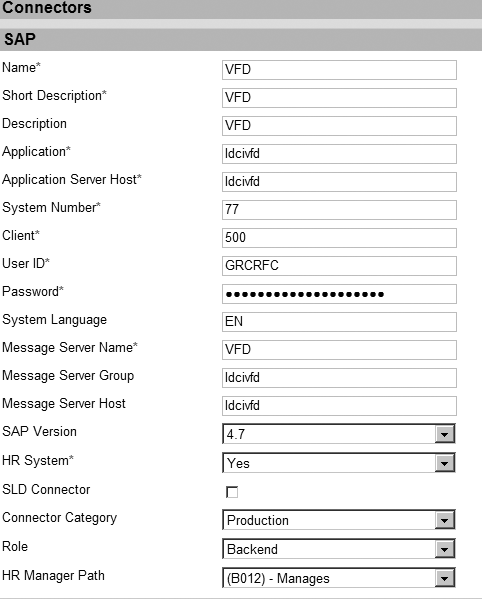
Figure 1
Create connectors in CUP
Web User
The applications are integrated via Web services using a centralized Web user ID and password with proper authorization in the User Management Engine (UME). This Web user needs to have administrative roles for each of the four capabilities.
This user communicates between the GRC capabilities via Web services configured in each application. Using the same user ID and password information from the connector, create a common Web user in the UME for all capabilities. This user is for all Web service configuration across the GRC capabilities.
In UME, go to User Management > Create user (Figure 2). In each capability, you use this same ID and password whenever a Web service ID is required. For example, in ERM you can enter the User Name and Password (Figure 3).

Figure 2
Create user in UME

Figure 3
ERM configuration example
For authorizations required for your Web user, refer to the security guide for SAP GRC Access Control at https://service.sap.com/securityguide and follow SAP Business User > SAP GRC Access Control 5.3.
RFC User
This user communicates between the front-end Java components and back-end target systems. Create the RFC user and choose Communications as the User Type in the target systems (Figure 4). Then assign administrative authorizations for all applications. Assign appropriate RFC authorization. For authorizations required for your RFC user, refer to the security guide for GRC Access Control by going to https://service.sap.com/securityguide and following menu path SAP Business User > SAP GRC Access Control 5.3.
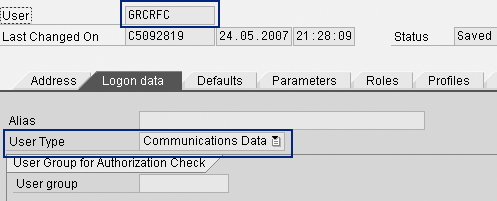
Figure 4
Create the RFC user
Master Data Attributes
Because you can use the capabilities individually, you maintain the master data separately in each capability. However, for integration to work properly, you need to maintain the master data consistently in all four components. The following are master data attributes that you use in multiple capabilities.
- Functional area: You need to make sure that the Functional Area ID field in ERM exactly matches the Functional Area Name field in CUP
- Business process: You need to make sure that the Business Process ID field in ERM exactly matches the Business Process Name field in CUP
- Sub process: The Sub Process ID field in ERM needs to exactly match the Sub Process Name field in CUP
- Role owner: The role owner in ERM should be the same as role approver in CUP
The applications do not use the other key fields as key integration fields to synch data, but you should create them with consistent descriptions to avoid confusion for the business users (e.g., Business Process Description field). For example, RAR also has a Business Process field to which segregation of duties (SoD) rules are linked. This field should be consistent with the business processes defined in ERM and CUP.
ERM Integration with CUP
The first integration point is from ERM to CUP to facilitate workflow approvals for role updates. Then you need to import roles for access requests.
Approval Workflow for Role Updates
I’ll show you the high-level steps for enabling this. Again, the detailed instructions on how to do this are located in the BPX document referenced earlier.
- Upload the .xml append file
- Configure the request types in CUP
- Configure the request priority
- Configure the initiators
- Configure custom approver determinators (CADs). CADs determine the approver for role approval initiated from ERM.
- Configure workflow stages. You need unique stages for each type of workflow that you’re implementing.
- Configure workflow paths. These are the approval paths that the integration initiators trigger. Again, you need unique stages for each type of workflow that you’re implementing.
- In CUP, configure the exit uniform resource identifier (URI) for all integration workflow types. All workflow exit URIs are the same. In CUP, follow menu path Configuration > Miscellaneous. Ensure that all workflow types are active by checking the Active check box (Figure 5).
- In ERM, you need to configure the workflow approval criteria. This configuration provides the role approvers for role approval in CUP. Go into ERM and follow menu path Configuration > Workflow > Approval Criteria. Select the appropriate attributes to determine approvers. For example, if you only select Business Process and Sub Process, the system determines your approvers by the combination of these two attributes.
- In ERM, Configure Web services for role update approval. Follow Configuration > Miscellaneous and enter the Workflow URL (Figure 6).

Figure 5
Ensure workflow types are active

Figure 6
Configure Web services for role update approval
Import Roles for Access Requests
The second integration point between ERM and CUP is to set up ERM to be the system of record for importing roles into CUP that you can use in access requests.
First you need to import the roles. There is an option to set Enterprise Role Management as the system for role source. To do this in CUP, follow Configuration > Roles > Import Roles and choose the Role Source as Enterprise Role Management from the drop-down menu. By importing the roles from ERM, the user requesting access can see the roles as defined in ERM, which I’ll show you next.
ERM Integration with RAR
Integrating ERM with RAR allows ERM to use the data stored in RAR for the following areas:
- Risk Analysis: Uses the rules defined in RAR
- Transaction usage: Requires alerts to be configured correctly in RAR
- Mitigations: Uses the mitigations defined in RAR
- Functions: Uses the function definitions from RAR rule architect
Overall Configuration
Configure Web services for Risk Analysis, transaction usage, mitigation, and functions. In ERM, follow Configuration > Miscellaneous and set up using the following steps (Figure 7). The user name and password should be the Web user set up in master data that I explained earlier.

Figure 7
Configure Web services
Risk Analysis
In ERM, you can choose the level of Risk Analysis as Transaction Level or Permission Level. Even though you configure to use the rules from RAR, you can run it at a different level than what you have set in RAR. For example, you set the default analysis type in RAR by following menu path Configuration > Risk Analysis > Default Values. In ERM, however, you may want the analysis to be run at transaction code level. To do this, in ERM follow Configuration > Miscellaneous and, next to Analysis Type, choose Transaction from the drop-down menu.
Transaction Usage
You can run the report shown in Figure 8 from ERM to highlight transaction usage by role. In addition to the configuration above, you need to configure alerts in RAR for this to work. The configuration guide explains the configuration of alerts in depth. In addition, SAP Note 1015921 provides a good overview of key areas of the setup that you should confirm. If you do not configure alerts correctly in RAR, this report from ERM does not work.

Figure 8
Transaction usage report in ERM
Mitigations
After you configure Web services, you’re able to attach mitigations maintained in RAR to roles created in ERM. Specifically, when you run Risk Analysis on a role in ERM, it brings up the screen shown in Figure 9. You can then click on the Risk Description to bring up a pop-up screen. You can select the Mitigation Control that you want to assign to this role. The system stores the data both in ERM and RAR so that any time in the future when you run Risk Analysis, this mitigation shows as attached to this risk for this role.
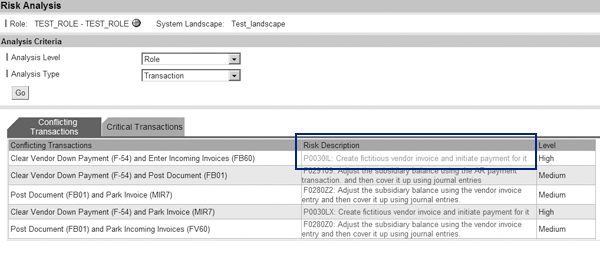
Figure 9
Run Risk Analysis on a role in ERM
Addition of Transactions via Functions
Companies may want to build roles by following the definition of the functions maintained in RAR Rule Architect. If you want to be able to add transactions from a function, you need to configure it as allowable. In ERM, follow menu path Configuration > Miscellaneous and set the Allows you to add a function to an authorization option to Yes from the drop-down menu.
If this configuration is set to Yes, when you create a role, you can pull transactions into the role based on the definition of a function from RAR. Specifically, the system displays a new tab called Functions when you go to Role > Create > Authorization Data. If this configuration is set to No, this same screen does not show the tab.
RAR Integration with CUP
RAR integrates with CUP for approval workflows and rules and mitigations. I’ll look into each next.
Approval Workflows
Just as in ERM, RAR can use CUP to enable automated workflows to approve various changes in RAR. When a user creates or updates risks or mitigation control definitions, or assigns controls to users, roles, or profiles, the system sends the request from RAR to CUP for the appropriate approval based on workflow configuration. Specifically, you can use CUP to enable workflows for three types of RAR changes:
- Approval workflow for risk updates
- Approval workflow for mitigating control updates
- Approval workflow for mitigated users, roles, and profiles updates
You then need to complete 10 steps to allow RAR to use CUP workflow.
- Upload the .xml append file
- Configure the request types in CUP
- Configure the request priority
- Configure the request attributes
- Configure the initiators. For RAR users, roles, and profiles mitigation changes, the initiator is CC_MITIGATION_CHANGE. The system sends requests for mitigated users, roles, or profiles update approval from RAR to CUP via a Web service to trigger this initiator (Figure 10). For RAR mitigating control changes, the initiator is CC_MITIGATION_INITIATOR. The system sends requests for mitigating control create or update approval from RAR to CUP via a Web service to trigger this initiator. For RAR risk changes, the initiator is CC_RISK CHANGE. The system sends requests for risk create or update approval from RAR to CUP via a Web service to trigger this initiator.
- Configure the CADs. You need to create unique CADs for each workflow that you’re implementing (e.g., risk change, mitigation change, mitigation user change).
- Configure the workflow stages. You need unique stages for each type of workflow that you’re implementing.
- Configure the workflow paths. These are the approval paths that trigger via the integration initiators that you configured before. You need unique stages for each type of workflow that you’re implementing.
- Configure exit URI for all integration workflow types. This is the same configuration that you did for the ERM integration with CUP.
- In RAR, configure workflow options. The workflow options are by default set to Yes to enable workflow integration with CUP to provide approval workflow for risk, mitigating control, and mitigation maintenance. Go to RAR and follow Configuration > Workflow.

Figure 10
Change initiator
Rules and Mitigations
The second point of integration is from CUP back into RAR. Specifically, you can configure it so that CUP calls to RAR to leverage the rules you use to run Risk Analysis and the mitigations stored in RAR.
You need to perform three steps to integrate CUP into RAR.
- Retrieve URIs for Risk Analysis, mitigation, risk search, organization rule, and function search Web service configuration
- Configure Risk Analysis integration with RAR. To do this, go to CUP and follow Configuration > Risk Analysis (Figure 11). Enter the URI obtained above into the URI field. The user name and password should be the same Web services user ID created as part of master data. You need to configure a default analysis type that defines whether Risk Analysis should be performed at action level (i.e., just transactions) or object level (i.e., permission). If you want the system to consider mitigating controls already assigned in RAR when running Risk Analysis, you need to check the Consider Mitigating Controls check box. Similarly, only check the Perform Org. Rule Analysis check box if you have defined organization rules in RAR.
- Configure mitigation integration with RAR. Access CUP and on the Configuration tab, click on Mitigation (Figure 12). Enter the URIs obtained in the first step.
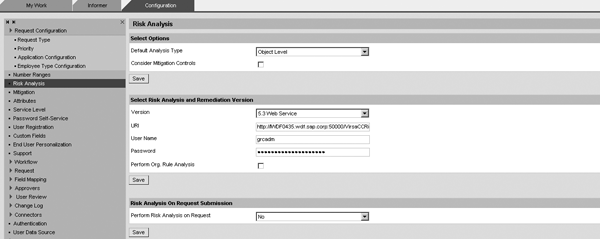
Figure 11
Configure Risk Analysis integration with RAR

Figure 12
Configure mitigation integration with RAR
Keep in mind that the system only runs Risk Analysis in CUP using the default rule set as configured in RAR. If you have multiple rule sets in RAR, it’s not possible to run Risk Analysis in CUP on those multiple rule sets.
SPM Integration with RAR
When running reports in SPM, you can filter them so that the report only shows the critical transaction.
SPM can use the rules defined in the rule architect of RAR to determine this. To configure this, you log in to the back-end ABAP system where SPM is installed. Use transaction code /virsa/vfat and click on the Configuration button.
In configuration, ensure parameter Critical Transaction Table from Compliance Calibrator (VRAT) is set to YES (Figure 13). You also need to configure the Connector ID for Risk Analysis correctly for the system.
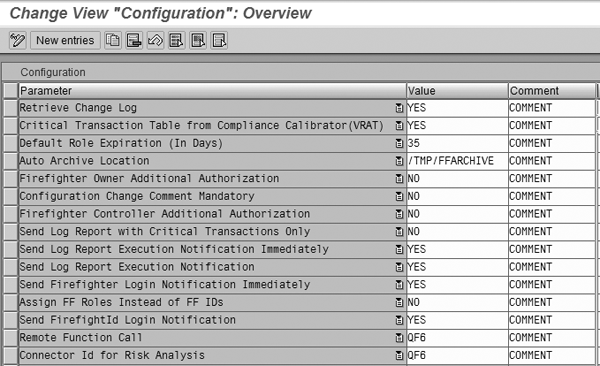
Figure 13
Set parameter to YES
Then you use transaction /virsa/zrtcnfg to configure for Risk Terminator. Risk Terminator is a sub-component of RAR that allows you to stop role or user changes that cause conflicts directly in the SAP system. This does not mean that you need to use Risk Terminator, but you need to set several options for SPM to call into RAR.
Specifically, you need to set the Select the CC release to be used parameter to CC5X. You also need to set the RFC destination for release CC5.X correctly. SAP Note 1055976 contains other key areas that you need to configure correctly.
SPM Integration with RAR
With Access Control 5.3, there is now an integration point between SPM and CUP. A user can use CUP to request access to a SuperUser ID. This is described in detail in the 5.3 release notes, which you can obtain through the SAP Service marketplace at https://websmp209.sap-ag.de/support and by following menu path Release & Upgrade Info > Release Notes > SAP Solutions > SAP GRC Products > SAP GRC Access Control > SAP GRC Access Control 5.3.
Key Notes
A number of SAP Notes are helpful about the subjects I’ve covered. Here’s a list of some that you might find handy.
1129369 SOD Conflicts Report Configuration
1099486 Import the Roles from Role Expert into Access Enforcer
1138458 Integrating AE workflows into Portal Universal Worklists
1103932 Integration of the AE with CC
1113883 Integration of Role Expert with Access Enforcer
1167243 FF5.2 SAP R/3 connectivity with CC5.2 Java
1055976 Firefighter 5.2 - Unable to run the SoD analysis report
1058798 Risk Terminator not Working.
1110440 Risk Terminator not triggered for composite or single role
1058830 Risk Terminator not working when assigning Critical Profile
1048331 Alerts Notification for
Mitigating Control
986419 Alert Log Handling and the JAVA Server
1147813 Alerts are not generating
1015921 Collective note for Alerts Log not capturing data
Jayne Gibbon
Jayne Gibbon, CPA, has been implementing SAP applications since 1996 and is currently a director in the Chief Customer Office at SAP. Jayne’s focus is making customers successful with their SAP HANA deployments. She has helped more than 100 customers drive business value with SAP HANA. Prior to joining SAP in 2007, Jayne worked for two multinational manufacturing companies based in Wisconsin. While an SAP customer, Jayne led the very first implementation of Virsa’s Compliance Calibrator, which is now part of SAP Access Control. Jayne’s experience includes internal audit; computer security; governance, risk, and compliance; SAP HANA; and SAP analytics.
You may contact the author at jayne.gibbon@sap.com.
If you have comments about this article or publication, or would like to submit an article idea, please contact the editor.