See how you can link the custom-developed programs to your Closing Cockpit and follow a discussion on the special settings and prerequisites related to this process. Learn how to:
• Link your custom-developed solutions to the Closing Cockpit for better integration with period-end activities to receive full reporting capabilities for executing custom-developed programs inside the Closing Cockpit
• Use two options to link custom-developed programs to the Closing Cockpit
• Use two ways to change the default layout for the spool for program SCMABOX so that users see the output in a consistent way (e.g., a sufficient number of columns in output)
Key Concept
Closing Cockpit is a standard SAP tool to monitor and control the entire period-end closing cycle. Therefore, it is important that it cover all the custom-developed programs. However, there is a special way to link these specific custom-developed programs to the Closing Cockpit to ensure that on execution in the Closing Cockpit, the SAP system displays the spools and job logs correctly and also picks the variant with dynamic variables correctly.
Organizations generally have custom-developed programs for business requirements that are not met in a standard SAP system (e.g., converting a credit card file from a bank into a format that an SAP system can recognize, such as KR1025 or GL1025). These custom-developed programs are not needed when business requirements are met by a standard SAP system or when a business relies on an easy manual workaround or uses a third-party tool. This program needs to be incorporated into the period-end closing activities (Closing Cockpit) to ensure an end-to-end process. In my example, the end-to-process begins with receiving the credit card file from the bank, moves to uploading the file into an SAP system, and ends with posting the file in an SAP system.
This article focuses only on the aspect of linking custom-developed programs to the Closing Cockpit.
The prerequisite is to register the custom-developed program for the Closing Cockpit into table SCMAPROGRAMS. Execute transaction SM30 or use cockpit transaction CLOCOC and follow menu path Goto > Register Program for Closing Cockpit. Enter the table name as SCMAPROGRAMS. Click the Maintain button (Figure 1).

Figure 1
Maintain table SCMAPROGRAMS
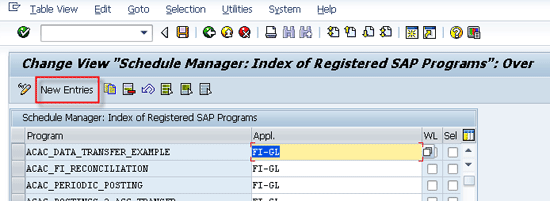
In the next screen, click the New Entries button as shown in Figure 2.

Figure 2
Create a new entry for a custom-developed program for the Closing Cockpit
On the next screen, maintain your custom-developed program and application area as CUSTOMER or a specific relevant application area (e.g., FI-GL as shown in Figure 3). Save the changes to your transport request by clicking the save icon. (The changes done here are client independent, so it applies to all clients of the same SAP system immediately.)

Figure 3
Register a custom-developed program for Closing Cockpit
There are two options to link custom-developed programs to the Closing Cockpit:
- Enhance custom-developed programs with source code changes
- Use the SCMABOX program to link custom-developed programs
Option 1: Enhance Custom-Developed Programs with Source Code Changes
To ensure that custom-developed programs behave the same way that the standard program does in the Closing Cockpit and displays information (e.g., spool, job logs, and status) correctly and that this data can be used in flow definition, SAP provides three report templates in SAP Note 325118 (https://service.sap.com/sap/support/notes/325118). You need to copy the code for one of these report templates into your custom-developed program:
- SCMO_REPORT1
- SCMO_REPORT2
- SCMO_REPORT3
Table 1 describes the features of these three report templates.

Table 1
Three report templates for a custom-developed program for the Closing Cockpit
Here are examples of using these three different scenarios. However, the use can differ based on an organization’s particular needs from custom-developed programs:
- There is a custom-developed program that is used for reporting and is a stand-alone process (e.g., a report showing changes in purchase order data). Such custom-developed programs do not need to be in a workflow. Therefore, SCMO_REPORT1 is suitable for such a custom-developed program.
- There can be cross-application relevant to the custom-developed program also, such as uploading exchange rates into an SAP system from a third-party tool. Therefore, SCMO_REPORT2 is suitable for such a custom developed program.
- There is a custom-developed program to convert the credit card file format from a bank-provided format into an SAP-readable format. This custom-developed program is to be used in a specific application, FI-TV (Travel Management), and can be used in the workflow of uploading the credit card file into an SAP system. Therefore, SCMO_REPORT3 is suitable for such a custom-developed program. When you define the workflow specific to that application (FI-TV in my example), then such custom-developed programs linked to that application can be used in the workflow.
After you include changes of one of these report templates into your custom-developed program, your custom-developed program is ready to be included in a task (or flow if applicable) definition in Closing Cockpit. The custom-developed program now behaves in the same way as a standard program that is linked. However, a lot of development work is necessary to change all existing custom-developed programs to adjust for the code of these SCMO_REPORT* templates. The organization may also have scores of custom developments and changing anything in the program’s code also involves retesting the custom-developed program’s features to ensure that there is no adverse impact. Therefore, option 2 provides an easier way to link custom developed programs in the Closing Cockpit.
Option 2: Use the SCMABOX Program to Link Custom-Developed Programs
https://service.sap.com/sap/support/notes/551743
In the selection screen of program SCMABOX (Figure 4), enter the name of your custom-developed program name in the Program Name field. In case your custom-developed program has a selection screen, enter the variant in the Variant field that contains the selection screen values.

Figure 4
The selection screen of the SCMABOX program
Note
If you are using dynamic variables in your variant, make sure that SAP Note 1844130 (https://service.sap.com/sap/support/notes/1844130) is also implemented in your system correctly. The changes in this SAP Note make sure that the variants of your custom-developed program are copied into a temporary variant with the specific values of dynamic variables available at the time of execution or scheduling. You then execute the custom-developed program with this temporary variant to reflect the correct values. The boxes for Test Run and Activity options appear on the selection screen (Figure 4) only when you implement SAP Note 1075752 (https://service.sap.com/sap/support/notes/1075752) in your system.
Execute the SCMABOX Program
Table 2 compares the three methods for executing the SCMABOX program.

Table 2
A comparison of the three execution options in the SCMABOX program
Send Mail upon Completion (Optional)
You can configure the text and email recipient (specific user, distribution list, or external email ID) after the completion of the batch job of SCMABOX program.
Note
The sidebar titled “The SCMABOXE Program” contains the details of the new advanced program SCMABOXE. If you are having version 700 of Cross-Application Component (SAP_ABA), then use the details of this program SCMABOXE instead of program SCMABOX.
The SCMABOXE Program
From the version 700 of Cross-Application Component (SAP_ABA), SAP also provides a new enhanced program, SCMABOXE, in SAP Note 1372743 (
https://service.sap.com/sap/support/notes/1372743). Here the main difference from the SCMABOX transaction is that you can trigger an email based on the outcome of the custom-developed program execution.
The first option, Start Program in Same Job, enables you to specify the triggering of the email as shown in
Figure A if the batch job is completed successfully. (If the job is not completed successfully, the mail triggering event is not triggered and no option is given for that scenario in this program SCMABOXE. In such a case, email is triggered only if such an option is defined in the workflow definition.)
The second option, Start New Job and Wait for End (Endless loop), enables you to specify the triggering of the email as shown
Figure B if the first batch job is completed successfully or the parallel batch job has an error.
The third option, Start New Job with Own Init/Closing Steps, does not include an option to trigger emails as shown in
Figure C. The reason is that this batch job of SCMABOXE does not monitor the new batch job triggered, and there is no possibility to check the completion of that parallel job in this SCMABOXE program main batch job.
Set the Output Length of the Spool Created from the SCMABOX Program
There is an additional problem created by the use of the SCMABOX program: When the spool is generated by its execution, it picks the format X_65_80 (65 rows and 80 columns) page output by default. However, the output might have more columns and become truncated in the spool.
There are two ways to change the default layout for the spool for this program: user-specific default settings and all users default settings.
Method 1: User-Specific Default Settings
As specified in SAP Note 503024 (https://service.sap.com/sap/support/notes/503024), users can change the format (e.g., to X_65_255 page output) by following these instructions: Execute transaction SE38 and enter the corresponding report name. In the menu, select Program > Execute > Background (Figure 5).

Figure 5
Set print parameters – Execute background step
In the next screen (
Figure 6) select Goto > Print parameters.

Figure 6
Set print parameters – Navigate to Print parameters
In the next screen (
Figure 7) click the Properties button.

Figure 7
Set print parameters – Setting printer
In the next screen (
Figure 8) set the desired parameters for the printing. Enter the desired formatting (e.g., X_65_255) and click the Settings button.

Figure 8
Set print parameters – Setting printer parameters pettings
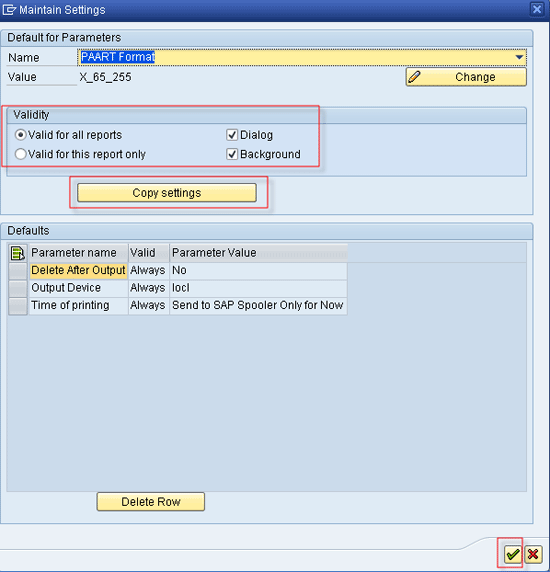
On the dialog box that appears next, select the validity of the settings made either specifically for this report or for all reports. After specifying various settings, click the Continue button to save the settings as shown in
Figure 9.

Figure 9
Set Print Parameters – Set the print defaults step
Note
The setting made in Figure 9 is applied only to the user who is using method 1 for changing the layout of the spool of the SCMABOX program. Therefore, if the same setting needs to be applied to an entire organization, each user needs to do these steps separately. This process might be time-consuming and hectic for large organizations.
Method 2: All Users Default Settings
To change the parameters setting for all the users centrally, you need to execute program RSPRIPARADMIN in transaction SE38. On the selection screen, enter the report name and the desired format. Click the Copy button (Figure 10).

Figure 10
Set print parameters via program RSPRIPARADMIN
In the next screen (Figure 11), you see the default values stored for the program. These values apply to all the users (unless a user has specifically defined a different format using method 1).

Figure 11
Default values set in program RSPRIPARADMIN
There are some other useful SAP Notes related to SCMABOX functionality. However, the following SAP Notes are useful only if you imported the task list in the Closing Cockpit from Schedule Manager:
- SAP Note 1518915
- SAP Note 1338505
SAP Note 1518915 (SchedMan: Analysis report of the variable values) is available from the version 700 of Cross-Application Component (SAP_ABA) in SAP. Applying this SAP Note provides you with a program called SCMA_CHECK_VARIANT_VALUES. This program enables you to go to the selection screen and check the values of various variables used in a task list name (Figure 12).

Figure 12
Selection screen of program SCMA_CHECK_VARIANT_VALUES
On execution, the output shows the various variables values (Figure 13).

Figure 13
The output screen of program SCMA_CHECK_VARIANT_VALUES
Applying SAP Note 1338505 (SCHEDMAN: Automatic transport of report variants) provides you with a program called ZSCMA_TRANS_BOX. This program enables you to go to the selection screen and enter a task list name (Figure 14).

Figure 14
The selection screen of program ZSCMA_TRANS_BOX
After you execute program ZSCMA_TRANS_BOX in a test run, the output shows various reports and variants (Figure 15).

Figure 15
The output screen of program ZSCMA_TRANS_BOX in test run mode
During the actual execution of program ZSCMA_TRANS_BOX, it asks the transport request number in which it saves all the variants. You then can transport the same to other systems. The important point to notice is that if you use the SCMABOX program in your task list (template), this program also fetches the custom-developed program and variant linked in SCMABOX and includes that in the transport request.
Gaurav Agarwal
Gaurav Aggarwal is SAP S/4HANA lead consultant at Infosys Limited. He has more than 14 years of experience, including 11 years in SAP Finance. He has expertise in both SAP FI and Controlling (CO) with integration to other modules in manufacturing and process industries. He is a chartered accountant and SAP Certified Financial Consultant. He holds a bachelor’s degree in commerce and is a techno-functional expert with thorough knowledge of the necessary ABAP for functional experts. He is a veteran in G/L, AR, AP, banking, FA, Travel Management, and closing cockpit and has handled greenfield implementation, upgrades and conversions, rollouts, and support projects.
You may contact the author at
gka2707@gmail.com.
If you have comments about this article or publication, or would like to submit an article idea, please contact the
editor.


