Improve the accuracy of available-to-pick in warehouse bin locations using inbound deliveries to post an automatic goods receipt at confirmation of putaway into a warehouse bin location.
Key Concept
You can manage goods receipt from the warehouse management level to improve picking accuracy and provide accurate warehouse bin available-to-pick. The receiving process in the warehouse starts with putaway transfer orders generated from an inbound delivery note. An inbound delivery note enables the warehouse to perform the putaway of the product into warehouse bin locations without posting the goods receipt until confirmation of the placement into the designated warehouse bin location takes place. This process increases accurate delivery by ensuring that once an outbound delivery is allocated and released to the warehouse, the products are at the right location and ready to be picked and shipped.
Most Warehouse Management System (WMS) implementations still use the classic goods receipt process as shown in Figure 1. First, goods receipts are posted against a purchase order when the product shows up in the warehouse. Then, putaway transfer orders are created for the goods receipt material document to initiate the putaway into a bin location. This is a process SAP supports and typically is what you need to do if you don’t use inbound deliveries.
With this process, the product is available for sale but cannot be picked until the putaway transfer order is created and the putaway into a warehouse bin location is confirmed. This can cause unnecessary exceptions during warehouse pick transfer order creation or wave release errors if you use pick waves in your warehouse operations. It can also lead to picking from your inbound staging area to satisfy a customer demand. Furthermore, it can affect warehouse accuracy and result in inefficiency in the warehouse processes.

Figure 1
Classic WMS goods receipt process with purchase order
In this article, I explain how to use inbound deliveries with your purchase orders to perform the receiving process. The inbound delivery notes are used to manage the receiving and putaway in your warehouse.
Following are the steps to process a receipt and putaway in the warehouse system:
- Create an inbound delivery note for the purchase order or standard transfer order to initiate the receiving process when product is received in the warehouse. (Note that in this step, no goods receipts have yet been posted for the product received.)
- Create putaway transfer orders using the inbound delivery to generate instructions for the warehouse to perform the putaway.
- Perform putaway based on the putaway transfer order data. The confirmation of the putaway transfer order triggers an automatic goods receipt posting against the inbound delivery and line.
Once these steps are performed, the product placed into the bin location is available and pickable for outbound deliveries/shipments.
Receiving via an Inbound Delivery
Rather than following the usual process of first posting goods receipts against the purchase orders when product arrives at the warehouse (prior to putaway to a warehouse bin location), you instead enable the inbound delivery creation functionality for purchase orders or standard transfer orders. Use the inbound deliveries for processing the receipt of products into a warehouse. The inbound delivery is used in the WMS module to create transfer orders (putaway instructions) to put the material received into warehouse bin locations.
All the warehouse operations related to the receiving activities can be processed in the inbound delivery. There is no need to post the actual goods receipt of the stock until the placement confirmation of the stock into a bin location is received. The system processes an automatic goods receipt for the material and amount placed into the bin location when the putaway transfer order is confirmed (Figure 2). As soon as the putaway is confirmed, the product and quantity are available for sale and, more importantly, picking. This method gives you a significant advantage for the putaway processing:
- Automatic goods receipts at confirmation ensure a quantity placed into a bin location is instantly saleable and available for picking.
- Outbound orders are not released to the warehouse until the product is in a bin location and available for picking.
- Reduces pick exceptions and transfer order creation or wave release errors as product is not available for picking until placed into the bin location.

Figure 2
Goods receipt process overview with inbound delivery
In a warehouse operation in which outbound processes are automated (i.e., picking wave creation and picking transfer order creation), this setup ensures that the system is not attempting to create a pick transfer order for material that is not in a pickable bin. These types of outbound processes are commonly found in high volume warehouse operations such as retail, wholesale, or spare parts distribution.
Inbound Delivery Creation Process
Inbound delivery can be created as follows:
- With reference to a purchase order
- With reference to a standard transfer order
- With collective processing for several purchase orders
Enabling a purchase order or standard transfer order line with a valid confirmation control key is required to allow inbound delivery creation. You can assign an appropriate confirmation control key on the Confirmations tab of the purchasing document item. The right confirmation key allows the inbound delivery creation for the purchase order item. I recommend using the standard SAP Confirmation Control Key 0004. This standard confirmation control key enables inbound delivery creation for purchase orders and standard transfer orders. Figure 3 shows the assignment of Confirmation Control Key 0004.

Figure 3
Purchase order item overview with Confirmation Control Key 0004
Configuring Confirmation Control Keys
SAP provides a list of standard confirmation control keys. If required, you can configure your own confirmation control keys. To configure a confirmation control key, follow IMG menu Materials Management Purchasing > Confirmations > Set Up Confirmation Control.
Figure 4 shows the SAP-provided confirmation control keys. The Confirmation Control Key 0004 is defined for inbound delivery creation. This key is typically sufficient to enable inbound delivery creation for purchase orders and standard transfer orders. As mentioned, you can always create your confirmation control key with settings specific to your business requirements if required.

Figure 4
Confirmation control key overview
Tip!
You have multiple options to default the confirmation control key:
- You can assign a confirmation control key to the vendor master
- You can assign a confirmation control key to the Info Record or Contract
- You can default the confirmation control key for the Document Type in Customizing
Putaway Transfer Orders
Once inbound deliveries are created for purchase orders or standard transfer orders, these inbound deliveries can now be used to process the receipt of products into the warehouse. In WMS, the inbound delivery is used as the reference document to create appropriate warehouse transfer orders (i.e., putaway instructions), for managing the putaway of the received materials into warehouse bin locations.
Use the SAP inbound delivery monitor to manage and monitor the warehouse receiving and putaway activities. The inbound delivery monitor is called via transaction VL06IP.
The inbound delivery monitor provides selection criteria that allow you to determine the inbound deliveries for the product and purchasing documents you want to process (Figure 5). I highlight a few selection options you can use to determine the inbound deliveries you would like to work on:
- PO Data
- Time Data
- Partner Data
- Doc. Data

Figure 5
Inbound delivery selection screen for putaway
Here is a list of SAP transaction codes related to the inbound delivery monitor functionality. You may want to consider using these transactions to monitor the different stages of the overall inbound process:
- VL06I: Inbound delivery monitor
- VL06IC: Confirmation of putaway inbound delivery
- VL06IF: Selection inbound deliveries
- VL06IG: Inbound deliveries for goods receipt
- VL06IP: Inbound deliveries for putaway
Figure 6 shows the overview screen of the inbound delivery monitor displaying a list of inbound deliveries ready for putaway (VL06IP). From this screen, you can manage the putaway process.
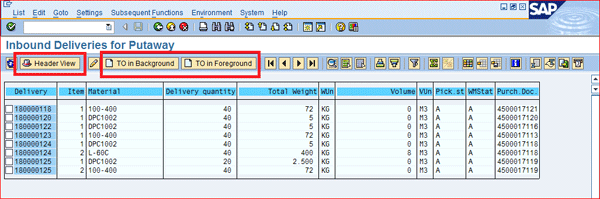
Figure 6
Inbound delivery overview for putaway
Putaway transfer orders are created by selecting the inbound delivery and executing the transfer order creation for the inbound deliveries via the transfer order creation buttons available on the application tool bar or menu of the Monitor.
- The putaway transfer orders can be created in the foreground or background.
- The inbound delivery monitor allows you to manage and monitor your receiving and putaway process.
- You can switch between heard or item views enabling you to create transfer orders for individual lines if required.
- Other methods/transactions to create transfer orders for inbound deliveries are available.
Figure 7 shows the transfer orders that were created from the monitor for the inbound delivery 180000125.
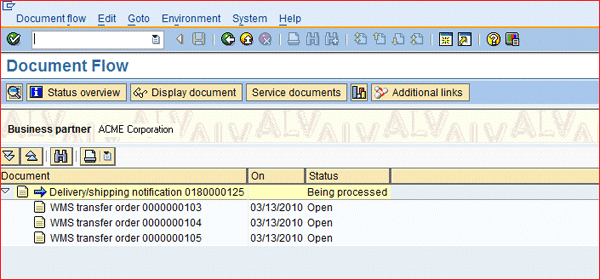
Figure 7
Document flow inbound delivery
The system created three single-line transfer orders. These are transfer orders with one transfer order line item for each item to be processed; in other words, these transfer orders contain a single putaway instruction for the warehouse operator. An inbound delivery line creates at least one single line transfer order. Typically, the inbound delivery line results in multiple single-line putaway transfer orders due to the quantity received and the number of bin locations required to store the material. This creation is due to the activation of the warehouse Split Profile, which is when a large transfer order is split into several smaller transfer orders (in our case, single line) for putaway.
I will review the required customizing steps for single line transfer order creation next.
Customizing Steps to Implement Single Line Transfer Order Creation
Step 1. Set up the Warehouse Split Profile. To set up a transfer order Split Profile follow the IMG menu path Logistics Executions > Warehouse Management > Activities > Processing Performance Data/TO Split > Define Profiles. Here you define a warehouse profile with the option “Split single TO” active. This profile results in single line transfer order creation when used with warehouse transfer orders (Figure 8).

Figure 8
Split profile data overview
Step 2. Assign the Split Profile to the Warehouse Activity Area. To assign the Split Profile to a warehouse process, follow IMG menu path Logistics Executions >Warehouse Management > Activities > Processing Performance Data/TO Split > Control for Performance Data Processing/Define TO Split.
Assign the single transfer order profile to Movement Type 101 and Storage Type 902. Storage Type 902 is the interim storage area for receipts. Movement Type (MvT) 101 is the standard WM Movement Type for goods receipts (Figure 9).
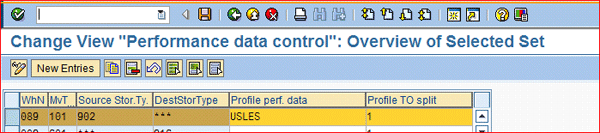
Figure 9
Assign split profile to the warehouse activity area
These customizing settings ensure that single line warehouse transfer orders are created for inbound deliveries. Next, warehouse operations processes these putaway transfer orders as shown in Figure 10. The document flow shows that the same number of goods receipts have been posted as confirmed transfer orders for this inbound delivery.
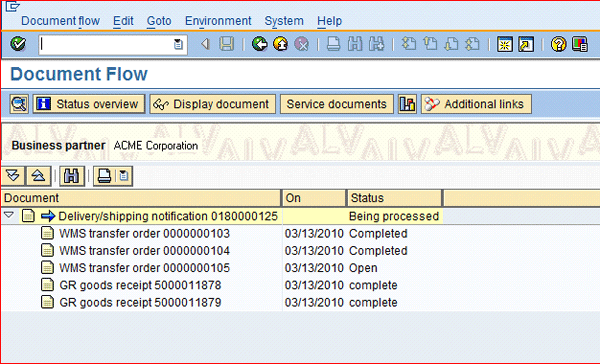
Figure 10
Inbound delivery document flow overview
Figures 11 and 12 show that goods receipt quantity and transfer order quantity of this example are identical. This is due to activation of automatic goods receipt positing for transfer orders after confirmation of these transfer orders.

Figure 11
Warehouse Transfer Order Item view

Figure 12
Material document overview
Tip!
Using single line transfer orders also allows multiple warehouse associates to work on the putaway of the transfer orders for an inbound delivery. This provides much more flexibility for executing of the putaway transfer orders. Furthermore, it allows automatic goods receipt posting of the putaway transfer order confirmation.
Next, I will walk you through the customizing requirement of automatic goods receipt posting. You must customize to ensure that material is available to be picked and shipped as soon as the putaway is confirmed. This eliminates delays in the manual posting of a goods receipt after a putaway.
Customizing Requirement of Automatic Goods Receipt Posting
Perform the following customizing to enable the automatic positing of a goods receipt after confirmation of the transfer order. First follow IMG menu path Logistics Execution > Warehouse Management > Interfaces > Shipping > Define Shipping Control. You will see a pop-up screen with multiple activity selection options. Select the activity option Define Shipping Control at the Movement Type Level from the list.
Next, set the movement type control indicator for warehouse Movement Type 101 to 4 as shown in Figure 13 in the Copy WM quantity column. The movement type control Indicator 4 posts the goods receipt for the transfer order when confirmed. This indicator ensures that the WM quantity (i.e., the transfer order quantity), is used for the goods receipt positing. This setup, along with single line transfer order creation, ensures that multiple goods receipts can be posted against the inbound delivery note and that each putaway is immediately available for picking.
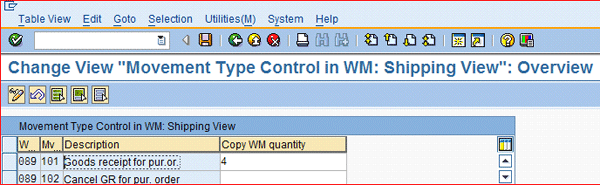
Figure 13
Indicator to post WM quantity as goods receipt quantity
Hasan Yakisan
Hasan Yakisan is a senior SAP LES consultant with more than 17 years of SAP implementation experience. During his career, he has focused on helping his customers optimize their logistics business processes by designing SAP solutions for highly complex logistics business requirements to maximize and enhance the functionality of the SAP R/3 product, and has been providing new solutions within the logistics area.
You may contact the author at hasan.yakisan@enowa.com.
If you have comments about this article or publication, or would like to submit an article idea, please contact the editor.