See how to configure Engineering Change Management (ECM) to exert greater controls, checks, and balances on your master data creation process.
Key Concept
Engineering Change Management (ECM) is a tool that companies can use to gain better visibility, as well as to provide checks and balances, over the master data creation process. ECM does that by recording all changes or updates to SAP ERP Central Component (ECC) master data. It also ensures that business process owners validate and confirm every step of the master data creation or change.
Engineering Change Management (ECM) offers extensive controls for managing master data in the production planning (PP) component. You can easily set it up to bring better visibility and accountability across business processes. You can also use ECM in other logistics and supply chain components of SAP ERP Central Component (ECC).
After explaining the necessary configuration, I cover the business processes known as Engineering Change Request (ECR) and Engineering Change Order (ECO). A table is included to help you understand the logical and sequential order in which ECM statuses work. Finally, the ECM Information System enables you to appreciate and take better advantage of the reporting features available in SAP ECC.
ECM Configuration
The first step in configuring ECM is to assign a digital signature to system statuses within ECR/ECO to validate the process step. A digital signature is a validation step that the user takes before the system makes the requested changes. ECR and ECO have a large number of system statuses into which you can integrate the digital signature, including the following:
- Check ECR
- ECR checked
- Approve ECR
- Withdraw approval
- Reject ECR
- Convert ECR to ECO
- Lock ECR/ECO
- Unlock ECR/ECO
To assign the previously configured digital signature to signature network for ECR/ECO, follow SAP ECC configuration (SPRO) menu path Cross-Application Components > Engineering Change Management > Change Type > Approval > Define Signature Network for change master record. On this initial screen, select the line item CM2 and click the details icon to go to
Figure 1.
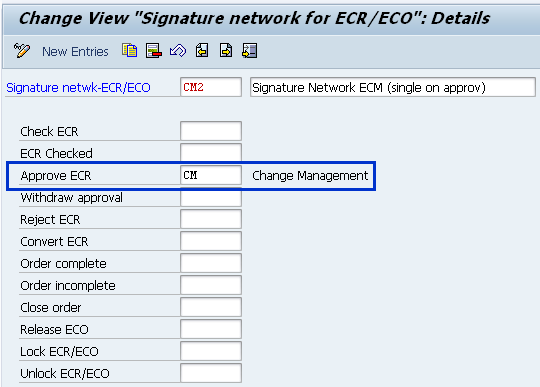
Figure 1
Signature strategy in ECR/ECO
In
Figure 1, you can incorporate the digital signature in one or several steps. In my example, I incorporate the previously configured digital signature CM to the step Approve ECR. It means that whenever the user updates the system status to Approve ECR, the system brings up the option for the user to digitally sign to validate the process step. A digital signature is a pop-up in which the user must enter an SAP login password to validate the changes to system status. If your company’s business process requires you to incorporate digital signature in several such steps, then you need to make the relevant settings at this stage. Click the save icon to save your entries.
Define Change Type for Change Master Record
To integrate the digital signature with ECR/ECO at the change master record (header level) follow configuration menu path Cross-Application Components > Engineering Change Management > Change Type > Define change type for Change Master Record (
Figure 2).

Figure 2
Change type at header level with signature strategy CM2
In
Figure 2, I create a new change type 700 (first column) and incorporate the same signature network CM2 that I configured in
Figure 1. The change type 700 is a unique identification containing specific settings, such as signature network, which I’ll eventually use in the ECM process. You can also integrate the SAP Workflow with the help of an SAP Workflow expert. The workflow expert would have previously created the workflow for this business process and at this stage (in
Figure 2) can enter details like workflow type and workflow task. Save your settings by pressing Ctrl+S or clicking the save icon.
Signature Network for Objects
Based on the same principle as signature network for change master record (the header level of ECR/ECO), the system offers you the option to incorporate a digital signature to individual objects (at the item level of ECR/ECO), such as a material bill of materials (BOM), an inspection plan, or a master recipe.
You can integrate digital signatures into a large number of system statuses in the object management record. Some of these are:
- Change possible
- Change unnecessary
- Change impossible
- Release change
In my example, I have not incorporated any digital signature at the object level.
Define Change Type for Objects
Based on the same principle as change type for change master record (the header level of ECR/ECO), the system offers you the option to incorporate the digital signature network and workflow to individual objects (at the item level of ECR/ECO). To create change type ECR/ECO for objects, follow configuration menu path Cross-Application Components > Engineering Change Management > Change Type > Define change type for Objects (
Figure 3).

Figure 3
Change type at object or item level
In
Figure 3, I create a new change type 725 (first column), but this time do not assign any signature network. I create this new change type 725 to show how you can use it at the item level of an object, such as material BOM. In other words, you can have two different control levels to the master data creation process using ECM. The first control level can be at the header level and the second can be at the item level. I’ve not assigned the signature network at this stage, as I do not want to want to integrate a digital signature at the item level of ECR/ECO. If your business process requires that you do so, this is the time to incorporate a signature network at the item level. Save your entries by pressing Ctrl+S or clicking the save icon.
Automated Transactions
If the business process entails that when a prerequisite is met, the subsequent process can trigger automatically, then you can use automated transactions in ECR/ECO. For example, it’s possible that an approved ECR may be converted to ECO automatically if the relevant configuration settings are made. This may be the case when all approvals for ECR are in place and the system can proceed to convert an ECR into an ECO automatically, to save you from manually processing a step. You do, however, have the option to incorporate a digital signature in any or all automated transactions. While options such as automated transactions eliminate any manual intervention, digital signatures add a validation step along the entire ECM process of master data creation or change.
To make the appropriate settings to set up automated transactions, follow SAP configuration menu path Cross-Application Components > Engineering Change Management > Change Type > Define Automated Transactions (
Figure 4).
Figure 4 shows the standard list of available change types, and several columns with check boxes to select.

Figure 4
Automated transactions at the header level
At the ECR/ECO level, you can automate some of the business processes. The system automatically sets the relevant status if the process is marked as automatic for:
- Check ECR
- Checked ECR
- Approve ECR
- Convert ECR to ECO
- Complete Change
- Release Change
In my example (
Figure 4), I click the New Entries button, enter the previously created (in
Figure 2) change type 700, and select the Approve Autom. check box. As a result, when the system status ECR Checked is set, the system automatically sets the next status, which in this case is approve ECR.
Note
When you integrate ECM in your business processes, do assess and evaluate to see the business processes that you can automate without compromising on controls. This saves the effort of individually setting and changing statuses each time.
Next, select the line item with ChgTyp 700 in
Figure 4, and double-click the Object Type Level folder on the left. This leads to the screen shown in
Figure 5.

Figure 5
Automated transactions at object type level
In
Figure 5, click the New Entries button and select object type 2 from the drop-down menu to denote that the automated process applies to the material BOM. Object type 2 refers to the material BOM. To see a selected list of object types you can automate in ECR/ECO, refer to
Table 1.

Table 1
Selected standard object types
In my example, I have not automated any process at the object level. The processes you can automate at the object levels are:
- Change possible
- Release change
Save your entries by pressing Ctrl+S or clicking the save icon.
Table 1 also shows that you can integrate ECM with the master data of PP, plant maintenenace (PM), quality management (QM), and the Document Management System in ECC.
Note
While this article does not cover the Workflow associated with ECM, you can integrate Workflow in ECM by following ECC configuration (SPRO) menu path Cross-Application Components > Engineering Change Management > Change Type > Set Workflow for ECR/ECO.
ECM in Action
I now show how the configuration that I performed, such as change types 700 and 725 (for ECR/ECO) for header and object, respectively, and the digital signature on specific system statuses at the header level, impacts the ECM process.
I begin with the creation of ECR and keep on updating system statuses at ECR and object levels in logical and sequential order. I then convert ECR into ECO, followed by updating system statuses at ECO level.
To create an ECR, follow menu path Cross-Application Components > Engineering Change Management > Change Number > Create or execute transaction code CC01 (
Figure 6). In
Figure 6, select the ECR radio button and enter the previously configured Change Type, 700. Press Enter, which leads to
Figure 7.
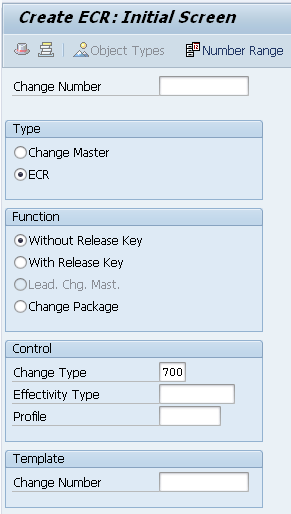
Figure 6
Initial screen for ECR creation
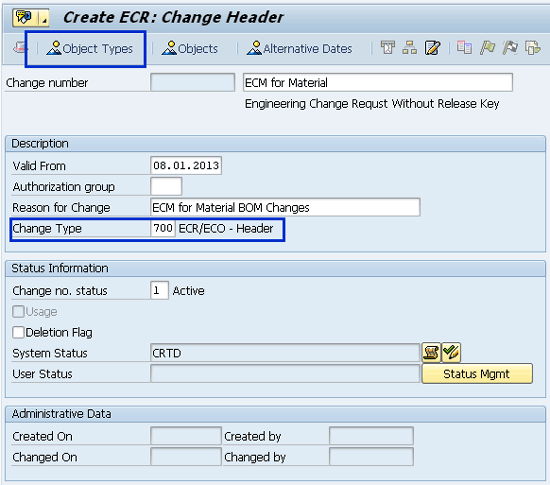
Figure 7
Header screen of ECR
Figure 7 is the header data of ECR, in which I entered a short text and a Valid From date as 08.01.2013 of ECR. You can also give a short text in the Reason for Change field. Notice that the System Status field is automatically set to CRTD, which is for created. At the header level of ECR, the system also incorporates the Change Type 700. Click the Object Types button in
Figure 7 and it takes you to the screen shown in
Figure 8.
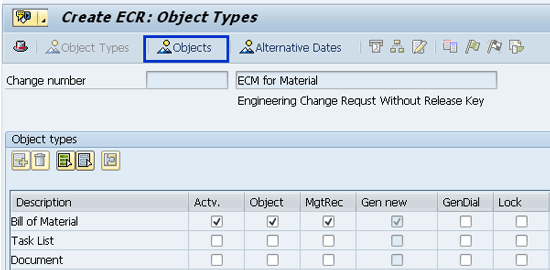
Figure 8
Object types selection in ECR
Because, in my example, I am working with material BOM, I select the three check boxes (e.g., Actv., Object, and MgtRec.) to enable the system not only to make this object active, but also to provide the option to enter object details. Next, click the Objects button in
Figure 8, which takes you to
Figure 9.
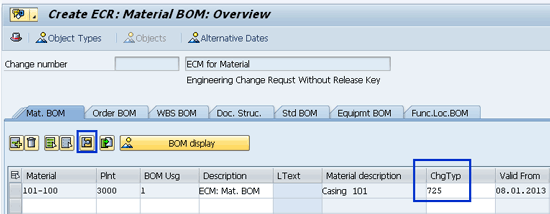
Figure 9
ECR creation – Material BOM overview
In
Figure 9, I enter the material BOM as 101–100, the plant as 3000, the BOM usage as 1, and the Description as ECM: Mat. BOM. I also enter the previously configured change type for the object as 725. Select the first line item (with material 101–100) and click the details view icon. This leads to the screen shown in
Figure 10.
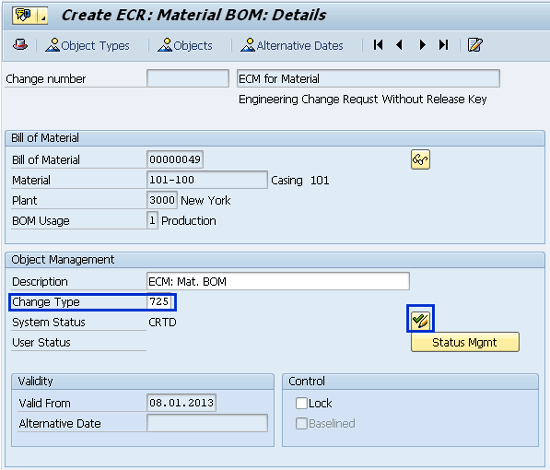
Figure 10
Item details of material BOM 101-100 with Change Type 725
Figure 10 shows not just the Change Type for the object (which in my example is material BOM), but also provides the option to continue updating the system statuses as and when the actual information is available. You can continue to update the statuses by clicking the change status icon (the green checkmark with the pencil), highlighted in
Figure 10.
Save the entry and the system generates an internally generated Change Number, which in my example is 500000000088. I use this change number for all the system statuses updates.
The Business Process of ECM
The business process of ECM begins with ECR creation, in which the user defines the object types and then the specific objects, such as material BOM. This is followed by consistently updating the system status after the user performs each activity. If ECC Workflow integrates with ECM, then you can automate the steps and processes involved in ECM. When necessary prerequisites are in place, the system enables you to convert an ECR into an ECO, and to enable the user to make necessary changes in the object with reference to ECO. Finally, you close and release the ECO to signal the completion process of ECM.
Check ECR
With the system-generated Change Number, I execute transaction code CC02 to start updating the system statuses in logical and sequential order. On the initial screen for Change Number (through transaction code CC02), I enter the Change Number 500000000088 and press Enter, which leads to the header details of the Change Number. On the header details of Change Master, I click the system status icon, which leads to
Figure 11. (Refer to
Figure 10 to see where to click the system status icon.) In
Figure 11, I set the system status to Check ECR to signal that the concerned person can initiate ECR checking. The system also updates the status, as shown by the green checkmark next to Check ECR in
Figure 12.
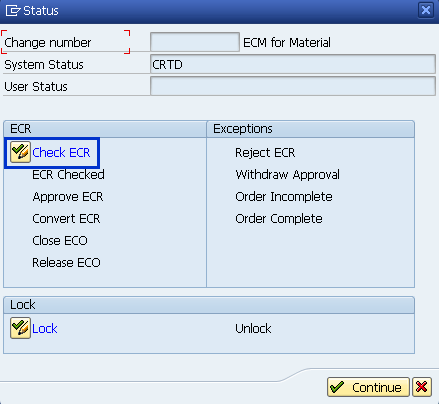
Figure 11
Initial ECR status set to Check ECR
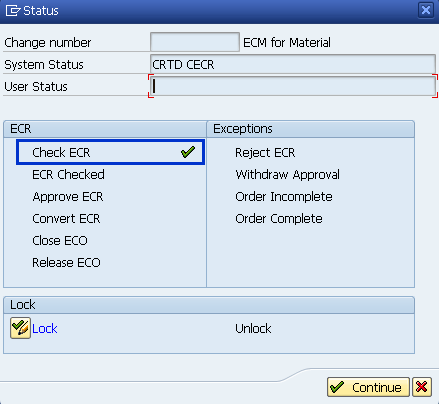
Figure 12
System status after user selects the Check ECR status
Click the Continue button in
Figure 12 and it brings back the header details (
Figure 10). Save the ECR.
Change Possible (Object) and Digital Signature
The ECR is now ready to be checked and the user accordingly updates the status of the checked ECR. On the header details of ECR, go to the detailed view of the object (material BOM). Refer to
Figure 10 again, and click the system status icon, which leads to
Figure 13. After checking the ECR, I now have three options. They are: confirm that changes are possible, unnecessary, or impossible. The option selection depends on the actual findings by the concerned person of the changes in the material BOM, and hence the system status is accordingly updated. Click the system status Change Possible button and click the Continue button. Next, save the ECR by clicking the save icon or pressing Ctrl+S.
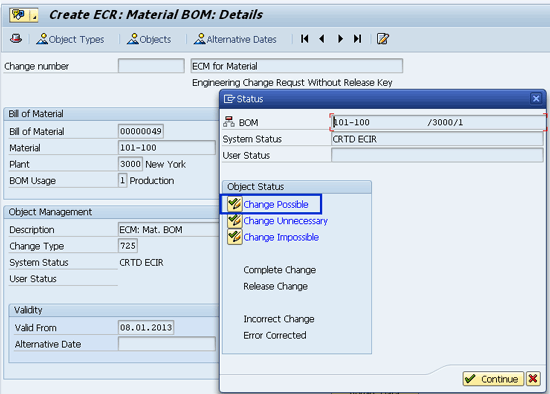
Figure 13
Object status set to Change Possible
ECR Checked (Header) and Digital Signature
In
Figure 13, the header details of the ECR, click the system status icon (which is behind the Status popup window in
Figure 13), and it leads to
Figure 14. The system status ECR Checked becomes available for the user to set after the previous step (Check ECR) is completed. This is why it is important to ensure that all the steps needed to convert an ECR into an ECO are performed in a sequential and logical order. I set the system status to ECR Checked and the next status as Approve ECR (
Figure 14). The system immediately opens the pop-up screen shown in
Figure 15, which prompts the user to digitally sign before the status update becomes effective.

Figure 14
System status set to ECR Checked and then Approve ECR
Remember, this setting was configured earlier, in
Figure 1, which requires a digital signature to validate any changes made when the user sets the system status as Approve ECR
In
Figure 15, I enter some short details in the Comment box and then digitally sign, by entering the SAP login password and clicking the continue (green checkmark) icon.
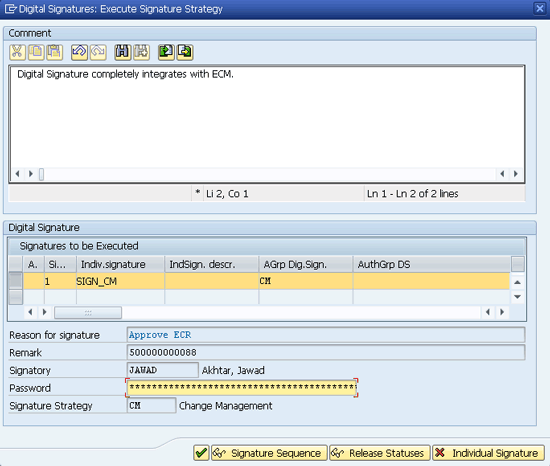
Figure 15
ECM integration with the digital signature
Automated Transaction and Conversion of ECR into an ECO
With the ECR checked and the system status updated accordingly, the next step is to approve the ECR. In my example, because I configured that the ECR approval is going to be an automated process, the system message in
Figure 16 appears. (Refer to
Figure 4 for the necessary configuration settings to automatically update the system status to Approve ECR, as soon as the system status ECR Checked is in place.)
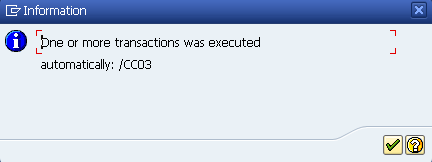
Figure 16
Automated transaction
The next step is to convert the ECR into an ECO. Click the system status icon in
Figure 10, which takes you to
Figure 17. Here, set the system status to Convert ECR.
Figure 18 shows the result of this action.
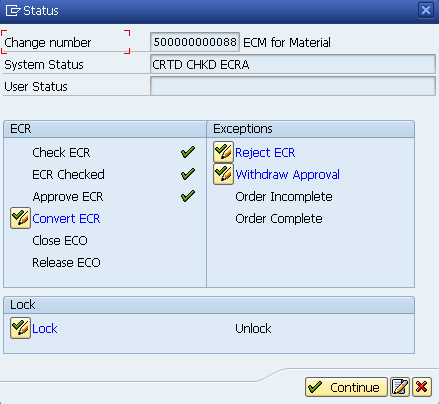
Figure 17
Convert ECR to ECO

Figure 18
ECR converted to ECO
In
Figure 18, click the Continue button and save ECR 500000000088, which is now already converted to an ECO.
Changes in the BOM with the Change Number
Unless an ECR is converted to ECO, no changes in the material BOM (the object) are possible with reference to the Change Number. With the Change Number for the BOM created in the system, I now proceed to make actual changes in the material BOM with reference to the Change Number.
To change the material BOM, execute transaction code CS02 (
Figure 19). Here I enter the Material (101–100), the Plant (3000), and the BOM Usage (1, which is for production). I also enter the Change Number (500000000088) as well as the Valid From date (08.01.2013). Click the header (hat) icon and it leads to
Figure 20.
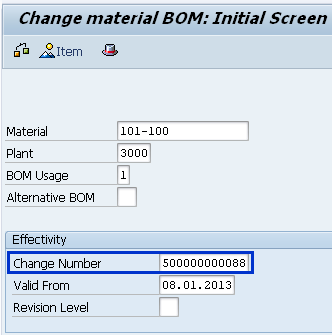
Figure 19
Initial screen of BOM with Change Number
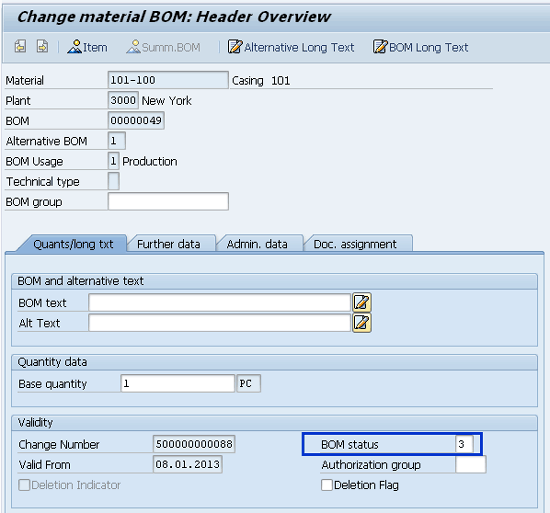
Figure 20
Header screen of material BOM
It is important to ensure that the header of the material BOM has its status as 3, which is for active with change history (
Figure 20).
In
Figure 20, notice that the system has automatically incorporated the Change Number in the material BOM. Any changes or updates made are now comprehensively recorded and the information is available with reference to the Change Number in the ECM Information System. Click the Item overview button in
Figure 20, which takes you to
Figure 21. Here, select line item 0010 and click the item details icon to go to
Figure 22.
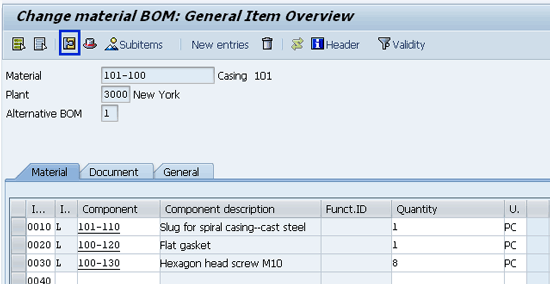
Figure 21
Item Overview of Material BOM
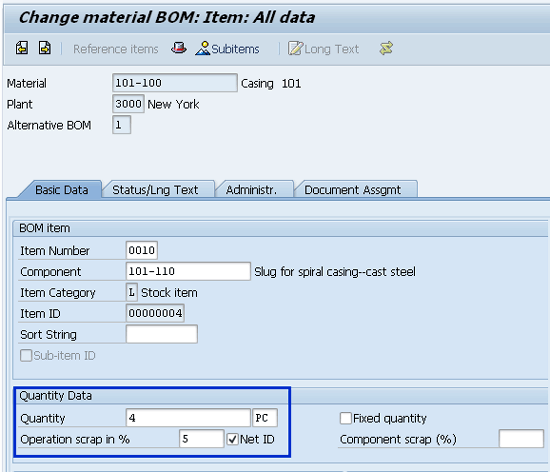
Figure 22
Item detail screen of Component 101–100
In
Figure 22, I change the component Quantity from 1 to 4, enter 5 in the Operation scrap in the % field, and select the Net ID check box. I’ve made these changes to reflect the latest and updated details of a business process, hence these changes are made to the material BOM. I changed the component quantity from 1 to 4 to reflect that, due to design changes of the material 101–100, it now takes four pieces of component 101–110 to produce one piece of material 101–100 (the header material of the material BOM). Similarly, I’ve updated the operation scrap percentage to 5 (percent) to show that the actual production process of the material now generates net 5 percent scrap at the operation level. The Net ID check box denotes the net percentage of scrap generated at the operation level. Save your entries by pressing Ctrl+S or clicking the save icon.
Complete and Release Change (Object)
After changes have been made to the master data, the material BOM in this case, I again go back to the Change Master number 500000000088 via transaction code CC02 to the system status for the object. Click the BOM for material 101–100. Set the system status to Complete Change, and then to Release Change so that it finally appears as in
Figure 23.
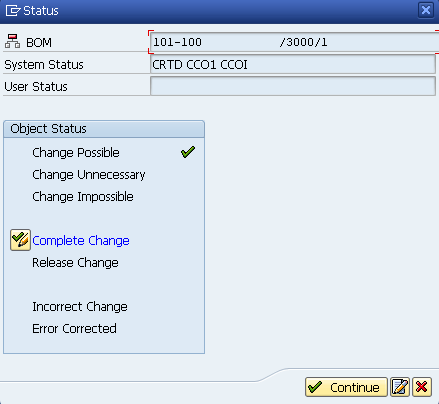
Figure 23
ECO status update to Complete Change
If the system status is Release Change, you also have the option to set the system status to Incorrect Change, which can then be updated to Error Corrected. Click the Continue button in
Figure 23 and it takes you back to the header details of the ECR (now an ECO). Click the save icon to save your settings.
Close and Release ECO
Finally, click the system status icon in
Figure 10 and set the system status to Close ECO to reflect that all the necessary changes to the ECO have been made (
Figure 24). Set the system status to Release ECO. The pop-up message in
Figure 25 appears to confirm the status.
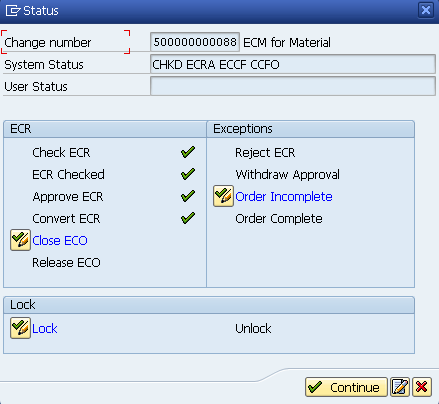
Figure 24
Header status set to Close ECO

Figure 25
Header status set to Release ECO
A released ECO does not allow any further changes to the master data (object) with reference to the Change Number. Also note that, until a user releases the ECO, the option to lock the ECO is still available. This lock option becomes unavailable when you release the ECO.
ECR/ECO Step-by-Step Approach: At a Glance
A lot of steps were involved in converting the ECR to an ECO. To help understand the sequence of steps involved and their logical links to each other, refer to
Table 2.
Table 2 starts with a description of each step. The next two columns (Change master record/header and Object/item), indicates whether the step corresponds to the header or to the object level. Finally, the Remarks column provides greater details of the corresponding steps.
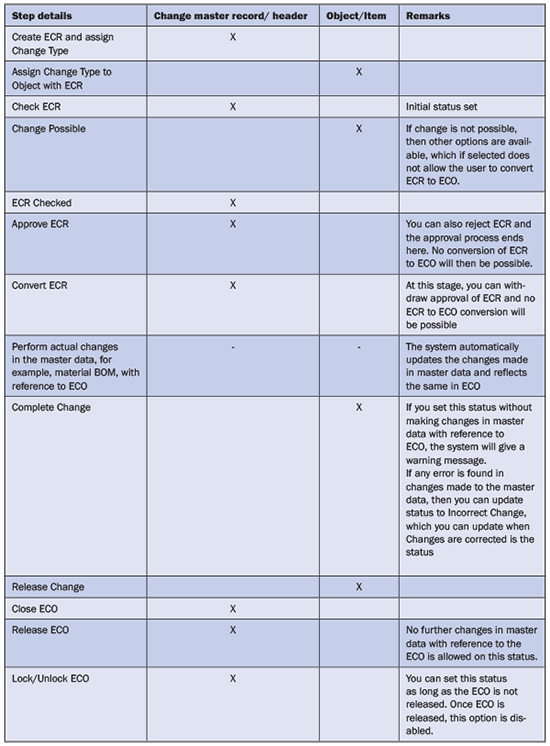
Table 2
ECR/ECO step-by-step approach, at a glance
With all these changes made to the material BOM and with reference to the Change Number, I am now ready to evaluate the changes in the Engineering Change Management (ECM) information system. An information system is the standard reporting tool that SAP ECC offers in all components to get comprehensive details of transactions.
ECM Information System
Leveraging the strength of information system in SAP ECC, ECM also has its own set of reports and information systems for user to get relevant and comprehensive information, based on user-defined criteria. To view changes made to the material BOM with reference to the Change Number, follow SAP menu path Cross-Application Components > Engineering Change Management > Reporting > Information System, or use transaction CC07 (
Figure 26).

Figure 26
Initial screen of the ECM information system
Figure 26 is the initial screen of the ECM information system. You have a large number of options to enter or select as relevant parameters, so that when the report executes, the system displays only the relevant results. Here, I enter only the Change Number (500000000088) and click the execute icon or press F8, which leads to
Figure 27.

Figure 27
ECM information system
In Figure 27, double-click the Change Number 500000000088 and it leads to the summary of all the important information with reference to the Change Number. This information includes the object type, object, description, and change type. Click the BOM tab in Figure 27 and it takes you to the screen in Figure 28.

Figure 28
Detailed view of all changes made to the BOM with reference to ECM
Figure 28 provides the comprehensive details of all the changes made to material BOM 101–110, including the Old Value and New Value, against each field. Where there was no old value, as in the case of Change Number 500000000088, the same number is shown in the New Value column, and the Old Value column is left blank.

Jawad Akhtar
Jawad Akhtar earned his chemical engineering degree from Missouri University of Science and Technology. He has 17 years of professional experience, of which nine years are in SAP. He has completed eight end-to-end SAP project implementation lifecycles in the areas of PP, QM, MM, PM, and DMS in the steel, automobile, chemical, fertilizer, FMCG, and building products industries. He also has worked as an SAP integration manager and an SAP project manager. He has been proactively involved in a business development and solution architect role for seven years. He is the author of
Production Planning and Control with SAP ERP, it's filled with in-depth infomation on discrete, process, and repetitive manufacturing types. His profile on LinkedIn is at
https://pk.linkedin.com/in/jawadakhtar. You may follow Jawad on Twitter @jawadahl. Currently, he is associated with AbacusConsulting as Head of SAP Delivery.
You may contact the author at
jawad.akhtar@live.com.
If you have comments about this article or publication, or would like to submit an article idea, please contact the
editor.


