In the wake of globalization of business, enterprise organizations need to continuously expand their operations. This expansion generates a need to have bank holdings in various countries to support the daily operations of payments and collections. SAP S4/HANA Finance for cash management has a component named Bank Account Management to centrally manage bank accounts. Bank account processes such as opening and closing involve multiple steps and need various approvals. These processes can be now be managed via workflows in SAP S/4HANA Finance in a streamlined way.
Key Concept
Managing bank accounts has become a user activity in SAP S/4HANA Finance for cash management instead of a traditional configurational activity in a classical SAP ERP Central Component (ECC) system, where it used to be defined in the development system and transported up to production. This makes it more important than ever to control the bank account management process so that it has proper details backed up by relevant authority and a harmonized structure. SAP provides workflow capability in Bank Account Management in which various users can assume different roles to request, create, change, and approve the bank accounts.
How do you manage bank accounts in the SAP ERP Central Component (ECC) system? If you want to create a house bank or account ID, you first must configure it in the development system and then it travels through a test or a quality system to reach the production environment. Moreover, business users need to depend on the IT team, which might not be aware of how a bank account will be used. SAP S/4HANA Finance has reimagined this process and given full control to business users for bank account management. I walk you through the standard SAP workflow provided for bank account management and show how to configure and use those settings to streamline your banking structure. Let’s first see the structure of this offering in SAP S/4HANA Finance.
Note
SAP S/4HANA Finance for cash management is a separate license and does not come with standard SAP S/4HANA (i.e., the digital core). For bank account management processes, SAP has given two options to customers. The first option is full-fledged Bank Account Management, which is part of this separate license of SAP S4/HANA Finance for cash management. The second option is Bank Account Management Lite, which comes pre-installed along with SAP S/4HANA Finance (i.e., no separate license). The workflow functionality explained in this article is supported only in the full-fledged Bank Account Management and not in Bank Account Management Lite. There are other differences between the lite version and full-fledged version, as detailed in SAP Note 2165520 (
https://launchpad.support.sap.com/#/notes/2165520).
I also focus on the settings needed for workflow in Bank Account Management and do not cover any other basic settings needed in the system, such as the type of bank accounts and the HR organizational hierarchy.
Further, SAP Fiori is a mandatory component for using the Bank Account Management workflow process. SAP Fiori comes with the SAP S/4HANA license, so it has to be installed by your Basis team before you can start using the features explained in this article.
Overview of Standard SAP S/4HANA Bank Account Management Workflows
Figure 1 shows the overview of a standard SAP workflow template, WS74300043, which is the main workflow for Bank Account Management. Based on the user activity (opening, modifying, and closing), the related sub-workflow is triggered.

Figure 1
Overview of standard SAP workflow for Bank Account Management
Configuration to Activate Bank Account Management Workflows
To activate standard workflows in SAP S/4HANA Finance for cash management, you first need to activate the business function FIN_FSCM_CLM. To complete this step, execute transaction code SFW5 and select the check box for this line, as shown in
Figure 2. After FIN_FSCM_CLM is activated, the cash management component in your system is enabled. (This activation is indicated by the following message: Business func. will remain activated.)

Figure 2
Activate business function FIN_FSCM_CLM
Note
This is a reversible business function, so if at any point of time you do not want to use the SAP S/4HANA Finance for cash management features, then this can be de-implemented. You also need to implement various notes mentioned in SAP Note
2255265 (Release Information Note: SAP Cash Management (SAP S/4HANA Finance 1605).
Define Number Ranges for the Bank Account Technical IDs
Each bank account in the SAP S/4HANA Finance system is also assigned a technical ID by the system automatically at the time a bank account is created. For this you need to define a number range interval in the customization menu path SPRO > Financial Supply Chain Management > Cash and Liquidity Management > Bank Account Management > Basic Settings > Define Number Ranges for Bank Account Technical IDs (transaction code S_E91_86000029).
Figure 3 shows the sample number range I entered for this technical ID object. Click the save icon to save your data.

Figure 3
Number range for technical ID for bank account master
Define Number Ranges for a Change Request
When a user does an activity in Bank Account Management in SAP S/4HANA, such as opening or changing a bank account, the system triggers a change request. In this activity, you need to define a number range interval in the customization menu path SPRO > Financial Supply Chain Management > Cash and Liquidity Management > Bank Account Management -> Basic Settings > Define Number Ranges for Change Requests (transaction code S_E91_86000030) for such change requests.
Figure 4 shows the sample number range to enter for these change requests in Bank Account Management for my example. Click the save icon to save your data.
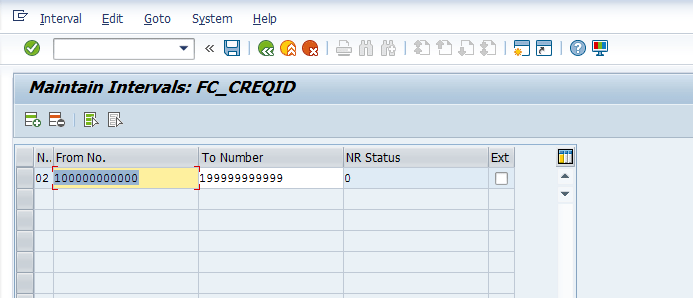
Figure 4
Number range for change requests in Bank Account Management
Link Number Ranges for Bank Account Master Data Settings
In this activity, you link the number ranges created in the section “Define Number Ranges for the Bank Account Technical IDs” to the Bank Account Management component. For this you need to execute transaction code S_E91_86000021 or follow customization menu path SPRO > Financial Supply Chain Management > Cash and Liquidity Management > Bank Account Management > Basic Settings > Define Settings for Bank Account Master Data, as shown in
Figure 5. In the menu on the left side, select the option Bank Account Master Data Setting, and then on the right side, enter the number range ID you created in
Figures 3 and
4. Click the save icon to save your data.
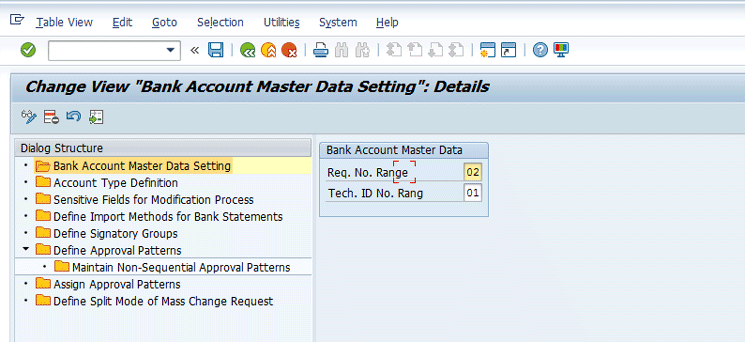
Figure 5
Link number ranges to Bank Account Management
Activate Sensitive Fields for Bank Account Modification Workflow
You can mark sensitive fields in the Bank Account Management master, and if you try to change any one of these, the system triggers the modification workflow to start the approval process for such changes. Execute transaction code S_E91_86000021 or follow customization menu path SPRO > Financial Supply Chain Management > Cash and Liquidity Management > Bank Account Management > Basic Settings > Define Settings for Bank Account Master Data. In the menu in the left side of the screen (
Figure 6), select the option Sensitive Fields for Modification Process, and then on the right side, enter the details (Object and Field name) for the sensitive fields as per your business controls, and click the save icon.
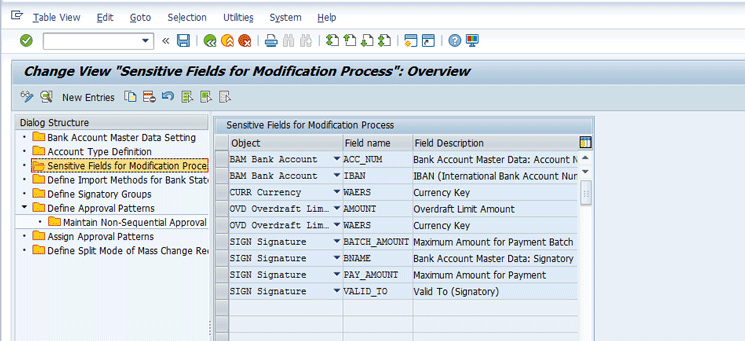
Figure 6
Mark sensitive fields in Bank Account Management for modification workflow
Group Change Requests for Mass Changes Workflow in Bank Account Management
There is also workflow for mass changes in the Bank Account Management master data. An approver may not want to have a separate email for each bank account that is changed, as the emails could overflow his or her mailbox and make tracking the approval difficult. You can define settings to group together the change requests for mass modification in bank accounts based on company code, bank account type, or both. For example, you could group mass modification of bank accounts, such as changing a General Ledger (G/L) account or changing payment signatories. Execute transaction code S_E91_86000021 or follow customization path SPRO > Financial Supply Chain Management > Cash and Liquidity Management > Bank Account Management > Basic Settings > Define Settings for Bank Account Master Data. In the screen the system displays (
Figure 7), in the menu on the left side, select the option Define Split Mode of Mass Change Request. On the right side, select the grouping option you want and click the save icon.
Figure 7 shows an example of a grouping based on company code.
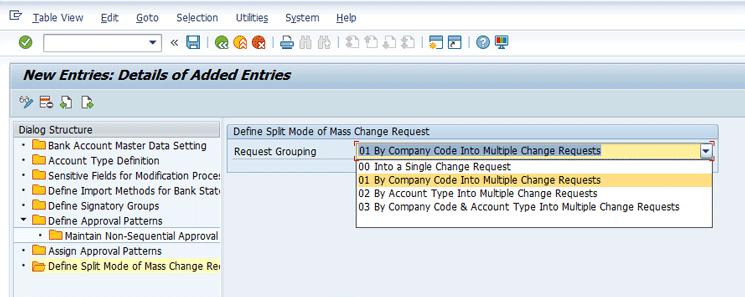
Figure 7
Define settings for a change request grouping for Bank Account Management mass modification workflow
Activate Event Type Linkage for Bank Account Management Workflow Triggering
In this activity you assign the workflow to the event CREATED for change request object FCLM_CR. As shown in
Figure 8, the SAP system has the pre-activated standard SAP workflow WS743000043. (This activation is indicated by the check box selected under the Type linka… [Type linkage for triggering workflow processes] column.) To access the setting shown in
Figure 8, execute transaction code SWETYPV or follow customization path SPRO > Financial Supply Chain Management > Cash and Liquidity Management > Bank Account Management > Maintain the Event Type Linkage for Triggering Workflow Processes.

Figure 8
Define settings for the event type linkage for Bank Account Management workflow
This standard workflow template WS74300043 has the various features as sub-workflows as shown in
Figure 1. You can define the custom workflow template and assign it in the highlighted line in
Figure 8 in the Receiver Type column. (Creating a custom workflow is out of the scope of this article.)
Define Responsibilities for Rules Used in Workflow Steps
The SAP system uses rules for various user roles for the processing in standard workflow for bank account management as listed in
Table 1. The use for different user roles is explained in the section titled “Process Flow for Opening a Bank Account for a House Bank in SAP S/4HANA Bank Account Management.”
| Rule |
Description |
| Rule 74300006: Cash Manager |
The Cash Manager can approve or reject the change request for opening, changing, or closing bank accounts. |
| Rule 74300007: Bank Accountant |
The Bank Accountant is responsible for opening, changing, or closing bank accounts and works under the Cash Manager. |
| Rule 74300008: Key User |
The Key User is responsible for making configuration changes for bank accounts and house bank accounts. |
Table 1
Rules for standard workflow for bank account management
To assign the responsibilities to the rules, execute transaction code S_E91_86000113 or follow customization path SPRO > Financial Supply Chain Management > Cash and Liquidity Management > Bank Account Management > Define Responsibilities for Rules Used in Workflow Steps. In the screen that opens (
Figure 9), enter the rule number in the Rule Number field from the rule numbers mentioned in
Table 1 and click the change icon.
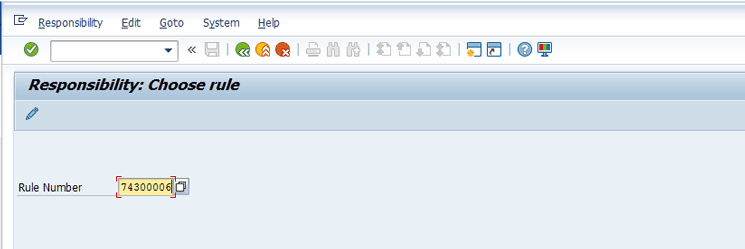
Figure 9
Enter the rule ID for defining responsibilities for Bank Account Management workflow
In the next screen (
Figure 10), click the create icon to create a responsibility.

Figure 10
Create responsibilities for Cash Manager in Bank Account Management workflow
In the pop-up screen that appears (
Figure 11), enter the validity date range for this cash manager assignment and click the enter icon. The Object abbr. (object abbreviation) field shows the description of the rule number entered in
Figure 9, which is CLM_CASHMGR in this example for rule 74300006.
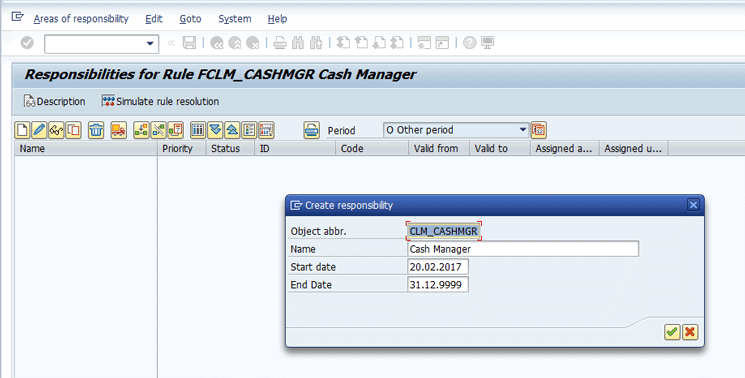
Figure 11
Define a responsibility for Cash Manager in Bank Account Management workflow
In the next screen (
Figure 12), you can enter the company code and account type to which you want to apply this assignment. If you do not want to restrict a field, you can enter the wildcard character * (asterisk) to apply to all. After entering these details, click the save icon and then click the back icon.

Figure 12
Assign company codes and account types for responsibility
You can now see the responsibility created as shown in
Figure 13. Click the insert agent assignment icon.

Figure 13
The newly created responsibility for Cash Manager in Bank Account Management workflow
In the next screen, you can select to which level in your organizational hierarchy you want to assign this responsibility. For example, if I assign a position here, then all users having such a position would be authorized agents for the cash manager task. For my example, I assign only a particular user, so I select the User option in
Figure 14 and click the enter icon.
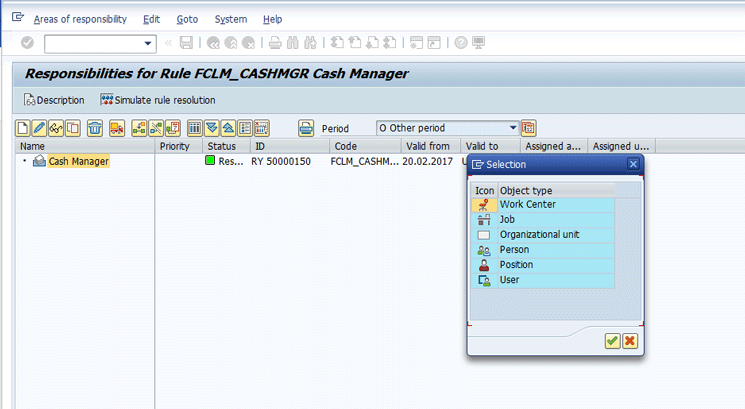
Figure 14
Assign an HR hierarchy element to the Cash Manager responsibility
Then you can search the object using wildcard symbols, as I have done in my search for a user with the name Cash (
Figure 15). Click the enter icon to start your search.

Figure 15
Search for a user in the HR hierarchy
The system then shows that available user with that search. You can select and assign the user to the responsibility as shown in
Figure 16 by entering the validity date range and then clicking the create icon.
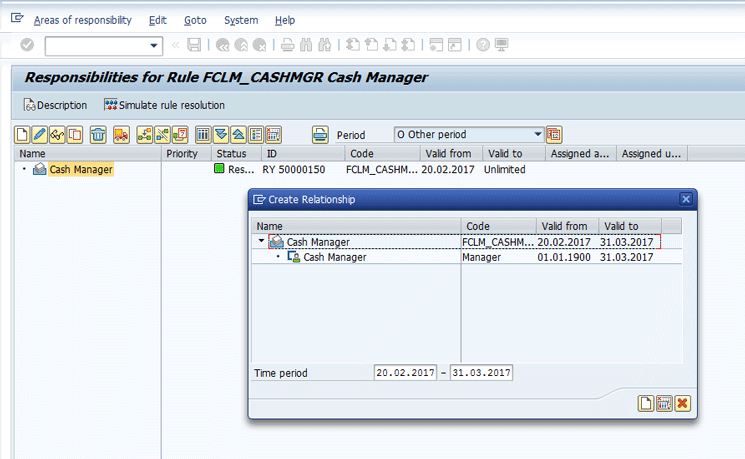
Figure 16
Specify a validity period for assigning a user to the Cash Manager responsibility
As shown in
Figure 17, you can see that a user has been assigned to Cash Manager responsibility and is authorized for any task related to the Cash Manager position.
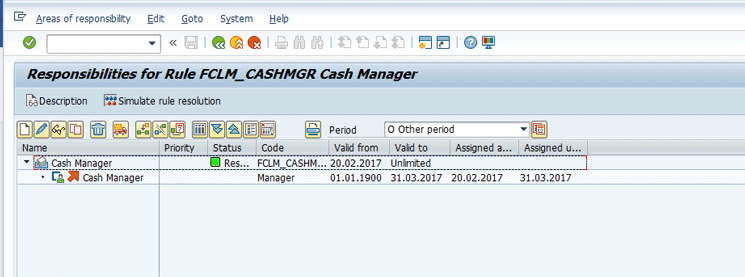
Figure 17
Assign a user to Cash Manager responsibility
Note
Similar to the rule 74300006 for Cash Manager, you also need to assign a user, position, or some other designation to the other rules—74300007 for Bank Accountant and 74300008 for Key User. For my example, I have assigned users to these rules as shown in Figures 18 and 19.
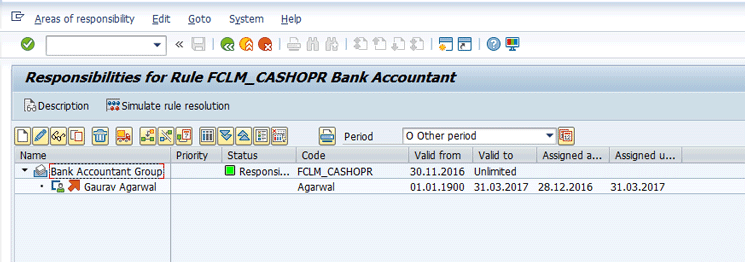
Figure 18
Assign a user to the Bank Accountant or Cash Management specialist responsibility
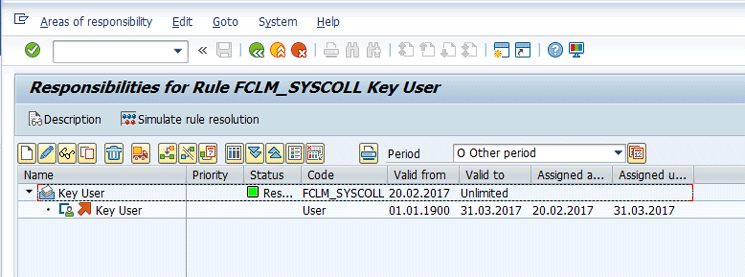
Figure 19
Assign a user to Key User responsibility
Activate Internet Communication Framework (ICF) Services for Using Bank Account Management via Fiori Apps
You need to activate the ICF services listed in
Table 2 via transaction code SICF so that you can use the various features in SAP Fiori apps for Bank Account Management. SAP Fiori apps provide the front-end screens for various users involved in the process to complete the Bank Account Management workflow.
| Web Dynpro services
|
Workflow services
|
Power list (POWL) services
|
| WDA_FCLM_BAM_ACC_MASTER |
IBO_WDA_INBOX |
POWL |
| WDA_FCLM_BAM_ACC_REVIEW |
SWF_FORMABSENC |
POWL_COLLECTOR |
| WDA_FCLM_BAM_ADAPT_SIGN |
SWF_WORKPLACE |
POPWL_COMPOSITE |
| WDA_FCLM_BAM_BANK_DATA |
UCT_DISPLAY_DOCUMENT |
POWL_EASY |
| WDA_FCLM_BAM_CHGREQ |
UCT_DISPLAY_INBOX |
POWL_ERRORPAGE |
| WDA_FCLM_BAM_HIERARCHY |
UCT_DISPLAY_SIGNOFF |
POWL_MASTER_QUERY |
|
|
|
| WDA_FCLM_BAM_HIER_BP |
UCT_DISPLAY_CHANGE |
POWL_PERS_COMP |
| WDA_FCLM_BAM_HIER_MAINTAIN |
USMD_CREQUEST_PROTOCOL2 |
|
|
|
|
| WDA_FCLM_BAM_MASS_CHANGE |
USMD_SSW_RULE |
|
| WDA_FCLM_BAM_REVIEW_REPORT |
USMD_WF_NAVIGATION |
|
| WDA_FCLM_BAM_REQOVERVIEW |
|
|
| WDA_FCLM_REPORT |
|
|
| WDA_FCLM_UPLOAD_DOWNLOAD |
|
|
Table 2
ICF services
To activate a service, execute transaction code SICF, and in the screen that appears (
Figure 20), enter the name of the service to be activated in the Service Name Field and click the execute icon.
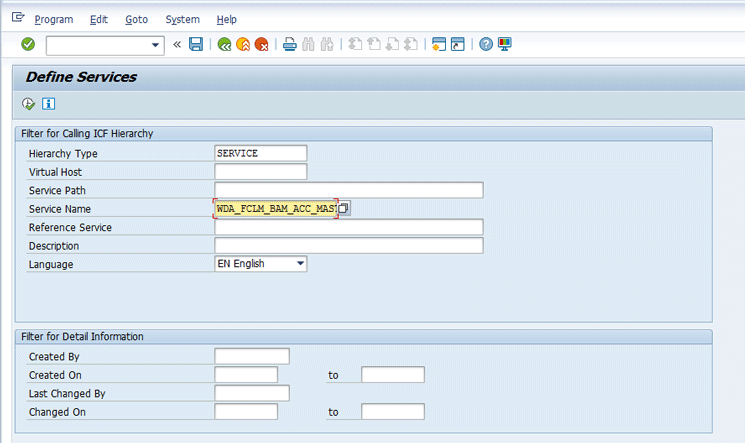
Figure 20
The selection screen for activating ICF services
In the next screen, right-click the service name (in this case, Bank Account Master Data) and select the Activate Service option as shown in
Figure 21.
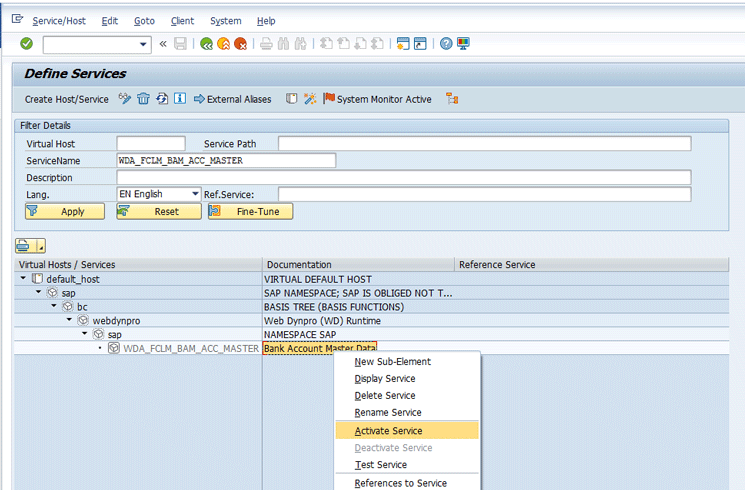
Figure 21
Activate ICF services
A message in a pop-up screen (
Figure 22) then asks you to confirm the activation. Click the Yes button to activate the services.
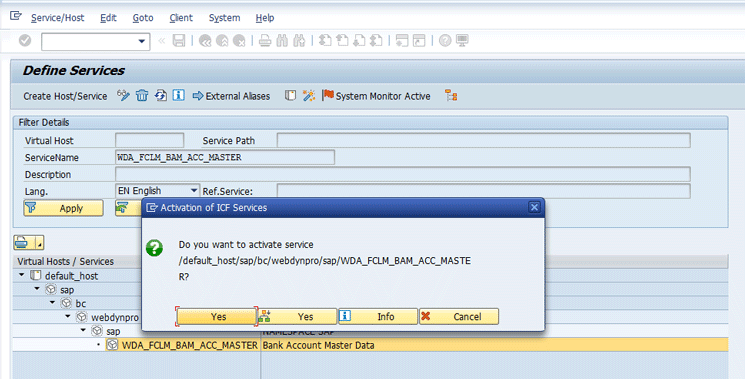
Figure 22
Confirm the activation of ICF services
Process Flow for Opening a Bank Account for a House Bank in SAP S/4HANA Bank Account Management
There are various sub-processes in Bank Account Management for bank accounts as shown in
Figure 1 (e.g., opening, changing, or closing a bank account). Let’s go through the bank account opening procedure by considering the various steps as per standard SAP workflow template WS74300047, as shown in
Figure 23.

Figure 23
Workflow (WS74300047) for opening a new bank account
This workflow involves various steps and related SAP Fiori apps as structured in
Figure 24. Now let’s go through these steps.
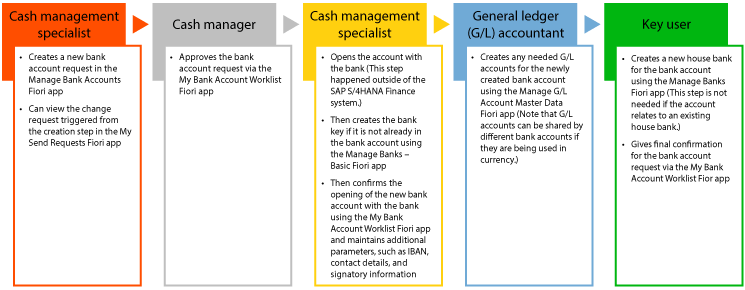
Figure 24
Steps involved in opening a new bank account with workflow template WS74300047 active
The Bank Accountant Creates a Bank Account Opening Request
A cash management specialist or bank accountant selects the SAP Fiori app Manage Bank Accounts, as shown in
Figure 25.
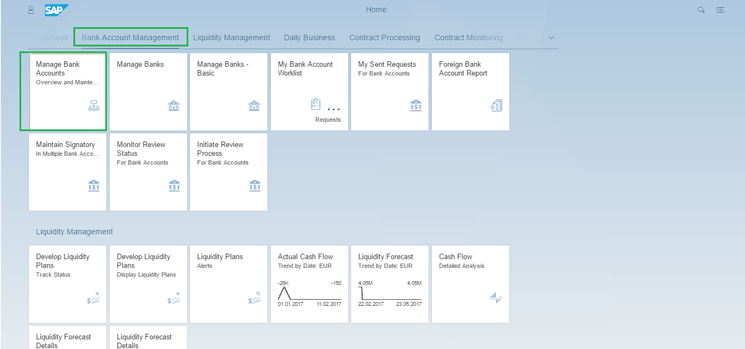
Figure 25
Select the Manage Bank Accounts SAP Fiori app
Then in the next screen, the user selects the New Bank Account button as shown in
Figure 26.
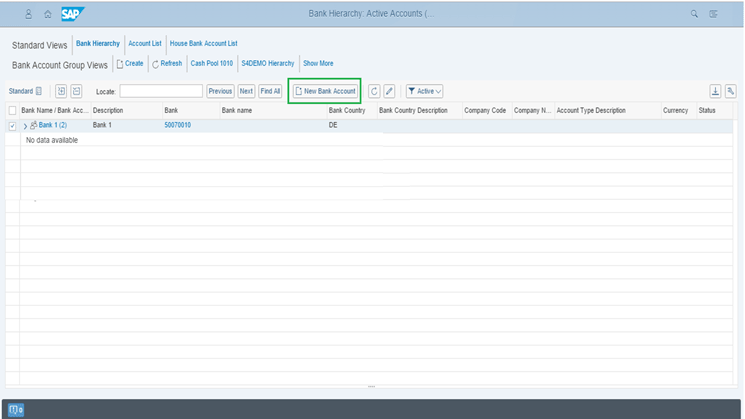
Figure 26
Select the option New Bank Account in the SAP Fiori app
In the next screen (
Figure 27), enter details about your new bank account’s request under the General Data section.
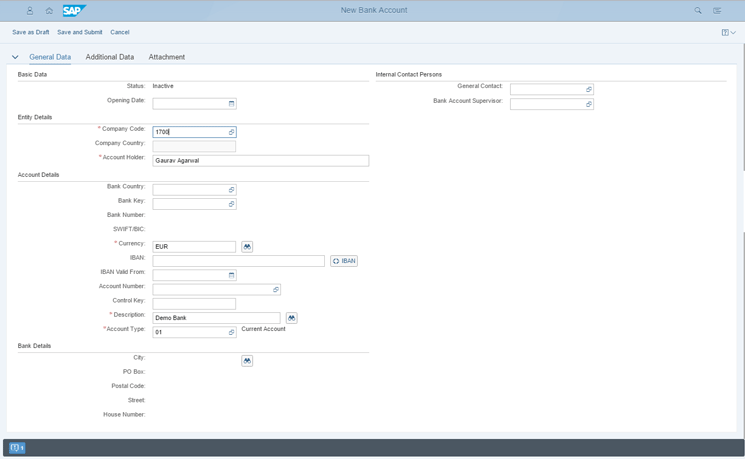
Figure 27
Enter general data parameters for the new bank account
You can enter organizational details such as profit center and segment in the Additional Data section as shown in
Figure 28. You can also attach any supporting documents in the Attachment section. After entering details, click the Save and Submit button as shown in
Figure 28.
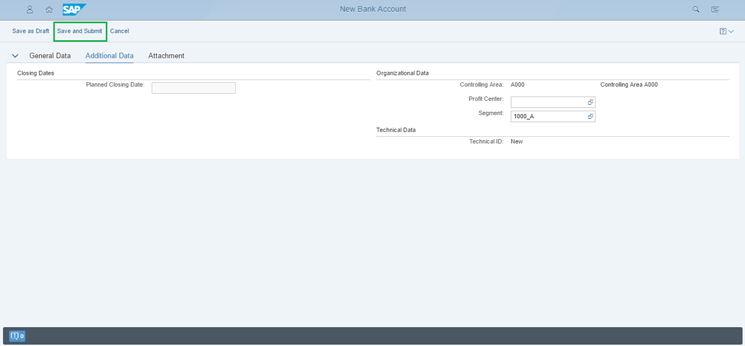
Figure 28
Submit the new bank account opening request
In the next screen (
Figure 29), you can add notes about this request, which go to the cash manager via workflow. Then click the Submit button.
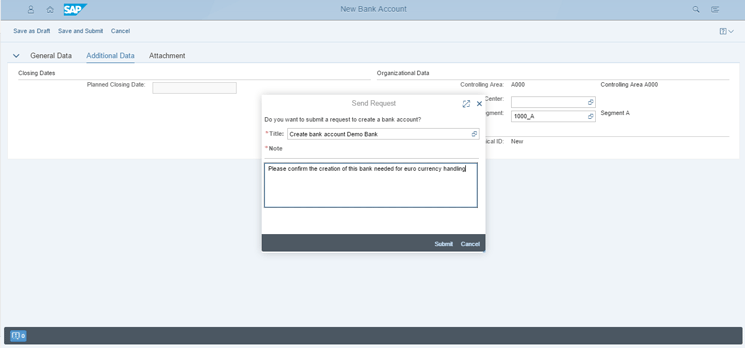
Figure 29
Enter notes for submitting the new bank account opening request
The system then shows the change request number generated for new bank account creation as shown in
Figure 30.
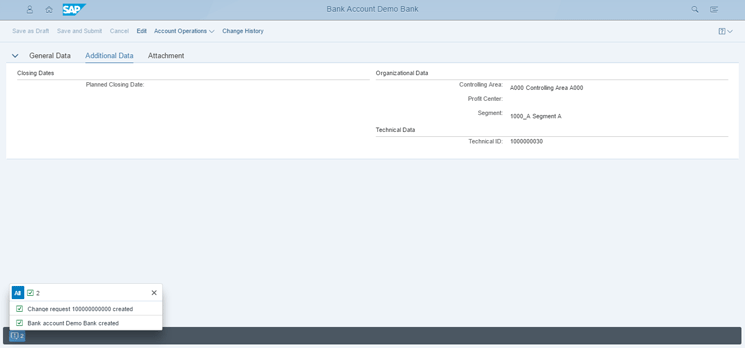
Figure 30
Generation of workflow (change request) for new bank account opening
The Bank Accountant Checks the Bank Account Opening Request
This is an optional step used if a bank accountant wants to see the status for the change request. For this, the user selects the SAP Fiori app My Sent Requests as shown in
Figure 31.

Figure 31
Select the My Sent Requests SAP Fiori app
In the next screen, you can see the status of the change requests as shown in
Figure 32. You can click the line to see the details of the bank account requested as shown in
Figure 33.

Figure 32
Change request for creating a new bank account

Figure 33
Details for the new bank account requested
The Cash Manager Approves the Bank Account Opening Request
For this, the Cash Manager selects the SAP Fiori app My Bank Account Worklist as shown in
Figure 34.
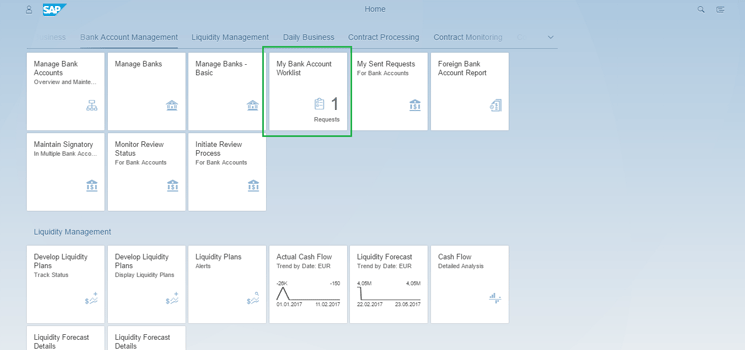
Figure 34
Select the My Bank Account Worklist Fiori app
In the next screen, the cash manager can see the status of the change requests as shown in
Figure 35 and can click the request to open the details.
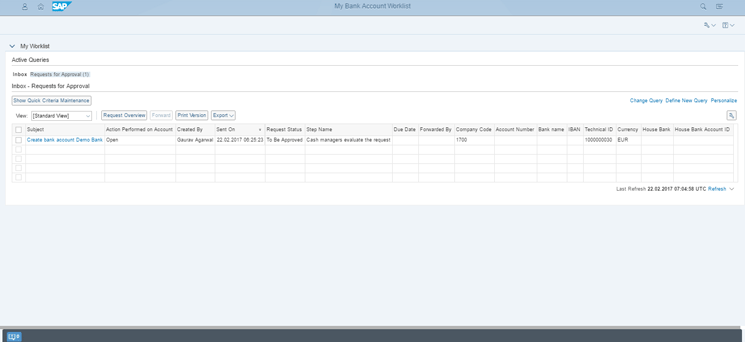
Figure 35
Change requests for bank account management
In the next screen, the cash manager can see the details of the bank account requested as shown in
Figure 36 and select the action Approve or Reject to process the workflow. The cash manager can also check the Existing Bank Accounts to ensure there is no duplication. In this example the cash manager clicks the Approve button to process the workflow.
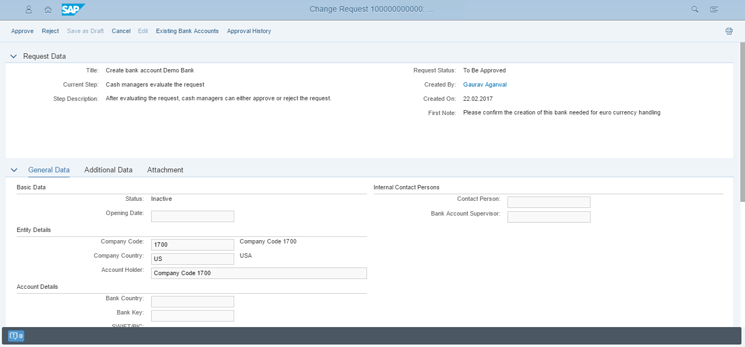
Figure 36
Details for the new bank account request
In the next screen (
Figure 37), the cash manager can provide notes and then click the Approve button to proceed with approval.
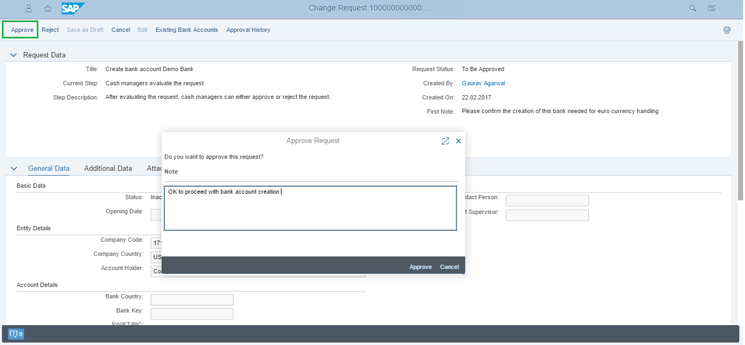
Figure 37
The cash manager approves the new bank account request
You then can see the system message that the change request is approved as shown in
Figure 38.
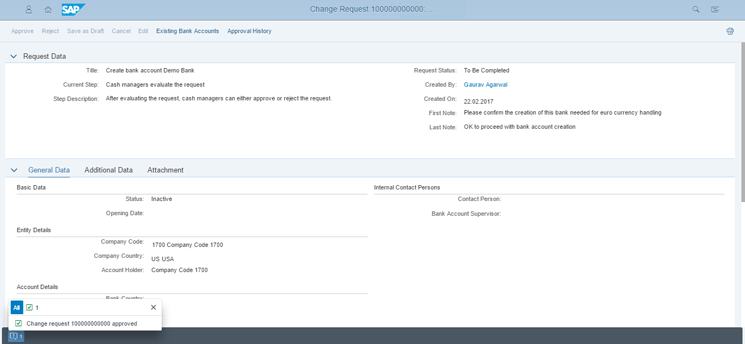
Figure 38
Approval message after approval action by the cash manager
The Bank Accountant Opens Bank Account and Creates a Bank Key
After getting approval from the cash manager, the bank accountant can approach the bank to open a new bank account. This process happens outside the SAP system. Also, if it is a bank in which there is no existing bank key in the SAP system, then the bank accountant needs to create a bank key in the system. For this, you select the Manage Banks - Basic SAP Fiori app as shown in
Figure 39.
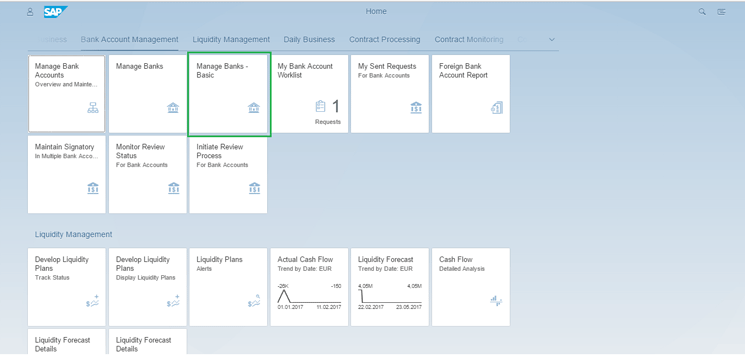
Figure 39
Select the Manage Banks - Basic SAP Fiori app
Then in the next screen, the bank accountant can check if the bank key already exists. If a key does not yet exist, the bank accountant creates a new bank key using the Create Bank button as shown in
Figure 40.
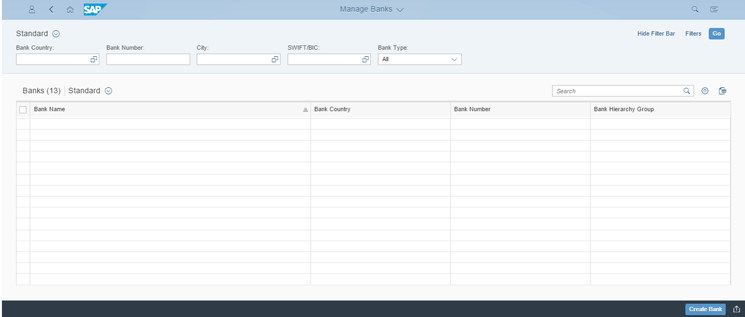
Figure 40
Select the option Create Bank in the SAP Fiori app
In the next screen, enter details for this new bank and click the Save button as shown in
Figure 41.
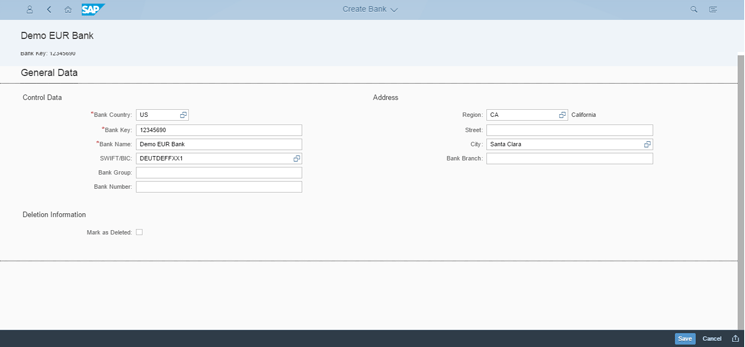
Figure 41
Enter details for the new bank key
Then you can see a success message as shown in
Figure 42.
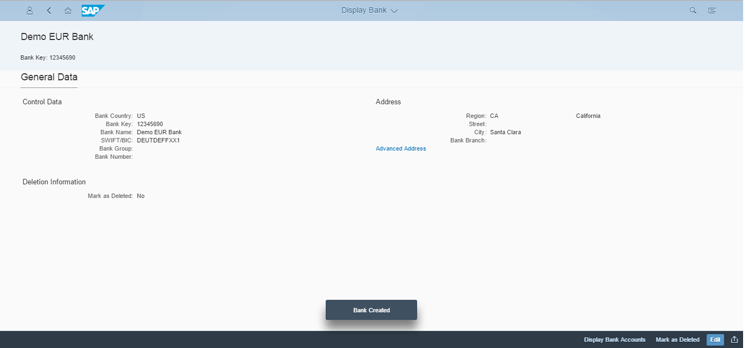
Figure 42
Success message for the bank key creation
The Bank Accountant Confirms the Creation of the Bank Account and Maintains the Additional Parameters
Once the account has been opened with the bank, the bank accountant can maintain additional parameters, such as the International Bank Account Number (IBAN), contact details, and overdraft limits, and confirm the bank account creation. For this, select the SAP Fiori app My Bank Account Worklist as shown in
Figure 43.
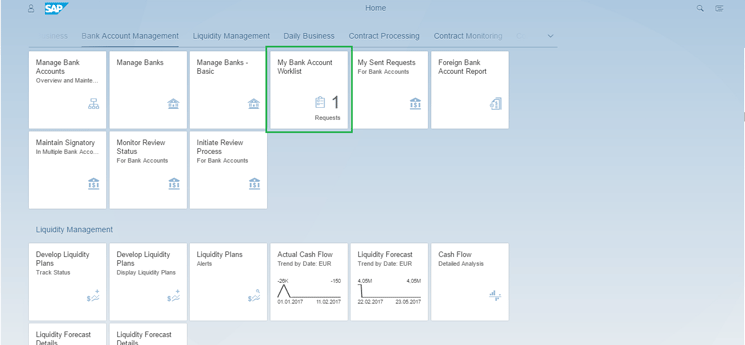
Figure 43
Select the My Bank Account Worklist SAP Fiori app
Then in the next screen, the bank accountant can see the change request for the new bank account pending with the Step Name Bank accountants process the account (
Figure 44).

Figure 44
Change request pending for bank accountant action
Click the request to display the details as shown in
Figure 45.
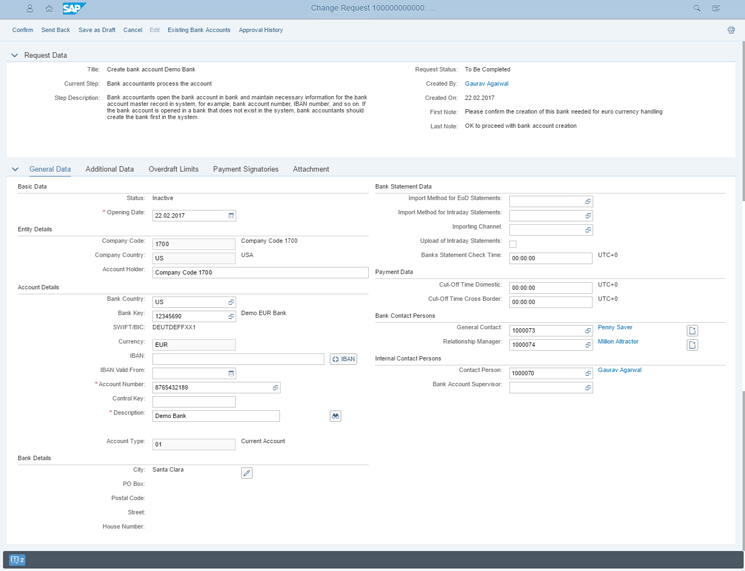
Figure 45
Maintain general data details for the new bank account
In
Figure 45, the bank accountant can maintain various parameters (e.g., contact details and bank key) for the bank account that is now opened with the bank.
The bank accountant can also click the Additional Data tab to maintain the profit center or segment, as shown in
Figure 46. In this tab, the bank accountant can enter the relevant Profit center or Segment fields or select the value by and press the F4 button.
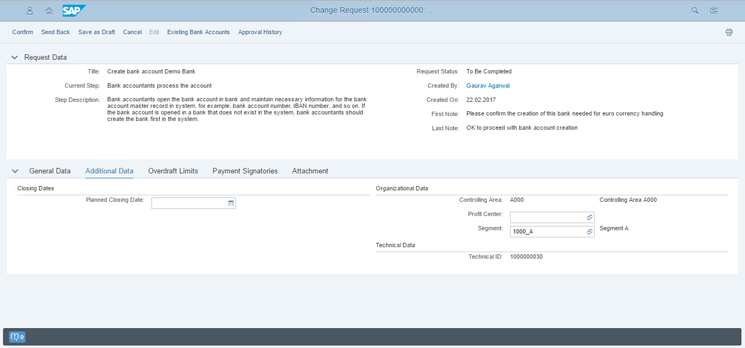
Figure 46
Maintain additional data details for the new bank account
Then the bank accountant can navigate to the Overdraft Limits tab for defining the overdraft limits sanctioned by the bank for this new account as shown in
Figure 47. To add the limits, click the Add button and then populate the fields under the Currency and Overdraft Limit columns. In the fields under Valid From and Valid To enter validity ranges.
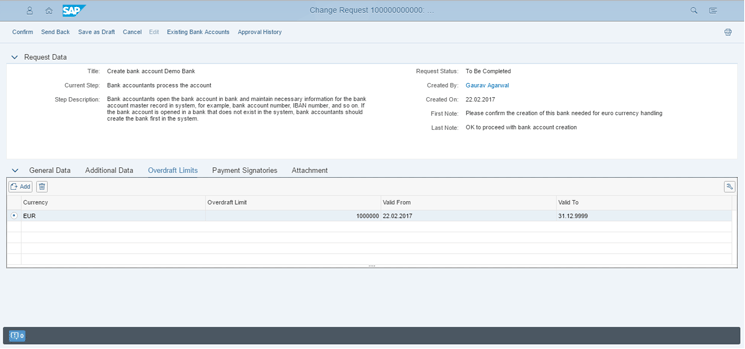
Figure 47
Define overdraft limits for the new bank account
The bank accountant can navigate to the Payment Signatories tab for defining responsible persons for various approval levels activated for the bank account type. For example, in
Figure 48, you can see two levels assigned to different users for approval of any payment and amount limits also defined for single payment and batch payments. To add a level, click the Add button and then enter the signatory group, currency, amount limits, and validity ranges.
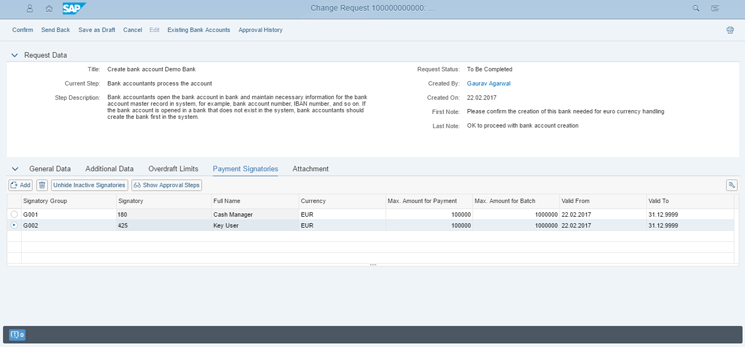
Figure 48
Define responsible persons for various approval levels activated for bank account types
After you click the Confirm button in
Figure 48, a pop-up screen appears (
Figure 49) in which the bank accountant can enter notes (optional) and then click the Confirm button.
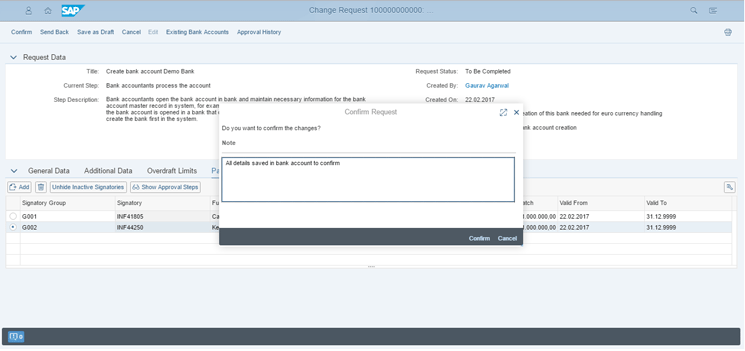
Figure 49
Confirm the new bank account maintenance
You can then see the confirmation message as shown in
Figure 50.
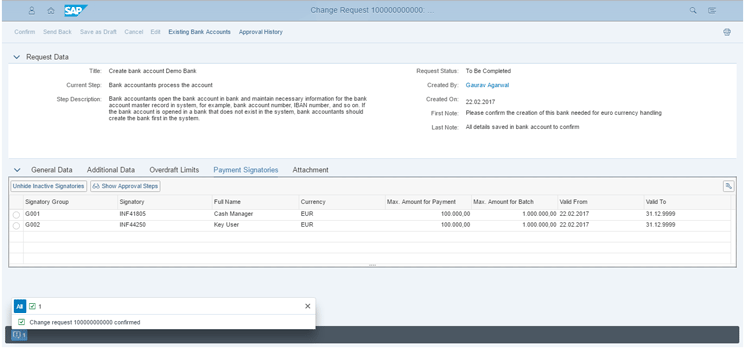
Figure 50
Confirmation message for new bank account maintenance
The G/L Accountant Creates the Needed G/L Accounts
Various bank accounts can use the same G/L account if they have same currency key, so this step is optional and needed only if new bank accounts must be created. Also, there might be multiple G/L master data records to be created (for example, one for incoming, one for outgoing, and one for clearing) based on the business process design. For creating a new G/L master data record, the G/L accountant selects the SAP Fiori app Manage G/L Account Master Data as shown in
Figure 51.
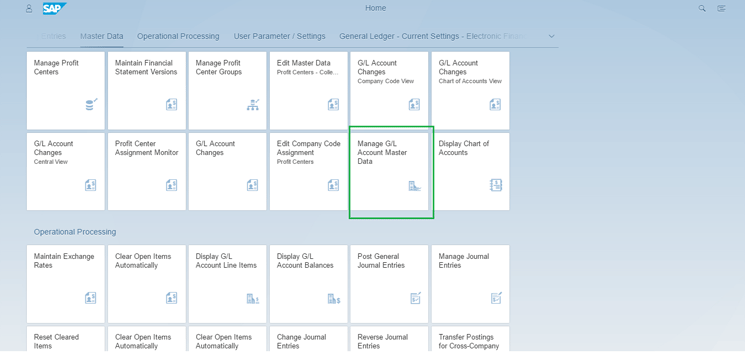
Figure 51
Select the Manage G/L Account Master Data SAP Fiori app
In the next screen, the G/L accountant can search an existing G/L account and copy it or click the + icon (as shown in
Figure 52) to create a new G/L account.
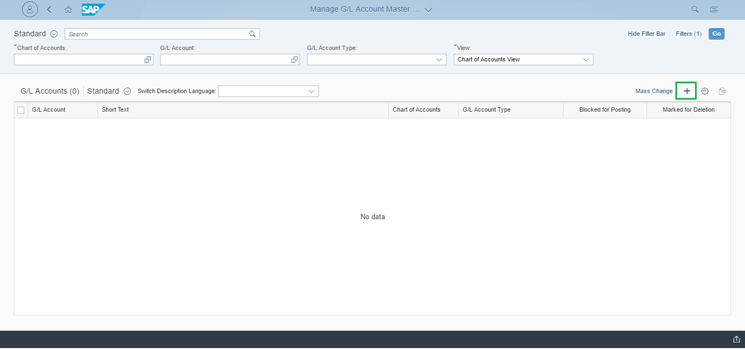
Figure 52
Initiate new G/L master creation
In the next screen, the G/L accountant can enter general data, company code assignment, and controlling-area related details for the new G/L account as shown in
Figures 53 and
54.

Figure 53
General data details for the new G/L master creation
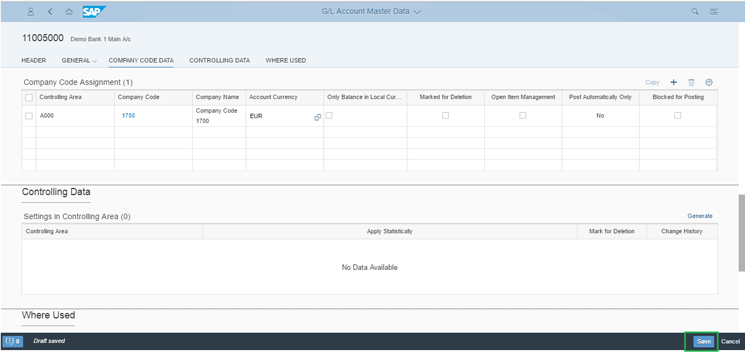
Figure 54
Company code assignment and controlling area details for the new G/L master creation
After you click the Save button in
Figure 54, the system shows that the G/L account is created successfully (
Figure 55).

Figure 55
A system message showing new G/L master creation
The Key User (Configuration Expert) Creates the House Bank
If the account is a new house bank, then the key user can create it. For this, the key user selects the SAP Fiori app Manage Banks as shown in
Figure 56.
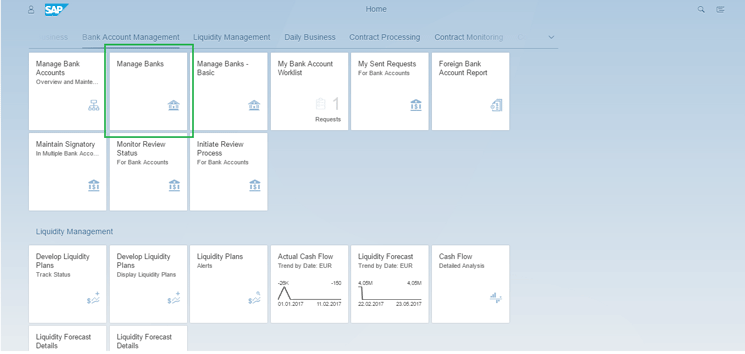
Figure 56
Select the Manage Banks Fiori app
Then in the next screen (
Figure 57), open the bank line to see details.
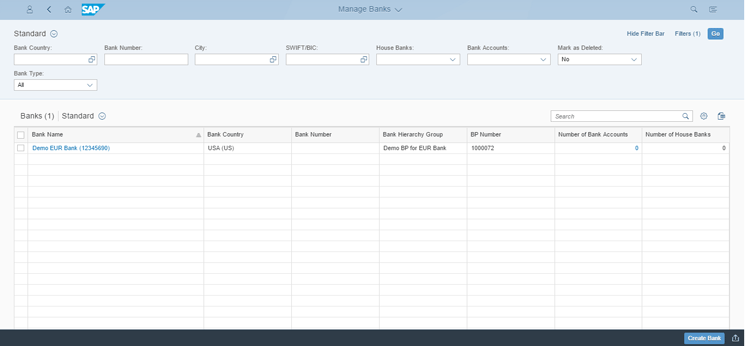
Figure 57
Open bank details
In the next screen (
Figure 58), click the Edit button to create a house bank.
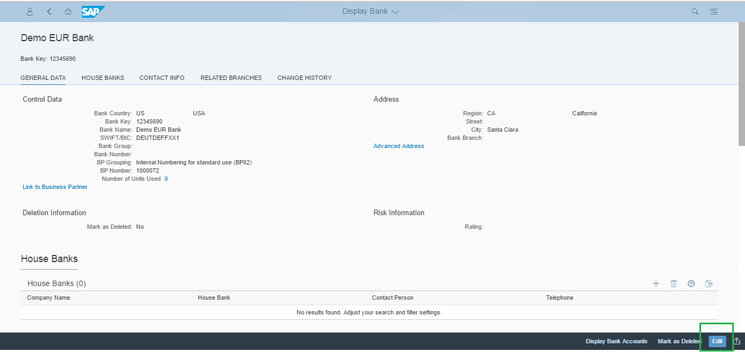
Figure 58
Edit the bank details
In the next screen (
Figure 59), click the add icon (the + sign) in the House Banks section.

Figure 59
Add a house bank in bank details
In the next screen (
Figure 60), enter the details for the new house bank and click the Save button.
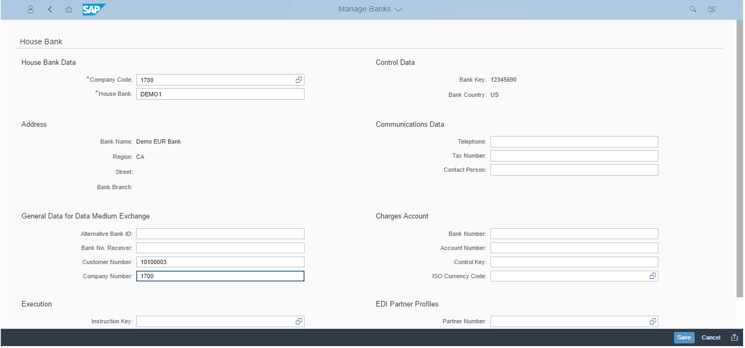
Figure 60
Specify the details for the new house bank in bank details
Then the system shows the success message for this house bank creation as shown in
Figure 61.
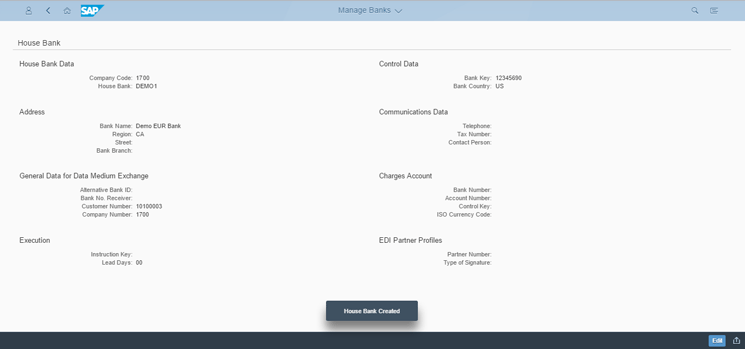
Figure 61
House bank created for the new bank account
The Key User (Configuration Expert) Links the House Bank to the New Bank Account and Performs Final Confirmation
As a last step, the key user opens the change request, such as the house bank, and then performs the final confirmation of the new bank account creation. For this, the key user selects the SAP Fiori app My Bank Account Worklist as shown in
Figure 62.

Figure 62
Select the My Bank Account Worklist SAP Fiori app
Then in the next screen (
Figure 63), the key user can see the change request for the new bank account pending with the Step Name Key users finish the configuration. Click the request to display the details.
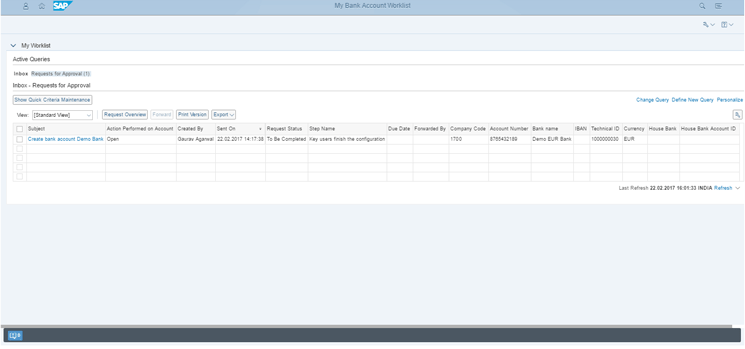
Figure 63
Open the change request for the new bank account
In the next screen, the key user selects the Connectivity Path section and specifies the company code, house bank, validity details, and account ID for this new bank account as shown in
Figure 64.
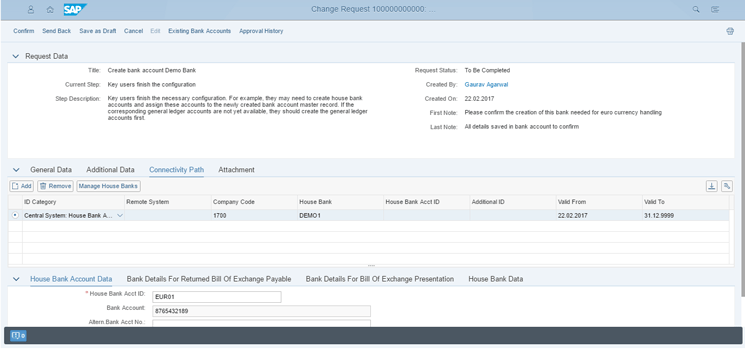
Figure 64
Specify details for the house bank in the connectivity path for the new bank account
After the key user clicks the Confirm button, a pop-up screen appears (
Figure 65) in which the key user can enter notes (optional) and click the Confirm button to save them.
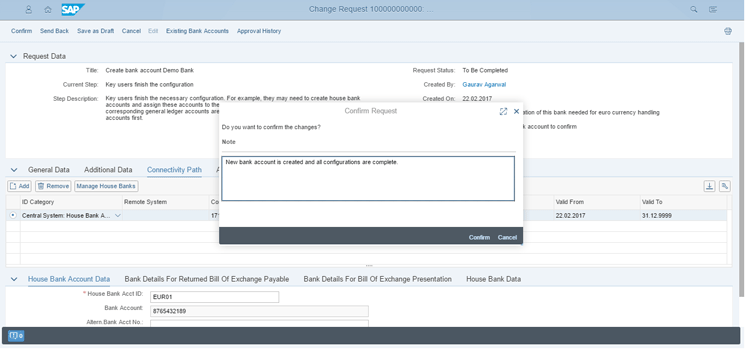
Figure 65
Confirm the new bank account maintenance
You then see the confirmation message shown in
Figure 66.
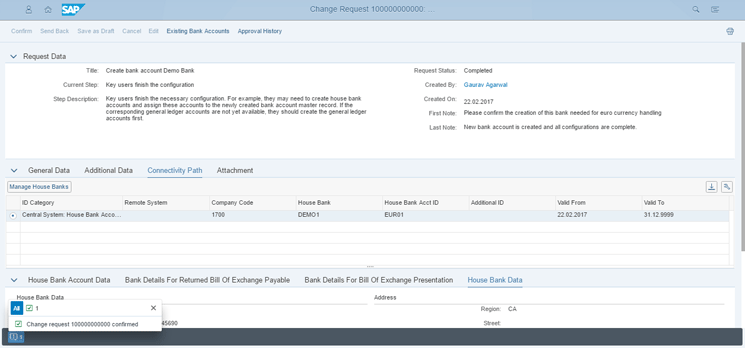
Figure 66
Confirmation message for new bank account creation completion
If you click the Approval History button in
Figure 66, you can see the flow details as shown in
Figure 67. From the flow details, you can see who has approved or confirmed and at what date or time, resulting in a proper audit trail for the workflow.
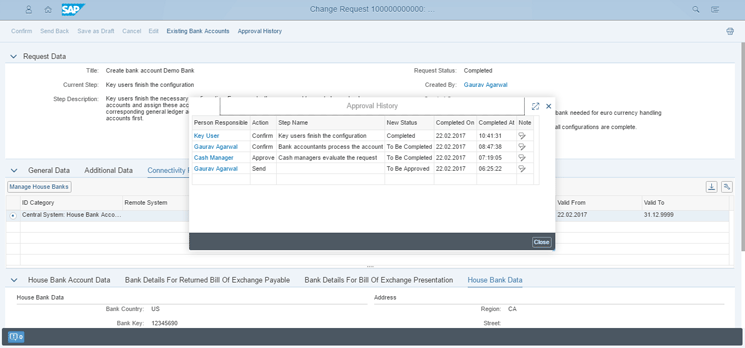
Figure 67
Approval history showing workflow steps
Note
From the SAP S/4HANA 1610 on-premise version, some new features have also been added in Bank Account Management for bank account maintenance. In Table 3, I provide a brief overview of these features as this article is focusing on workflow functionality.
| Feature |
Description |
| Centralized Bank Account Management |
This feature enables you to replicate bank accounts, house banks, and house bank accounts from a central system to remote systems using SAP pre-delivered Intermediate Document (IDoc) message types. |
| Mass upload of bank accounts |
A business can download the data from production or legacy systems or manually prepare data in a Bank Account Management Excel file. |
|
This Bank Account Management Excel file can be uploaded in development, quality, production, and other areas in SAP S/4HANA systems. |
|
This mass upload can also trigger relevant workflows for various entries in Bank Account Management Excel files. |
Table 3
Bank Account Management features added in SAP S/4HANA Finance 1610 on-premise version
Gaurav Agarwal
Gaurav Aggarwal is SAP S/4HANA lead consultant at Infosys Limited. He has more than 14 years of experience, including 11 years in SAP Finance. He has expertise in both SAP FI and Controlling (CO) with integration to other modules in manufacturing and process industries. He is a chartered accountant and SAP Certified Financial Consultant. He holds a bachelor’s degree in commerce and is a techno-functional expert with thorough knowledge of the necessary ABAP for functional experts. He is a veteran in G/L, AR, AP, banking, FA, Travel Management, and closing cockpit and has handled greenfield implementation, upgrades and conversions, rollouts, and support projects.
You may contact the author at
gka2707@gmail.com.
If you have comments about this article or publication, or would like to submit an article idea, please contact the
editor.


