Storing an employee’s work location and address is a critical task. In many countries the standard SAP enterprise structure design allows you to store address details only at the level of personnel area, but not at the personnel subarea level. For many organizations this is at too high a level, as personnel subareas correspond to physical locations. See a demonstration of a method that uses standard SAP ERP HCM functionality to store work address details at the personnel subarea level without resorting to custom-built or Z tables. A small amount of custom development is required to read these into address infotype records, and sample code is given.
Key Concept
In the SAP ERP HCM system, personnel subareas represent groupings of employees who share HR characteristics or terms and conditions such as pay scales or work schedules.
Note
For the purposes of this article, I assume that preliminary basic Personnel Administration (PA) configuration has already been done in the system. In particular:
- That personnel areas and subareas have been configured.
- That basic PA actions for hiring, organization reassignment, and so on have been configured.
- That a PA user exit is already implemented, or that you have sufficient knowledge to implement this, or you have an ABAP resource who can implement this for you.
The SAP ERP HCM enterprise structure is a hierarchical legal and business- oriented representation of the company or organization. A company code is sub-divided into a number of subordinate personnel areas which are, in turn, sub-divided into a number of personnel subareas. Personnel subareas are often configured to correspond to specific work locations (for example, regional offices), and therefore require a specific address. However, in standard SAP customizing in many countries (e.g., in the UK and Ireland) the address details configuration tables are only available at the personnel area level, which is usually one level too high. Figure 1 shows an example of this kind of typical enterprise structure.
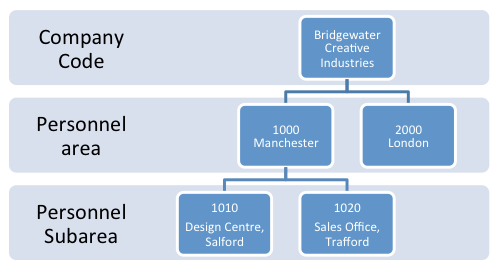
Figure 1
An example of a typical HR enterprise structure where personnel subareas correspond to physical locations
In the UK, the SAP ERP HCM system stores personnel area addresses in table T001P. For most other countries the personnel area addresses are stored in table T500P. There are some country-specific extensions of table T001P, however, that provide additional organizational data relating to the personnel area and subarea of infotype 0001. For example, in the US, table T5U0P (additional organizational data for a personnel area or subarea) is available for this purpose.
Frequently, users and solution architects don’t have a standard method for storing personnel subarea addresses and are faced with no good options for how to store them. Three common, unsatisfactory, solutions are: Store the addresses in the organization structure, build a set of custom (Z) tables to store them, or forego storing the addresses altogether.
My goal is to show a method for storing addresses in the existing configuration tables from another SAP system module. Plant storage locations are used in the SAP Supply Chain Management (SCM), logistics, materials management, and sales and distribution modules, and offer a standard address entry table. These can then be incorporated in a PA user exit simply by automatically creating a work address infotype (0006) record. This infotype record can be created directly in transaction PA30 (maintain master data) or automatically as part of the hiring action or any other relevant actions.
In my example scenario, I demonstrate how to automatically create a work address infotype record for all employees in Personnel Area 1000 Manchester, Personnel Subarea 1010 Design Centre, with the following details:
123 New Street
Salford
Manchester
M1 3HH
Figure 2 shows the work address record created for an employee hired into the personnel subarea 1010 Design Centre. The correct address was automatically pulled from the address configured for the personnel subarea.
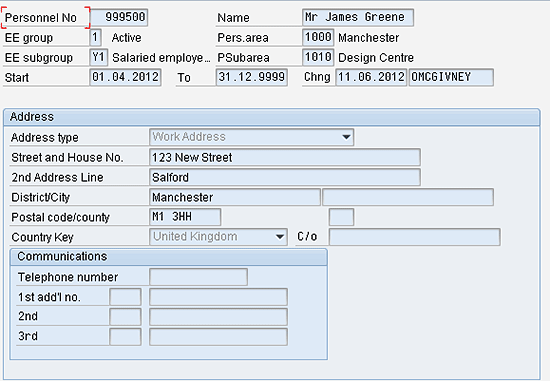
Figure 2
A work address record created in a hiring action
There are the three parts to completing the set-up of this functionality:
- Add a step to create an infotype 0006 (work address) subtype to the relevant HR actions.
- Configure the personnel subarea addresses in the plant storage locations.
- Create a user exit that is triggered whenever an infotype 0006 (addresses) subtype (work address) is created that reads the configuration set up in Step 2 (above).
In the following sections I show you how to do each of these.
Part 1. Add the Infotype 0006 (Work Address) Subtype to the Relevant HR Actions
First you have to create a way to add a work address infotype 0006 to the HR actions.
Step 1. Verify the Work Address Subtype Number
Make a note of the subtype value for the work address subtype. This can be accessed via IMG menu path Personnel Management > Personnel Administration > Personal Data > Addresses > Create Address Types. Alternatively the table can be accessed directly via transaction SM30 (maintain table views), in table VV_T591A_0006___AL0 (Address Subtype Characteristics). In my example (shown in Figure 3), the work address subtype has been set up with the number 7, because the SAP standard work address entry is subtype 7 in many countries. Create a new table entry in the usual way if one is not available in your system.

Figure 3
Confirm the work address subtype number
Step 2. Add a Work Address Infotype to the HR Actions
In this step, a new entry is added into the hiring action to automatically create the work address infotype.
At the point at which infotypes are assigned to each InfoGroup, a new entry is made for the addresses infotype with the work address subtype. For example, Figure 4 shows all the infotypes that are created in the hiring action. In my scenario, a new entry for infotype 0006 (Addresses) with the work address subtype (7) is inserted. Just make sure that the subtype value corresponds to the value you verified or created in Step 1.

Figure 4
Create a new entry for the work address subtype in the hiring action
A similar entry should be made for any other actions where the employee could move within the organization (e.g., the organization reassignment action).
Part 2. Configure the Personnel Subarea Addresses in the Plant Storage Locations
The idea of using plant storage locations to store personnel subarea addresses came about from a cross-module integration planning session on a recent implementation. I realized that the sales and distribution (SD) consultants had already gathered and configured all the locations that employees worked at as part of their build activities. So, instead of setting up duplicate address configuration on the HCM side, I decided to use what was already available. Full configuration details are given below in case plant storage locations haven’t been implemented on your system.
Plant storage locations are used in the SAP SCM system’s logistics, materials management, and SD modules. A storage location typically defines a physical location within a manufacturing or distribution plant for locating stock in a warehouse, for example. The SAP system provides an address table for each storage location, and these can also be used to store the address of a personnel subarea.
In a standalone SAP ERP HCM system it is very unlikely that these tables are being used. However, in a case where these plant and storage location tables are already in use in your system then you need to coordinate this process with your logistics, materials management, and SD departments. In that situation, you would need to coordinate a naming convention to ensure there was no confusion between plant locations and personnel subareas.
Once you have done this, take the following steps to store an address for a personnel subarea using plant and storage locations.
Step 1. Create a Plant for Each Personnel Area
In this step, for each personnel area you create a new plant. Follow IMG menu path Enterprise Structure > Definition > Logistics General > Define, copy, delete, check plant, which results in the screen in Figure 5. Create a new plant with the same four-digit code as the personnel area (1000), enter the personnel area name in the Name 1 field (Manchester), and click the save icon, which takes you back to the IMG. Repeat this step for all your personnel areas.

Figure 5
Create a plant with the same name and code as each personnel area
Step 2. Create a Storage Location for Each Subarea
In this step, you create a new storage location for each personnel subarea. Starting in the IMG, follow the next menu path after Step 1: Enterprise Structure > Definition > Materials Management > Maintain Storage locations, which results in the screen in Figure 6.

Figure 6
Enter the personnel area number in the Plant field
Enter the four-digit number (1000) of the plant work area (e.g., the personnel area) that you previously created, and press the green checkmark icon, which results in the screen in Figure 7.
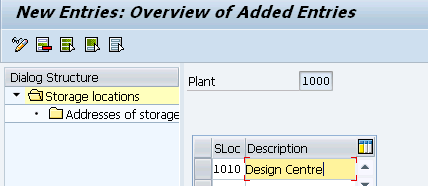
Figure 7
Create a new storage location
Step 3. Create a Storage Location for Each Personnel Subarea
In the pane on the right side of the screen (Figure 7) create a new storage location for the personnel subarea. Enter the four-digit personnel subarea code in the SLoc column and the accompanying subarea name in the Description column; in my example, these are 1010 and Design Centre, respectively. Click the save icon.
Step 4. Select the Addresses of the Storage Locations
In the same screen and again on the right side, select the new storage location and personnel subarea entry. Click the grey square at the left of your subarea number (1010), shown in Figure 8. Then double-click the Addresses of storage locations folder on the left side of the screen, which results in the screen shown in Figure 9.

Figure 8
Choose the addresses for the storage locations

Figure 9
Create a new address for the storage location
The title bar changes from New Entries to Change View (Figure 9). At this point no fields are available for editing.
Step 5. Add a New Storage Location Entry
In the screen shown in Figure 9, click the New Entries button, which opens up the No. column in the screen on the right side of the figure where you can add your new entries.
Step 6. Choose the Storage Location Number
In the No. column, enter the number 1 for your storage location (Figure 10), and press Enter. This opens the screen shown in Figure 11, where you can input the personnel subarea address. (If this subscreen does not appear after you press Enter, click the address icon  [Figure 10]).
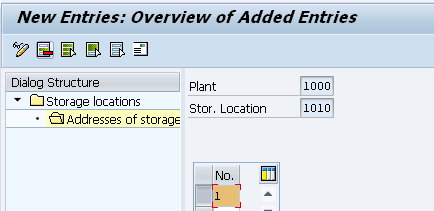
Figure 10
Choose new storage location number (1)

Figure 11
Enter the new details for your personnel subarea address
Step 7. Enter the New Personnel Subarea Address Details
In the subscreen in Figure 11, enter the address of your personnel subarea (e.g., 123 New Street, M1 3HH, Manchester). Click the save icon to save the new personnel subarea address.
Step 8. Repeat Steps for Any Other Personnel Subareas
Use the back arrow to return to the IMG. Once you’re there repeat the same steps (from Figure 2, Step 6 onwards) for all the personnel area and subarea combinations.
You have now stored an address with an eight-character key where the plant code and storage location code have the same four-digit codes as your personnel areas and subareas. This key can be read using the custom code user exit (such as the PA infotypes), which I discuss later in this article.
Part 3. Create a User Exit to Populate the Work Address Field
In this final section, a link is made between the personnel area address configuration table and the infotype using a PA user exit. The user exit is triggered whenever an infotype 0006 (addresses), subtype (work address), is created that reads the configuration set up in Part 2 of this article. The user exit could either be in an action (such as the hiring action) or created directly within the Create Master Data Screen (transaction code PA30).
Note
I assume readers are familiar with the SAP ERP HCM infotype enhancement PBAS0001 PA: Pers.Admin./Recruitment: Default values and checks, and that it already has been implemented using the enhancements transaction code (CMOD). I also assume that the function module for PBO EXIT_SAPFP50M_001 has been activated and the include ZXPADU01 created. Alternatively the more modern Business Add-In (BAdI) HRPAD00INFTY Update/Infotype maintenance, method BEFORE_OUTPUT, can be used with minor modifications.
This code is called whenever a work address infotype record is created. Note that there is a check on both the infotype and subtype to make sure that the work address is created only when required. You may need to adjust the subtype value according to the way your own system has been customized.
Step 1. Add the Code to the PA User Exit
In transaction code SE38 enter the include name ZXPADU01 and add the code shown in Figure 12. If this user exit is already in use, you'll have to merge the code below into your existing code.
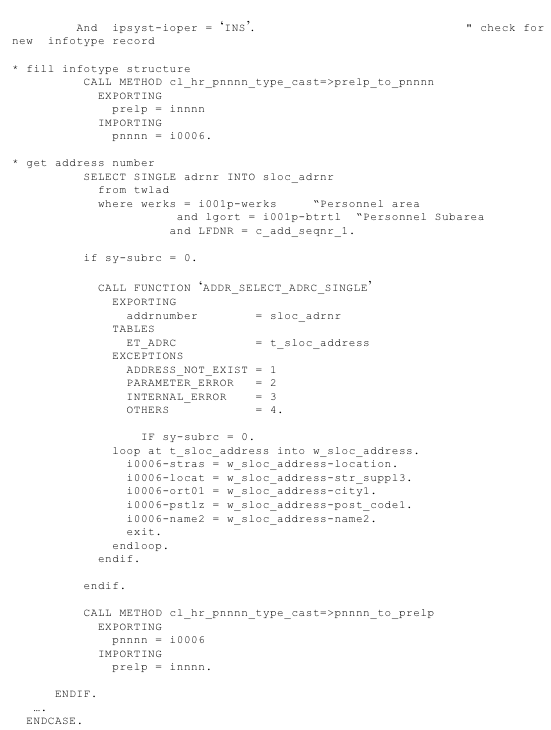
Figure 12
User exit code to be copied and pasted
This is how it works:
- The code is called whenever an address infotype with a work address subtype is created.
- Each address has a unique number in the plant location address table TWLAD
- Table TWLAD is read using a key based on the personnel area and subarea to get the unique address number.
- The plant location address is derived by passing the address number to the function module ADDR_SELECT_ADRC_SINGLE.
- The address details are then passed into the corresponding fields of infotype 6.
Step 2. Usage and Testing
Once the above steps have been completed you should be to test the functionality. Create a new employee using the hiring action (or other action that was updated in Part 1, Step 2). You should see that a work address infotype record is created automatically and pre-populated with the relevant personnel subarea address. Alternatively, you can complete the personnel action and then check the employees address infotype records using the view master data transaction (transaction code PA20). When the functionality is working, you have an SAP ERP HCM system where employees work address records are created automatically and are available for standard address reports or for SAP query.
Note
If a work location itself changes due to an office move or re-location then it is necessary to update the work addresses infotype records manually. This can be done by configuring the new address in a storage location. A new work address infotype 0006 record can be created with an effective date of the start of the relocation using Legacy System Migration Workbench (LSMW) or another mass infotype creation tool.
Owen McGivney
Owen McGivney is a senior consultant at iProCon Ltd., part of the iProCon group, based in London, England. He has worked on implementing SAP HR and payroll systems since 1998. Owen has delivered UK, Irish, and multi-national payroll solutions for a wide range of private- and public-sector clients. He has a special interest in combining ABAP programming with configuration to create innovative and effective solutions.
You may contact the author at o.mcgivney@iprocon.com.
If you have comments about this article or publication, or would like to submit an article idea, please contact the editor.


