Learn how to configure user defaults functionality in SAP Access Control 10.0 to drive automatic assignment of values to user master data based on specific request attributes.
Key Concept
A user defaults business rule can be used to define the default entries automatically maintained for a user master record based on defined attributes and conditions in a Business Rules Framework plus application. The user default assignment is performed on successful approval of an access request and just before provisioning occurs in the target system. The attributes for the user default are mostly values available in transaction code SU01 (user maintenance). Additionally, you can maintain user group assignment and parameter IDs to be provisioned by default based on a defined business rule.
A typical business environment needs to maintain default values for specific users based on clear-cut reasons such as operational responsibility or organizational structure. For example, in the SAP Advanced Planner & Optimizer (SAP APO) system where the time zone is critical for production planning activities, you can use user defaults to drive the automatic assignment of a time zone based on a user’s physical location. The system allows you to automate the assignment of a user default to users at the point of access provisioning using business rules defined in Business Rule Framework plus (BRFplus).
This capability provides control to access provisioning, saves time in maintaining numerous master records, and makes the assignment of transaction code SU01-specific values less error prone. The user defaults are normally associated with user details that exist in transaction code SU01 (user maintenance). A number of fields in the user master data can benefit from user default assignment.
Figure 1 diagrams the behavior of the business logic on which the user default functionality is based. It shows that user default fields (which exist as fields in transaction code SU01) should be provisioned for an access request when the location and system are defined as LAGOS and GECCLNT800, respectively. In the same vein, when the location and system are defined as LONDON and GECCLNT800, respectively, the corresponding user defaults need to be provisioned. For example, the time zone in the former system scenario is WAT and the time zone in the latter scenario is GMTUK. This assignment is provisioned in the target system (for example, SAP APO) by the access request management functionality of the SAP Access Control 10.0 system.

Figure 1
The user default access control application business rule
I discuss the capability of the User Default Business Rule and describe the following processes:
- Maintain user defaults master data
- Maintain actions for request types
- Maintain the BRFplus function ID and access control application mapping
- Configure BRFplus logic for a user defaults business rule
- Simulate a business scenario
Note
In this article, I assume the access request management business scenario is well configured so that you can create an access request and approve the provisioning of the same in the system. A good understanding of BRFplus is a prerequisite to this article. I do not explain the basics steps for creating and maintaining the standard BRFplus objects.
Maintain User Defaults Master Data
The user defaults functionality works on the principle that the BRFplus application evaluates a series of input criteria and then outputs a specific result value. This result value then equates to the key assigned to the specific user default configuration set in customizing (user default master data). The first step in setting up a user defaults business rule is to identify the attributes for which you intend to maintain user defaults. These records typically exist in transaction code SU01.The following attributes are supported:
- Start Menu (Default tab)
- Logon Language (Default tab)
- Time Zone, Personal Time Zone (Default tab)
- Decimal Notations (Default tab)
- Date Format (Default tab)
- Output Device (Default tab)
- Output Immediately (Default tab)
- Delete after output (Default tab)
- User group authorization (Logon data tab)
You can also set default values for user groups (Groups tab) and parameters ID (Parameters tab). The use case of this functionality varies depending on the business requirement. For example, you might want specific entries automatically assigned to a user group at the point of access provisioning for all systems in your landscape. Similarly, you can choose to default specific parameters to a user master record in a particular system in your landscape — for example, SAP NetWeaver Business Warehouse (SAP NetWeaver BW) systems only.
Every entry in the user default master data is uniquely identified with a placeholder that is used for mapping in the BRFplus logic. This unique identifier is auto-assigned in ascending numeric order. The maintenance of user default master data allows you to define a unique identifier for the attributes of the master data that you intend to associate with a particular system. Usually, this identifier is reconciled with the user default ID in the BRFplus logic of the user default access control application.
To maintain the user default master, follow menu path SPRO > SAP Reference IMG > SAP Customizing Implementation Guide > Governance, Risk and Compliance > Access Control > User Provisioning > Maintain User Defaults. To make the user default entry productive, you must select the Active indicator (
Figure 2).
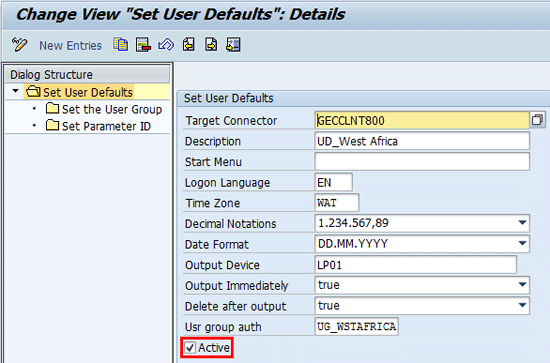
Figure 2
The initial screen for user default master data
Double-click the folder named Set the User Group and define the user group assignment to a user default identifier (
Figure 3).

Figure 3
User default master data – User group
Now you need to define the parameter ID and value assignment to a user default identifier. Return to the Change View “Set User Defaults”: Details screen (
Figure 2) and double-click the folder named Set Parameter ID.
Maintain Actions for Request Types
The attribute of the request types influences the behavior of the user default access control application. Activating the Business Configuration Set (BC Set) GRAC_ACCESS_REQUEST_REQ_TYPE via transaction code SCPR20 populates the system with standard request types and actions. The following actions are predelivered in the system:
- Create user
- Change user
- Delete user
- Lock user
- Unlock user
- Assign object
- Super user access
- Create & Lock user
- Change & Lock user
- Change & Unlock user
- User Defaults
- Retain
- Remove
To configure the user default to work for different request types, you need to associate the action (user defaults) to the request type in addition to any other desired actions. This action allows the request to consider the user defaults associated with the request. To perform the configuration for assignment of user default action to a request type, follow menu path SPRO > SAP Reference IMG > SAP Customizing Implementation Guide > Governance, Risk and Compliance > Access Control > User Provisioning > Define Request Type. In the screen that appears (
Figure 4) click the Request type folder and click New Account in the Description field.

Figure 4
Request type master data
Now click Change Account in the Description field and double-click the Select action folder (
Figure 5).
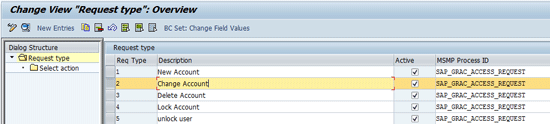
Figure 5
Select a request type
In the next screen (
Figure 6) click the New Entries button.
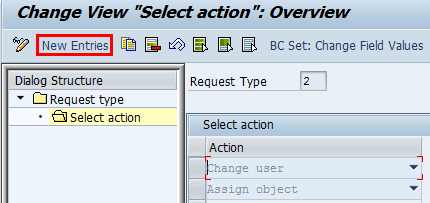
Figure 6
Assign actions to a request type
Use the drop-down arrow button to select an action. In my example I select User Defaults (
Figure 7).

Figure 7
Select a User Defaults action for assignment to a change request type
Click the Save icon. A status message appears in the next screen (
Figure 8).

Figure 8
Status message for successfully saving changes to request type
Note
It is important to state that user defaults are only activated for request actions (create user and change user only).
Maintain the BRFplus Function ID and Access Control Application Mapping
The user default rule is a standard application in SAP Access Control 10.0. The application is defined and maintained within the BRFplus workbench. You need to check for the correct function ID in the BRFplus workbench. To identify the correct function ID, access transaction code BRFplus and navigate to the appropriate function of the application as shown in
Figure 9.
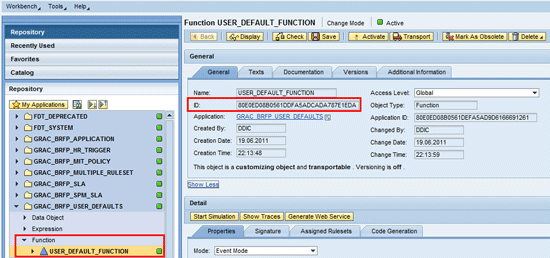
Figure 9
Function ID definition in BRFplus workbench
Next, ensure that the correct function ID is mapped against the access control application in customizing. Follow menu path SPRO > SAP Reference IMG > SAP Customizing Implementation Guide >Governance, Risk and Compliance > Access Control > Maintain AC Applications and BRFplus Function Mapping (
Figure 10). If the entry in
Figure 10 is incorrect, you need to maintain the entry accordingly.
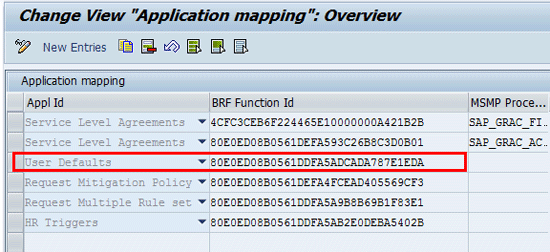
Figure 10
Function ID assignment to user defaults access control application
Note
It is possible that the standard access control BRFplus application may not be available in the application mapping table. This is usually the case with the client copy option used during system setup in which some objects might not be copied (from client 000) into the production clients. In such a scenario, refer to SAP Note 1637515 (Not able to find the predelivered BRFplus rules). It explains how to export (from client 000) and import (into productive client) the corresponding .xml file for the appropriate access control application.
Configure BRFplus Logic for a User Defaults Business Rule
Configuring BRFplus logic for user defaults can be complex or simple depending on the client requirement. Therefore, a good understanding of how to use the different objects and expressions of the BRFplus engine is essential. I use the following objects and expressions in the configuration of the BRFplus logic for the purpose of determining user defaults provisioned for different request types:
- Ruleset: This BRFplus object represents a collection of rules. It is usually associated with a particular function. The ruleset is used to drive proper organization and management of business rules.
- Rules: These definitions govern the operation and limitation of an organization’s business processes.
- Table Operation: This expression type is used to perform aggregation, existence check, and line count on an entire table.
- Decision Table: This expression type processes (in sequence) a table of conditions and results. It returns either the first row or all rows where the condition is satisfied.
Figure 11 outlines the different objects and expressions that are used in configuring the user default provisoning functionality for my business case.
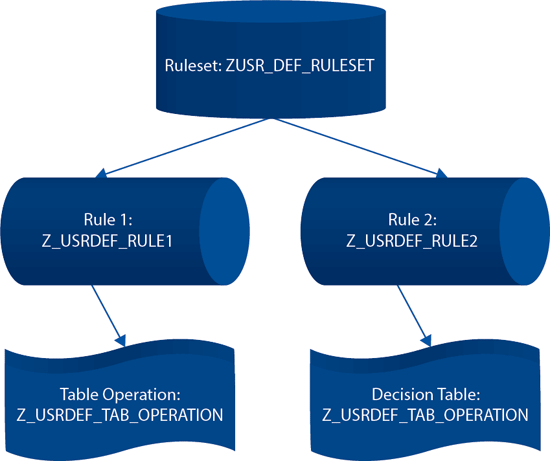
Figure 11
User default access control application design logic
To create a ruleset follow these steps:
In the BRFplus workbench, navigate to the application (GRAC_BRFP_USER_DEFAULTS) and then to the function (
Figure 12).
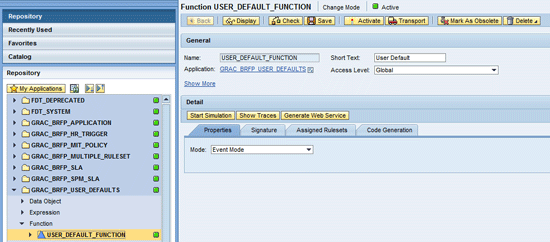
Figure 12
Navigate to the application and the function
Click the Assigned Rulesets tab and then click the Create Ruleset button (
Figure 13).
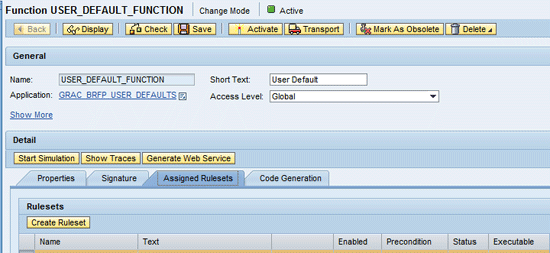
Figure 13
Create the ruleset
In the next screen enter values for the Name, Short Text, and Text fields (
Figure 14). Click the Create and Navigate To Object button.
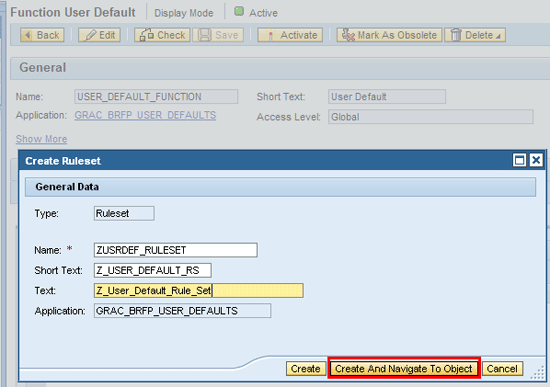
Figure 14
Enter values for the ruleset
In the pop-up screen (
Figure 15) click the Yes button.
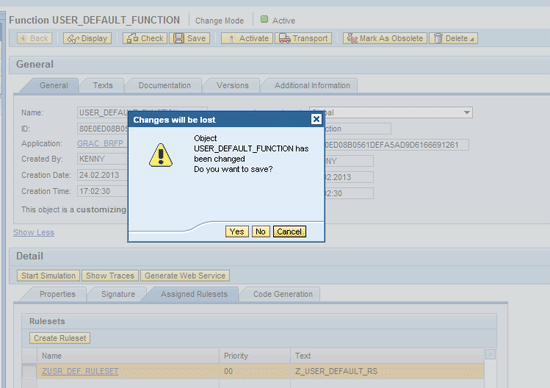
Figure 15
Save changes made to the user default function
Figure 16 shows the status message displayed confirming the creation of the ruleset. You use this ruleset to provide a container for storing the different rules that are subsequently created.
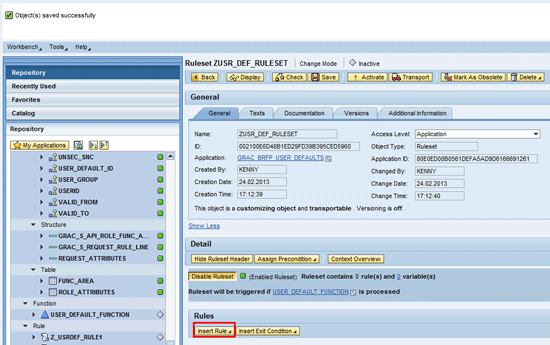
Figure 16
Creation of ruleset to store business rules
Rules exist as BRFplus objects that are defined to satisfy the IF THEN ELSE logic. That is: IF <condition> THEN <perform operation> ELSE <perform operation>.
I create two rules:
- Z_USRDEF_RULE1: The purpose of this rule is to select the first record at the request line item level.
- Z_USRDEF_RULE2: The purpose of this rule is to select the correct user default identifier.
To create rules, right-click the application and follow menu path Create > Rule. In the next screen that appears enter values for the Name, Short Text, and Text fields and click the Create button (
Figure 17).

Figure 17
Definition of rule name
Click the Create button. In the next screen you receive a status message (
Figure 18).
Figure 18
The status message indicates that the object was successfully created
Repeat the same steps to create a second rule. Choose the ruleset created earlier by breaking down the application folder for user defaults following the path: Application Name (GRAC_BRFP_USER_DEFAULTS) > Ruleset > Ruleset Name (ZUSR_DEF_RULESET).
In the screen that appears (
Figure 19), click the Insert Rule button. In the Description field select rule 2 and enter a description for the rule.
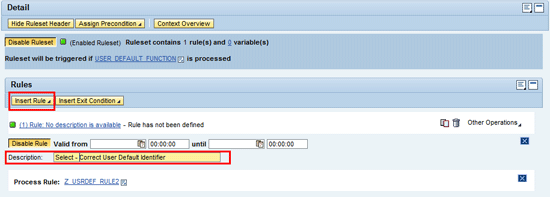
Figure 19
Insertion of rule into a ruleset
Repeat the same step of rule insertion to add rule 1 to the ruleset and also provide a description. You should see a screen similar to
Figure 20.
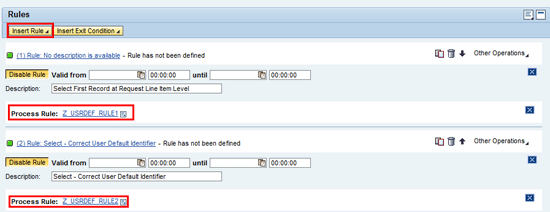
Figure 20
Rules definition and association with ruleset
Click the Save button. A status message appears in the next screen (
Figure 21).
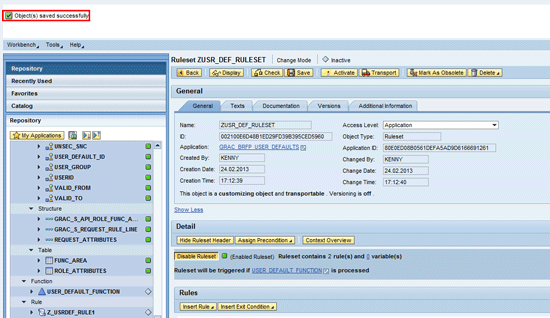
Figure 21
Status message for saving ruleset
At this juncture, you need to define the attributes of the rules and what you expect the rules to achieve.
Rule Z_USRDEF_RULE1
: This rule enables you to access the line-items table and move the first line to a line-items structure. Create a table operation expression type and associate it with rule Z_USRDEF_RULE1 as shown in
Figure 22. Note that I choose the operation First line to be evaluated against the ROLE_ATTRIBUTES context data object. Click the Save button and then click the Activate button to activate the table operation to make it productive.
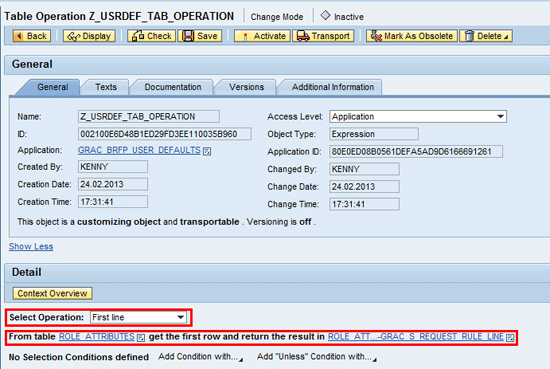
Figure 22
Table operation expression definition for a rule
After successfully activating the table operation, you receive a status message (
Figure 23).

Figure 23
Status message after activating table operation expression
The next activity is to maintain rule 2 (Z_USRDEF_RULE2) to fetch the right user default ID. To maintain this rule create a decision table expression and then associate it to the rule. The assignment is automatically done if you create the object via the Detail section of the rule structure (
Figure 24). To create a decision table directly from a rule, navigate back to rule 2 by drilling down in the application folder in the BRFplus workbench and following menu path Application (GRAC_BRFP_USER_DEFAULTS) > Rule > Rule name (Z_USRDEF_RULE2).
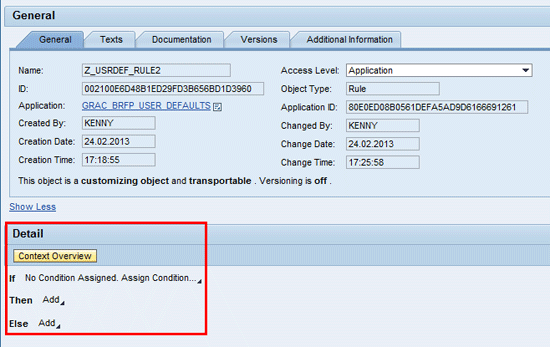
Figure 24
Rule definition screen
In the Detail section of the rule follow menu path Process Expression > Create…..
In the next screen change the Type field to Decision Table and maintain the other fields as shown in
Figure 25.

Figure 25
Definition of decision table details
Click the Create and Navigate To Object button. In the pop-up screen (
Figure 26), click the Yes button.

Figure 26
Dialog box for decision table creation confirmation
A status message appears in the next screen (
Figure 27).
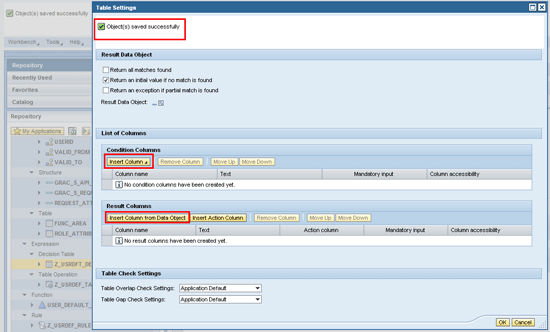
Figure 27
Status message for successfully saving the decision table
Click the Insert Column and the Insert Column from Data Object buttons to populate the decision. The result data object for the decision table should be USER_DEFAULT, and the result column is automatically set to USER_DEFAULT_ID. The condition columns are defined as CONNECTOR and LOCATION. The entries in the decision table imply that the attributes that the logic evaluates are the connector (system) and location associated with an access request. The decision table should return an initial value if no match is found. Figure 28 shows what the decision table settings for the logic should look like for our business example.
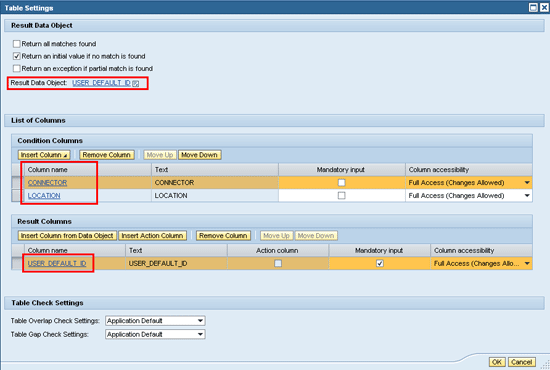
Figure 28
Table settings for a decision table showing the result data object, condition, and result columns
Click the OK button. In the next screen that appears (Figure 29) click the add row icon to add values for the condition column in the decision table.
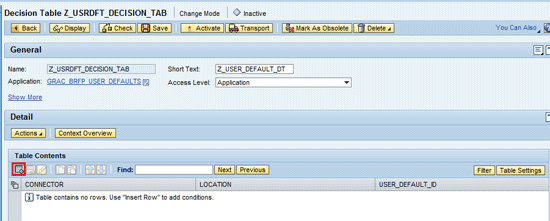
Figure 29
Add records to the decision table
The next screen contains the content of the decision table. This content tells the system to look in the access request. If the system (CONNECTOR) is GECCLNT800 and the location is LAGOS, then the attributes associated with the user default identifier – 001 are assigned to the user created (or maintained) in transaction code SU01(of the back-end system) via the access request. In same manner, if the system = GECCLNT800 and the location = LONDON, then the attributes associated with the user default identifier – 002 need to be assigned to the user created or maintained in transaction code SU01 via the access request functionality of the SAP Access Control 10.0 system. Click the Save button (Figure 30).
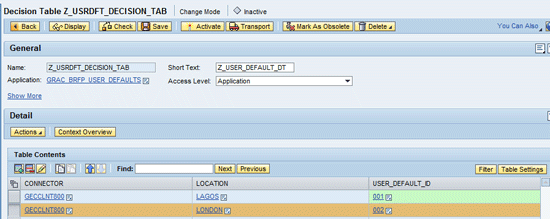
Figure 30
Decision table entries for user defaults business rule
In the next screen you receive a status message. Click the Activate button to make the object productive. The next screen that appears displays another status message. It is important to mention that user default IDs 001 and 002 have matching entries in customizing SPRO > SAP Reference IMG > SAP Customizing Implementation Guide > Governance, Risk and Compliance > Access Control > User Provisioning > Maintain User Defaults (Figure 31). If this condition is not satisfied, then the defined business rule is not executed correctly.

Figure 31
Maintain user defaults in customizing
To make the definition productive, you need to activate the decision table. Click the Activate button. In the next screen you receive a status message after successful activation of the decision table. Now you need to activate the associated function. Navigate back to the function by drilling down in the application folder in the BRFplus workbench and click the Activate button (
Figure 32).

Figure 32
Activate the function of the user default access control application
In the confirmation dialog box (Figure 33) click the Activate button to confirm your action.
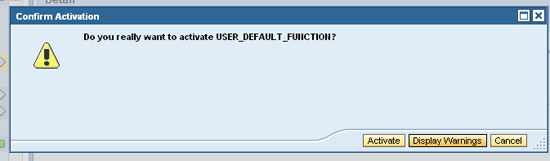
Figure 33
The confirmation screen for the activation of function
Navigate back to the ruleset by drilling down in the application folder in the BRFplus workbench to activate it and the associated rules. Click the Activate button (Figure 34).

Figure 34
Ruleset definition showing associated rules
A confirmation screen appears asking if the referenced objects should be included. Check the Include Referenced Objects check box and click the Activate button (Figure 35).

Figure 35
The confirmation window for ruleset activation
In the next screen you receive confirmation of successful activation of the objects (Figure 36).

Figure 36
Status message for successful activation of the ruleset
Simulation of a Scenario
I create an access request against the system GECCLNT800 for a user whose location is LAGOS in the SAP Access Control system by following SAP NWBC path Access Management > Access Request > Access Request Creation (quick link).
Figure 37 shows the location field (User Details tab) of the access request form maintained as LAGOS.
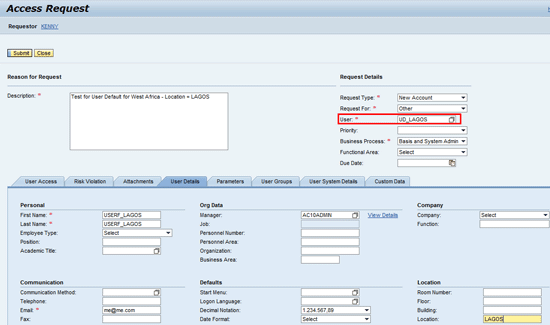
Figure 37
Access request form with Location = LAGOS
Click the User Access tab to review the system assignment.
Figure 38 shows that the request is for system (connector): GECCLNT800.

Figure 38
System GECCLNT800 assignment in an access request form
Based on the definition of the user default master data in my business scenario, the default user master data (transaction code SU01) of the user account created following successful provisioning action of the access request is maintained as follows:
User Group for Authorization Check: UG_WSTARFICA
Logon Language: EN
Date Format: DD.MM.YYYY
Output Device: LP01
Output Immediately: Yes
Delete After Output: Yes
Parameter ID: SCL
User Group: UG_WSTARFICA
Figures 39 through
42 show the different user defaults provisioned in transaction code SU01 in the back-end system.
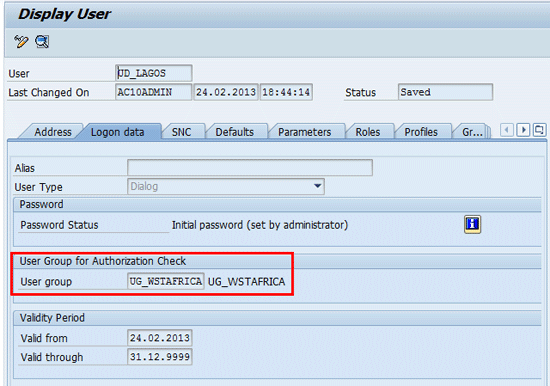
Figure 39
User group for authorization check assignment
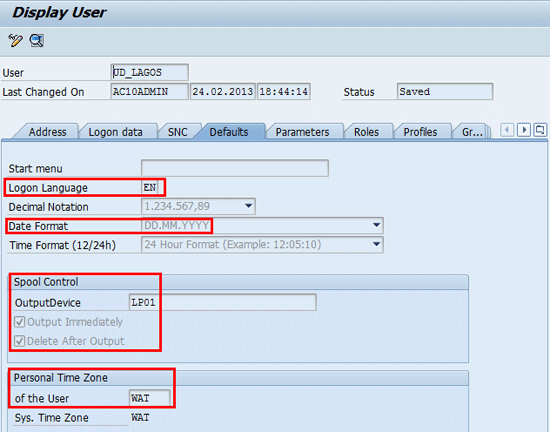
Figure 40
Logon Language, Date Format, Spool Control, and Personal Time
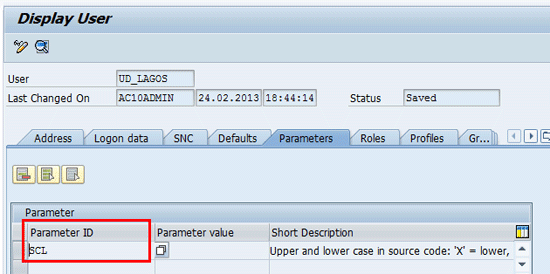
Figure 41
Parameter value
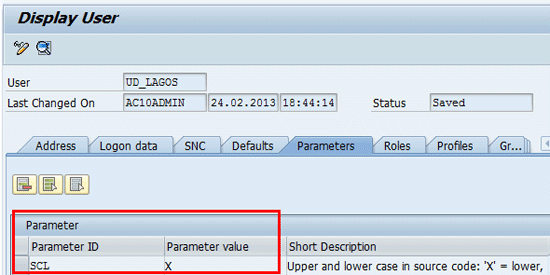
Figure 42
User group assignment
Figure 43 shows the provisioning log containing actions and timestamps to independently confirm the creation of the access request in the SAP Access Control 10.0 system and the subsequent provisioning activities in the back-end system (GECCLNT800).

Figure 43
Provisioning log showing timestamp for the creation of user UD_LAGOS
Kehinde Eseyin
Kehinde Eseyin is a security architect. He holds a bachelor’s degree in computer science. He has about 12 years of IT security, governance framework, IS risk, and compliance experience gained by working in numerous global organizations. Over the years, he has demonstrated competencies in security design, information assurance, cyber security, data privacy, threat and vulnerability management, penetration testing, business architecture, project management, IT audit, IS controls framework, and identity and access management.
You may contact the author at
eseyinok@gmail.com.
If you have comments about this article or publication, or would like to submit an article idea, please contact the
editor.