Learn how to change reference fields in SEPA Direct Debit to make payment collections more efficient and cost-effective.
Key Concept
The SEPA format is the standard way of transferring electronic bank payments in euros within the countries of the EU and four additional countries. The file format is standardized for all countries. The SEPA Direct Debit is the standard SEPA way for collecting money from customers.
When you are collecting payments for customer invoices using SEPA Direct Debit, the generated payment file contains the invoice reference numbers. The standard SEPA file format for Direct Debit can hold only up to four invoice references. When the system collects more than four invoices, the payment program automatically creates a payment advice. A payment advice specifies the invoices paid by a bank transfer. By modifying the file format you can hold more than four invoice references in the SEPA Direct Debit file, thereby reducing the number of payment advices to be sent as well as the costs.
Note
I assume that you have basic knowledge of SEPA and SAP’s automatic payment functionality.
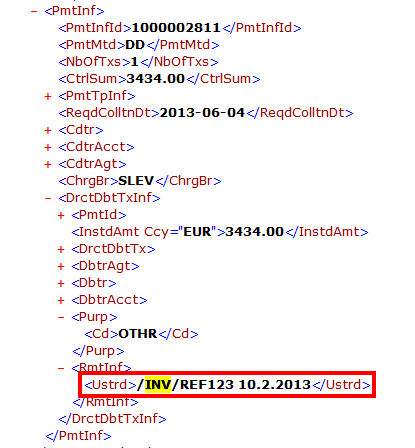
Before I discuss the steps required to make the necessary adjustments, I first want to explain how the standard reference fields look in the payment file. Figure 1 shows an example of the standard SEPA Direct Debit format. The line starting with <Ustrd> shows how a reference to an invoice to be collected is built up. It starts with /INV/ followed by the invoice number (in this example REF123) and the invoice date (in this example 10.2.2013). Because of this lengthy reference the number of invoices is limited to four.
In the next section I discuss the steps to be taken to adjust the references in the payment file.
Step 1. Create a New Layout for the Reference Field
This new layout is to be maintained in a customizing transaction called Adjust note to payee. You can find this transaction in the IMG. Follow menu path Financial Accounting > Accounts receivable and Accounts Payable > Business Transactions > Outgoing Payments > Automatic Outgoing Payments > Payment Media > Make Settings for Payment Medium Formats from Payment Medium Workbench > Create Payment Medium Formats, or you can start directly by executing transaction code OBPM2. You then see a screen like the one shown in Figure 2.
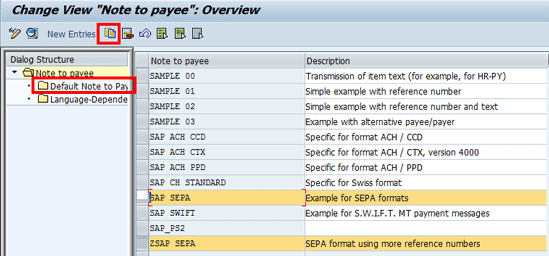
Figure 2
Adjust the Note to payee
Rather than adjusting the standard SAP format SAP SEPA, it is better to copy the SAP default to a new format. This action prevents future SAP updates from affecting your layout. You can copy the default by selecting the SAP SEPA line, clicking the copy icon  , and then entering your own name and description for the Note to payee. In Figure 2 you can see that SAP SEPA has already been copied to ZSAP SEPA. Go to the details of the newly created Note to payee by selecting the line of the Note to payee. Click the folder Default Note to Payee.
After clicking the folder you see a screen similar to the one shown in Figure 3. The first line contains the note to payee text; the other lines are not relevant for this article. In Figure 3 the Note to payee text has already been adjusted. It now consists of a slash and the technical field name of the invoice number. The field name is enclosed by ampersands to indicate that it is a field name. The original content of the Note to payee text was /INV/&FPAYP-XBLNR& &FPAYP-BLDAT(Z)&. This matches the layout shown in Figure 1.

Figure 3
Details of the Default Note to Payee
Step 2. Create New Data Medium Exchange Format
Use transaction code DMEE to create a new format for the payment file. In step 4, I explain how to link the new Note to payee format to this new file format. Execute transaction DMEE to create a new format tree ZSAP_DD, which has modified settings for the invoice references. The standard four reference fields are present; this number must be increased to reduce the number of payment advices to be sent. In transaction DMEE, enter the Tree type (e.g., PAYM) and format tree (e.g., SEPA_DD) and click the copy icon as indicated in Figure 4. (This is the standard available format.)
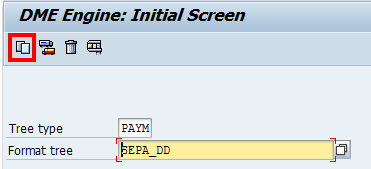
Figure 4
Enter a tree type and format tree
In the pop-up screen enter the name of the new format tree (Figure 5). Click the Copy button to proceed to the details of the format tree (Figure 6).

Figure 5
The pop-up screen to enter a new format tree name
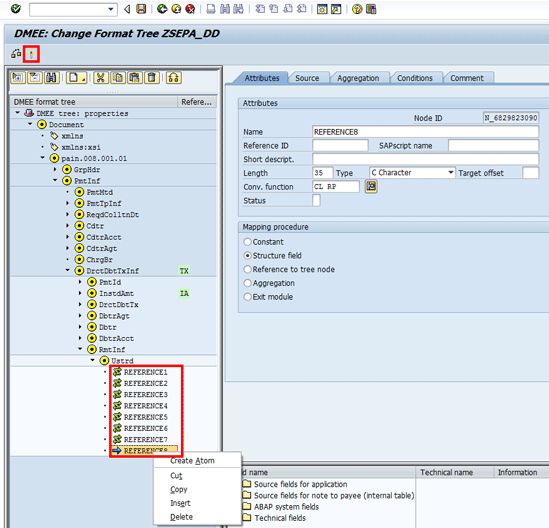
Figure 6
Details of the format tree
On the details screen (Figure 6), go to the reference fields by opening branches of the tree. Click the black triangles pointing to the right. The path to follow is shown in Figure 6. Select one of these fields and right-click your mouse and select Copy from the list of options. Adjust the name from, for instance, REFERENCE1 to REFERENCE5. Make sure that all the fields have a unique name. After you have finished adjusting the reference name, activate the new format by clicking the activate icon  .
.
Figure 6
Details of the format tree
Step 3. Create New Payment Medium Exchange Format
With transaction code OBPM1, copy payment medium exchange format SEPA_DD to ZSEPA_DD to create a new format. It is essential for the name of the format to be exactly the same as the format type created using transaction code DMEE in step 2.
You can find this transaction in the IMG. Follow menu path Financial Accounting > Accounts receivable and Accounts Payable > Business Transactions > Outgoing Payments > Automatic Outgoing Payments > Payment Media > Make Settings for Payment Medium Formats from Payment Medium Workbench > Create Payment Medium Formats.
Once you have executed transaction code OBPM1, select the line SEPA_DD and click the copy icon (this step is similar to the copy in transaction DMEE and therefore not shown).
Figure 7 shows the copied data in the new ZSEPA_DD format.
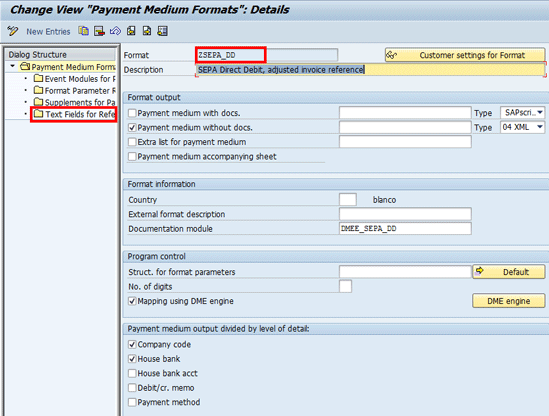
Figure 7
The details for a payment medium format
On the left side of the screen shown in Figure 7, click the folder Text Fields for Reference information. You then see a screen like the one shown in Figure 8. Change the number of fields for the first line to 8. This is the same number as the value for reference fields in your data medium exchange format created in step 2.

Figure 8
Text fields for reference information
Step 4. Adjust the Payment Method
The new payment medium format and the note to payee format must be assigned to the payment method used for SEPA direct debit. To do this, follow IMG menu path Financial Accounting > Accounts receivable and Accounts Payable > Business Transactions > Outgoing Payments> Automatic Outgoing Payments > Payment Method/Bank Selection for Payment Program > Set Up Payment Methods per Country for Payment Transactions (Figure 9). After starting the transaction, choose the correct country or payment method combination. Because this is basic payment method maintenance, this is not shown here.
At the bottom of Figure 9 assign the payment medium format created in step 3 to the payment method by entering its name in the Format field. After entering the format name you must assign the note to payee. On the left side of Figure 9 you can see the folder called Note to Payee by Origin. Click this folder to assign the Note to Payee format to the payment method.

Figure 9
Assign a payment medium format to the payment method
In Figure 10 enter the name of the Note to Payee format to assign it to the payment method. Press the save button at the top of the screen to save your entries.

Figure 10
Assign the Note to Payee format
Step 6. Create and Assign Variants to the Payment Format
Finally, you need to set up new variants to be assigned to the payment format. The variants control the parameters used for the creation of the payment file (for example, how to print a control report). The variants can be maintained using transaction code OBPM4. You can also start this transaction via the IMG by following menu path Financial Accounting > Accounts receivable and Accounts Payable > Business Transactions > Outgoing Payments> Automatic Outgoing Payments > Payment Media > Make Settings for Payment Medium Formats from Payment Medium Workbench > Create/Assign Selection Variants. I do not explain the maintenance and assignment of variants in detail as this is standard maintenance of payment methods using the payment medium workbench.
After this last step the new payment medium format can be used. Figure 11 shows that the file now contains eight invoice references.

Figure 11
The new format
Kees van Westerop
Kees van Westerop has been working as an SAP consultant for more than 25 years. He has an MBA degree in mathematics and a degree in finance. Kees has been concentrating on the financial modules, especially in general ledger accounting, cost center accounting, and consolidation. He also has a great deal of experience with rollouts of kernel systems and integrating finance and logistics.
You may contact the author at keesvanwesterop@hotmail.com.
If you have comments about this article or publication, or would like to submit an article idea, please contact the editor.