Learn a few tips on how to capitalize on the functionalities that SAP Collections Management offers.
Key Concept
SAP Collections Management is a process within SAP ERP to efficiently manage the customer collection process. It is based around the principle of a prioritized worklist for the collections specialist to use to contact customers. The specialist then updates the worklist with the actions from the contact.
Although SAP Collections Management offers benefits to companies that implement it, mistakes can prevent them from maximizing the benefit of this software. I discuss some of the common mistakes and how to resolve them to ensure that your accounts receivables department is as efficient as possible.
Within SAP Collections Management the core tool centers on a prioritized worklist with which the credit control team works. This worklist replaces downloaded aged debt reports, either in spreadsheets or paper copies, supported by the standard transaction code FBL5N.
I provide mitigation tips to ensure common design issues are not made, ensuring that the true business benefit you expect from your Collections Management implementation is actually achieved.
Worklists
Design issue: Having too many customers appearing on a worklist
Solution: Ensure that only the customers you need to contact appear on your worklists
This is where I see the biggest confusion with my clients. They ask questions such as, “Should my entire customer base appear on the worklist?” My stock answer is that not all your customers should appear. Some may not have any debt, or others may have debt that is not overdue. Some customers may have paid 90 percent of their account, and is there any value in having those customers appear on the worklist if they don’t owe that much?
The volume and type of collection rules within your collection strategy control whether a customer appears within the worklist. Each customer is linked to a collection group that in turn is linked to a collection strategy. If any of the rules are met within the collection strategy, the customer obtains a valuation and then appears within the worklist.
When a customer has a resubmissions (the process in which the customer is removed from the worklist for a period of time owing to the request from the customer), the customer does not appear within the worklist even if one of the rules within the strategy is met. That is because within the resubmission you manually enter when the customer becomes able to be seen on the worklist again, assuming it meets the rules set within the corresponding Collection Strategy.
However, the exit rule, one of the most powerful actions, is often overlooked when designing a collection strategy. As its name indicates, the exit rule provides an exit to the collection strategy. Therefore, if a rule is met with an exit rule, the customer is excluded from the worklist.
Note
A customer is excluded from the calculation of the worklist based on the date of the resubmission. The exit rule is aimed at customers who are in the calculation of the worklist, but are to be excluded because an individual rule has been met. Companies can use both resubmissions and exit rules to control the volume of customers within their worklists.
You may have a rule to say if the amount to be collected is less than £100, then you don’t want the customer to appear within the worklist. Figure 1 is an example of a collection strategy (transaction code UDM_STRATEGY) that has a simple exit rule. The exit rule is highlighted at the top of the collection strategy. In this example the exit rule is triggered when the customer has an amount to be collected that is between £0.00 and £100.00.

Figure 1
The initial screen for displaying a collection strategy using transaction code UDM_STRATEGY
To see how this would work, you can simulate the collection strategy by selecting the simulate icon  , which is found within transaction code UDM_STRATEGY. If you have a customer who has an amount to collect that is between £0.00 and £100.00 and you have the exit rule in your collection strategy, you can use the display log to see the outcome. To confirm this you can see the information in the log of the simulation. Select the simulate icon from the UDM_STRATEGY transaction code and enter a customer number (e.g., 91).
In the display log from the simulation of the collection strategy, the third line down details that no worklist item has been created as the exit rule was met for customer 91 (Figure 2). This means that the customer does not appear on the worklist as he owes only a small amount. When the amount to be collected is greater than £100 the customer appears back on the collection worklist.

Figure 2
The display log for simulation of a collection strategy from transaction code UDM_STRATEGY
Proactive Calling
Business issue: My customers still pay me beyond terms; I always feel as if I am chasing my tail
Solution: Proactive customer contact (chase the customer for their debt before it becomes overdue)
From a best practice point of view, contacting a customer after the debt has fallen due is a wasted opportunity. If the first time you know about a problem or issue is after the debt has fallen due, you will have difficulty reducing the amount of overdues you have within your aged debt analysis. Instead, contacting the client prior to when payment is due is a good way to obtain confirmation that a full payment will be received in their next payment run. If this is not the case you have some time to try and resolve any of the client’s issues such as a missing invoice or a dispute on an invoice. Within the collection strategy you can influence the due date of the customer’s invoices to push the due date forward leading to those invoices being included in the amount to be collected rule – CR00000008.
CR00000008 is one of the most important and commonly used SAP-delivered collection rules. It shows the amount the customer owes. This excludes any open disputes and invoices that are in an open promise to pay. This is the standard calculation; however, you may influence this calculation via a Business Add-In (BAdI) to change the way this calculation is performed. (An example is removing certain document types from the calculation.) Ideally, the collections specialist should be looking for the customer to confirm that the next payment will be the same as the amount to be collected.
Using the same customer as in the first example, I know that the amount to be collected is currently less than £100, as the exit rule was triggered (Figure 2). However, if you edit the collection strategy in the Receivables processing before the Due Date tab in the initial screen for a collection strategy, you can change the due date of all open items by a value of x days – where x is the value in the field No. Days before Due Date.
For example, to move the due date forward by 10 days, click the Receivables Processing bef. Due Date tab and enter 10 in the No. Days before Due Date field (Figure 3). After this change is made, an invoice that is due on January 15 is in fact seen as due for Collections Management on January 5. It will be included in the Amount to be Collected field and therefore picked up by collection rule CR00000008.

Figure 3
The Receivables Processing bef. Due Date tab in transaction code UDM_STRATEGY
After you simulate the collection strategy, the items that are due in fewer than 10 days are now part of the amount to be collected and therefore the exit rule in the collection strategy detailed in Figure 1 no longer applies. The other collection rules are met and provide the customer valuation.
Figure 4 shows the display log for the collection strategy for the customer once the due date field has been altered by 10 days. Line 3 does not apply (the exit rule), and some of the other rules have been met, leading to valuation for the customer.
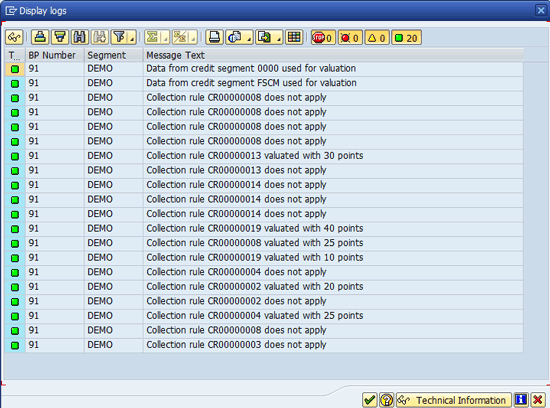
Figure 4
The display log for the collection strategy after the due date field was changed
Figure 5 shows the simulated worklist item after the Strategy simulation. (The simulation process within the collection strategy allows you to confirm how a customer [business partner] will act based on the rules defined in the collections strategy. When you are designing a collection strategy, the simulation button is used to compare how different customers react to the rules and scoring within the collection strategy.) The two columns highlighted in green show the valuation the customer would achieve and show the value of the amount to be collected.

Figure 5
The simulated worklist item from the Collection Strategy
The valuation scoring is central to the Collections Management process. The more points a customer gets, the higher up the Collections Worklist they appear. The idea is that you would want to call or contact customers who meet the majority of your measures (collections rules).
Don’t Duplicate Work
Business issue: I still have a sizable team contacting my customers
Solution: Don’t duplicate your work or effort
After a project has gone live, I like to walk through the accounts-receivables department to see the users use the new screens and process. Experienced SAP system users use the core FI-AR transaction of transaction code FBL5N as their comfort blanket. They have been taught to use the Collections Worklist, and that this now replaces FBL5N. However, there is always a reason why they revert to their comfort zone. This is human nature and not a personal criticism; it is always hard to give up a reliable source of information.
Note
FBL5N is the old transaction, and process receivables is the new one. Visually they are very different. However, if users are satisfied using the old way (FBL5N), they will, instead of using the new screen, duplicate their effort (run the worklist, go to FBL5N for detailed information, and then go back to process receivables to update the contact information).
Running the worklist, scrolling to an FBL5N session, and then returning to the worklist to update the contact waste time and effort. The Process Receivables screen within Collections Management should have the same balance and the same information as FBL5N. You reach this screen by double-clicking the customer within the Collections Management worklist.
There may be some fields that are available in FBL5N that are not available in the Process Receivables screen as default. To facilitate non-Collections Management fields from standard FI-AR being displayed within the worklist, you need to use two BAdIs. The first BAdI is used to distribute data from FI-AR to Collections Management. The second one is used to create extra fields in the Collections Worklist Process Receivables screen.
To execute the first BAdI, follow menu path Financial Supply Chain Management > Basic Settings for Collections Management > Worklist > Integration with Accounts Receivable Accounting > Distribution of Data in Collections Management. Select BadI: Distribution of Data in Collections Management and click the execute icon.
Once you have sent the data from FI-AR to Collections Management you need to include the extra fields in the Collections Worklist Process Receivables Screen. Follow menu path Financial Supply Chain Management > Basic Settings for Collections Management > Worklist. Select the BaDI: Enhancement of Worklist Items on Creation and click the execute icon. In the same screen select BAdI: Enhancement of Worklist Items on Display and click the execute icon.
Be Unique
Business issue: All my customers have the same score
Business solution: Be unique and assign customers to different groups with different collection strategies to score them in different ways. Look at the collection group function to make sure different types of customers are measured in different ways.
Some companies have tens of thousands of customers in a single company code and their initial design is to have them all in the same collection group. In most cases not all the customers are the same in terms of payment terms, number of invoices, and credit risk. Therefore, putting all of these customers into the same collection group limits how you classify these customers, leading to customers being called at the wrong time or not at all.
Putting customers into common groups, such as national accounts, high risk accounts, and industry-specific accounts, enables you to use different sets of rules to prioritize the accounts. This is a simple master data task and requires additional collection groups to be created and linked to a relevant collection strategy.
This is achieved by executing transaction code UDM_GROUP or following menu path Financial Supply Chain Management > Collections Management > Current Settings > UDM_GROUP. In the screen that appears (Figure 6) you can create a collection group and then link it to an existing collection strategy. You also can change the strategy of a collection group so that it is measured in a different way, leaving different customers appearing on the collection worklist and changing the order that they appear there as well.

Figure 6
Create a collections group and link it to a collection strategy by transaction code UDM_GROUP
After you have created your collection group, you need to add it to an active collection segment. For this step use transaction code UDMGROUP2SGMT or follow menu path Accounting > Financial Supply Chain Management > Collections Management > Current Settings > Assign Groups to Segments. In the screen that appears (Figure 7) go to List of Collection Segments > Assign Collection Group. Select the collection segment and add your new collection group. Go into the Collection Segment folder to select the Segment and then go into the Assign Collection Group folder to assign the Collection Group.

Figure 7
Assign Collection Groups to a Collection Segment
After this is done the data on the Business Partner can be changed to move the customer from one collection group to another.
Create Your Own Collection Rules
The SAP system delivers a number of collection rules that enable you to create a truly prioritized worklist. However, you can also create your own custom rule. One common method is to join two standard rules into a custom one. Therefore, if criteria A and B are met, then the new rule is met.
Occasionally, you may wish to modify the standard logic. The most common one I have seen is to use the Risk Category within standard FI-AR Credit Management and not Risk Class, which is part of SAP FSCM Credit Management. The benefit of this step is to have a less generic rule and therefore ensure customers are scored uniquely.
A collection rule needs to be linked to a basic rule. The SAP system delivers a number of standard collection rules linked to standard basic rules. If you want to modify a standard collection rule, you may need to modify the original basic rule. SAP recommends that you copy the standard and make a custom copy from which to work. To define a collection rule, follow menu path Financial Supply Chain Management > Basic Settings for Collections Management > Collection Strategies > Collection Rules. Select Define Collection Rules and click the execute icon.
In SAP ECC 6.0 enhancement package 5, SAP delivers a standard list of collection rules. To access this list follow menu path Financial Supply Chain Management > Collections Management > Basic Settings for Collections Management > Collections Strategies > Collections Rules > Define Collection Rules. In the screen that appears (Figure 8) go to the Assignment of Basic Rules folder. In this folder the line that has been highlighted is formed of two standard rules. It is a combination of CR00000001 and CR00000002.

Figure 8
The standard list of collection rules delivered within SAP ECC 6.0 enhancement package 5
To view the details of the collection rule highlighted in Figure 8, double-click it. In the next screen (Figure 9) you see that the Risk Class must be met for the value of the second line (Total of All items overdue since n days) to be considered.

Figure 9
The details of the collection rule CR00000002A
When adding this rule to a collection strategy, you need to specify the single or many risk classes for the value of overdue items, and the age of the overdue items for the rule to be valuated (Figure 10).
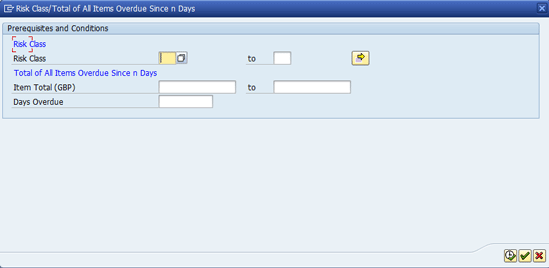
Figure 10
The details of the prerequisites and condition data
The user can now use the Collection rule within the Collection Strategy to score customers based on their risk class, and also the amount overdue. For example, Risk Class A and overdue greater than £10,000 would have 30 points, but for Risk Class B and overdue greater than £10,000, the score would be 10 because the customers in Risk Class A are deemed more risky than those in Risk Class B.
SAP Collections Management provides as standard some simple tools that can be customized to meet the specific requirements of the customer. The solution should align to the business process which in turn should be based to improve the efficiency of the customer collections process. Standard configuration can be used to achieve this; however, there are many BAdIs available to customize the final solution to meet the specific requirement. From experience it is clear that every company will have its own unique requirements and processes. A standard solution or implementation is not really possible if process efficiency is a key driver for the initial implementation.
Mark Chalfen
Mark Chalfen is the finance capability lead at Bluefin Solutions, a niche SAP consultancy in the UK, and an SAP mentor. Mark has more than 12 years’ experience in SAP FI/CO in a number of industries. Mark’s core skills include Financial Supply Chain Management (SAP FSCM) and the new GL. He is currently advising a wide variety of clients on maximizing their SAP landscape either in the current R/3 version or upgrading to SAP ERP.
You may contact the author at mark.chalfen@bluefinsolutions.com.
If you have comments about this article or publication, or would like to submit an article idea, please contact the editor.