Learn how to create and manage the new Metadata Framework-based Talent Pools introduced in the November 2013 release of SuccessFactors. Learn how the Talent Pools work and how they can be leveraged for succession, development, and other business processes. In addition, find out how to enable and configure Talent Pools in your system.
Key Concept
In the November 2013 (1311) release of SuccessFactors, new Talent Pool functionality was introduced that leverages the Metadata Framework (MDF) functionality. Talent Pools are used to manage groups of talented employees that can be used as a pipeline of talent for succession planning or for development activities.
Talent Pools offer organizations a way to manage groups of talented individuals. Talent Pools can cover many different topics, disciplines, employee types, and job functions, but, ultimately, they enable organizations to manage the different types of talents for their different talent needs.
Concepts of Talent Pools and the New Metadata Framework (MDF)-Based Talent Pools
Until the November 2013 (1311) release of SuccessFactors, Talent Pools were generic and inflexible labels given to employees. Previously, Talent Pools could be created only against a Position, but now they are independent groups that can be used for any talent-related purpose. From the November 2013 release, SuccessFactors introduced the Talent Pools functionality that is based on the new MDF. This introduced a flexible, configurable, effective-dated, object-based Talent Pool concept with an easy-to-use and manageable user interface (UI).
Note
Role-based permissions must be enabled and used in SuccessFactors to use the new MDF-based Talent Pools. I go into this in more detail later in this article.
The Talent Pool functionality is built around the TalentPool Generic Object. Using a Generic Object, users can configure the TalentPool Generic Object to behave as they wish. For example, they can:
- Change field labels
- Add field label translations
- Add custom fields
- Assign rules
Additionally, the concept means that you can create multiple Talent Pool records to represent the different Talent Pools that employees use within the SuccessFactors systems, and assign employees to multiple Talent Pools as needed.
Features and Functionality of the MDF-Based Talent Pools
The MDF-based Talent Pools enable you to:
- Create Talent Pools
- Modify details of existing Talent Pools
- Add members to Talent Pools
- Change assignment details of Talent Pool members
The Talent Pools application is accessed from within the Succession application. Once enabled, Talent Pools appear in the list of menu options, as displayed in Figure 1. Each Talent Pool is displayed on the screen in two columns and displays up to nine photos of members of the Talent Pool. You can view details of each Talent Pool by clicking the Talent Pool. You can also create a new Talent Pool by clicking the Add a Pool hyperlink, or delete a Talent Pool by clicking the X (both in the top-right corner of the screen in Figure 1).

Figure 1
Talent Pools in SuccessFactors
In my example I create a new Talent Pool by clicking Add a Pool on the Talent Pools screen. This opens the New Talent Pool screen (Figure 2).
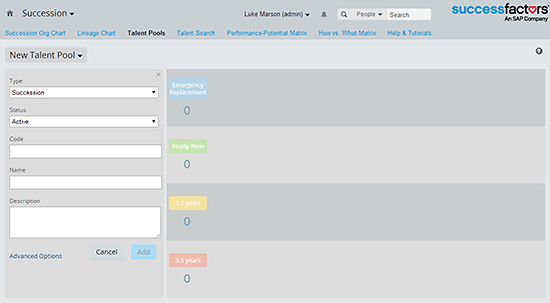
Figure 2
Add a new Talent Pool
The left side of the screen is where the attributes of the Talent Pool are defined. These are:
- Type: This is either Succession or Default
- Status: Whether the Talent Pool is Active or Inactive
- Code: The ID of the Talent Pool
- Name: The name of the Talent Pool
- Description: A description of the Talent Pool
Clicking the Advanced Options hyperlink opens the Advanced Options TalentPool pop-up screen (Figure 3) in which the additional attributes can be defined for the Talent Pool, such as:
- enableReadiness: Whether a readiness value can be assigned to each member assigned to the Talent Group
- effectiveStartDate: The start date of the Talent Pool
- Owner: The person that is responsible for the Talent Pool

Figure 3
Talent Pool Advanced options
Notice that this screen (Figure 3) contains some of the details defined in the New Talent Pool screen (Figure 2). Click the Save button (Figure 3) after your details have been entered.
For my example, I create a Talent Pool for the engineers in the organization. For it, I define the following attributes (Figure 4):
- Type: Succession
- Status: Active
- Code: ENG
- Name: Engineers
- Description: Talent Pool for engineers in the company
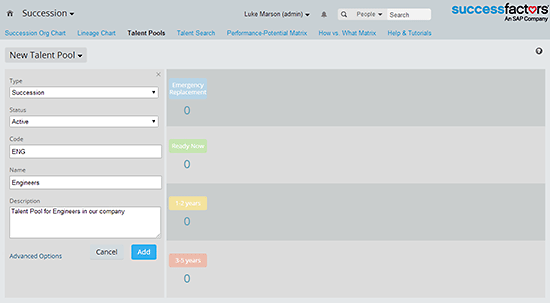
Figure 4
The New Talent Pool screen with the new information
I do not define any additional attributes in Advanced Options. Click the Add button to create the Talent Pool. In the next screen you see your new Talent Pool (Figure 5).

Figure 5
The new Engineers’ Talent Pool
In the screen in Figure 5 new members can be added or attributes can be edited for existing member assignments. You can also switch between other Talent Pools by selecting the button with the name of the Talent Pool on it (in the top left section of the screen—Engineers, in my example). This action opens a drop-down list that displays all the other Talent Pools. There you see the Readiness labels on the left side. These are:
- Emergency Replacement
- Ready Now
- 1–2 years
- 3–5 years
There are no employees nominated in the Talent Pool (e.g., there are no employee names to be added). To add one click Take Action in the top-right corner of Figure 5 to expand the drop-down options. Click Add an Employee from the drop-down list of actions. The Add an Employee search box opens in which you can search for an employee to nominate by typing the employee’s name in the search box. A list of matches for the search criteria appears (Figure 6).
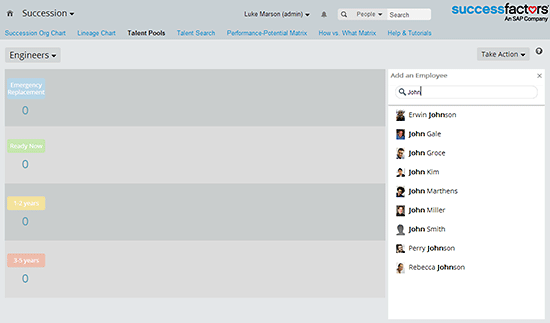
Figure 6
Use the search box to find employees to nominate
John Kim is a talent Engineer within the organization. In this example I select him. This opens up the nomination form (Figure 7).
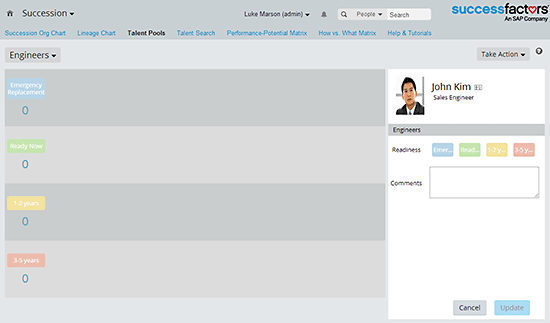
Figure 7
Nomination form for nominating John Kim to the Engineers’ Talent Pool
John is talented, but management has decided he isn’t fully ready to take on a more senior position within the organization. Therefore, select the yellow 1–2 years button and enter a comment (e.g., Requires some development) in the screen in Figure 8.

Figure 8
John Kim’s nominating information details
Click the Update button to submit the nomination. This action adds the new information to his nomination and shows John Kim in the 1–2 years box in the Talent Pool (Figure 9).

Figure 9
The Engineers’ Talent Pool showing John Kim’s status
Let’s repeat this process for another employee, John Miller. I add him as Ready Now (Figure 10).

Figure 10
The Engineers’ Talent Pool showing John Kim and John Miller's statuses
Now that you are finished nominating employees to the Engineers’ Talent Pool, go back to the Talent Pools screen by selecting Talent Pools at the top (Figure 10). The next screen displays the Engineers’ Talent Pool with the two nominated employees (Figure 11).

Figure 11
The Engineers’ Talent Pool showing two members who have been nominated
You can also change nominations for employees who have been nominated in each pool. For example, an individual’s readiness may have changed due to their personal development in the last year. You can change this data by opening a Talent Pool and then clicking the employee’s name. This action opens the same form shown in Figure 8 and, as when nominating employees, the appropriate Readiness is selected. When an employee has more than one Talent Pool nomination, each Talent Pool for which the employee is nominated is displayed in this window (Figure 12).
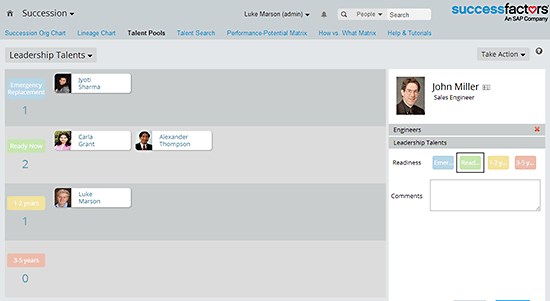
Figure 12
Editing the nomination for John Miller
Mapping Talent Pools to Job Roles
You can map Job Roles—both legacy Job Roles and Job Roles created with the Job Profile builder—to Talent Pools so that Talent Pool assignments can be displayed on the Succession Org Chart. This chart also indicates that the Talent Pool is a source of successors for the mapped Job Role.
Mapping Talent Pools to Job Roles Created with the Job Profile Builder
In OneAdmin, go to Manage Job Profile Content in Company Settings. This action opens the Manage Job Profile Content screen (Figure 13.)
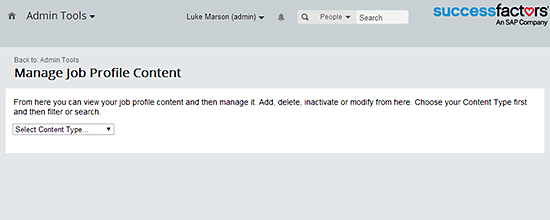
Figure 13
View the job profile and manage it
In the drop-down menu, select the Set Up Families and Roles option. This option displays all the job families set up in the system. Click the Roles tab to display all the job roles set up in the system (Figure 14.)
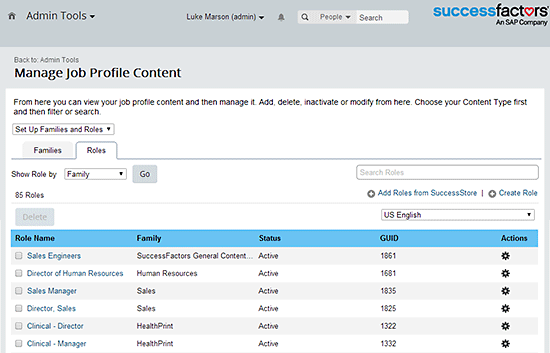
Figure 14
Display the job roles in the Manage Job Profile Content
Select the desired Job Role from the list by clicking the job title in the Role Name column. In my example I select the Sales Engineers job role. This action takes you to the Edit: Role page (Figure 15). On the Edit: Role page click the Mapped Talent Pools tab and then click the Map Talent Pools button. A pop-up window appears that lists all the Talent Pools to which the user has access (Figure 16).

Figure 15
Mapped Talent Pools tab for the Sales Engineers’ job role

Figure 16
The If Portlet showing Works Council Member is equal to Part Time
Select the Engineers Talent Pool by clicking the Engineers check box. After you click the Save button, the system returns you to the Edit: Role screen in which the new mapping is displayed (Figure 17). Click the Save Role button to save the new mapping.

Figure 16
Mapping a Talent Pool to the Sales Engineers’ job role
The next step is to test the new mapping. Navigate to the Succession Org Chart in the Succession module (via the main navigation menu). In the Succession Org Chart search for a position that has the Sales Engineer Job Code assigned to it (since the Sales Engineer Job Code is assigned to the Sales Engineer Job Role). In Figure 18, the Engineers’ Talent Pool is shown at the bottom of the Sales Engineer position box as a hyperlink (Engineers) with the number of talents in the Talent Pool listed above it. Select the Engineers hyperlink to go to the Engineers Talent Pool.
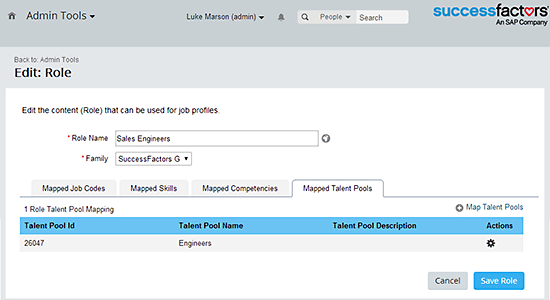
Figure 17
The Sales Engineers’ job role showing the new mapping
Next, I show how to map legacy Job Roles.
Mapping Talent Pools to Legacy Job Roles
In OneAdmin, go to Manage Job Roles in Company Settings (not shown). This action opens the Families & Roles screen in which the job families are displayed (Figure 19).
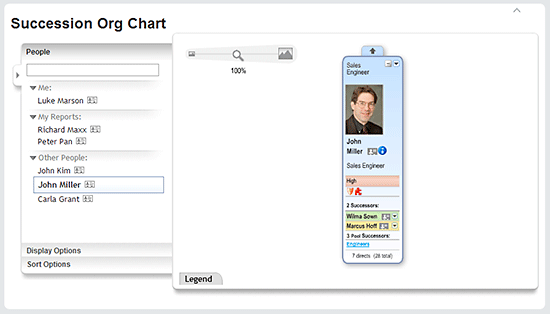
Figure 18
The Succession Org Chart showing the Engineers’ Talent Pool on the Sales Engineer position
Select the desired job family from the list. In my example I select the check box for the Engineers’ job link under the Family column (Figure 19), which opens the job family screen (Figure 20). Here you see all the job roles in the job family (e.g., Mechanical Engineers and Sales Engineers).
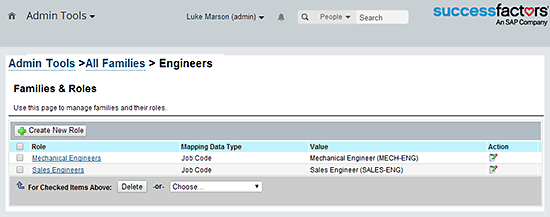
Figure 20
All the job roles in the Engineers’ job family
In my example I want to edit the Sales Engineers job Role. In the Action column, select the edit icon (pencil and paper) next to the desired job Role to open the Edit pop-up window for the Sales Engineers’ job (Figure 21).
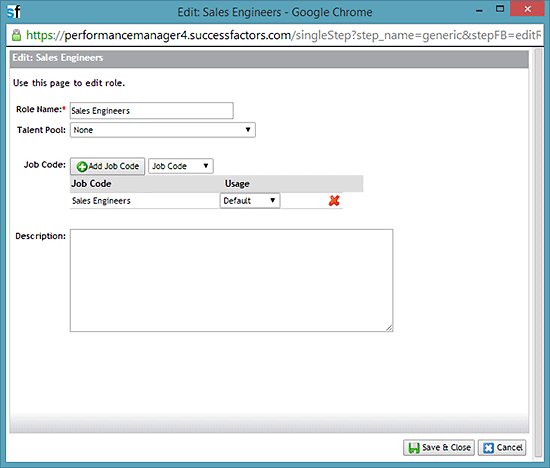
Figure 21
Edit the Sales Engineers’ job role
From the Talent Pool drop-down menu select the Engineers Talent Pool. Click the Save & Close button at the bottom of the window to save the new mapping. This new mapping can now be tested in the same way as testing was done for the job roles created with the Job Profile Builder.
Note
Only one Talent Pool can be selected for a legacy job role. However, the same Talent Pool can be used with more than one job role. The Talent Pool functionality supports job roles mapped to only the Job Code field.
Use Cases for Talent Pools
Talent Pools provide a number of use cases for businesses to track talent across the organization. Talent Pools are flexible and can be used as and how the organization requires. In addition, employees can be members of multiple Talent Pools and thus can be tracked according to the different disciplines and skillsets that they have.
Although succession plans track candidates who could be considered successors for the position, often organizations need to track successors or potential successors in different ways. For example, companies may use Talent Pools to track:
- High-potential talents
- High-performing talents
- Job function-specific talents or employees (e.g., engineers, management candidates, or forklift operators)
- High-risk employees (e.g., at high risk of loss or have a high impact of loss)
- Strategic pipeline (e.g., executive potentials or leadership talents)
- Employee types
- Upcoming retirees
- Employees who may not fit into a conventional workplace (e.g., they cannot work a 40-hour week or need to telecommute)
- Other individuals that have specific value to your organization
Once Talent Pools are defined and managed they can be used for a number of different activities. For example:
- Sourcing for succession plans
- Sourcing for vacant or new positions
- Assigning to training (e.g., for potential managers and for health and safety purposes)
- Developing long-term career and development plans
- Grooming individuals outside of succession pools
Both these lists are not comprehensive, and they also do not provide a full range of possibilities that Talent Pools offer. However, they do provide a broad overview of how these Talent Pools can be used.
Enabling and Configuring the New Talent Pools Functionality
There are four steps required to enable the MDF-based Talent Pools functionality:
- Enable MDF-based Talent Pools in Provisioning
- Enable Permissioning of the TalentPool Generic Object
- Localize Any TalentPool Generic Object Fields
- Permission the TalentPool Generic Object for the Appropriate Users
Enable MDF-Based Talent Pools in Provisioning
Before the new MDF-based Talent Pools functionality in SuccessFactors can be accessed, it needs to be enabled in Provisioning. In Company Settings select the two settings shown in Figure 22, and click the Save button (not shown) to enable these features.

Figure 22
Select these Provisioning settings to enable the MDF-based Talent Pools
Enable Permissioning of the TalentPool Generic Object
Once the MDF-based Talent Pools have been enabled in Provisioning, you need to enable permissioning in the TalentPool Generic Object. This means that the object can be permissioned to Permission Roles in the Role-Based Permissions framework.
Note
To perform this task, administrators must have permission to access the MDF.
In OneAdmin, navigate to Configure Object Definitions in the Company Settings menu. In the Search drop-down menu select Object Definition and in the drop-down next to it select the TalentPool Generic Object (Figure 23).

Figure 23
Select the TalentPool Generic Object
This displays the object definition for the TalentPool Generic Object (Figure 24).

Figure 24
The object definition screen for the TalentPool Generic Object
Scroll down to the Security heading in the Name column, under which nothing should be defined. If this is the case, then this part of the screen should look like the one shown in Figure 25.

Figure 25
The default definitions for the TalentPool Generic Object
If the security definition is not defined, then scroll to the top of the Object Definition screen (Figure 24), select the Take Action hyperlink, and click the Make Correction button (not shown). This action opens the object definition for editing (Figure 26).
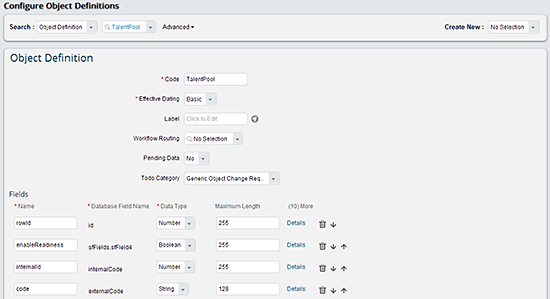
Figure 26
Edit the definition for the TalentPool Generic Object
Scroll down to the Security heading (Figure 27).

Figure 27
The Security heading on the edit Object Definition screen
Change the values to:
- Secured: Yes
- Permission Category: Miscellaneous Permissions
Scroll down to the bottom of the screen and click the Save button (not shown) to save the changes and return to the Object Definition screen for the TalentPool Generic Object. If you scroll down to the Security heading, it should look like the screen shown in Figure 28.

Figure 28
The configured Security definition for the TalentPool Generic Object
The object has now been configured so that permissioning is enabled.
If the Security definition is already defined—as seen in Figure 28—then the TalentPool Generic Object already has permissioning enabled and you are ready to localize the TalentPool Generic Object fields.
Localize Any TalentPool Generic Object Fields
Sometimes the field labels of the TalentPool Generic Object may need to be changed or a local language added, depending on user requirements. For example, a company may need to translate the fields into the language of a subsidiary that is not provided by the standard system. These revisions are made in the same way that any field labels are changed or additional language translations are added to field labels. Although I do not cover these activities in this article, refer to my SAP Experts article, “Creating Metadata Framework Objects in SuccessFactors Employee Central,” for details on performing these activities for Generic Objects.
Permission the TalentPool Generic Object for the Appropriate Users
Once the object definition for the TalentPool Generic Object has been configured, you need to add to the Permission Roles of the users who have access to the MDF-based Talent Pools functionality. As defined in the previous steps, the TalentPool Generic Object is located in the Miscellaneous Permissions group. Individual Talent Pools can be assigned to different Permission Roles by restricting the target population for the TalentPool Generic Object to each Talent Pool required by the individuals who are assigned the Permission Role. More detail about Role-Based Permissions is beyond the scope of his article.
Luke Marson
Luke Marson is co-founder, CEO Americas, and Principal Architect for Employee Central at iXerv, a global SAP SuccessFactors consulting partner. In addition to his duties as CEO, he is an active architect and subject-matter expert on SAP SuccessFactors. Luke is a Certified Professional in SuccessFactors Employee Central who has worked with over 15 customers, and is the co-author of the following books: SuccessFactors with SAP ERP HCM and SAP SuccessFactors Employee Central. He is also an author, blogger, speaker, strategist, and widely recognized expert in SAP SuccessFactors and SAP ERP HCM. Luke can be found on Twitter at @lukemarson.
You may contact the author at .
If you have comments about this article or publication, or would like to submit an article idea, please contact the editor.