by Vivek Madhav, Principal Consultant, Infosys
Analyzing data presented in a dashboard helps enhance performance and pinpoint the opportunities and problem areas in a business. When data analysis is combined with qualitative comments, it can play a crucial role in ideation and strategy formulation. Learn about a custom solution that helps business analysts input their comments and feedback in the dashboard.
Key Concept
A Web services-based function module can be used to connect to SAP BusinessObjects Dashboards. The function module performs the business logic of handling comments (e.g., read or update comments).
No standard mechanism can provide the comment functionality to SAP BusinessObjects Dashboards 4.x (formerly known as Xcelsius). We developed a custom mechanism that any business area can implement for BusinessObjects Dashboards 4.x or older versions of Xcelsius.
We carried out this solution for the research division of a multinational company. This functionality was implemented in the company’s finance dashboard, which provided a snapshot of actual versus plan financial data. The solution gives users the flexibility to provide their comments on the deviation between plan and actual data, among other things. Moreover, the comments are visible to other peers and superiors based on authorization, and they can be stored permanently in the database.
Important considerations for this dashboard commenting feature include the following:
- Commenting should be implemented at the granular level (e.g., a combination of profit center level, plant, period, or version). We recommend performing due diligence with the business before choosing the granularity.
- User IDs should be stored along with comments to maintain an audit trail.
- It is possible to enable entry of multiple comments for different areas of analysis (e.g., income, expense, headcount) in the same comment box. Consider this option as per business requirements.
- Dashboard layout is important for usability and user experience. Based on our experience, placing the comment box on the upper right side of a dashboard provides better visibility and improves user experience.
We demonstrate a step-by-step approach covering the scenarios for read and update comments.
Note
After understanding the concept of using a Web-services-based function module in a dashboard connection, you can explore more than the commenting functionality.
Step 1. Create a Table
Create a table using transaction code SE11 in SAP NetWeaver BW. While creating the table, ensure that the table contains all the required columns that need to store data from the dashboard and display data on the dashboard. Typically, there is a column for comment text and all the fields for which comments are to be saved (e.g., profit center, plant, fiscal period). The granularity of commenting is decided based on the key fields of this table.
Step 2. Create a Function Module
Use transaction code SE37 in SAP NetWeaver BW to create a function module (
Figure 1) with settings for the name of the function module and the processing type. For our example, follow these steps:
- Enter the name of the function module
- Select the Remote-Enabled Module radio button as the Processing Type to enable this feature for the Web service
- Click the save and activate
 icons
icons
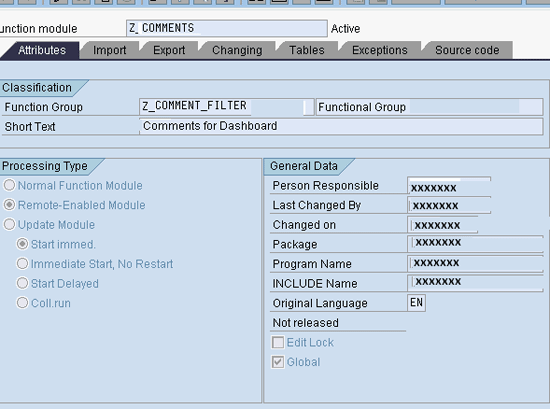
Figure 1
The attributes of a function module
Next, click the Import tab (
Figure 2) to add import parameters. Import parameters refer to values that are drawn as input from the dashboard. These parameters, which typically consist of all the columns of the table created in Step 1, are passed to the table for read, update, and insert. Enter input parameters under the Parameter Name column, enter the corresponding data type in the Associated Type, and check off the boxes for Options (shown as the Opti… column) and Pass Value (shown as the Pas… column) in
Figure 2.
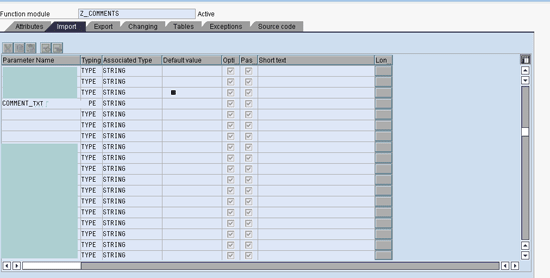
Figure 2
Import parameters for the function module
Export parameters are defined in the Export tab (
Figure 3). These parameters refer to values that are to be displayed on the dashboard (e.g., past comments from a table). Enter the output parameters under the Parameter Name column, enter the corresponding data type in the Associated Type column, and check off the option for Pass Value (shown as the Pass Val… column) in
Figure 3.

Figure 3
Export parameters for the function module
Source Code for Comments
Go to the Source code tab (
Figure 4) to write ABAP code for the following actions:
- Read Comments
- Update / Insert Comments
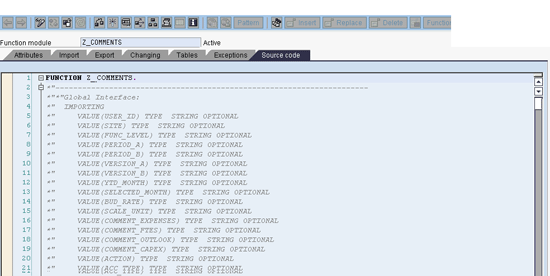
Figure 4
Enter the source code for the function module
The scalable ABAP code can be extended according to your requirements. We provide a pseudo-code that provides you with an example of how to use ABAP to carry out the comment functionality (
Figure 5).
Click here to download the pseudo-code.
The pseudo code for the function module considers only two cases:
- When the action is to read the comments
- When the action is to update and insert comments
The relevance of focusing on these two cases is that users almost always perform these activities for comments. In other words, they either read comments or update and insert comments.

Figure 5
Pseudo code for comment functions
Step 3. Create a Web Service from the Function Module
The following steps show how to create a Web-service-based function module that you can access through SAP BusinessObjects Dashboards connections. These are standard steps to create a Web service from a function module.
Use transaction SE37 in SAP NetWeaver BW. Open the function module for which the Web service is to be created. Follow menu path Utilities > More Utilities > Create Web Service > From the Function Module (
Figure 6).

Figure 6
The navigation path to create a Web service
When the Web services wizard window opens, enter values in the fields for Service Definition and Kurzbeschreibung (German for “short description”) as shown in
Figure 7. Click the Continue button.
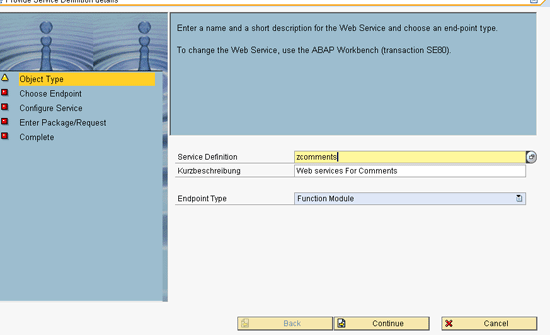
Figure 7
Parameters for creating a Web service
On the next screen, type in the name of the function module or use the search feature to search for the function module (
Figure 8). Check the box for Mapping der Namen (“mapping the names”). Click the Continue button.
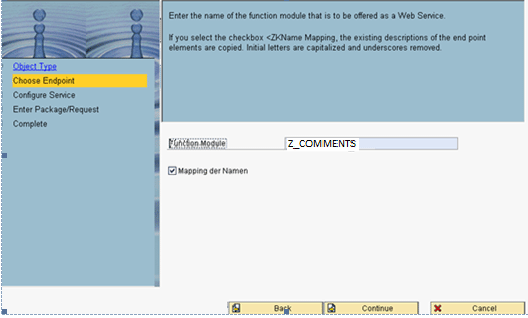
Figure 8
Mapping with the function module
Now select PRF_DT_IF_SEC_LOW from the drop-down menu in the Profile field (
Figure 9) under the SOAP Application tab. Click the Continue button. SOAP is an essential component for configuring a Web service. The SOAP application details in
Figure 9 are standard entries required for configuration. After completing this step, you have configured the Web service.
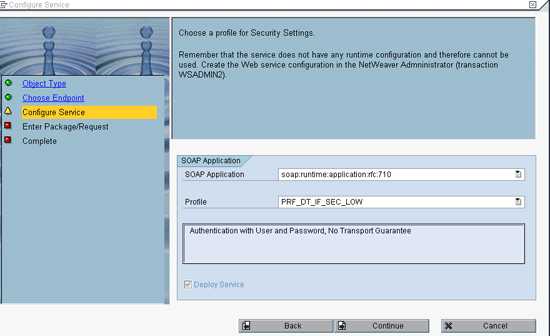
Figure 9
SOAP application parameters
To transport the Web Service across the system landscape, provide the transport package and the transport request as applicable to your system. In
Figure 10, we use $TMP for the transport package, which is a standard package for local objects. Complete the Transport Request field as noted by your system specifications, which is information the development team knows. Click the Continue button.

Figure 10
Transport package and transport request parameters
Click the Complete button on the next screen. You have created a Web service for function module ZCOMMENTS_F.
Step 4. Bind the Web Service
To bind the Web service, use the Service-Oriented Architecture (SOA) Management tool. Use transaction SOAMANAGER in SAP NetWeaver BW. The SOA Management screen opens in the Web browser. Under the Business Administration tab, click the Web Service Administration link (
Figure 11).

Figure 11
Web Service Administration configurations in the SOA Management tool
In the Web Service Administration screen, there is a list of services available. Choose a service in the Search by box (
Figure 12). Click the Apply Selection button at the bottom.
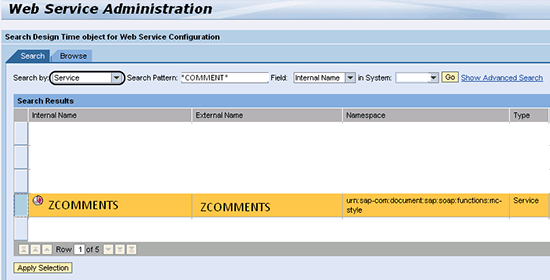
Figure 12
Choose a service in Web Service Administration
In the next screen, under the Configurations tab, click the Create Service button (
Figure 13).
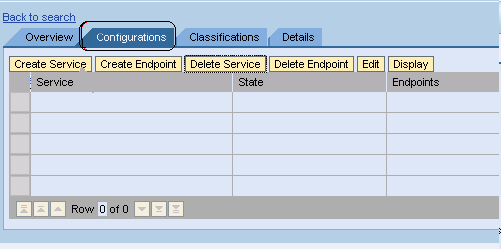
Figure 13
Configure the Web service
As shown in
Figure 14, enter the following values into the fields:
- New Service Name: ZCOMMENTS
- Description: Web Service for Comments
- New Binding Name: ZCOMMENTS
After providing these details, click the Apply Settings button.
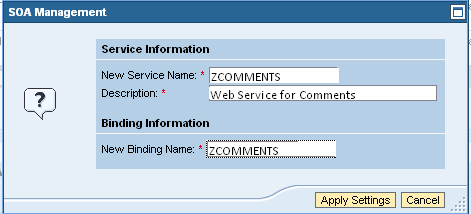
Figure 14
Parameters for configuration
The system returns you to the prior screen. Under the Overview tab, the Web service name is visible (
Figure 15). Click the Open WSDL document for selected binding link, which opens the Web Services Description Language (WSDL) document.
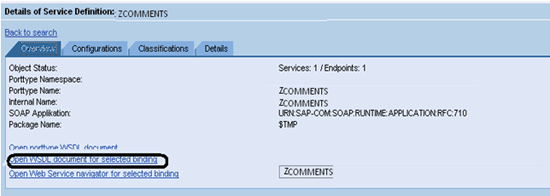
Figure 15
WSDL binding screen
The WSDL document page provides the WSDL binding link in the address bar (
Figure 16). Copy this link. You use it in the next step as input to the SAP BusinessObjects Dashboards Web services connection.
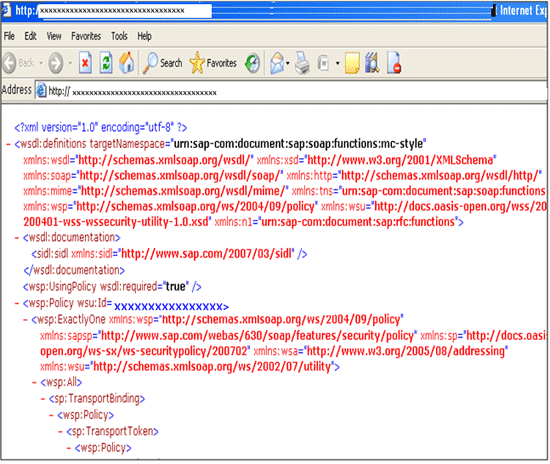
Figure 16
A WSDL link in the Address bar
Step 5. Establish a Connection between the Dashboard and the Web Service
As a prerequisite to this step, create a dashboard UI using SAP BusinessObjects Dashboards (formerly Xcelsius), which is a typical activity for dashboard designers. You can create the UI and map its components as shown in
Figure 17.
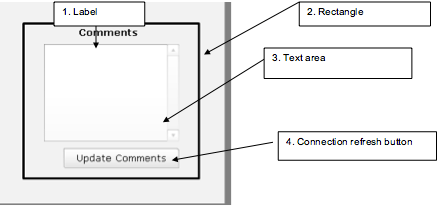
Figure 17
Dashboard UI components
Select the text area component, right-click it, and then choose Properties. Map cell D3 to the Link to Cell option. This mapping ensures that comments are linked to D3 in SAP BusinessObjects Dashboards as shown in
Figure 18.
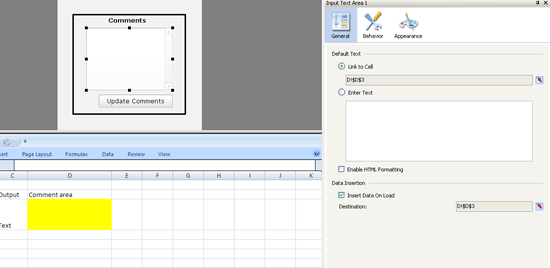
Figure 18
The dashboard text area
Right-click the Connection Refresh button, select Properties, and change the button’s Label field to Update Comments (
Figure 19). Close out of the Properties screen.

Figure 19
Rename the Connection Refresh button to Update Comments
Connections
Now you create two Web service connections: Read Comments and Update Comments. The first connection is to read the already stored comment for display on the dashboard, while the latter is to save the comment entered on the dashboard UI by the user.
To create the connection, click the data manager icon

on the menu panel of the Dashboard Design screen. This opens the Data Manager dialog box. Click the Add button and select connection type Web Service Connection (
Figure 20).
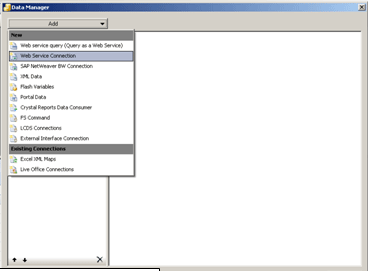
Figure 20
Add connections
Under the Definition tab, rename the first connection as Read Comments (
Figure 21). Similarly, create another connection and rename it as Update Comments.
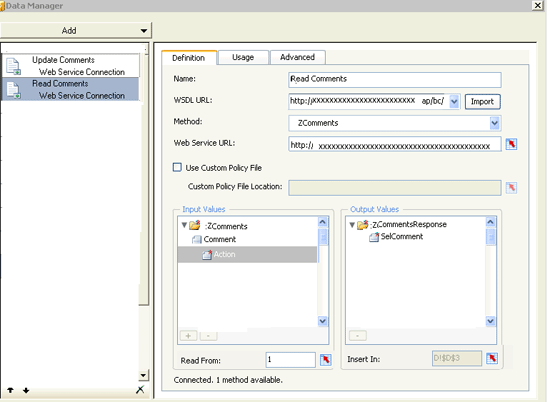
Figure 21
Define the Read Comments connection
Mapping
You must map the Web service connections you just created to the Web service ZComments that you created in step 4. Open the Read Comments connection you created and click the Definition tab. Copy the binding link (Web service URL) from step 4 (
Figure 16), paste it into the WSDL URL field (
Figure 21), and click the Import button.
Note
If the binding link is valid, it populates the Method and Web Service URL fields and the Input Values and Output Values panes as shown in Figure 21.
Subsequently, you need to configure input and output values. These values become the input and output parameters of the function module.
In the Input Values pane in
Figure 21, you must configure the input parameter Action to pass the appropriate value to function module Z_COMMENTS. Remember, the function module (
Figure 4) expects value 1 for read and 2 for update. Hard-code the value of parameter Action to 1 in the Read From field under the Input values pane (
Figure 21).
You do not need to configure the other input parameter Comment because it is not expected as an input parameter by the function module.
In the Output Values pane, map output parameter SelComment to the D3 cell of Sheet D as shown in
Figure 21. Click the Excel mapping

icon at the bottom of the Output Values pane and select cell D3 as shown in
Figure 22. Click OK.
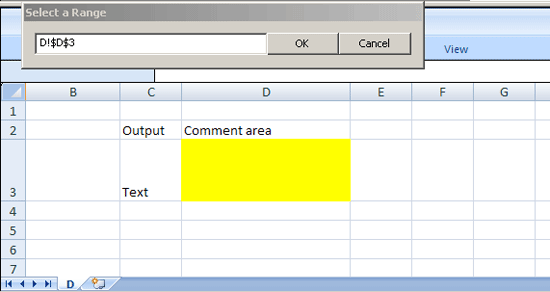
Figure 22
Map the output parameter
After the connection is defined, it is important to specify how and when to use or trigger this connection.
Click the Usage tab and mark the check box for Refresh Before Components Are Loaded (
Figure 23). This option triggers the Read Comments connection every time before a dashboard loads. This ensures a comment already stored is fetched at the time of the dashboard load.
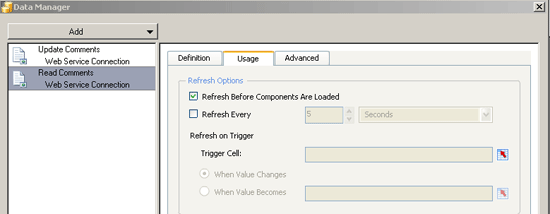
Figure 23
Usage tab fields for the Read Comments connection
Mapping of the Update Connection is similar to that of the Read Connection. However, the parameters for this connection are different.
Open the Update Connection you created earlier and click to the Definition tab. Copy the binding link (Web service URL) from step 4 (
Figure 16), paste it into WSDL URL field, and click the Import button (
Figure 24).

Figure 24
Definition of the Update Comments connection
In the Input Values pane, hard-code the input parameter Action to 2 as expected by function module Z_Comments (
Figure 24). Then map the input parameter Comment to cell D3 of Sheet D (
Figure 25). This action passes the comment entered by the user on the dashboard to the function module for saving into the database table. You do not need to map the output value because it is not relevant for this connection.
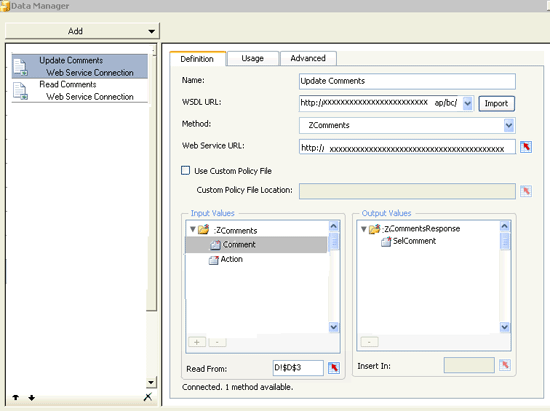
Figure 25
Map the input parameter Comment to cell D3
The next step is to trigger this connection, which should occur when someone clicks the Update Comments button on the dashboard. To configure this trigger, close the Data Manager window to return to the SAP BusinessObjects Dashboard Design screen. Select the Update Comments button, right-click it, and choose Properties (
Figure 26).

Figure 26
Properties of the Update Comments button
Mark the check box for Update Comments, which selects the connection for the Update Comments button (
Figure 27).

Figure 27
Select the connection for the button
This completes the implementation of commenting functionality in the dashboard. Finally, save and publish the dashboard.
Step 6. Use Comments in the Dashboard
After you publish the dashboard, the system draws all input variables from the Excel sheet and the Read Comments Web service launches. If there are existing comments for the current user or current selection, the Read Comments Web service displays the output parameters in the form of existing comments.
To write comments, users can edit the text boxes and click the Updates Comments button to launch the Web service for Update Comments (
Figure 28). The dashboard stores all comments into the table for future reference.
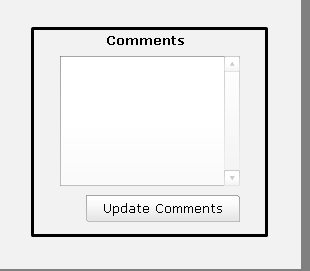
Figure 28
A Comments box on the dashboard
Vinay Gupta
Vinay Gupta is a technical architect at Infosys with nine years of experience in SAP NetWeaver BW. He specializes in data modeling, reporting, and performance tuning for SAP Net Weaver BW and SAP BusinessObjects.
If you would like to submit an article idea, please contact the BI editor.
You may contact the author at
scott.wallask@wispubs.com.
If you have comments about this article or publication, or would like to submit an article idea, please contact the
editor.
Neha Lunkad Lodha
Neha Lunkad Lodha is the Team Lead for SAP BusinessObjects and SAP NetWeaver BW at Infosys, in New Jersey. She specializes in SAP NetWeaver BW and reporting using SAP BusinessObjects toolsets and BEx Query.
You may contact the author at
nehalunkad87@gmail.com.
If you have comments about this article or publication, or would like to submit an article idea, please contact the
editor.
Vivek Madhav
Vivek Madhav is a principal consultant at Infosys with more than 11 years of experience in IT. He specializes in SAP NetWeaver BW, SAP BusinessObjects, and SAP Enterprise Performance Management. He currently focuses on providing consulting and solutions in the space of planning and analytics in the finance area. He has also worked on SAP Planning and Consolidation (BPC) and Profitability and Cost Management (PCM).
If you would like to submit an article idea, please contact the BI editor.
You may contact the author at
scott.wallask@wispubs.com.
If you have comments about this article or publication, or would like to submit an article idea, please contact the
editor.