Learn the steps to call Web services in SAP Data Services and use them in Data Services jobs. This how-to guide provides configuration steps for connecting with the Web services datastore. It includes configuration advice about which datastore type to use and how to configure it. Some real-life scenarios show where this technique can be used to complete complex tasks.
Key Concept
SAP Data Services integrates with multiple types of databases, including third-party applications, SAP ERP Central Component (SAP ECC), SAP NetWeaver BW, JD Edwards, and Web services. SAP Web services datastore provides you with the functionality to call programs hosted on external servers. It represents a connection from Data Services to an external Web service-based data source.
Before we explain the steps to set up a Web services datastore and consume it, let’s understand when its use is essential. Typically, in a data conversion or migration or a warehouse extraction, transformation, and loading (ETL) program, a few processes such as currency conversion or job scheduling are continuous or recurring. However, currency conversion and conditional job scheduling are not integrated with SAP Data Services.
Therefore, you need to connect with external programs to perform both tasks. You can use Data Services with services from many providers to perform currency conversion on the fly. Another example of a useful Web service is a weather map. Perishable goods, travel, logistics, and airline companies need weather information to be stored in their databases to manage and track the goods or the fleets efficiently.
We use a business scenario and step-by-step instructions to explain all the configuration points to enable consumption of Web services. We demonstrate the basics for configuring the Web services datastore and then consuming that Web service in a batch job.
Prerequisites
The following are required for this process:
- Access to SAP Data Services 12.1 or higher (installed and configured).
- An address and Web services Description Library (WSDL) to consume.
- Prior knowledge of XML and Nested Relational Data Model (NRDM) is helpful.
Web services are the most common method for interaction between two applications. These applications or programs are hosted on Web servers and exposed to the outer world through Simple Object Access Protocol (SOAP) messages communicating via HTTP. SAP Data Services provide you with functionality to consume external Web services in the Data Services jobs.
The scheduling capabilities of SAP Data Services are limited, but we expect upcoming releases to have enhanced functionalities. For example, now jobs can be scheduled individually, but if there are multiple jobs dependent on each other and conditional execution is required, there is no built-in mechanism in the Data Services scheduler. In such cases a workaround is to expose the Data Services batch jobs as Web services, set up another job to consume these exposed Web services, and execute the required jobs depending on specific criteria.
Note
Consuming a Web service can be a useful way to implement some business requirements, but this comes with a cost of performance because of the nested XML schema processing and the SOAP call for the Web service over the network. The network speed also affects the performance of the dataflow. Therefore, we recommend that you adapt this approach only if you have a limited number of records to process.
Step-by-Step Guide
In our example, we consume an external currency conversion Web service, which takes two parameters (currency codes and the conversion rate of the day). The basic steps are as follows:
- Configure the Web services datastore.
- Browse and import metadata from the Web service.
- Call the Web service methods from a batch job.
First of all, to connect with a Web service, you need its address. In this example we are using an external currency conversion Web service, which is hosted at https://www.webservicex.net/CurrencyConvertor.asmx?WSDL. This free Web service provides the daily currency conversion rate.
Configure the Web Services Datastore
The Web services datastore represents a connection from Data Services to an external Web service-based data source. You need to define at least one Web services datastore with which data can be exchanged. The user must have privileges to access the Web service and call the available methods.
From your Windows desktop follow menu path Start > All Programs > SAP BusinessObjects Data Services > Data Services Designer. Once the log-in window pops up, enter your credentials and log in into the Data Services Designer. Next, you define a Web services datastore. Click Project > New > Datastore.
In the screen that appears enter the name of the datastore. In our example the datastore is created with the name DS_WebService (Figure 1). The name can contain letters or numbers or can be underscored “_”. Special characters and spaces are not allowed. Select the datastore type from the available options in the drop-down menu. In our example we chose Web Service from the drop-down list.
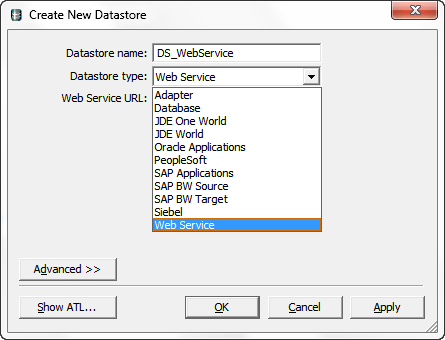
Figure 1
Select a datstore type
The screen now includes a new field, Web Service URL. Enter the Web service URL to be used. In our example the Web service URL is https://www.webservicex.net/CurrencyConvertor.asmx?WSDL (Figure 2). The Web service URL accepts the connection and returns the WSDL.
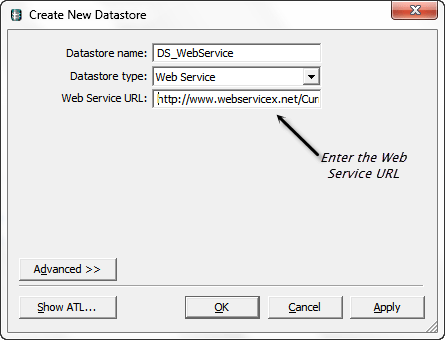
Figure 2
Datastore configuration
If the Web service requires log-in credentials, click the Advanced button which opens up options below the button. Enter the log-in details in the user name and password fields. Click the Apply button. If the connection is successful, click the OK button. Now you see the DS_WebService datastore under the Datastore tab of your local repository (Figure 3).
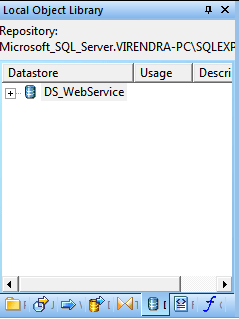
Figure 3
The Local Object Library
Browse and Import Metadata from the Web Service
The Data Services application stores metadata in the datastore. After connecting with the Web service, you import the available functions in Data Services. Go to the Datastore tab of the Local Object Library and select the Web service datastore you just created (Figure 3). Right-click the datastore and select the Open button. (Alternatively you can double-click the datastore name.)
Now open the metadata browsing window on the right side of the Data Services Designer interface, which is known as a workspace (Figure 4). Here you have two options:
- External Metadata: Display metadata from an external WSDL.
- Repository Metadata: Display metadata imported into the repository.
Select the External Metadata radio button shown in Figure 4 and you see a list of all the available operations of the Web services. In our example there is only one operation available (CurrencyConvertorSoap). Expand the CurrencyConvertorSoap operation and select the function ConversionRate. Right-click the function name and click the Import button.

Figure 4
Import the Web service function
This action imports the function definition in the datastore under the Functions node as shown in Figure 5.
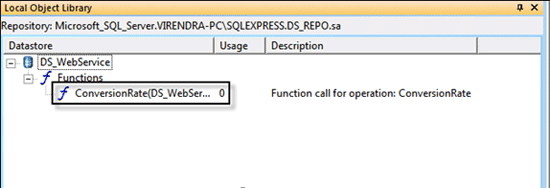
Figure 5
The Web service function under the DS_WebService datastore
Note
Be aware of the Request and Response schemas of the Web service function. Both are used while calling the function and handling the response back.
To view the function schema, right-click the function name (Figure 5) and select the Open button, or double-click the function name. This action opens the function schema in the workspace (Figure 6).
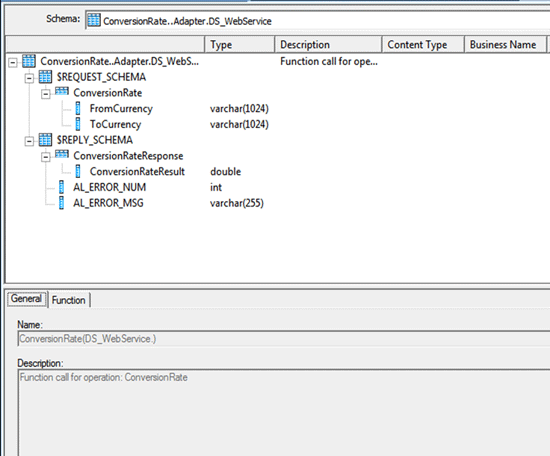
Figure 6
ConversionRate function: Request and Response schemas
Figure 6 shows the Request and Response/Reply schemas. Both are Nested Relational Data Modeling (NRDM) schemas. An NRDM schema is used to represent the hierarchical relationship of relational data in XML format. While calling the function ConversionRate, you have to prepare the input in the NRDM format. You also need to flatten the response so that you can process it further in Data Services. There are two additional output columns in the Reply schema:
- AL_ERROR_NUM: The error number in case of call failure.
- AL_ERROR_MSG: The error description.
Both the columns are useful when you are debugging runtime errors.
Call the Web Service Methods from a Batch Job
The next task is to call the CurrencyConversion function in a batch job and retrieve the results. Go to the Data Services Designer and create a new project. Follow menu path Project > New > Project. Enter the project name and click the Create button (Figure 7).
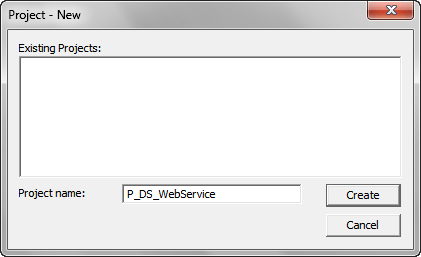
Figure 7
Create a new project
In the next screen (not shown) right-click the project name in the Project Area and click the New Batch Job button. That creates a batch job, in our example J_DS_WebService, which is shown in Figure 8. Figure 8 shows the creation of data flow, which is the next step after batch job creation.
Now you need to rename the job to an appropriate name. Select the dataflow icon from the tool pallet and click the workspace. This action creates a new dataflow with a default name. Rename it DF_DS_WebService (Figure 8).
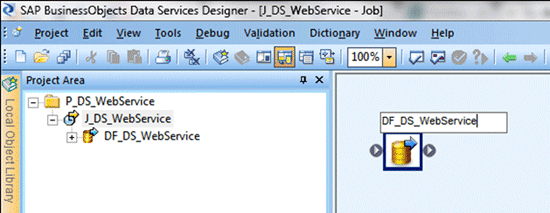
Figure 8
Create a new dataflow
Now double-click the name of the dataflow. In our example there is a source table named CURRENCY_CONVERSION under Datastore DS_Source. This table contains From Currency and To Currency.
Expand the Datastore DS_SOURCE and drag the table CURRENCY_CONVERSION into the dataflow workspace on the right side. (This is the space where users design their jobs, dataflows, or workflows.) A context menu appears (Figure 9). Select the Make Source context menu option. When you drag the table CURRENCY_CONVERSION to the right section of the figure the context menu with Make Source, Make Target, and Cancel appears. This process makes the object as a source (from which data is used for processing) or as a target (to store the processed data).

Figure 9
Add a source table
Go to the Transform tab of the Local Object Library. Expand the Platform node. Select the Row_Generation transform and add it to the dataflow by dragging it to the workspace (Figure 10).

Figure 10
Add the Row Generation transform to the dataflow
Now double-click the the Row_Generation transform. In the screen that appears (Figure 11) leave the configuration of the Row_Generation transform to the initial configuration. You use this Row_Generation transform later in the query to create the NRDM structure, which is used as the Request schema for the Web service function call.
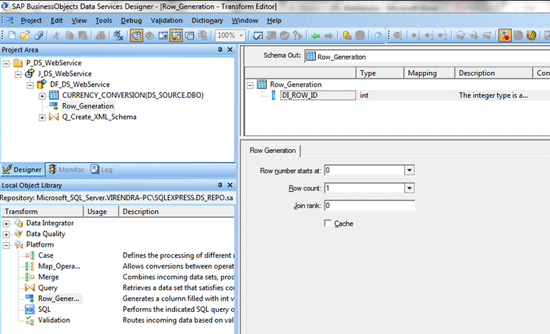
Figure 11
The Row Generation transform
Go back to the Dataflow work space shown in Figure 10 by clicking the dataflow name in the Project Area. Select the query transform icon from the tool pallet and click inside the Dataflow work space. This adds a new query transform in the dataflow. The default name is Query_#, where # is a sequence number assigned automatically by Data Services (e.g., Query_1). Rename it Q_Create_XML_Schema (Figure 12). Connect both the Source table Currency_Conversion and the Row_Generation transform to the Q_Create_XML_Schema. To connect a source table to a transform, click the square on the right edge of the source and drag the cursor to the arrow on the left edge of the transform.
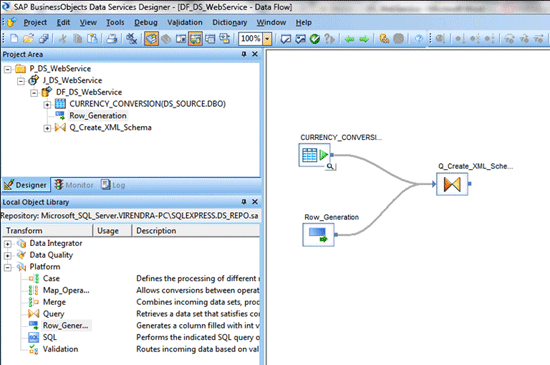
Figure 12
Add a query transform to the dataflow
Now double-click the Q_Create_XML_Schema transform. When you double-click a transform, it opens up in the transform editor in the workspace (Figure 13). Select the columns of the CURRENCY_CONVERSION table from the Schema In area and drag these to the Schema Out area.

Figure 13
Transform Editor: Q_Create_XML_Schema transform
Now click the From tab. You then see both the input sources listed under the From tab. Select the Row_Generation schema. Right-click it and select the Delete button (Figure 14). (Alternatively, you can select the Row_Generation schema and click the delete icon  in the right side to delete the input source.) Row_Generation is removed from Input, as it is required only to create a nested schema. Therefore, for the Parent Output schema Q_Create_XML_Schema, you remove it from input. The subschema Row_Generation is used later. Figure 15 shows the already open query transform editor.

Figure 14
Set up the query transform From tab
Now add a new Output Schema. Right-click in the Schema Out area and select the option New Output Schema.
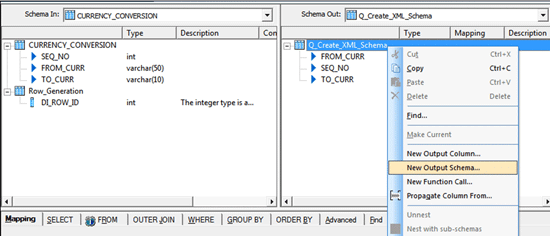
Figure 15
Create a new output schema
This action prompts the system for the schema name as shown in Figure 16. Enter the desired schema name (e.g., Curr_Rate) and click the OK button.

Figure 16
Enter the schema name
In the next screen you see that the new sub-schema named Curr_Rate is disabled (Figure 17). Right-click Curr_Rate and select the Make Current option. This enables the Curr_Rate subschema for the addition of columns under it.

Figure 17
Set up the subschema Curr_Rate as current
Click the From tab. That takes you to Figure 18. Note that the From tab does not display an input source, but you want this source to be listed in this tab as all sources must be listed in the From tab.
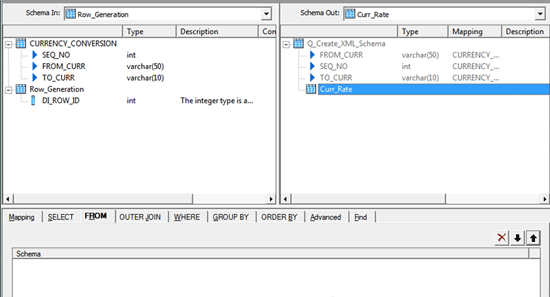
Figure 18
Blank From tab for subschema Curr_Rate
Select the Row_Generation schema from the Schema In and drag it to the From tab (Figure 19). This action adds the Row_Generation transform in the input schema of the From tab in the parameter area.
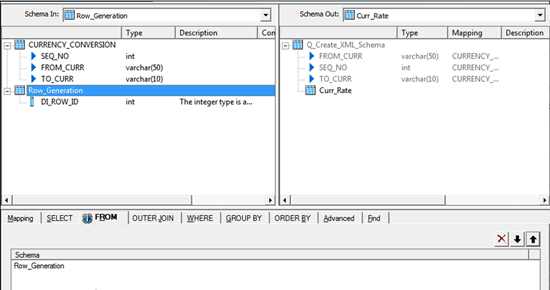
Figure 19
Set Row_Generation as the source for the subschema Cur_Rate
Select FROM_CURR and TO_CURR from the Input Schema on the left side of the Query editor (Figure 20) and drag it under the Curr_Rate subschema in the output Schema on the right side of the query editor.
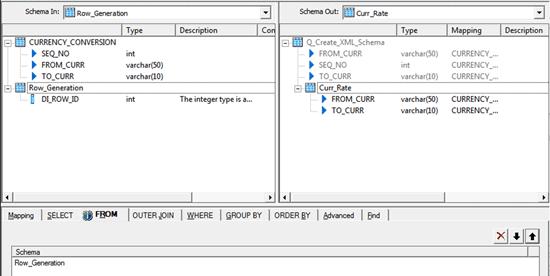
Figure 20
Map the subschema Curr_Rate
Now you have the NRDM structure ready for the input to the Web service function. Go back to the dataflow DF_DS_WebService workspace and add a new query transform next to the Q_Create_XML_Schema. Rename the new Query transform Q_Call_WS_Function. Connect the Q_Create_XML_Schema and Q_Call_WS_Function. (Q_Create_XML_Schema is the input source for the query transform Q_Call_WS_Function. Connect it accordingly). Open the Q_Call_WS_Function transform. Right-click the Schema Out window and select the New Function Call option, as seen in the Figure 21. This takes you to Figure 22.
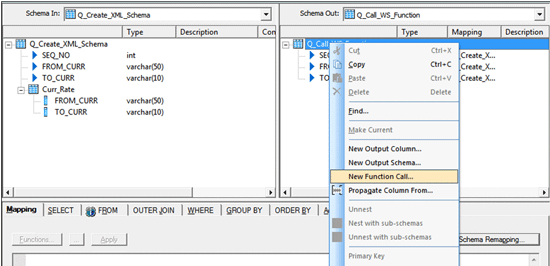
Figure 21
New function call
In the Select Function window select the DS_WebService from the Function Categories (Figure 22). All the available functions under DS_WebService are listed under the Function Name on the right section of this screen. Select the function DS_WebService.ConversionRate and click the Next button.

Figure 22
Select the function category
The next screen shows the input schema of the query and the input schema of the function (Figure 23). Select the ConversionRate in the input schema of the function. This action opens the text box at the bottom of the window. Select Curr_Rate from the input schema of the query. Drag it to the ConversionRate text box. Once this step is done the text box shows the value Q_create_XML_Schema.Curr_rate.
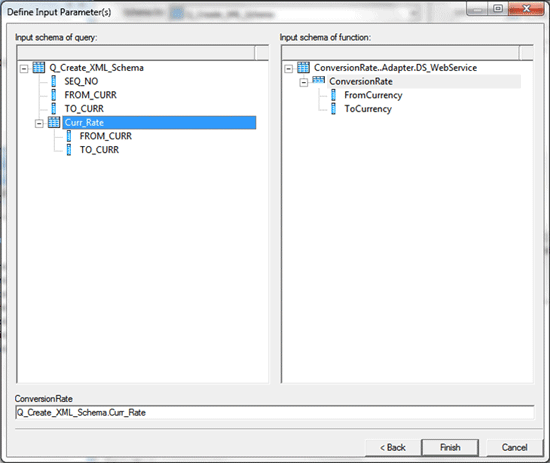
Figure 23
Set up the ConversionRate function call
Click the Finish button. The function DS_WebService.ConversionRate appears in the Schema Out with its Reply Schema (Figure 24).
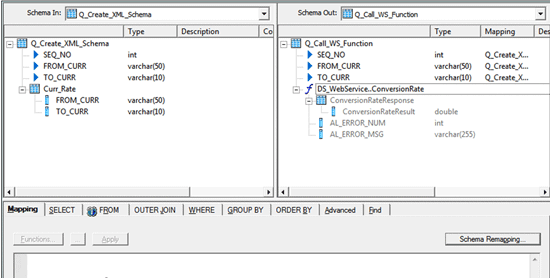
Figure 24
The function call as seen in query transform Q_Call_WS_Function
Because the Response schema is also in NRDM structure, you need to flatten the NRDM. To do so, add a new query transform in the dataflow DF_DS_WebService and rename it Q_UnNest_XML. Connect the Q_Call_WS_Function transform with Q_UnNest_XML transform as the input source.
Open the query transform editor by double-clicking query transform Q_UnNest_XML. Select all the columns from the Schema In and drag these to Schema Out area. This adds all the columns into the Schema Out area. Now right-click the ConversionRateResponse subschema in the Schema Out area and select the Unnest option as shown in the Figure 25.

Figure 25
The unnest function response
In the next screen the icon next to the ConversionRateResponse schema changes and has an arrow on the lower left corner (Figure 26).
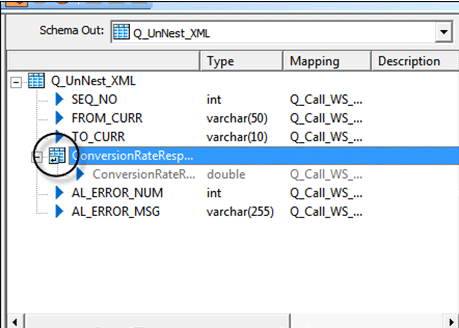
Figure 26
The unnest icon in the ConversionRateResponse schema
Go back to the dataflow DF_DS_WebService workspace. Select the template table icon from the tool pallet and click the DF_DS_WebService dataflow work space. A Create Template pop-up appears (Figure 27). Enter the appropriate template table name. Select the DS_TARGET datastore from the drop-down list available in the In datastore field. Click the OK button. Alternatively, you can choose a different datastore that has a connection configured to your target database.
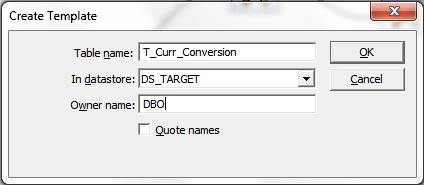
Figure 27
Create a template table
Connect the query transform Q_UnNest_XML with the target template table T_Curr_Conversion by clicking the square on the right edge of the Q_Unnest_XML. Drag the cursor to the arrow on the left edge of the T_CURR_Conversion template table. The final dataflow looks like the diagram in Figure 28.
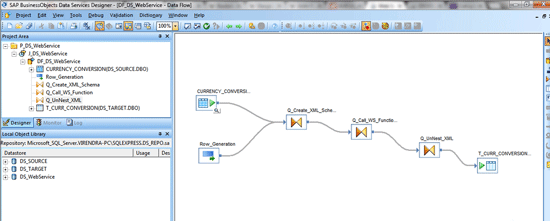
Figure 28
Complete dataflow as seen in the Designer
Save the job by clicking the save all icon in Figure 29, which is the top of Figure 28.

Figure 29
Save the job
After the job is saved successfully perform the job validation. Click the validate all icon shown in the standard tool bar (Figure 30). The Output section should not display any validation errors.

Figure 30
Validate the job
Right-click the job J_DS_WebService in the Project Area and click the Execute… button (Figure 31). (Alternatively, you can open the job by double-clicking it and then click the execute job icon  in the Debug tool bar.)

Figure 31
Execute the job
Select the OK button in the Execution Properties window (Figure 32).

Figure 32
The Execution Properties window
The next screen displays a log indicating that the job was successfully executed (Figure 33).
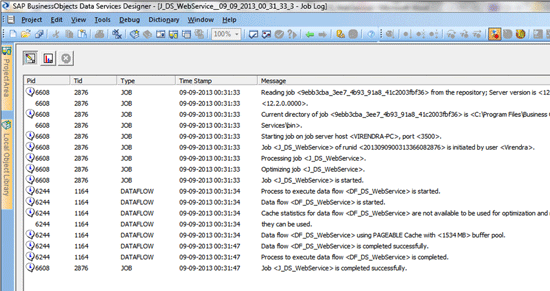
Figure 33
The job trace log
In the Project area double-click the dataflow DF_DS_WebService. In the Work Area right-click the CURRENCY_CONVERSION table and select the View Data option. This opens the Data Preview Pane that shows the data of the CURRENCY_CONVERSION table (Figure 34). Repeat the same steps for the T_CURR_CONVERSION_TARGET table. Figure 34 shows the source data and the target data. The target table T_CURR_CONVERSION shows the conversion rates received from the Web service call. The USD to INR conversion rate was 65.25 on Sept. 9, 2013.

Figure 34
Result data
Sunil Mehta
Sunil Mehta is a solution architect at SAP. He received his master’s degree in Computer Management from Symbiosis in Pune, India. He is a certified SAP FI/CO/BOBJ consultant, working in analytics. During his career he has been associated with Accenture, IBM, Capgemini, and KPMG, and has worked in various roles, including as a consultant solution architect and a project manager.
You may contact the author at Sunil.Mehta@sap.com.
If you have comments about this article or publication, or would like to submit an article idea, please contact the editor.

Virendra K. Soni
Virendra K. Soni is a Certified SAP Data Services Consultant and is currently associated with SAP. He has 6.5 years of industry experience in Data Migration, Data Conversion, and Data ware Housing with the Retail and Self-insurance industries. Prior to SAP he has worked with Capgemini, CSC and HCL Technologies.
You may contact the author at Virendra.kumar.soni@sap.com.
If you have comments about this article or publication, or would like to submit an article idea, please contact the editor.

Biswajit Biswas
Biswajit Biswas works at SAP GD and is a subject matter expert in SAP analytics. He has five years’ experience. He is proficient in the SAP BusinessObjects suite of reporting tools and SAP Data Services. He has been associated with development of Rapid Deployment Solutions for analytics on SAP HANA, focusing on the utilities industry.
You may contact the author at biswajit.biswas@sap.com.
If you have comments about this article or publication, or would like to submit an article idea, please contact the editor.


