Learn how to set up SAP Revenue Accounting and Reporting 1.2 in SAP ERP Central Component (ECC) 6.0 to comply with the new accounting standard regulation IFRS 15. The new regulation was jointly released by two leading accounting standard bodies: the International Accounting Standards Board (IASB) and the Financial Accounting Standards Board (FASB).
Key Concept
SAP Revenue Accounting and Reporting is a free add-on product introduced to help companies that are affected by the IFRS 15 regulation. This new regulation takes effect on January 1, 2018, for public companies and from 2019 for private companies. SAP Revenue Accounting and Reporting offers Web Dynpro applications based on Business Rule Framework Plus (BRFplus) that help organizations meet IFRS 15 regulations.
The International Accounting Standards Board (IASB) is responsible for International Financial Reporting Standards (IFRS) in the following regions:
- The European Union (EU)
- Asia-Pacific and Japan (APJ) and Latin America (LA)
The Financial Accounting Standards Board (FASB) is responsible for US Generally Accepted Accounting Principles (US GAAP) in the US region.
Both these leading accounting standard bodies (FASB and IASB) jointly announced a new accounting standard regulation on May 28, 2014, to have convergence in accounting practices across the regions.
The new accounting standard affects all organizations that are using contracts and will change the practice of their revenue recognition process. For example, as per the new accounting standard IFRS 15, an entity can recognize the revenue when (or as) the entity satisfies a performance obligation by transferring promised goods or services to a customer and the customer obtains the control of the promised goods or services.
In new accounting standard terminology, revenue will be recognized when the performance obligation (POB) is satisfied. This can be near the time of customer invoicing or can depend on other events—for example, a goods issue or proof of delivery. In other words, an entity should not wait to recognize the revenue until the invoice reaches the customer.
Note
Currently, in SAP Revenue Accounting and Reporting 1.2, revenue can be recognized either based on contract acquisition costs, customer invoice, consumption, goods issue, or manual fulfillment. Proof of delivery is not available in standard SAP Revenue Accounting and Reporting at this moment.
I show you how to set up SAP Revenue Accounting and Reporting 1.2 in an SAP S/4HANA Finance environment or in an SAP system with at least SAP ERP Central Component (ECC) 6.0 enhancement package 5, Support Package 10. I also explain how to integrate the SAP sales and distribution (SD) component with SAP Revenue Accounting and Reporting 1.2.
The amount of recognized revenue depends on new attributes, such as multiple element arrangements (MEA), variable considerations, and allocation of transaction price. In summary, the IFRS 15 accounting standard is based on the five-step model shown in
Figure 1.

Figure 1
The five-step model of the IFRS 15 accounting standard
The architecture for SAP Revenue Accounting and Reporting is shown in
Figure 2.
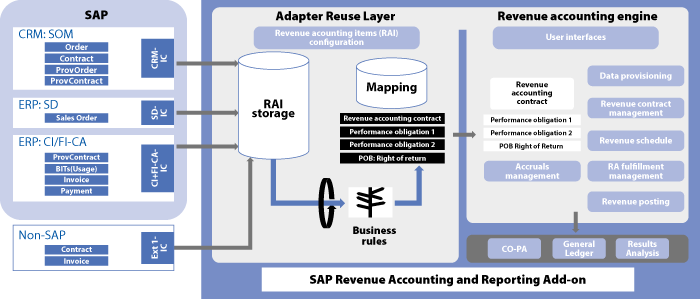
Figure 2
The solution architecture for SAP Revenue Accounting and Reporting
Note
The following list contains definitions of the acronyms and terms in Figure 2:
BITS: Billabile Items
CI: Convergent Invoicing
CO-PA: Profitablity Analysis
FI-CA: Contract Accounts Receivable and Payable
IC: Integration Component
POB: Performance Obligation
ProvContract: Provider Contract
ProvOrder: Provider Order
SD: Sales and Distribution
SOM: Sales Order Management
To configure the solution, carry out the following customization steps in sequence in the SAP ERP Central Component (ECC) 6.0 system:
- Set up user roles and authorizations
- Set up revenue accounting items and revenue accounting item management
- Set up revenue accounting contracts
- Integrate cost object controlling with SAP Revenue Accounting and Reporting
- Set up revenue accounting postings
- Set up the BRFplus application
- Integrate SD with SAP Revenue Accounting and Reporting
Step 1. Set Up User Roles and Authorizations
In the step, you assign the roles shown in
Table 1 to your user.
| Role |
Short role description
|
Detail role description
|
| SAP_SR_FARR_REV_ACCOUNTANT |
Revenue Accountant |
This role provides activities to create, change, and display all details of revenue accounting and to perform reconciliation activities, reporting, and disclosures. |
| SAP_SR_FARR_REV_ADMIN |
Revenue Accounting Administrator |
This role provides activities to view, change, transfer, and process all revenue accounting items (RAIs) without any restrictions on company code. Users with this role will be able to schedule posting runs and check the logs. |
| SAP_SR_FARR_REV_AUDITOR |
Revenue Accounting Auditor |
This transaction role provides evaluations to revenue accounting contracts, revenue accounting reconciliation, and reporting. |
| SAP_SR_FARR_REV_MANAGER_1 |
Revenue Manager |
The Revenue Manager is able to perform Revenue Accountant activities and have additional access to the BRFplus application's decision table. |
| SAP_SR_FARR_REV_RFCUSER_A |
Revenue Accounting RFC User (Authorization) |
You need to create one Remote Function Call (RFC) user and assign the role. This authorization role is assigned to users who allow sending RAIs from different source systems. A user with this role can access received RAIs from sender systems into the RAI monitor (transaction code FARR_RAI_MON). |
Table 1
Role assignments
Note
BRFPlus or BRF+ is a standard transaction code to access a BRFplus application. This transaction code can be executed in the SAP system as BRF+ or BRFplus.
Step 2. Set Up Revenue Accounting Items (RAIs) and RAI Management
RAIs contain all data from operational applications (for example, order items, fulfillment items, and invoice items). These items are transferred from operational applications to SAP Revenue Accounting and Reporting. The structure of RAIs can be configured in SAP Revenue Accounting and Reporting separately for different operational applications. As part of standard SAP Revenue Accounting and Reporting configuration, you first need to activate RAI classes and then generate the interfaces for each RAI class. Currently, the SAP Revenue Accounting and Reporting standard solution provides three RAI classes:
- Order items
- Fulfillment items
- Invoice items
- Activate settings for RAIs
- Activate settings for revenue accounting item management
Repeat the same steps for configuring the remaining two item classes (fulfillment items and invoice items).
Activate Settings for RAIs
SAP standard Revenue Accounting and Reporting retrieves three RAIs from operational applications as described in
Figures 2 and
3.

Figure 3
RAIs and statuses
SAP Revenue Accounting and Reporting provides three RAI classes for an SD-SAP Revenue Accounting and Reporting integration scenario.
Note
There are additional documents available that cover POBs in sales orders, such as the
Financials Expert article “
Maintain Compliance with the IFRS 15 Revenue Standard with SAP Revenue Accounting and Reporting.”
The following list contains definitions of the acronyms and terms in
Figure 3:
BRF+: Business Rule Framework Plus
CI: Convergent Invoicing
FI-CA: Contract Accounts Receivable and Payable
POB: Performance Obligation
RAI: Revenue accounting item
SD: Sales and Distribution
You need to maintain the following revenue accounting item classes:
- Order items (for example: SD01)
- Fulfillment items (for example: SD02)
- Invoice items (for example: SD03)
You can use the above standard RAI classes or create a new revenue accounting item class (for example: YD01 for Order items). To activate a revenue accounting item, follow IMG menu path SAP Customizing Implementation Guide > Financial Accounting (New) > Revenue Accounting > Inbound Processing > Revenue Accounting Items > Maintain Revenue Accounting Item Classes. Click the create icon to create a new RAI class in the screen shown in
Figure 4.

Figure 4
Create an RAI class
In the screen, enter YD01 in the Rev. Acc. Itm Class (revenue accounting item class) field, SD Order Item in the Name field, and 01 in the Class Type field. Click the enter icon to save your settings in the system and activate the configuration.
Repeat the above steps to activate the remaining RAI classes for fulfillment items (YD02-SD Fulfillment Item) and invoice items (YD03-SD Invoice Item). The next screen (
Figure 5) shows all your active RAI classes.

Figure 5
Maintain all RAI classes
In the next step, you generate interfaces for the above RAI classes. These interfaces need to be generated to transfer RAIs and generate data storage (for example, database tables, table structures, function groups, and function modules for these RAIs).
Follow IMG menu path SAP Customizing Implementation Guide > Financial Accounting (New) > Revenue Accounting > Inbound Processing > Revenue Accounting Items > Generate Interfaces for Revenue Accounting Item Classes. This path takes you to the screen shown in
Figure 6.

Figure 6
Generated interfaces for RAI class YD01
Select each RAI class (for example, order item YD01) and click the Generate button.
Repeat the above steps to generate interfaces for the remaining RAI classes for fulfillment items (YD02) and invoice items (YD03). In the next screen you see all your generated interfaces for RAI classes as shown in
Figure 7.

Figure 7
Generated interfaces for all RAI classes
Before proceeding with the next step of SAP Revenue Accounting and Reporting configuration (assign upload rules to revenue accounting item classes), I will provide some information about the Revenue Accounting Item Monitor (RAI Monitor). The RAI Monitor displays the RAIs that flow from operational applications (for example, SD, SAP Customer Relationship Management [CRM], SAP Convergent Invoicing/Financial Contract Accounting [CI/FI-CA], or non-SAP components and are processed into the Adapter Re-use Layer (ARL), which is part of SAP Revenue Accounting and Reporting (Refer back to the diagrams in
Figures 2 and
3).
There are separate configuration steps for CI/FI-CA, CRM, and non-SAP integration with SAP Revenue Accounting and Reporting. I cover the functionality of Revenue Accounting and Reporting Solution and its integration with the SD component only.
The RAI Monitor plays a similar role for all operational applications. It means that it displays all RAIs from CRM, SD, FI-CA, or non-SAP components.
The ARL receives all RAIs (order item RAIs, fulfillment RAIs, and invoice RAIs) and transforms them into revenue accounting contracts and performance obligations. Refer back to
Figure 3.
Execute transaction code FARR_RAI_MON to display the RAI Monitor (
Figure 8).
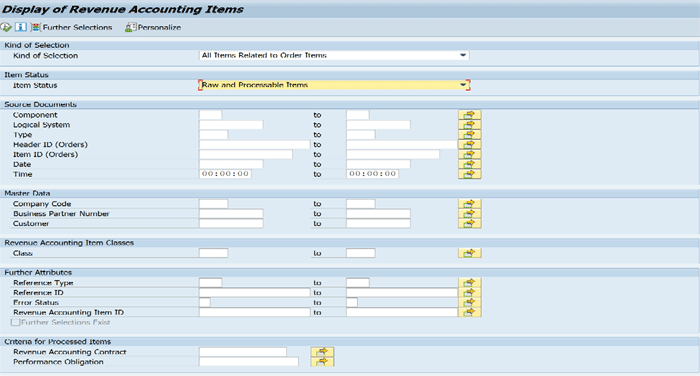
Figure 8
The RAI Monitor selection screen
The next step of your configuration is to assign any of the following upload rules to your RAI classes:
- Create Items as Raw Revenue Accounting Items
- Create Items as Processable Revenue Accounting Items
When you select the Raw revenue accounting items upload rule for RAI classes, revenue accounting items for order items, fulfillment items, and invoice items have an initial status as Raw. These RAIs can either be manually transferred to Processable status, or you can use mass processing through a parallelized batch job using transaction code FARR_RAI_TRANS (Transfer Revenue Accounting Items).
Note
RAIs have different statuses based on a transfer from an operational application to the SAP Revenue Accounting and Reporting engine. These statuses are dependent on the configuration as shown in Figure 9. Refer to Figure 3 to see the different statuses.

Figure 9
Assignment of upload rules to RAI classes
Follow IMG menu path SAP Customizing Implementation Guide > Financial Accounting (New) > Revenue Accounting > Inbound Processing > Revenue Accounting Items > Assign Upload Rules to Revenue Accounting Item Classes. This path takes you to the screen shown in
Figure 9. Click the New Entries button. Enter the RAI class (for example, order item YD01) and select the upload rule value Create Items as Raw Revenue Accounting Items from the drop-down. Click the save icon to save your entries. Repeat the steps for the remaining revenue accounting item classes (YD02 and YD03).
After you complete the above customization settings, RAI items having a Raw status (

) are displayed in the RAI Monitor (Result Screen) shown in
Figure 10. This screen has two tabs: Main Item and Condition Item.

Figure 10
RAI Monitor (Result Screen) – Main Items
In the Main Item tab (it appears as Main … in
Figure 10), you find all details related to RAI items—for example, Material, Customer, RAI Class, and Header ID (as Order #).
In the Condition Item tab (it appears as Condition It … in
Figure 10 and Condition ... in
Figure 11) you find all conditions for RAIs from operational applications—for example, pricing conditions and cost-based conditions, as shown in
Figure 11).
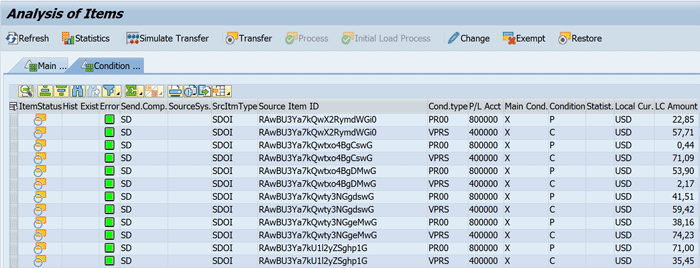
Figure 11
RAI Monitor (Result Screen) – Condition Items
Note
You need to maintain other configuration steps as well to display the RAI Monitor result screen without an error. I recommend that you review the operational systems (for example: SD) setup so that it transfers correct data (order, fulfillment, invoice items) to SAP Revenue Accounting and Reporting. You then need to follow the steps in this article to do the setup for SAP Revenue Accounting and Reporting and its integration with SD.
After order item RAIs are transferred or processed (either manually or via a batch job) successfully to the revenue accounting engine, contract IDs and performance obligation IDs (POB IDs) are assigned to the revenue accounting items as shown in
Figure 12.
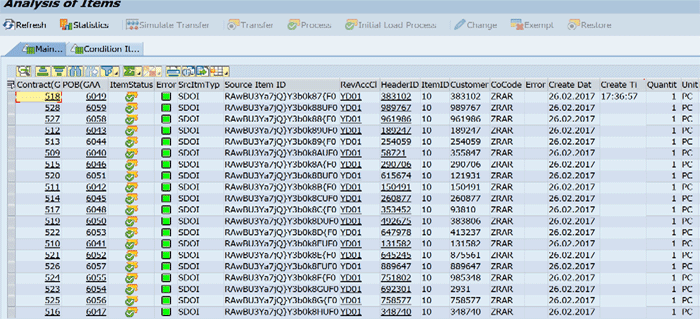
Figure 12
RAI Monitor (Result Screen) – Main Items
Note
If you are maintaining more than one accounting principle in your system, then multiple revenue contracts can be created from one operational contract.
Activate Settings for Revenue Accounting Item Management
In this configuration step, you define the logical system. The logical system is used to transfer RAI items to SAP Revenue Accounting and Reporting.
To complete this step, follow IMG menu path Financial Accounting (New) > Revenue Accounting > Inbound Processing > Revenue Accounting Item Management > Define Logical Systems. This path takes you to the screen in
Figure 13. Click the New Entries button. In the fields under the Log.System and Name columns, enter the name of the logical system and a description, repectively. Click the save icon to save your entries.

Figure 13
Maintain logical systems
![]()
In the next configuration step, you need to configure Sender Components. Follow IMG menu path SAP Customizing Implementation Guide > Financial Accounting (New) > Revenue Accounting > Inbound Processing > Revenue Accounting Item Management> Define Sender Components. This step is required to maintain the sender component first as shown in
Figure 14 and then assign it to the logical system (refer back to
Figure 13).

Figure 14
Sender components, assigned logical systems, and source item types information
![]()
Ideally, assigned source item types in
Figure 14 are automatically filled once SAP Revenue Accounting and Reporting is installed.
In the next configuration step, you configure condition types for the Standalone Selling Price (SSP) and Right of Return (ROR). There are two ways to handle the SSP and ROR of a performance obligation:
- BRFplus rules can determine SSP and ROR values
- SSP and ROR values can be transferred from the sender application (for example, the SD component).
I assume that you have maintained the above condition types at the sales order items level and have transferred them to the Revenue Accounting Application. In such a scenario, BRFplus rules are not considered.
Follow IMG menu path SAP Customizing Implementation Guide > Financial Accounting (New) > Revenue Accounting > Inbound Processing > Revenue Accounting Item Management> Define Condition Types for Standalone Selling Price and Right of Return. This path takes you to the screen shown in
Figure 15. Click the New Entries button. Enter Condition types (for example, ROR) and select the condition mode Right of Return from the drop-down. Repeat the step for SSP and select condition mode Standalone Selling Price from the drop-down. Click the save icon to save your entries.
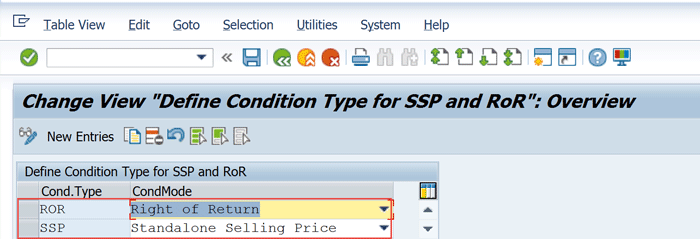
Figure 15
Condition Types SSP and ROR
In the next configuration step, you maintain BRFplus applications. Talk with business managers at your organization to come up with a list of business rules (for example, accounts information or mapping characteristics of POB with materials). To complete this step follow IMG menu path Financial Accounting (New) > Revenue Accounting > Inbound Processing > Revenue Accounting Item Management > Maintain BRFplus Applications. This path takes you to the BRFplus screen. Search for the standard BRFplus application and create a copy version of it (refer to step 6 for more details).
Now assign the newly created BRFplus application to RAI classes for transferring RAIs to Revenue Accounting Engine. To complete this step, follow IMG menu path Financial Accounting (New) > Revenue Accounting > Inbound Processing > Revenue Accounting Item Management > Assign BRFplus Applications to Revenue Accounting Item Classes. This path takes you to the screen in
Figure 16. Click the New Entries button. In the field under the RevAccCl (revenue accounting class) column, enter the name of a revenue accounting class (for example YD01) and under the BRF Application column, enter the name of your BRFplus application name. Click the save icon to save your data.

Figure 16
BRFplus assignment to a revenue accounting class
Your next step is to maintain the BRFplus structure to an RAI class. To complete this step follow IMG menu path Financial Accounting (New) > Revenue Accounting > Inbound Processing > Revenue Accounting Item Management > Maintain BRFplus Structure. This path takes you to the screen in
Figure 17. Click the New Entries button. In the field under the Rev AccCl (revenue accounting class) column, enter the name of a revenue accounting class (for example, YD01) and in the field under the BRFplus Context Structure column, enter a name. Click the save icon to save your entries.

Figure 17
BRFplus context structure assignment to a revenue accounting class
Now you are ready to maintain an ID for a decision table for the newly created BRFplus application.
Note
A decision table in a BRFplus application is used to create business rules (for example, decision tables for revenue recognition, recognized cost, or deferred revenue; or decision tables for POBs or to combine POBs). (Refer to step 6 for more details.)
To complete this step follow IMG menu path Financial Accounting (New) > Revenue Accounting > Inbound Processing > Revenue Accounting Item Management > Maintain Decision Table ID for Simplified BRFplus UI. This path takes you to the screen in
Figure 18. Assign each decision table ID (for example, DT_PROCESS_HEADER) to your BRF application and decision table. Click the save icon to save your data. Similarly, repeat the steps for other decision table IDs and assign them to your BRFplus application.

Figure 18
Maintain decision table IDs
Step 3. Revenue Accounting Contracts
As part of this configuration step, configure the key settings shown in
Figure 19. To reach this screen follow IMG menu path Financial Accounting (New) > Revenue Accounting > Revenue Accounting Contracts > Configure Accounting Principle-specific Settings. This path takes you to the screen in
Figure 19.

Figure 19
Accounting principle-specific configuration
Click the New Entries button and enter the following values:
- Your accounting principles—for example, GAAP
- Select either of these two options for Post. Liab.: (1.) Unbilled Receivable and Deferred Revenue: Using this drop-down option, you display the amounts that are recognized as revenue for the invoices that have not yet been sent. Deferred Revenue represents the advance payments for goods or services that are to be delivered in the future. (2.) Contract Liability and Contract Asset: Using this drop-down option, you display contract liability and contract assets amounts in your posting table (table FARR_D_POSTING)
- Enable the Contract Modification flag: Selection of this check box helps you to perform a contract change.
- Enable the Cost Recognition flag: Selection of this check box helps you to recognize the expenses and revenue at the same time as per the matching principle of revenue accounting.
- Select either of these two options (Contract Level or POB Level) for the Posting Level as appears in Posting Table (table name: FARR_D_POSTING).
Click the save icon to save your data.
In the next configuration step, you assign your company codes to the accounting principles. You also specify the transfer date and a migration status to indicate the date on which your Revenue Accounting application should be productive. To complete this step, follow IMG menu path Financial Accounting (New) > Revenue Accounting > Revenue Accounting Contracts > Assign Company Codes to Accounting Principles. This path takes you to the screen in
Figure 20.

Figure 20
Company code assignment to accounting principles
![]()
Click the New Entries button, enter the following values, and click the save icon to save your data:
- Your accounting principles: GAAP, for example
- Company Code: your company code
- Transfer Date: always the end of the past period. For example: 31-08-2016
- Status: Select the initial status as Migration. Then move to Transition > Adoptive Preparation and finally Productive as the implementation phase continues.
- Adoption Date: the start of the next period. For example: 01-09-2016
- Source Accounting Principle: original accounting principle prior to the SAP Revenue Accounting and Reporting transition. In the transition phase, the source accounting principle is used as a basis to copy data into the new accounting principle.
- Enable the flag for External Accounting Principle: It determines if the source accounting principle is external (i.e., it is not managed in Revenue Accounting and Reporting). It is optional.
In the next configuration step, you open the revenue accounting period per the accounting principle that allows you to perform the revenue posting. To complete this step, follow IMG menu path Financial Accounting (New) > Revenue Accounting > Revenue Accounting Contracts > Open and Close Revenue Accounting Periods. This path takes you to the screen in
Figure 21.

Figure 21
Revenue accounting period close
![]()
Click the New Entries button and enter the following values:
- Company Code: your company code
- Your accounting principles: for example, GAAP
- From Fiscal Year: for example, 2016
- From Period: 09
- Status: Open
Click the save icon to save your entries.
To generate revenue contracts and performance obligations, you need to assign number ranges. To complete this step, follow IMG menu path Financial Accounting (New) > Revenue Accounting > Revenue Accounting Contracts > Number Ranges > Define Number Ranges for Contracts. This path takes you to the Range Maintenance: RevRec Contract screen (not shown) in which you click the Intervals button.
In the next screen (
Figure 22), click the insert new row icon
![]()
. Enter a two-character code in the field under the No (number) column. Enter a lower limit of the number range interval in the From No. (from number) field and an upper limit of the number range interval in the To Number field. Click the save icon to save your entries.

Figure 22
Enter a number range for the revenue contract
![]()
In the next screen (
Figure 23), click the insert line icon and enter a from number and to number range for the POB and contract.

Figure 23
Enter a number range for a RevRec POB and contract
![]()
Your next configuration step is to define contract categories and assign number ranges to them. This information is used to create new revenue contracts in this contract category. To complete this step, follow IMG menu path Financial Accounting (New) > Revenue Accounting > Revenue Accounting Contracts > Define Contract Categories. This path takes you to the screen in
Figure 24. Click the New Entries button. Enter the new contract category (for example, 0001-B2C Contracts) and enter a description: B2C Contracts. Select a number range in the No. Range column (as maintained in
Figure 24 Number Range: Revenue Contract). Click the save icon to save your entries.

Figure 24
Define the contract category
![]()
In the next configuration step, you define POB types and their associated attributes. These performance obligation types are used while configuring performance obligations in the POB decision table of your BRFplus application. For example, as per new regulations (IFRS 15) items from the high-tech and telco industries are examples of POBs (
Figures 25 and
26, respectively).
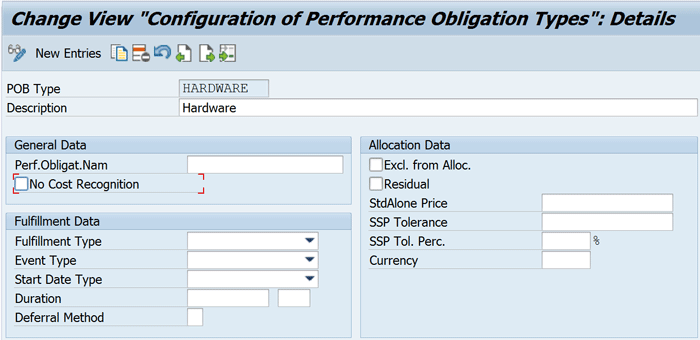
Figure 25
Configure a hardware POB type

Figure 26
Examples of POB types from the high-tech industry
![]()
![]()
To complete this step, follow IMG menu path Financial Accounting (New) > Revenue Accounting > Revenue Accounting Contracts > Define Performance Obligation Types. For my example, configure a POB type for hardware. In this example, hardware is like a template that includes all the predefined attribute values to be applied on similar POBs. During mapping of the item as a POB in your BRFplus application, this customization is being used. Click the New Entries button. This action takes you to the screen in
Figure 25. Enter the POB Type (e.g., HARDWARE) and a description (e.g., Hardware). Other attribute values are optional here (assuming that you configured these attributes in the BRFplus application). Repeat the similar steps for other POBs such as Service.
Similarly, other POB types can be configured. Some of these POB examples from the high-tech industry are shown in
Figure 26.
Note
SAP standard Revenue Accounting and Reporting provides the fulfillment types shown in Table 2.
![]()
| Fulfillment types |
Description
|
| Event-based |
Performance obligation (POB) fulfilled on the occurrence of a certain event (for example, a goods issue or customer invoice) |
| Time-based |
POB fulfilled at a specified time period for (example, an accounting period 1 of the year 2017, which means 2017001) |
| Percentage of completion |
POB can be fulfilled over time (for example, 25 percent in one accounting period, 50 percent in the next accounting period, and so on) |
Table 2
Available fulfillment types
Standard SAP Revenue Accounting and Reporting also provides a start date of the POB fulfillment as shown below:
- Available on creation of the POB
- Available after creation of the POB
- Is always an event date
Additionally, the SAP standard Revenue Accounting and Reporting solution also provides the deferral methods shown in
Table 3.
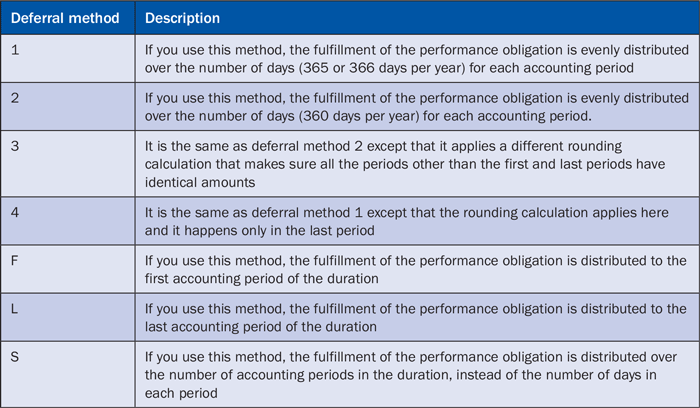
Table 3
List of deferral methods
Note
The deferral method is relevant only to performance obligations with a time-based fulfillment type. Durations of less than a day are not supported by any of the above deferral methods.
![]()
Once the above customization is done, then it can be used in the decision table DT_PROCESS_POB of your BRFplus application (copy version of FARR_AP_SD_PROCESS_TEMPLATE). Step 6 explains how to create decision table DT_PROCESS_POB.
Now you are ready to define reserved condition types. This means that you define condition types that are reserved for Revenue Accounting. To complete this step follow IMG menu path Financial Accounting (New) > Revenue Accounting > Revenue Accounting Contracts > Condition Types > Define Reserved Condition Types. This path takes you to the screen in
Figure 27.

Figure 27
Maintain reserved condition types
![]()
Enter the following condition types:
- Allocation Difference: for example, CORR
- Right-of-Return Revenue Adjustment: for example, PROR
- Right-of-Return Cost Adjustment: for example, CROR
- Exchange Rate Difference: for example, EXDF
These settings finally reflect in the posting table in table FARR_D_POSTING.
The next step is to define roles of condition types. To complete this step, follow IMG menu path Financial Accounting (New) > Revenue Accounting > Revenue Accounting Contracts > Condition Types > Define Roles for Condition Types. This path takes you to the screen in
Figure 28.

Figure 28
Define a condition type role
![]()
Click the New Entries button. In the Cond.Type field enter COAC (for example) and select Cond. Role value Contract Acquisition Cost from the drop-down. Click the save icon to save your data.
Note
Be aware that once you have defined a condition type role, you can neither delete nor change it in the future.
The next configuration step is to define fulfillment event types. These fullfillment event types can be used later in a BRFplus application to define POBs toward their fulfillments. This step is used either in Define Performance Obligation Types (refer back to
Figure 25 and
26) or it can be used in a BRFplus application to configure POB (refer to step 6 for more details). As per the new regulations, revenue is recognized based on these fulfillment event types.
To complete this step, follow IMG menu path Financial Accounting (New) > Revenue Accounting > Revenue Accounting Contracts > Define Fulfillment Event Types. This path takes you to the screen in
Figure 29.

Figure 29
Fulfillment event types
![]()
Ideally, the screen in
Figure 29 is automatically filled once SAP Revenue Accounting and Reporting is installed. In case some of the event types are missing, click the New Entries button and add the event type and description. This event type is used in the customization step Define Performance Obligation Types in IMG (
Figure 26) or in the decision table DT_PROCESS_POB of your BRFplus application.
Now you are ready to assign a BRFplus application to BRFplus rule-related processes. Follow IMG menu path SAP Customizing Implementation Guide > Financial Accounting (New) > Revenue Accounting > Revenue Accounting Contracts > Assign BRF+ Applications to Revenue Accounting Processes. This path takes you to the screen shown in
Figure 30.

Figure 30
BRFplus application assignments to revenue accounting process
![]()
Click the New Entries button. Select Account Determination from the drop-down of the BRF+ Related Process column. Enter your BRF+ Application (copy version of FARR_ACC_DETERMINE_TEMPLATE) in the BRF Application column. Similarly, Select Performance Obligation Status from the drop-down of the BRF+ Related Process column. Enter your BRF+ Application (copy version of FARR_POB_STATUS_TEMPLATE) in the BRF Application column. Click the save icon to save your entries.
Step 4. Integrate Cost Object Controlling with SAP Revenue Accounting and Reporting
SAP Revenue Accounting and Reporting 1.2 offers Revenue Accounting integration with Cost Object Controlling. To complete this step, follow IMG menu path Financial Accounting (New) > Revenue Accounting > Integration with Cost Object Controlling > Assign RA Version and Currency Type to Company Code and Acct. Principle.
To integrate with Cost Object Controlling, assign an RA version and currency type to your company code and accounting principle via transaction code SM30 in view V_TKKA_RR_AC. Additionally, you can also maintain entries for view V_TKKA_RR_ME using transaction code SM30 to specify RA keys and RA versions that will integrate with your revenue account.
Note
For longer-running projects in which Result Analysis is used for costs, step 4 briefly explains details on how to integrate result analysis with SAP Revenue Accounting and Reporting. If you want to use the integration of cost object controlling with SAP Revenue Accounting and Reporting, you need to apply SAP Note 2242051. This is where Result Analysis is used.
Step 5. Set Up Revenue Accounting Postings
The first configuration step for setting up revenue accounting postings is to configure a posting specification for a general ledger (G/L) account. In this customizing activity, you define specifications (for example, posting keys, document type, segment, business area, and profit center) for each company code. Refer to
Figure 31.

Figure 31
Posting specification for a G/L transfer
Account determination for revenue and cost is configured in a BRFplus application. Refer to step 6 for more details. To complete this step follow IMG menu path Financial Accounting (New) > Revenue Accounting > Revenue Accounting Postings > Define Posting Specifications for General Ledger Transfer. This path takes you to the screen in
Figure 31.
![]()
Click the New Entries button. Enter data in the following fields and then click the save icon to save your data:
- Company Code: your company code
- Credit.PK: Credit Posting Key value = 50
- Debit.PK: Debit Posting Key value = 40
- Type: Document Type Value = SA
- G/L Account: 999999 ( for example)
- Segment: your segment value
- Profit Center: your segment value
- BusA: your Business Area value
- Functional Area: your Functional Area value
The second step for setting up revenue accounting postings is to assign tax codes to non-taxable transactions for your company code. Ideally, a revenue-relevant posting doesn’t need this tax information; however, for a G/L posting, you need to maintain these tax codes.
To complete this step, follow IMG menu path Financial Accounting (New) > Revenue Accounting > Revenue Accounting Postings > Assign Tax Codes for Non-Taxable Transactions. This path takes you to the screen in
Figure 32.

Figure 32
Assign tax codes for non-taxable transactions
Click the New Entries button. In the field under the CoCd (company code) column, enter a code (for example: ZRAR). In the field under the Input ta... (input tax) column, enter a value (for example, V0). In the field under the Output t... (output tax) column, enter a value (for example, A0). In the field under the Jurisdict. code (jurisdiction code) column, enter a tax jurisdiction code if a taxation procedure is carried out using a jurisdiction code. Click the save icon to save your data.
The last step for setting up revenue accounting postings is to configure account determination for specific transactions. To complete this step follow IMG menu path Financial Accounting (New) > Revenue Accounting > Revenue Accounting Postings > Configure Account Determination for Specific Transactions. This path takes you to the screen in
Figure 33.

Figure 33
The Account Determination screen
![]()
Click the Recognized Revenue tab and then the Edit button. Now click the Add button. Enter data in the following fields and click the save icon to save it:
- Accounting Principle: your accounting principle—for example, GAAP
- Company Code (From.. To): your company code (From.. To)
- Reference Account: your reference account. The system uses this account defined on the pricing conditions of the sales order. This account is used to make postings for recognizing revenue.
- Reference Account Description: your reference account description
- Derived Account: your derived account. The system derives this account using a reference account for other account determination rules—for example, a right-of-return adjustment.
- Derived Account Description: your derived account description
Repeat the above steps to configure other accounts—for example, Receivable Adjustment, Deferred Cost , or Recognized Cost.
Step 6. Set Up the BRFplus Application
SAP Revenue Accounting and Reporting is based on BRFplus applications. SAP standard Revenue Accounting and Reporting offers the following BRFplus application templates:
- Account Determination: FARR_ACC_DETERMINE_TEMPLATE
- POB Processing Status: FARR_POB_STATUS_TEMPLATE
- Process sales documents for Revenue Accounting: FARR_AP_SD_PROCESS_TEMPLATE
SAP always recommends that you make a copy of a version of the above templates and then assign the BRFplus application to your RAI class and Revenue Accounting Processes (
Figures 16 and
30). Once you have created a copy version of the BRFplus application, you have to create various decision tables to incorporate business logics through business rules. In this step, see these examples for decision tables:
- Example 1: Configure a Revenue Recognition Account
- Example 2: Configure a POB
Example 1: Configure a Revenue Recognition Account
In general, there are two options to configure account determinations.
Option 1: Configure an accounts determination using the IMG node. To complete this step, navigate the menu path to the IMG node described above that takes you to
Figure 33. Follow the instructions to configure account determination for Recognized Revenue Account that are listed below
Figure 33.
Option 2: Configure an account determination using the BRFplus application. For example, if you want to configure account determination for recognized revenue, then you need to execute standard transaction code BRF+ or BRFplus. This takes you to the screen in
Figure 34.

Figure 34
The Account Determination BRFplus screen
![]()
Search for your BRFplus application. Navigate to the decision table Recognized Revenue (FARR_ACCT_DETERMINE_DT_RC_REV). Click the Edit button. Click the insert new row icon. Now click the edit icon
![]()
. A pop-up screen appears. Enter data in the following fields and then click the OK button:
- Accounting Principle: your accounting principle—for example, GAAP
- Company Code: your company code
- G/L Account: your reference Account
- G/L Account: your derived account
Click the save icon to save your data and activate it.
Likewise, maintain account determination for other key attributes, such as Contract Asset, Contract Liability, and Deferred Cost. As recommended in the earlier BRFplus application, for the POB Process Status, you can also make a copy version of the POB Processing Status template, apply your business logic, and then assign it to your Revenue Accounting Processes (
Figure 30).
Example 2: Configure a POB
As recommended in earlier steps, you also should make a copy version of the Process Sales Documents for Revenue Accounting Template, apply your business logic, and then assign the BRFplus application to your Revenue Accounting Processes (
Figure 30). In general, there are two options to configure POB.
Option 1: Configure a POB using an IMG node. Refer to
Figure 25.
Option 2: Configure a POB using the BRFplus application. For example, if you want to configure POB, then you need to execute standard transaction code BRF+ or BRFplus. This action takes you to the screen in
Figure 35.

Figure 35
Configure a POB in the BRFplus screen
![]() Figure 35
Figure 35
- Material: Select a material; for example, a printer
- Change value of Perf. Obligat. Name (peformance oblication name): Provide a POB name; for example, PRINTER
- Change value of POB type to: Choose a POB type: for example, HARDWARE
- Change value of Fulfillment Type to: Choose E for event based.
- Change value of Event Type to: Choose a fulfillment type; for example, MA (manual fulfillment)
- Change value of Unit Distinct to: Choose Unit-Distinct D. Unit-Distinct means changes to the performance obligation do not affect fulfillment that has already been accounted for. New fulfillment that occurs on the performance obligation covers the difference that the change causes.
For example, on February 1, 2017, a contract is accepted that requires your company to deliver 10 pieces of a product to a customer for a total amount of USD 600.
On February 5, 2017, one piece of the product is delivered to the customer.
On February 28, 2017, the accountant makes a posting that covers the one piece of the product already delivered. An amount of USD 60 is recognized.
On March 5, 2017, as part of a contract modification, the total quantity to be delivered becomes 12 pieces with the total price unchanged. The USD 60 that is already posted may be no longer applicable because the one piece already delivered now carries the value of only USD 50.
In this scenario, the above setting determines how the system handles fulfillment when more pieces of the product are delivered.
If set to Unit-Distinct, then the USD 60 that is already posted is left alone. Hence, the system distributes the remaining USD 540 among the undelivered 11 pieces. With one more piece delivered, an amount of USD 49.09 is considered fulfilled.
Click the OK button and then click the save icon to save your data and activate it.
Step 7. SD Integration with SAP Revenue Accounting and Reporting
SAP Revenue Accounting and Reporting can be integrated with SAP SD. The purpose of the SD integration with SAP Revenue Accounting and Reporting is to transfer all sales items (order items, invoice items, and fulfillment items) to SAP Revenue Accounting and Reporting and further use them for price allocation and to perform revenue recognition and cost recognition. I explain the baseline key settings with which you can transfer sales order items from SD to SAP Revenue Accounting and Reporting.
First you need to integrate with revenue accounting. In this customization, select the general activation check box for Revenue Account. Selecting this flag activates the integration component to communicate SD component with SAP Revenue Accounting and Reporting and maintains the background RFC destination. SAP recommends that you maintain an RFC user in the login credentials.
To complete this step, follow IMG menu path SAP Customizing Implementation Guide > Sales and Distribution > Revenue Accounting and Reporting > Integrate with Revenue Accounting. This path takes you to the screen in
Figure 36.

Figure 36
Revenue account flag and RFC destination
Select the Revenue Account check box and enter an RFC destination in the Destination field. Click the save icon (not shown) to save your data.
Now you need to maintain revenue accounting item settings. In this customization, configure revenue accounting for sales order item categories based on following parameters:
- Sales Organization
- Sales Document Type
- Sales Document Item Category
Select the type relevant for Revenue Accounting flag for the above combination so that these sales order items transfer to Revenue Accounting. To complete this step follow IMG menu path SAP Customizing Implementation Guide > Sales and Distribution > Revenue Accounting and Reporting > Maintain Revenue Accounting Item Settings. This path takes you to the screen in
Figure 37.

Figure 37
Maintain the Item Categories Setting screen
Click the New Entries button and enter the following values:
- Sales Organization: ZFRR (for example)
- Sales Document Type OR (for example)
- Item Category: TAN (for example)
- Type: Select Relevant for Revenue Accounting from the drop-down. Afte you select this option, this setting activates revenue accounting for a sales order item. Sales order items with this item category transfer to SAP Revenue Accounting and Reporting .
- Package ID: If you are using migration packages, then you can provide the pacakge ID here.
Once the above customization is performed, you then find an SD order item in your sales order with the following setting Relevant for Revenue Accounting, as shown in
Figure 38 (if you have selected the Type as Relevant for Revenue Accounting in
Figure 37).
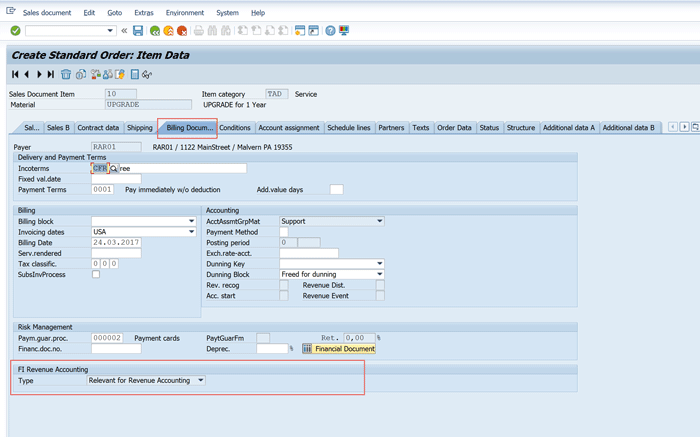
Figure 38
Sales order screen
In addition to all above customizations, you need to activate the services that belong to the SAP Revenue Accounting and Reporting solution.
To activate the service, first execute the standard transaction code SICF. In the initial screen that the system displays (not shown), enter FARR* in the Service Name field and click the execute icon (not shown) or press the F8 key. This action takes you to the screen in
Figure 39.
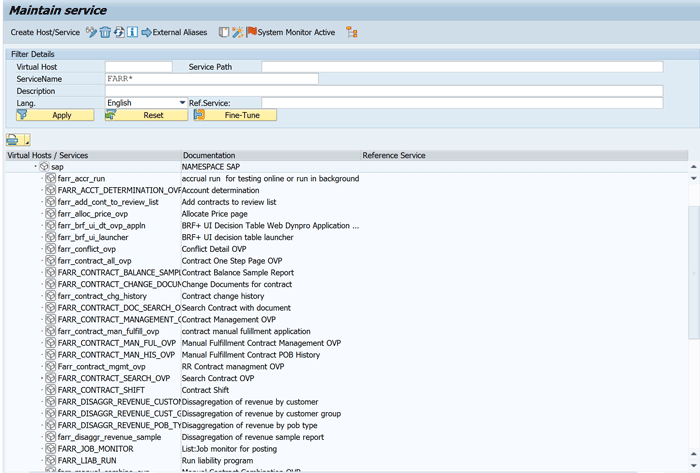
Figure 39
The Maintain service screen
![]()
Select any service; for example, FARR_CONTRACT_SEARCH_OVP. This service helps to find revenue accounting contracts. Right-click this service and select Activate Service. A pop-up screen then appears (not shown) and asks you to confirm the following: Do you want to activate service/default_host/sap/bc/webdynpro/sap/FARR_CONTRACT_SEARCH_OVP?
Click the Yes button. Now the above service is activated.
If you want to test this service, right-click this service and double-click Test Service. This activity takes you to the screen in
Figure 40. Repeat the same steps to activate all other services.

Figure 40
Search Revenue Accounting Contracts
![]()
Santosh Kumar
Santosh Kumar is an SAP-certified professional with nine years of consulting experience in SAP Financial Accounting and Controlling (FI-CO). He has thorough knowledge in the integration of sales and distribution (SD), FI-CO, SAP Contract Accounts Receivable and Payable (FI-CA), SAP Hybris Billing and SAP Revenue Accounting and Reporting. Santosh has worked in projects for industries such as high-tech, pharmaceuticals, telecommunications, retail (IS-R), and oil and gas. He works as a support engineer in the SAP Max Attention Team (SAP AGS) at SAP North America.
You may contact the author at
skcatch@gmail.com.
If you have comments about this article or publication, or would like to submit an article idea, please contact the
editor.


