With the introduction of SAP NetWeaver Business Rules Management as part of SAP NetWeaver Composition Environment, you can increase your flexibility by externalizing often changing rules into a rules management system. The biggest advantage of using a business rules management system is that you can change the rules during runtime as your business requires it. This article gives you a jumpstart to using Rules Manager, SAP’s management environment for maintaining deployed rulesets.
Key Concept
Rules Manager is a Web-based application that allows you to react quickly on changing business needs without involving your IT department. Changes take effect immediately, so you don’t need to start a long development project to adapt rules according to your business.
Assume that your business processes are guided by business rules. The classic example is a decision whether an approval for an order is necessary. The decision can depend on many aspects. The best way to handle these dependencies is to formulate them as rules.
One consideration for such a decision is the total amount of the order. If the order exceeds a certain threshold, the approval is mandatory. This threshold can vary depending on how long the organization has been a customer, how reliable the customer is in paying bills, and what the overall economical situation looks like.
However, what do you do if you want to change the threshold once your confidence in that customer has increased and you don’t want to approve every order coming from that particular customer? You want the involvement only in exceptional cases, such as huge orders of several million dollars in value. This is where the Rules Manager comes in, as it allows your business experts to adapt your business rules while they are productively running. This gives you the chance to react to changing market conditions faster. I guide you through the most important aspects of SAP’s Rules Manager, such as defining the access to rules projects, editing rules, and comparing different versions of rules.
Note
I covered SAP NetWeaver Business Rules Management (SAP NetWeaver BRM) in my previous articles “SAP NetWeaver Business Rules Management: Externalize Critical Business Logic for Enhanced Flexibility,” “SAP NetWeaver Business Rules Management: Tips for Testing and Working with Business Rules,” and “Flow Rulesets: Take Control Over Your Rule’s Execution Sequence.”
Granting Access to a Rules Project
Before you can work on your rules within Rules Manager, you have to assign certain access rights to those users who should be able to modify them. You can imagine how important such a feature is — it is certainly a critical operation if you change your rules while they run. So a sophisticated access control mechanism is needed to protect them.
For the rest of the article, I assume a running rules project on your server containing a decision table that can be called via a Web service. If you don’t know how to model a ruleset or how to publish them as Web service, take a look at my other articles about SAP NetWeaver BRM called “SAP NetWeaver Business Rules Management: Externalize Critical Business Logic for Enhanced Flexibility” and “Flow Rulesets: Take Control Over Your Rule’s Execution Sequence.”
I’m going to use the flow ruleset developed in my last article, which returns a Boolean value telling the caller whether an approval for an order was necessary depending on the country from where the order is coming and its total amount. Figure 1 depicts the rule flow whereas Figure 2 shows you the associated decision table that decides on the approval’s necessity.

Figure 1
Rule flow for the example ruleset

Figure 2
Decision table being called in the rule flow of Figure 1 (ApprovalNecessaryDT)
To verify that an access control system protects the rules project, try the following: Call the Rules Manager on your server in a Web browser by entering the URL https://<servername>:<port>/rulesmanager. The first screen you receive is a table containing all deployed rules development components (DCs). Within the table, select your rules DC. As result, you receive an error message telling you that you don’t have permission to open the project (Figure 3).

Figure 3
No permission for opening the selected project
Step 1. Define a new role
Step 2. Assign the role to the Rules Manager user manager
Step 3. Assign access rights for rulesets based on role
Step 1. Define a New Role
In this step you define a new role in the user management environment of the Java server and add an action to it that allows the use of the Rules Manager. Start the SAP NetWeaver Administrator by calling the URL https://<servername>:<port>/nwa. Follow menu path Operation Management > Users and Access > Identity Management to view the server’s user management overview screen. Select Role from the Search Criteria drop-down list (Figure 4).

Figure 4
Select Role
Switch to the Assigned Actions tab within the Details section. On this tab, you define the allowed actions for the newly created role. SAP NetWeaver BRM is delivered with many predefined actions. One of these actions is called SAP_BRM_APPROVE_RULE and allows the use of the Rules Manager, including the right to approve a particular version of a rule to be the active one. Enter *BRM_APPR* in the Get input field of the Available Actions area and click the Go button (Figure 5).

Figure 5
Search for the right action
Step 2. Assign the Role to the Rules Manager User
For this step, stay on the Identity Management screen but change the Search Criteria drop-down list back to User (Figure 4). Enter the username of the person who should have the rights for maintaining rulesets. Start the search by clicking the Go button. Select the user from the result table and click the Modify button beneath the table. I use the example of the demo user (Figure 6).

Figure 6
Modify the attributes of the found user

Figure 7
Add the new role to the current user
Step 3. Assign Access Rights for Rulesets Based on Role
The Identity Management view contains a special tab, Business Rules Access Control Management (compare Figure 6), for handling the rights of certain business rules. Click it to open the associated editor. The editor allows you to assign access rights for certain rules DCs — and within those components certain rulesets to roles.
The assignment process starts by entering the search criteria for the role to which you want to assign the rights. Next, you have to search for the rules DC to find which role should have access. Finally, you assign access permissions for a concrete ruleset within that rules DC. Let’s start with the role search.
Figure 8 depicts the search screen on the Business Rules Access Control Management tab. In the Find field you have to enter the search criteria for the role. Enter *access_role* as search criterion for the role’s name. Next, look for the rules DC to which you want to grant access. For this, click the value help icon  to the right of the DC Name field. A dedicated window named Find Development Component opens. Enter an appropriate search string (Figure 9).
Note
Although I left the DC Name field empty in Figure 8, you should enter a search criterion before you click the value help button to reduce the result list. Without a search criterion it will take some time to collect all DCs, especially for large projects.
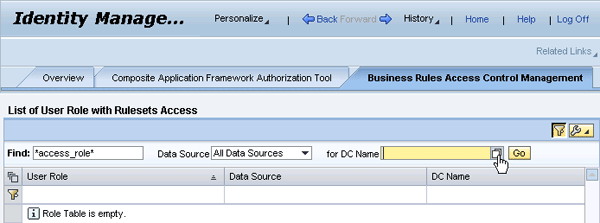
Figure 8
The Business Rules Access Control Management screen
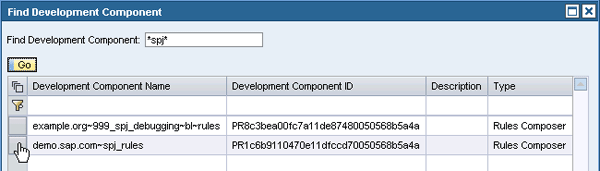
Figure 9
Search and select the rules DC
Click the Go button and the system fills the table with appropriate rules DCs that fulfill your search criteria. If you followed my articles so far, you’ll recognize the spj_rules DC. Select it in the table and as result the window automatically closes with the selected DC appearing in the DC Name field of the Business Rules Access Control Management tab (Figure 10).

Figure 10
Correctly filled fields for assigning roles to DCs
Click the Go button. As a result the table beneath the search form contains the entries fitting your criteria. As you can see from Figure 10, the result table contains existing assignments between the role and the DC name. This is essential to understand: You are more or less defining role and DC name pairs on this tab.
In this example, you want to assign rights to the rulesmanager_access_role for the DC with the name spj_rules. This means that you can define the access rights for handling rules on a very detailed level.
Let’s see how you can refine this even further. Look at the details section beneath the table of found role/DC pairs (Figure 11). It’s important to understand its contents in detail as it is the key for setting all the access rights for your rulesets. The line starting with DC Name: repeats the DC name chosen in the hit table (spj_rules). You can define the access rights for the DC individually. Currently, the DC Access Type is set to None. This is the reason why you could not open the DC in Rules Manager at the beginning of this article (compare with Figure 3).
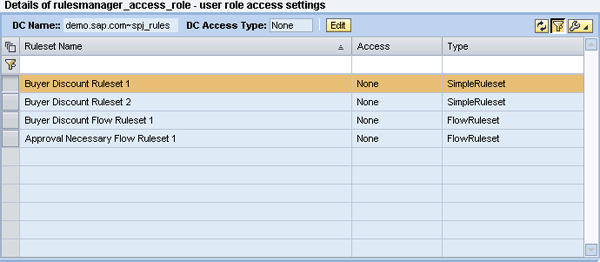
Figure 11
Overview of detailed settings for the rules access rights
However, that’s not the only access you can set. The table beneath the chosen DC lists all the rulesets contained in that DC. For each ruleset, you can assign dedicated access rights as the Access column indicates. To make changes you have to click the Edit button. As a result, all the fields that currently contain the string None change to drop-down lists (Figure 12).
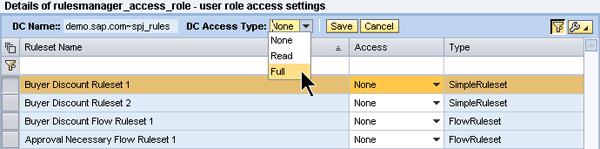
Figure 12
Assign access rights to the DC
- None: No rights at all
- Read: Read-only access
- Full: Read and write access
It is important for you to know the relationship of the selected DC access type right to the contents of the drop-down lists in the Access column of the ruleset table. If you choose None for the DC access type, you can’t assign rights for the rulesets. If you choose Read, you can only assign None or Read to the rulesets as well. Finally if you have chosen Full, you can assign all possible options for the rulesets. In short, the DC access type determines what you can set on the ruleset level.
Now change the DC access type to Full and the access entry for Approval Necessary Flow Ruleset 1 to Full as well. This allows you to modify the contents of the decision table. Save your changes by clicking the Save button. Figure 13 shows the final result of your changes.
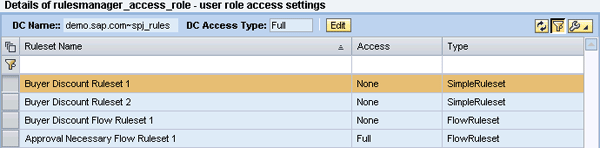
Figure 13
Final settings for the spj_rules DC
Working with Rules Manager
Now that you have defined the access rights for your rules DC, you can start working with the Rules Manager. Enter the URL https://<servername>:<port>/rulesmanager. Again the Rules Manager lists all development components containing rulesets. This time after selecting the appropriate rules DC (spj_rules, in this case) you will not receive an error message. Instead, the project details are displayed beneath the rules DC table (Figure 14).
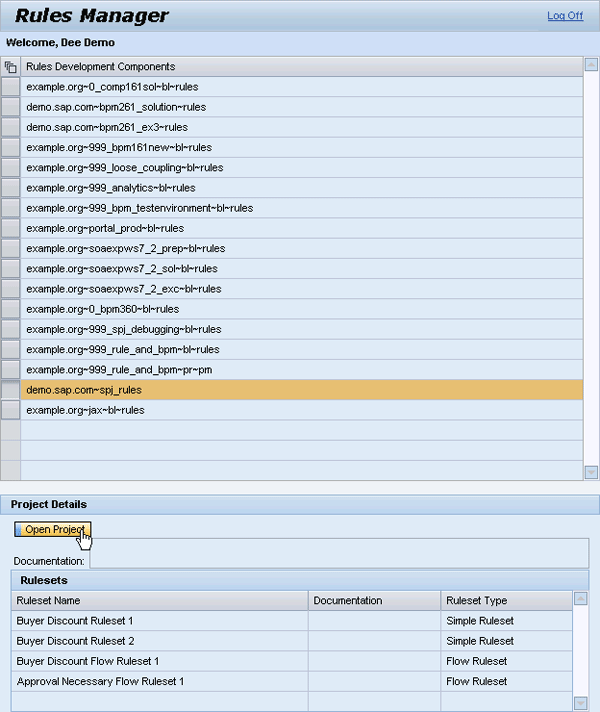
Figure 14
Open the rules project for maintenance
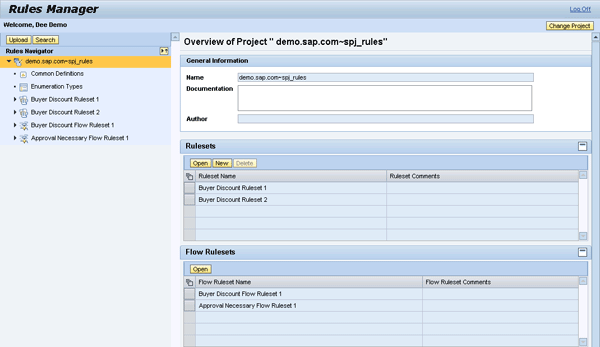
Figure 15
Rules Manager screen for the chosen rules DC
Depending on the entry chosen in the Rules Navigator view, the contents of the second part to the right of the Rules Navigator view changes. This is called the editor window and allows you to modify the current contents.
Say you want to change the threshold in the decision table for the Europe, Middle East, and Africa (EMEA) region to a lower value due to changed market conditions. Currently the value that decides whether an approval is necessary is set to 100,000 (Figure 2). Verify the correct behavior of your ruleset by using the Web Services Navigator (if you cannot remember how to test your rules with Web Service Navigator take a look at my first rules article, which explains the steps necessary to make your rules accessible via a Web service). If you enter a value greater than or equal to 100,000, the Web service should return true as value for the approvalNecessary return parameter. Otherwise, with the input 99,999 for the totalAmount field, the ruleset should return false (Figure 16).
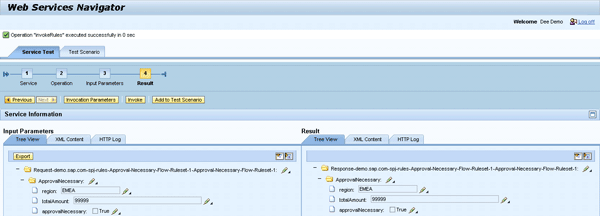
Figure 16
Testing the ruleset with the Web Services Navigator
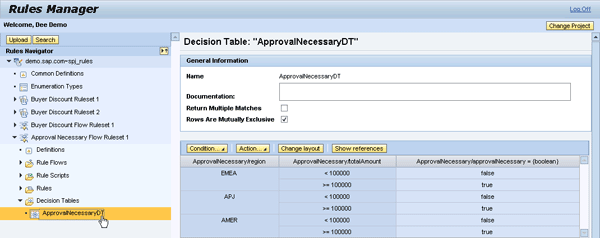
Figure 17
Navigate to the decision table
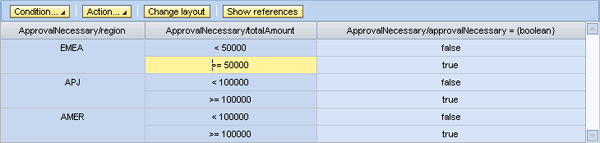
Figure 18
Modified table entries
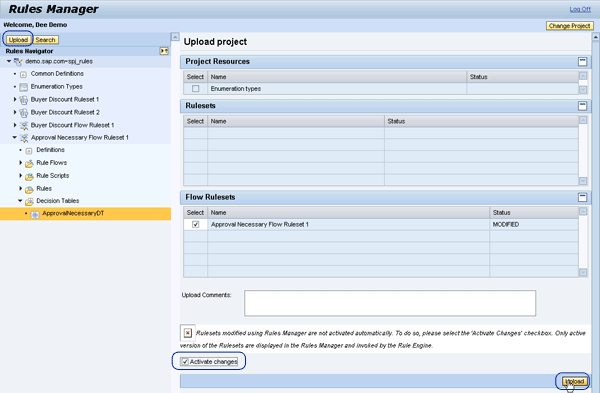
Figure 19
Upload the modified decision table
Note
Make sure that you don’t mix up the two Upload buttons in Figure 19. Although named identically, they fulfill completely different functions.
Verify the correct behavior of your ruleset by applying the same data you used for testing your ruleset in the Web Services Navigator again. For this, you just have to click the Invoke button in case you haven’t closed the Web Services Navigator window after your first test run (Figure 20). This time, an approval is necessary as 99,999 exceeds the new threshold of 50,000.
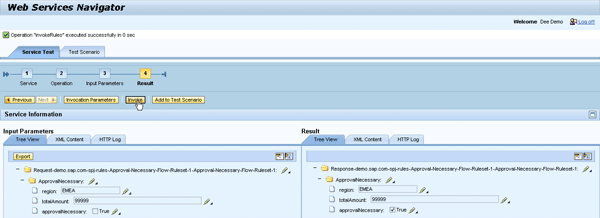
Figure 20
Test the ruleset after activating the new decision table
Adapt the Refresh Time
If you don’t see a change after activating the new decision table, it might be because the rules engine considers changes only after a certain amount of time. By default, the refresh rate is set to five minutes. If you want changes to be active immediately, follow these seven steps:
Step 1. Open the SAP NetWeaver Administrator (URL https://<servername>:<port>/nwa)
Step 2. Navigate to Configuration Management > Infrastructure
Step 3. Click the Application Modules link
Step 4. The module list appears. In the Name filter field, enter the search string brms~engine and press ENTER.
Step 5. Select the entry sap.com~tc~brms~engine~ejb.jar. It is the Enterprise JavaBean (EJB) containing the rules engine (Figure 21).
Step 6. Beneath the Module List table is the associated EJB Module Details section. In that area, switch to the Environment and References tab.
Step 7. The Environment and References tab lists the parameters you can modify for the selected EJB. One entry is named refreshtime. Select it and in the Full Details section beneath you can change the time to 0, which results in an immediate activation. Once changed, click the Save button to store your changes. Verify the new behavior by changing and testing the decision table again.
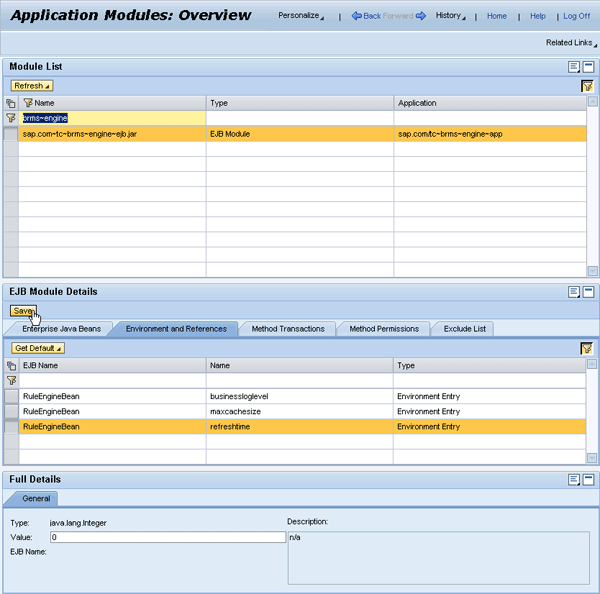
Figure 21
Set the rules engine’s refresh time
Compare Versions
By changing a ruleset’s definitions, rules, decision tables, and scripts with the Rules Manager, new versions of your ruleset are created. For an overview of a ruleset’s history, select the ruleset in the Rules Navigator by left-clicking it (wait until the entry is selected — the background color changes to orange) and then right-click it to view the context menu shown in Figure 22.
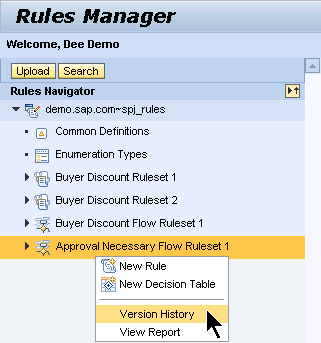
Figure 22
Look at the version history for a ruleset
From the context menu, choose Version History. As a result you receive an overview of all the versions you have created (Figure 23).
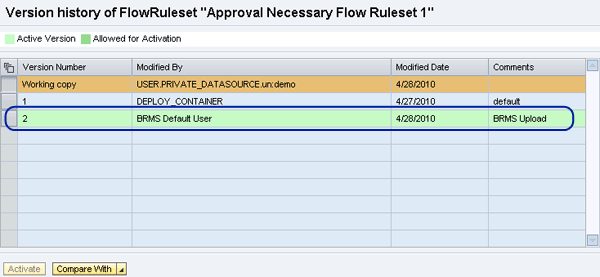
Figure 23
The ruleset’s version history
Another important feature is the possibility to compare two versions of your ruleset to figure out more details about changes. Select the first version by clicking the gray button in front of the version. The entry becomes highlighted in brown (Version Number 2 in the example in Figure 24).
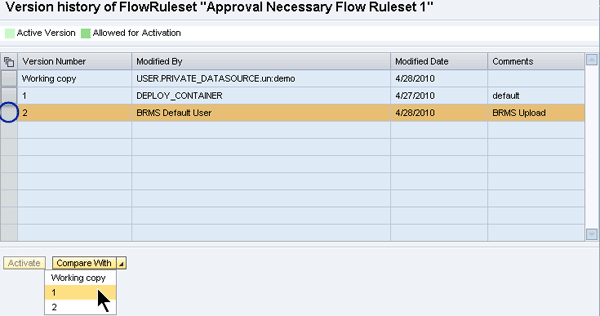
Figure 24
Compare versions
Next, click the version icon  to the right of the Compare With button. As result, a drop-down list containing all versions of your ruleset appears. Select the version you want to compare with your selected version. In this example, I want to compare it with version 1. After you have chosen an entry from the drop-down list, the overview table in Figure 25 appears.
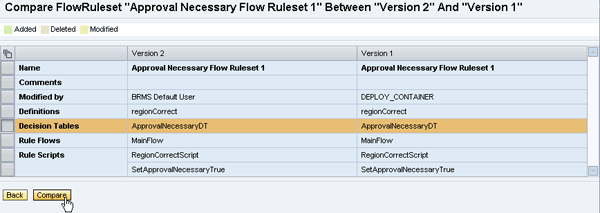
Figure 25
Decision about what to compare
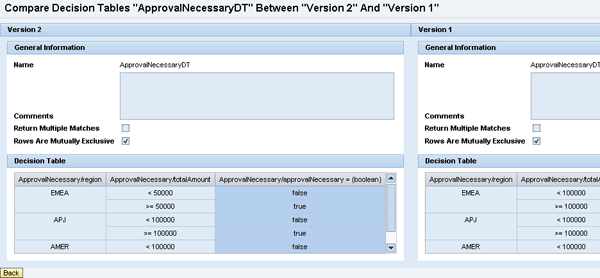
Figure 26
Compare the decision tables

Figure 27
Version history after deployment of a new version from SAP NetWeaver Developer Studio

Dr. Volker Stiehl
Prof. Dr. Volker Stiehl studied computer science at the Friedrich-Alexander-University of Erlangen-Nuremberg. After 12 years as a developer and senior system architect at Siemens, he joined SAP in 2004. As chief product expert, Volker was responsible for the success of the products SAP Process Orchestration, SAP Process Integration, and SAP HANA Cloud Integration (now SAP HANA Cloud Platform, integration service). He left SAP in 2016 and accepted a position as professor at the Ingolstadt Technical University of Applied Sciences where he is currently teaching business information systems. In September 2011, Volker received his Ph.D. degree from the University of Technology Darmstadt. His thesis was on the systematic design and implementation of applications using BPMN. Volker is also the author of Process-Driven Applications with BPMN as well as the co-author of SAP HANA Cloud Integration and a regular speaker at various national and international conferences.
You may contact the author at editor@SAPpro.com.
If you have comments about this article or publication, or would like to submit an article idea, please contact the editor.