A home page framework links your dashboards and BW tools such as BEx Browser and BEx Analyzer. This framework offers some portal benefits to those who have not yet implemented SAP NetWeaver Portal. Find out how to create the home page framework and set up your dashboards so your users can quickly switch from the dashboards to the BW tools.
Key Concept
SAP provides several tool sets to organize information for users, including BEx Browser for query access; BEx Analyzer to analyze queries in Microsoft Excel; BEx Web Analyzer to display query results and schedule queries to run; and Web Application Designer to create HTML-based Web templates and dashboards to display query results.
Providing quick and easy access to key information when you are supporting many departments can be challenging. How do you organize access to 500 different queries so all parts of the business have the same ability to zero in on what they need? One way is to develop an indexed home page from which the users can jump into subsequent levels of detailed information. From this home page, you can present users with answers and make it easier for them to find additional information.
For example, when reviewing data in dashboards users may need to access tools such as BEx Browser, BEx Analyzer, BEx Web Analyzer, and Web Application Designer (Web AD). The basic dilemma is that these tools are not integrated in a way that allows users to navigate seamlessly among them. You can go to BEx Browser, run a query, and end up in BEx Web Analyzer. However, you cannot then go to a dashboard. From a dashboard you can see query results, but you can’t return to BEx Web Analyzer or BEx Browser.
When designing a solution to overcome this, I had several other factors to consider at my company — we did not have SAP NetWeaver Portal to integrate the tools, we wanted zero footprint (no additional software installed on users’ desktops), and the access and navigation steps for the users had to be easy. The home page framework satisfies those needs and provides a way for users to navigate between the BW tools and dashboards. To see how this option compares with using a portal, see the sidebar, “Using a Home Page URL vs. SAP NetWeaver Portal.”
First I’ll explain how to set up the home page framework, and then I’ll show you how to organize multiple master dashboards using Web AD and BEx Web Analyzer in BW 3.5. The master dashboard allows users to view query results from the first few tabs and run queries from the last tab, which then renders results in BEx Web Analyzer. From here, they can click on the Go to Analytics Home Page link to return to the home page to choose a different dashboard. Users cannot get lost or stuck in a dead-end with this framework because both the master dashboard and BEx Web Analyzer have links to take them back to the Analytics home page.
Note
Since we developed this process in BW 3.5 we have upgraded to SAP NetWeaver 7.0. The framework works well in this new environment, but we have not yet recreated the steps with SAP NetWeaver BI 7.0 tool sets. The steps as outlined are for BW 3.5 users or sites that have SAP NetWeaver 7.0 without SAP NetWeaver Portal installed.
Develop the Home Page Framework
I’ll use the example of setting up an Analytics home page for three lines of business: Automotive, Real Estate, and Jobs. The framework consists of a home page from which you can call multi-tab dashboards (Figure 1). From the dashboards, you use the last tab to run queries that BEx Web Analyzer renders. Both the dashboards and BEx Web Analyzer have URL buttons to take the user to the Analytics home page.

Figure 1
Dashboard framework path
Note
Glen Leslie’s article,
“Quickly Build Impressive Dashboards in SAP BW 3.5,” describes how to use Web items in Web AD to create Web templates. He also introduces the concepts of master templates and sub-templates. He further defines the sub-templates into headers, footers, and tabs.
First let me show you how to use Web AD to create a simple home page consisting of URLs that you activate by clicking on a button. The URLs take you to individual master dashboards that have a specific business theme. In this example, I’ll show you how to segregate the three areas of the business into buttons that lead to the main dashboards.
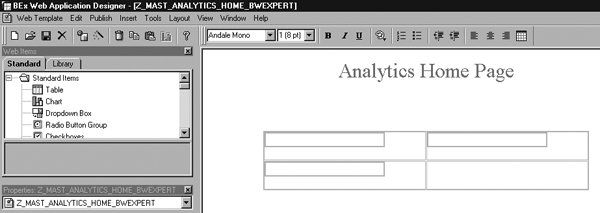
I have three distinct lines of business so I’ll use Web AD to insert a table with two columns and two rows, which gives me four cells to use. I’ll leave one cell blank. To insert the table, click on the insert table icon, and then click on the OK button. Then, insert another table with one row and one column in each table cell in which you want a button. This allows better format control of the buttons and of the overall page design by forcing any format changes (e.g., size or spacing) to stay within the designated space and not run into the other parts of the table. Figure 2 shows what the table structure should look like.

Figure 2
Two-by-two table with one-by-one tables inserted into three of the cells
When you’ve finished setting up the table, create the header for the page. This home page becomes the starting point for all your users, so you may want to enlist a graphics expert to create an appropriate header with your company logo. I’m just using text for my header – Analytics Home Page.
Next, click on the HTML tab in Web AD to see the page’s HTML code. Insert the button code in Figure 3 into the HTML code at the point where the tables are defined. In Figure 3, the last line shows the color assignment (#800000), the size (3), and the text set to Automotive.

Figure 3
Insert button code
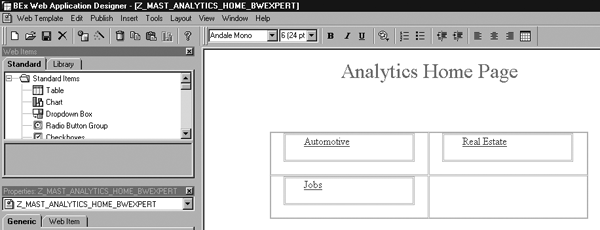
Repeat this process for the other two buttons for Real Estate and Jobs. After you finish, the layout page looks like Figure 4. You can view the full HTML code for the page by clicking this link.

Figure 4
Finished layout of the Analytics Home Page
Set Up the Master Dashboard
Each time you click on a button on the Analytics home page the system calls up a master dashboard. Adding a link to the standard header allows the user to go back to the home page easily.
Following the design standards that Glen Leslie’s article outlined, place a button in the standard header sub- template that appears on every dashboard. In my example, the standard header is a single line, multi-column table. I placed the URL link in the last cell. In this case, the URL link invokes the template ID named Z_MAST_ANALYTICS_HOME_BWEXPERT. The button code to add appears in Figure 5. Insert it into the code where the tables are defined, as you did with the code in Figure 3.
<TD><P align=center> <A href="BEx?sap-language=EN&bsplanguage=EN&CMD=LDCO&template_id=Z_MAST_ANALYTICS HOME_BWEXPERT" ><FONT color=#800000 size=4>Go To Analytics Home Page</FONT> </A>
|
| Figure 5 |
Code to add URL link |
A multi-tab dashboard design can have two or more tabs, depending on the business area complexity. Regardless, a best practice is to make the last tab a role-based tab so users can run queries themselves. This also allows power users and other query developers to propagate queries to the correct dashboard because you can assign a unique role to each master dashboard. In my example, the automotive master dashboard has an automotive role assigned to the last tab.
Alternatively, if I didn’t have a requirement to secure one department from another, I could assign a generic role to each dashboard from which many folder options would be available (e.g., one folder would be for automotive queries). This option is useful when all departments are allowed to run queries from any line of business — for example, if you permit the automotive side to run queries that show real estate results.
In Web AD, click on Role Menu in the Standard tab in the upper left side of the screen (Figure 6). Drag and drop it to the tab that you are working in. To assign a specific role to the Web item, click the Web Item tab and select List of Roles. This brings up the list of all the roles you can use for your Web page. Select the one you need and click on the OK button.

Figure 6
Select the role for your role-based tab
When the dashboards are in use, running a query from the Role tab opens the BEx Web Analyzer, which renders the query results. The last step to the framework is to add a link to BEx Web Analyzer that takes users back to the Analytics home page when they are done with the query.
Add a Link to BEx Web Analyzer
To add a link to the master dashboard, use the standard BEx Web Analyzer template called 0ANALYZER, which is the default template for rendering queries. 0ADHOC is another popular template that is similar to 0ANALYZER, but I like 0ANALYZER because it provides links to save and execute query views. 0ADHOC lets you save query views, but you cannot run previously stored views from this template.
To find the 0ANALYZER template, go to transaction SE38 and execute program RS_TEMPLATE_MAINTAIN. Enter 0ANALYZER in the Technical Name field and execute. Then click on the save as icon and enter a new name, such as ZTWP_0ANALYZER. Refer to David Fox’s article, “Create New BW Web Printing Controls Your Users Will Love,” in the BI hub of SAPexperts for the details about this step.
Now rerun the program RS_TEMPLATE_MAINTAIN and call up ZTWP_0ANALYZER. Looking through the HTML code, you can see that ZTWP_0ANALYZER is really a master template that calls several sub- templates for various parts of the page. For this exercise, you need to edit the sub-template 0ANALYZER_LINKS to insert the new link that takes the user back to the Analytics home page. While editing ZTWP_0ANALYZER, use the search icon and find 0ANALYZER_LINKS. Change the name to ZTWP_0ANALYZER_LINKS. The line you are editing should look like the code shown in Figure 7 when you are done.
<object> <param value="SAP_BW"/> <param value="GET_ITEM"/> <param value="ANALYZER_LINKS"/> <param value="CL_RSR_WWW_ITEM_TEMPLATE"/> <param value="ZTWP_0ANALYZER_LINKS"/> <param value=""/> ITEM: ANALYZER_LINKS </object>
|
| Figure 7 |
Edited code for link |
Save your work and using RS_TEMPLATE_MAINTAIN again, edit ZTWP_0ANALYZER_LINKS. Insert the code in Figure 8 right above the command that appears four lines from the bottom and save. Figure 9 shows what the ZTWP_0ANALYZER_LINKS template should now look like. You can see the new link to the far right.
<td><A href="BEx?sap-language=EN&bsplanguage=EN&CMD=LDCO&template_id=Z_MAST_ANALYTICS_HOME_BWEXPERT" > <IMG src="/sap/bw/mime/BEX/Icons/b_aclose_35.gif" border=0>Go To Analytics Home Page</A></td> </tr>
|
| Figure 8 |
Code to add to ZTWP_0ANALYZER_LINKS |

Figure 9
ZTWP_0ANALYZER_LINKS with the Go To Analytics Home Page link
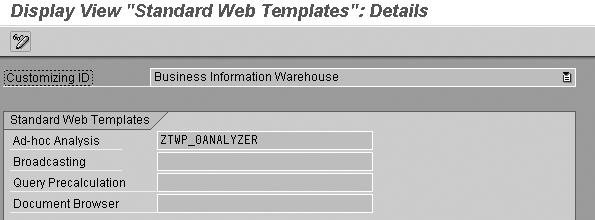
The last step is to make the ZTWP_0ANALYZER template the default template so all users who run a query get this BEx Analyzer version. Using the transaction SPRO, follow IMG menu path SAP NetWeaver>SAP Business Information Warehouse>Reporting-relevant Settings>BEx Web>Set Standard Web Templates. Execute the line item and enter ZTWP_0ANALYZER for the Ad-hoc Analysis field (Figure 10).

Figure 10
Name the new default template
Now that all the pieces are in place the Analytics home page is ready to use (Figure 11). From Web AD, execute the Analytics home page master dashboard and save the URL to your favorites in the browser. You can also now email this URL link to other BW users or publish the link to a portal or intranet.

Figure 11
Completed Analytics home page
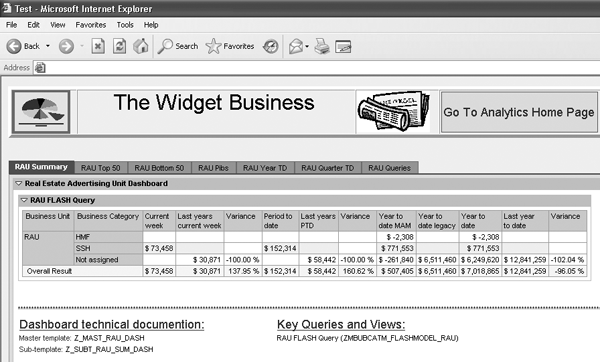
Figure 12 shows a sample of a master dashboard with a standard header template that includes a link back to the Analytics home page, a standard footer template with technical information, and seven sub- templates.

Figure 12
Real Estate Advertising Unit (RAU) master dashboard
Using a Home Page URL vs. SAP NetWeaver Portal
Using a home page URL takes less time than setting up SAP NetWeaver Portal — you can get BW up and running fast without waiting for the portal to come online. The home page approach also requires fewer resources. The BW team can set up the home page URL themselves because it requires only light HTML coding.
Additionally, by making use of the zero footprint dashboard design, you are positioned to take advantage of a portal product should you implement one in the future. The home page design allows you to publish BW information as an iView from Web AD. When you have a portal in place, you can integrate the iView into it.
However, the home page approach has some drawbacks. For example, you cannot secure the dashboards by name, which means that all users can access the dashboards. Instead, you enact security at the query or InfoProvider level. Users can click on a link from the home page, but they receive an authorization failure message on the dashboard for individual queries.
To alleviate this problem, use the Role item filtered for Web templates. For this process, you create a series of folders under a particular role and publish master dashboards to the folders. A user then opens the folder on the home page and sees a master dashboard link. In effect, using Web AD to assign the role Web item as the home page mimics BEx Browser.
Brian Hether
Brian Hether is the manager of data warehousing at The Washington Post. He has 17 years of data warehousing experience, most recently with SAP NetWeaver BW, helping take the system live in 2007. He holds a bachelor’s degree in mathematics, a master’s degree in information systems, and a professional development certification in business administration from Georgetown University.
You may contact the author at hetherbk@yahoo.com.
If you have comments about this article or publication, or would like to submit an article idea, please contact the editor.


