Manager
Learn how you can best use SAP Solution Manager 7.0 (formerly called SAP Solution Manager 4.0) functionality for an SAP implementation project. Specifically, read about the details of the Implementation Roadmap and the activities that should be performed in each implementation stage using tools found in SAP Solution Manager.
Key Concept
SAP Solution Manager provides Implementation Roadmaps to guide your project implementation. These methodologies cover, among other things, the necessary project management, business process configuration, testing requirements, and training aspects of a project, as well as the technical implementation activities.
SAP Solution Manager is the central component used to manage end-to-end solutions in both SAP and non-SAP systems. It helps your organization effectively implement and operate solutions, and it is formed by sets of tools that are used to centralize administration.
I’ll show you some of the benefits that SAP Solution Manager can provide for tracking your SAP implementation project, such as an implementation of SAP Business Suite, composite applications, SAP NetWeaver, or SAP applications for mobile business. I’ll walk you through an actual implementation project scenario, providing you with some of the tips and tricks I’ve learned along the way. I will cover each of the main project phases: Project Preparation, Business Blueprint, Realization, Final Preparation, and Go-Live and Support. I will advise you on what actions you should take during each of these stages. Although my example is based on an implementation project, you can use it as a basic guide for other types of projects as well.
The screenprints and steps in this article are from SAP Solution Manager 7.0 (formerly called SAP Solution Manager 4.0). For a link to information on recent enhancement packages and changes that are not included in this version of SAP Solution Manager, refer to the sidebar “SAP Solution Manager Release Information.” For a list of the main transactions in each phase, see Table 1 at the end of this article.
Project Preparation
To use SAP Solution Manager to track your project, the first step is to create the project along with its basic information (e.g., language, team members, and standards). In this first phase, you plan the project’s goals, implementation task sequence, and strategy. After defining the basic characteristics for the project, you must manage it using an appropriate Roadmap that establishes the guiding methodology for the project.
Note
Before you and your organization set out on an implementation project, you should have a rough project plan in mind. Then the Roadmap can help you create a detailed project plan.
To create your project, start by using transaction SOLAR_PROJECT_ADMIN. In the screen that appears, enter the project name, type, and solution. For my example, I chose to create a sample logistics and purchasing implementation project called IMP001_01. Click the green check mark icon to produce the screen shown in Figure 1, which contains the general data related to your implementation project.
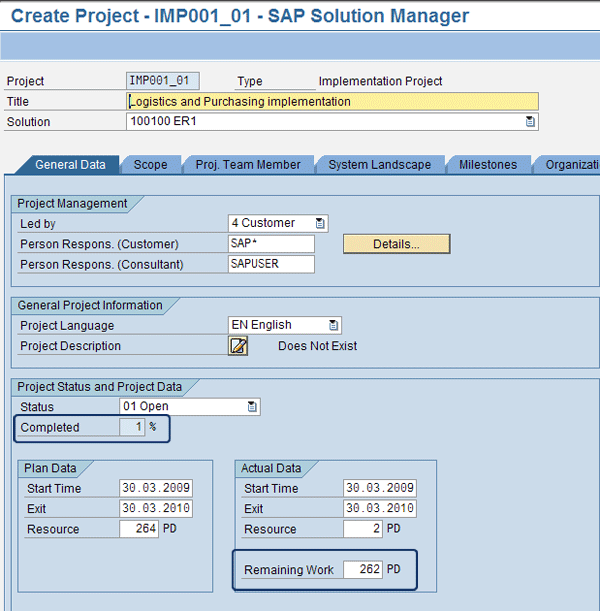
Figure 1
General project data
The main elements that you must either enter or review are the project’s name (e.g., IMP001_01), description of the project in the Title field, management information, language, status, and data. This information is based on your project plan. Note that Solution is not a required field.
The remaining work days and status are calculated automatically based on the planned and actual data you enter and generated as a percentage in the Remaining Work and Completed fields.
Note
Be careful when you select the Project Language because you cannot change it later. The project structure is created in the specified project language and you can only change documentation in the project language.
Next, you can define the scope of your project. Select the Scope tab and then select the Roadmap Select tab (Figure 2). You can see details on the scope of the project and select the Roadmap that acts as a guide for your entire project. There are four kinds of Roadmaps (also called methodologies) available in SAP Solution Manager:
- Implementation Roadmap (e.g., ASAP Implementation Roadmap)
- Global Template Roadmap
- Solution Management Roadmap
- Upgrade Roadmap
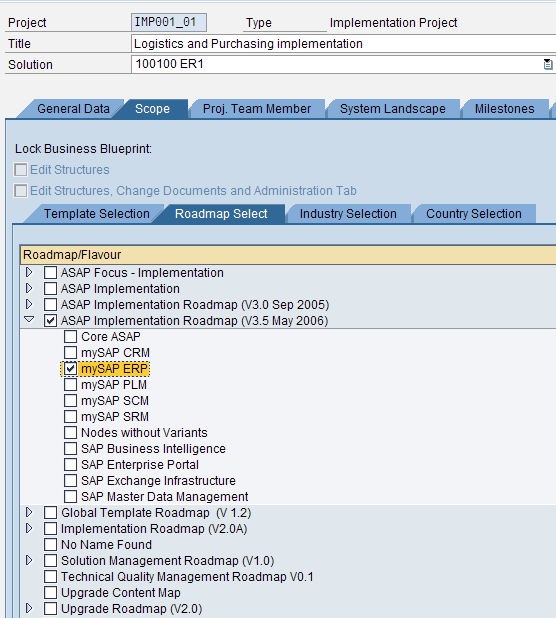
Figure 2
Available Roadmaps
Note
In SAP Solution Manager 7.0 with Enhancement Package 1, there are many new Roadmaps, such as the Run SAP Roadmap, and other Roadmaps are no longer available.
In my example, I checked the ASAP Implementation Roadmap and mySAP ERP options because my example project is dealing with the implementation of new logistic functionalities.
Next, select the Proj. Team Member tab (Figure 3). You can see the team members assigned to the project, along with their roles and company information. Note that free text is also allowed for roles that must be assigned but for which resources have not yet been named.

Figure 3
Team members assigned to the project
Next, select the System Landscape tab (Figure 4). You see the details of the logical components that form the system landscape relevant for this project. Select the ones you need (e.g., SAP ECC). You can also review the systems linked to SAP Solution Manager that allow it to act as a central unifying system. To manage the activities performed in those systems via SAP Solution Manager, you use the appropriate SAP Solution Manager transactions. Note that for each system there are different clients for development, quality assurance, testing, and production activities.
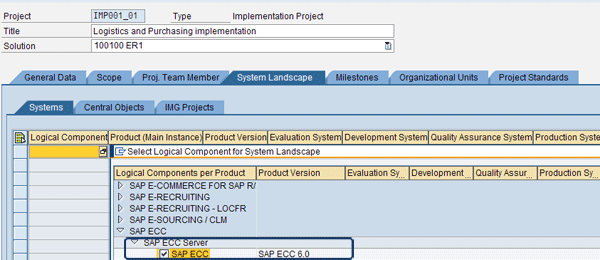
Figure 4
The system landscape relevant to the project
Note
To link other systems to SAP Solution Manager, the Basis team must maintain all products, systems, and related Remote Function Call (RFC) destination settings in transaction SMSY (System Landscape Maintenance).
Based on the system landscape you choose (e.g., SAP ECC 6.0), the following functions are available:
- Navigation to business content in component systems (i.e., those systems for which SAP Solution Manager acts as a central platform)
- Generation of IMG projects on component systems and distribution of central project data
- Comparison and distribution of customization in the local systems (i.e., where you can access component systems)
Save your project before you continue. Then click the Milestones tab to see the details of the project’s milestones (Figure 5). The milestones were defined in the Roadmap and automatically assigned to the project, but you can review them and add additional options in this tab. The project manager and other team members should agree on the milestones.

Figure 5
Milestones relevant to the project
You can monitor the project’s progression according to these milestones, check that the milestones assigned to the project are correct, update their planned and actual start dates, and add others if necessary. I can add other milestones if needed, but I cannot change them. The completion of each milestone triggers a service invoice based on the client’s particular agreement. Typically, the client is invoiced at the completion of all the phases described in this article.
Next, select the Organizational Units tab (Figure 6). You can see all the relevant organizational units involved in the project and their country details. In addition, you can report the organizational units for each SAP system in scope. This information is useful for multiple project analyses because you can define the same organizational unit for different projects and then analyze them based on the value of that particular organizational unit. However, you cannot use this information from a functional point of view because SAP Solution Manager only takes into account the organizational elements defined as enterprise structure elements in each of the SAP systems linked to it.

Figure 6
Organizational units relevant to the project
Next, select the Project Standards tab to view the list of all relevant project standards needed to complete a business activity relevant for your implementation. In my example, this business activity is the creation of a purchase order in a logistics and purchasing implementation (Figure 7).

Figure 7
Standards are used to track the project status
You can create new status values in the Status Values tab to track a specific phase or task. In the screen shown in Figure 7, you can see that I created four new Z custom statuses: ZSMI, ZSMIKW01, ZSMIST01, and ZSMIST02.
You can create multiple documents for each object in your project (e.g., master data) and then specify their statuses based on the Project status values (e.g., Open and In Process). It’s also easy to create new status values in this tab if your project requirements change.
There are two types of project documentation: project-specific documentation (only valid for that particular project) and cross-project documentation (valid for all projects). In the Documentation Types tab, you can create project documentation templates for each project document, which are stored in the local SAP Knowledge Warehouse and used in the Business Blueprint creation described later in this article. There are some documents already available in the system — for example, ASAP templates that you can use to perform a specific business scenario such as a consignment process across modules.
Roadmaps
You can use transaction RMMAIN to check the details of the Roadmap assigned to the project, as shown in Figure 8. The ASAP Implementation Roadmap contains the tasks that the functional team performs.
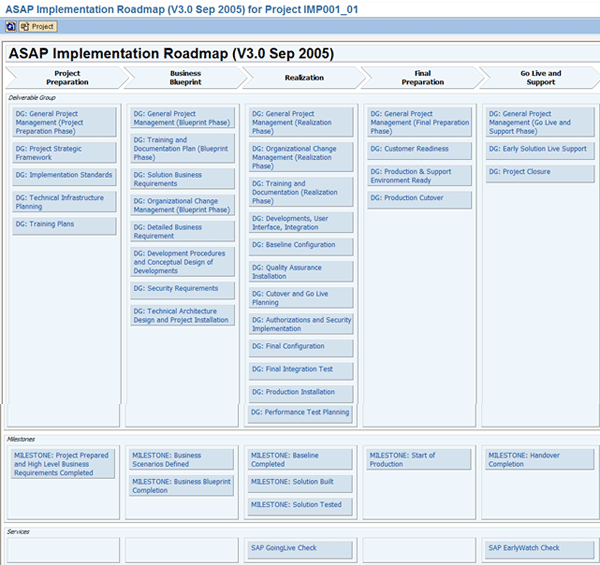
Figure 8
Roadmap assigned to the project
Note that transaction RMMAIN automatically displays the latest project you were working on. If you need to display another project, then you can enter your own project ID using the Project button. You can also check the details of more general Roadmaps using this transaction. In that case, you don’t have to specify the project ID because Roadmaps are standalone and project independent. If you need to display the list of all Roadmaps available in the system, click the Project button and select the No Project option. Click the Roadmap button to select a particular Roadmap (Figure 9). For my example, I chose the ASAP Implementation Roadmap.
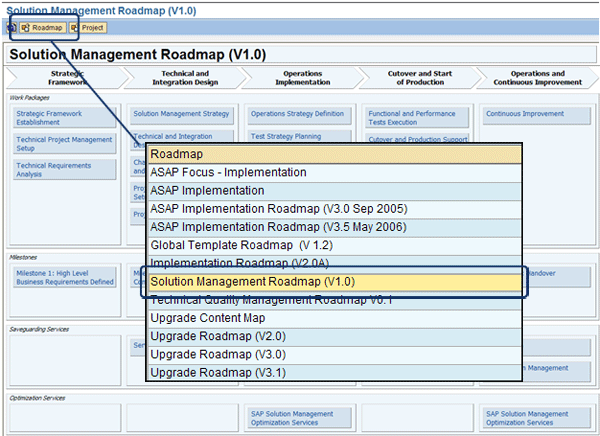
Figure 9
Different types of Roadmaps
Double-click ASAP Implementation Roadmap (V3.0 Sep 2005) to bring up the screen shown in Figure 10.

Figure 10
Visualization of the Roadmap in a hierarchical tree
For each level of project elements (e.g., Phase Startup, Project Initiated), you can store the appropriate documentation. This includes both standard SAP documentation (i.e., in the Accelerator tab, accelerators that SAP provides to facilitate implementations) and specific project documentation (in the Proj. Documentation tab).
In the Proj. Documentation tab shown in Figure 11, you see the available options for creating project-relevant documents. Document management in SAP Solution Manager is flexible, and you can create or use different types of documents for each of the project elements.

Figure 11
Options available to create project-specific documents
Double-click the Global Delivery Organization Roles document highlighted in Figure 10 and you can view an example of the documentation stored at Phase Startup (Figure 12).

Figure 12
Example of documentation
Business Blueprint
The goal of this phase is to determine the project scope and create a Business Blueprint to analyze the business processes and map them in the SAP system. Usually, the Business Blueprint collects the results of the following project phases:
- As-is: in this phase, all current business processes are documented (if this has not been done already). Note that this option has fallen out of favor in recent years because it slows down the project teams that deploy processes.
- To-be: in this phase, the current business processes are matched against the standard SAP functionalities. In addition, a gap list is created to stress all processes not covered using standard SAP functionalities (e.g., specific reports, forms, and interfaces required for various business processes).
Use transaction SOLAR01 to create the Business Blueprint. Specify your project ID using the Project ID button and make the appropriate checks and changes in the tabs that compose the Business Blueprint. For example, you can update business scenarios, edit the status of related documents, and add administrative information.
Note
In my example, I examine a small part of the master data. In an actual project, there are many entries for organizational units and master data, so it is beyond the scope of this article to examine all of these.
Figure 13 shows the details of the Gen. Documentation tab for the Processing Purchase Orders in ERP business process, which I have selected for my example. In this tab, you can view the SAP-standard documentation for each business process. You can select various processes and familiarize yourself with the content provided in this tab.

Figure 13
Example of general documentation for Processing Purchase Order in ERP
Next, select Master Data from the business process hierarchy on the left and then select the Proj. Documentation tab (Figure 14). You can see the list of the project documents created for the master data. Here, you can fill in and link the appropriate documentation. Each project has a specific set of documents to be entered for each activity using specific templates, and the list of the documents to be filled should be available in your system already. You should check the Blueprint-Relevant (Blueprint-…) column if an item is relevant to your Business Blueprint.

Figure 14
Project documentation details for master data
Select the Structure tab and you’ll see the structure of the master data included in the scope of the project and Business Blueprint (Figure 15). You can make changes to the list at this stage. My recommendation is to keep this list at a minimum so that you are mainly focused on the project’s priorities.

Figure 15
Business cases relevant for the Business Blueprint
Select the Administration tab to view the administration details of the master data (Figure 16). It is important to keep this information as accurate as possible for your projects’ structure elements (i.e., any items that do not display an execute icon beside them) so that you can react immediately to any kind of delay. You can see the planned dates versus the actual dates and the status of each structure element (for example, In Process for Master Data as shown in Figure 16).

Figure 16
Administration details for the master data
Select the Transactions tab to see all transactions relevant to a specific business activity. In the example shown in Figure 17, you can see all transactions relevant to managing conditions in procurement. In this list, you can add custom transactions, specify the logical component, mark a transaction as In Scope for your requirements and Business Blueprint, or designate a transaction as the Standard (default).

Figure 17
Figure 17 Transactions associated to each business process
At this point, you should decide how the Business Blueprint document is created. You do this in a Microsoft Word macro. There are two different options:
- Online generation, recommended for small documents
- Offline generation, recommended for both large and small documents
The Business Blueprint also contains information from the corresponding Business Process Repository content, which is available in your SAP Solution Manager system. The Business Process Repository is a package of reusable, predefined business process content formed by the following topics:
- Scenario documentation
- Transaction assignment
- IMG assignment
- Configuration guide
- Preconfigured processes delivered by business configuration sets
- Predefined test cases
To create the Business Blueprint and send it for review and sign-off, you must first enter transaction SOLAR01, specify your project ID, and then follow menu path Business Blueprint > Generate Blueprint Document (Figure 18). You can review and specify the details that are being sent along with the Business Blueprint, as well as the path for downloading the Business Blueprint, in the General Tab. If you select the Scope tab and click the Structure button, you can choose the scope of the Business Blueprint. There are also options to restrict the content of the document.

Figure 18
Details to include in the Business Blueprint document
Select the details you need to report in the Business Blueprint document and then run the report using the execute icon. The system issues the message shown in Figure 19.

Figure 19
Confirmation screen
To create the Business Blueprint document, follow menu path Tools > Macro > Macros.
Run the macro SAP_BUSINESS_BLUEPRINT from the Word document specified in Figure 19. This creates the document shown in Figure 20. Note that it is downloaded in the folder you specified in the download path, which you defined in the General tab in Figure 18.

Figure 20
Sample Business Blueprint that SAP Solution Manager generates
As you can see, the Business Blueprint is formed based on pre-configured business processes that need to be implemented. Documents with the attribute Not Blueprint Relevant (i.e., the Blueprint… check box was not checked) are not included in the Business Blueprint document, as determined in Figure 14.
If you need more details on the latest version of the Business Process Repository, you can download them from the SAP Service Marketplace at https://service.sap.com/solutionmanager.
Realization
The aim of the Realization phase is to use the Business Blueprint details generated in the previous step and implement solutions to meet the project’s requirements. To do so, the main activities performed during this phase are:
- Configuration (customizing)
- Testing the implemented solutions
- Preparing end-user documents
- Preparing customer documents
- Preparing training materials
It is beyond the scope of this article to provide details on all of these activities, but I’ll provide a few examples. Use transaction SOLAR02 to start performing these activities. In Figure 21, you can see the transactions for the Message Conditions business activity under the Transactions tab. You can also browse the functionalities that are available to track each business activity (highlighted on the right side of the screen).

Figure 21
Manage relevant project configuration activities
Select the Test Cases tab to view the details of the test cases to be performed for a specific business activity (Figure 22). It’s important to see how a test should be conducted for each business activity and what the results of these tests are. Based on the results of the tests, you can take corrective actions (e.g., change configurations, re-train users, or change business processes).
Note
Testing and defect management functionality is available in SAP Solution Manager, but going into detail about this is outside the scope of this article. For more information, refer to Suresh Veeraraghavan’s article “
Testing Made Easy in Solution Manager.”

Figure 22
Test case details for the Message Conditions
Final Preparation
The aim of the Final Preparation phase is to prepare and conduct end-user training and perform a final test and validation before going live. During this phase, you should close all open issues (e.g., incorrect interface parameters or missing master data need to perform a transaction). The delivery team should conduct data preparation and migration with a sign-off from each department. Use transaction RMMAIN to see the full list of activities that are available and recommended during the Final Preparation phase (Figure 23).

Figure 23
Final preparation activities
You should ensure that important activities related to the final preparation have been validated. For example, users should be trained and certified, the master data has been migrated in an accurate way, open documents migrated accurately, authorization profiles were appropriately tested, key performance indicators (KPIs) have been met, support documentation has been created, and an on-going support process has been defined.
Note
SAP Solution Manager offers e-Learning functionality to assist you with this phase, though getting into the details of e-Learning would be beyond the scope of my article.
Go-Live and Support
The aim of the Go-Live and Support phase is to start using the system for production activities and establish a solid support process for end users. Also, the implementation team should hand over its responsibilities to the help desk team. In Figure 24, you can see the list of activities available in the Go-Live and Support phase. Each project team can decide which of these options to use depending on its particular project’s strategy and needs.

Figure 24
Go-Live and Support activity details
Reporting
SAP Solution Manager provides flexible tools to analyze your projects at various stages.
You can get to the project analysis in two ways:
- Cross-project and phase, using transaction SOLAR_EVAL
- Project-specific, using transaction SOLAR_PROJECT_ADMIN and selecting Environment > Project Analyses
For the purposes of my example, I chose the project-specific transaction SOLAR_PROJECT_ADMIN and navigated to Environment > Project Analyses (Figure 25). You can see the options available for analyzing a project. For the purposes of my example, I chose General Status Analysis.
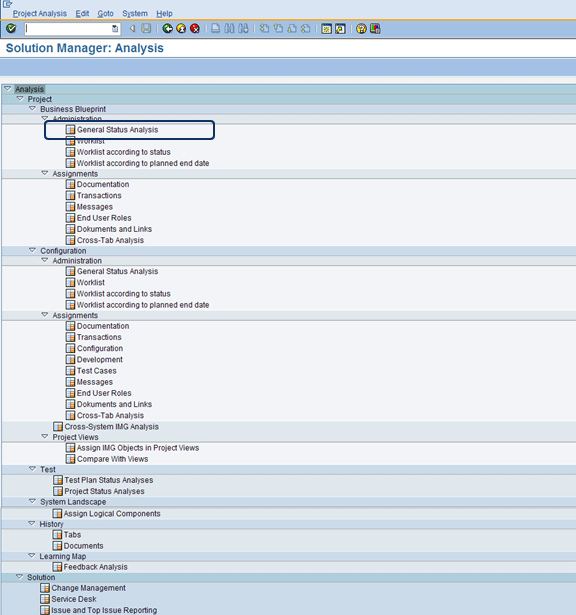
Figure 25
Options for analyzing a project in SAP Solution Manager
Double-click the analysis option you chose and you’ll see the selection screen for the project and its structure (Figure 26). I chose to analyze the complete structure, which you can do by clicking the Select Substructure button.

Figure 26
Selection of the project to analyze
Click the execute icon to run this report and you’ll see a screen similar to the one shown in Figure 27. For each business activity, you can examine the status details. The project analysis and analysis results display options are flexible. The layout details are provided in the SAP List Viewer (ALV) grid, or you can export the results to Microsoft Excel or Microsoft Project. You can also use assignment reports, which are provided by the system to give you an overview of all available documents and their statuses.
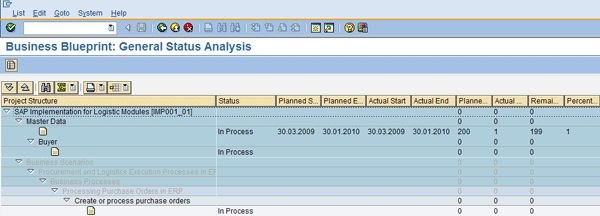
Figure 27
Project details status
Handover to Operation
After the project has been implemented and stabilization has passed without major issues, the project can be handed over to the service management organization. To hand the project over to the service management organization, use transaction SOLUTION_MANAGER (Figure 28).
Note
The stabilization phase was not covered in this article, but includes any work that should be done to hand over the project to the service management organization. The term service management organization, in my experience, refers to either the company (an internal service management organization) or a service provider.
In Table 1, you can find the important transactions you can use in each phase of the implementation phases.
|
Project Preparation
|
- Transaction SOLAR_PROJECT_ADMIN (Project Administration)
- Transaction RMMAIN (Roadmap)
- Transaction SOLAR01 (Blueprint)
- Transaction SOLAR_EVAL (Reporting)
|
|
Business Blueprint
|
- Transaction RMMAIN
- Transaction SOLAR01
- Transaction SOLAR_EVAL
- Transaction STWB_2 (Test Plan Management)
|
|
Realization
|
- Transaction RMMAIN
- Transaction SOLAR01
- Transaction SOLAR_EVAL
- Transaction SOLAR02 (Configuration)
- Transaction STWB_WORK (Testing)
- Transaction STWB_INFO (Test Workbench Infosystem)
|
|
Final Preparation
|
- Transaction RMMAIN
- Transaction SOLAR_EVAL
|
|
Go-Live and Support
|
- Transaction RMMAIN
- Transaction SOLAR_EVAL
|
|
| Table 1 |
Transactions available for each implementation phase |
SAP Solution Manager Release Information
For information on changes and updates in the latest release of SAP Solution Manager (SAP Solution Manager 7.0 with Enhancement Package 1), visit https://help.sap.com and navigate to the section on SAP Solution Manager (Figure A). Here you can review the documentation on SAP Enhancement Package 1 for SAP Solution Manager 7.0 and learn about all the new functionality, including Work Centers.


Gaetano Altavilla
Dr. Gaetano Altavilla is a senior SAP practice manager. His focus is on pre-sales, delivery of SAP application solutions for large international corporations, and SAP knowledge management in Europe, the Middle East, and Africa (EMEA).
In his 18 years of SAP application experience working for many multinational companies, such as Procter & Gamble and Hewlett-Packard, he has covered a wide range of ERP logistic areas, focusing on the MM, WM, SD, LES, PP, PP-PI, PLM (QM, PM, PS) modules, as welll as CRM (TFM), SRM (EBP), SCM (SAP APO), and MES (ME) components.
Dr. Altavilla holds a degree with first-class honors in mathematics from the University of Naples and is certified in many SAP modules: SAP Logistics Bootcamp, SAP MM, SD, LE (SHP/WM/LE), PP, PLM (PM, QM, PS), SRM, CRM, SCM (APO), SCM (TM), FI, CO, and Solution Manager. He also has experience in ABAP/4 and application link enabling (ALE) and IDocs. He has participated in numerous industry conferences, such as the SAP Skills Conference in Walldorf at SAP SE.
You may contact the author at Gaetano_altavilla@hotmail.com.
If you have comments about this article or publication, or would like to submit an article idea, please contact the editor.