One of the many new features in SAP HR 4.6x is an improved user interface. The author describes the graphical and table editor modes that manage the configuration of HR features, schemas, and rules. He focuses on the differences between the two modes.
As the SAP HR module has evolved, new features and user interfaces have added functionality and improved user interaction. With the later 4.6x releases, for example, improvements in the underlying ABAP technology framework have allowed for the use of ABAP controls technology, such as the ALV (ABAP List Viewer) and tree controls. You can see the changes to the user interface in the editors dealing with the configuration of HR features, schemas, and rules. I’m going to highlight some of the major differences between the graphical and table editor modes and highlight improvements to the feature, schema, and rule editor user interface. I’ll also show how to quickly switch between editor modes.
In previous SAP releases, maintenance of features, schemas, and rules was carried out through a table editor interface (
Figure 1). This table mode allows for command-line keystrokes that allow the knowledgeable user to perform source text maintenance tasks such as copying, deleting, navigating, and inserting lines. The table editor interface is considered more technically oriented. It relies on the user to remember keystroke combinations to carry out editing tasks that may not be accessible through toolbar buttons or menu options of the table editor interface.

Figure 1
Personnel calculation rule editor in table mode
Unlike the graphical view, the table editor view of source text allows the Ctrl+Y SAPGUI key combination to carry out mass copy and paste functions to transfer source text between any two Windows applications. There is less reliance on the user interface to guide the user in carrying out the various editor tasks. For example, few or no toolbar buttons are in the table editor interface for features, schemas, and rules to perform copy, delete, and other maintenance activities. Only basic editor maintenance functions such as “find” and “add new lines” are provided in the menu. Similarly, within the table editor user interface, the right-click context-sensitive pop-up menu that many Windows application users are accustomed to does not include any of the typical maintenance functions one would expect. Despite the lack of user-friendly features, the table interface allows for very rapid and efficient editor activities for the experienced user via the command line and in-line keystroke shortcuts (
Tables 1 and
2).
| Commands that are available when editing the decision tree for a feature enable you to maintain the decision tree and access the functions in the editor.You can either enter these commands in the command line or access them using the feature and edit menu options. |
| A |
(A)ttach: Used as a “goto function.” The cursor is moved to the selected line number. Enter “A” followed by a blank character and then the line number you want to access. |
| CHECK |
The syntax of the feature is checked. If it is correct, the system displays a message “Feature OK.” If not, it displays an error message. |
| F |
(F)etch: Enables you to display/maintain a different feature. Enter “F,” a space, and the five-character key of the desired feature. |
| FIND |
Finds the first occurrence of a character string in the feature .Enter “FIND,” a space, and the character string you are looking for. |
| I |
(I)nsert: Inserts the specified number of blank lines at the end of the Editor. Enter “I,” a space, and the desired number. |
| PRINT |
Accesses the print parameter screen to choose the output
device and the print options. |
| R |
(R)eplace: Replaces one character string with another. The character string is replaced every time it occurs. Enter “R,” then a space, then the character string to be replaced, then another space, and finally the character string to be insertedinstead. |
| U |
(U)pdate: Saves the feature and checks the syntax at the same time. If an error is identified, you can cancel the update. |
|
|
| Table 1 |
Table user interface command line option. The command-line option information is taken from SAP 4.7 Help Library > SAP R/3 Enterprise Application Components > Human Resources > HR Tools (PY-XX-TL) > Features Editor > Feature > Decision Tree for a Feature > Line Commands. |
|
| Line commands are used to structure and change the source text of decision trees. These commands are entered directly in the line number field of each line of the source text. |
| * |
Selected line displayed as the first line in the editor |
| A |
Target line for copy (C/CC..CC) or move (M/MM..MM) command. The lines that have been copied or moved are inserted directly after the selected target line. |
| B |
Target line for copy (C/CC..CC) or move (M/MM..MM) command. The lines copied or moved are inserted directly before the selected target line. |
| C |
Copies the selected line to the target line specified by the command A or B |
| CC..CC |
Copies the selected line block or line range to the target line specified by the command A or B. Enter CC in the first andlast line of the block you want to select. |
| D |
Deletes the selected line |
| DD..DD |
Deletes the selected line block or line range. Enter DD in the first and last line of the block you want to delete. |
| I |
Inserts a blank line directly beneath the selected line |
| In |
Inserts n blank lines directly beneath the selected line |
| M |
Moves the selected lines to the target line specified by the command A or B |
| MM..MM |
Moves the selected block of lines. Enter MM in the first and last line of the block you want to move. |
| R |
Duplicates the selected line. The copy is inserted in the line directly beneath the original. |
| Rn |
Copies the selected line n times. The copies are inserted directly beneath the original. |
| X |
Copies the content of the X buffer beneath this line |
| XX..XX |
Writes the selected line block to the X buffer. Enter XX in the first and last line of the block that you want to write to the buffer. |
|
|
| Table 2 |
Table mode in-line command list. The in-line com- mand information is taken from SAP 4.7 Help Library > SAP R/3 Enterprise Application Components > Human Resources > HR Tools (PY- XX-TL) > Features Editor > Feature > Decision Tree for a Feature > Editor Commands. |
|
For someone new to SAP and the table editor interface, however, performing such tasks could lead to errors. For example, syntax errors are common when maintaining personnel calculation rules in the personnel calculation rule editor. If the first letter of a new operation in a table line is off by one position, then the editor may not catch the syntax error and the processing of the rule will be different from what was intended.
You access the table and graphical editor modes via toolbar or menu options in the feature (
PE03), schema (
PE01), and personnel calculation rule (
PE02) editors. To toggle between graphical and table editor modes in the features editor, follow the menu path from the features editor main screen or within the source text screen via menu path
PView > Tree maintenance or Table Maintenance (
Figure 2). The schema and personnel calculation rules editors toggle between table and graphical modes via a toolbar button or the menu path from either the schema or rule editor main screen:
Utilities > Structural graphics or
Table display (
Figures 3, 4, and
5).
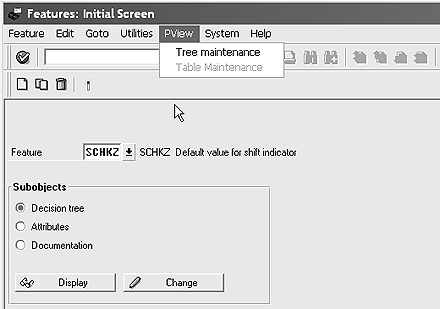
Figure 2
Feature editor user interface options
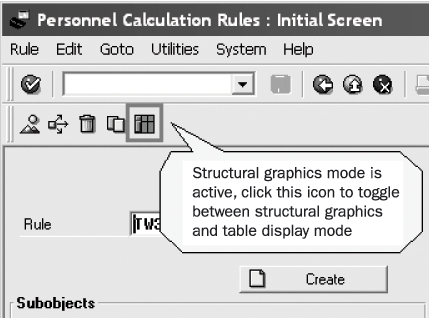
Figure 3
Personnel calculation rule editor user interface options via toggle icon in toolbar

Figure 4
Personnel calculation rule editor user interface options via toggle icon in toolbar

Figure 5
Personnel calculation rule editor user interface options in the menu
The default editor mode can be set as follows:
- Features editor (PE03): The editor mode that is active at logoff for each user is remembered and used at the next login.
- Schema editor (PE01): The table editor is the default mode since any changes to a schema must be carried out using the table interface. You can override this default mode by using the user parameter ID (PID) HRPE01_DISPLAYMODE. Set this PID to TREE or TABLE to override the default editor mode.
- Personnel calculation rule editor (PE02): The graphical editor mode is the default editor mode. However, you can control the default via the PID HRPE02_DISPLAYMODE. Set this PID to TREE or TABLE to override the default editor mode.
Graphical (Tree) Editor Mode
With new SAP releases, more emphasis was placed on improving the user interface to the feature, schema, and rule editors. This resulted in the option of using a graphical display of the feature, schema, and rule source text in a color-coded hierarchical format. (
Table 3.) The new graphical format is designed to improve the accuracy of editor maintenance activities. The format also aims to shorten the learning cycle required of new users through the use of pertinent toolbar buttons, menu options, and context-sensitive right-click pop-up menus.
| Feature |
PE03 |
4.5A |
| Rule |
PE02 |
4.5x |
| Schema |
PE01 |
4.0x (graphical mode is only available for display of schema,
schema maintenance must be carried out in table mode) |
|
|
| Table 3 |
Availability of graphical user interface for feature, schema, and rules editors |
|
Since the schema editor only supports a graphical mode for the display of source text, the interface enhancements to the schema editor are purely organizational, navigational, and non-maintenance oriented (
Figure 6). Some examples of display-only changes in the interface to the schema editor are drill-down navigation to subschemas and rules and right-click direct access to ABAP source code for functions and operations. This is similar to
PE04 (maintain functions and operations transaction).

Figure 6
Schema editor in graphical display-only mode for schema TM04
Contrasted with the table maintenance user interface, the graphical editor provides much more user guidance regarding syntax and formatting rules in the feature and rule editors. For example, using the features editor in the graphical mode automatically creates the “otherwise” node in the source text whenever a decision operation is created. This otherwise node is required to handle all decision branches that are not specifically handled in other nodes. You also can use cut, copy, and paste functions to move entire feature decision branches from one node to another, even if the nodes are at different hierarchical levels within the whole decision structure.
In
Figure 7, the entire decision tree under the node
2 Retiree/pensioner is selected and then copied to the
otherwise node in
Figure 8. As mentioned previously, the copy and paste functions can be executed in the graphical editor using the keyboard shortcut Ctrl+F6, the toolbar copy icon, the menu path
Edit > Copy, or the right-click pop-up menu item
Copy. This type of mass decision tree reorganization is not easily accomplished in the table editor view of the source text. The toolbar buttons and menu options now fully support all relevant editor task functions.

Figure 7
Copying the entire decision branch PERSK to another decision node
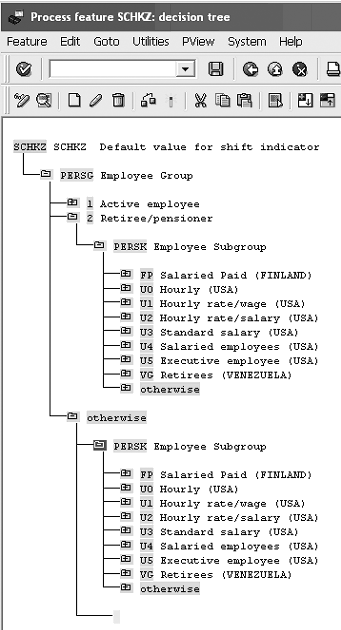
Figure 8
Feature SCHKZ after pasting the PERSK decision branch under the otherwise node
The right-click context-sensitive pop-up menu is also enhanced to include all the editor functions that are accessible to the user via the toolbar or menu options (e.g., copy, delete, change). In other words, unlike the table editor interface, the graphical editor functions are available through the toolbar buttons, menu options, and context-sensitive right-click pop-up menu and are now consistent and common across each access method. The graphical view also provides additional user guidance whenever a new hierarchical node is created (
Figure 9). The new node menu that appears assists the user by listing all the possible types of nodes that can be created. The pop-up node menu differs depending on the type of editor and the level within the source text hierarchy the user is currently in, but serves to assist in adhering to proper syntax and alignment rules.
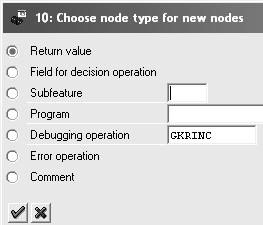
Figure 9
Graphical new node creation options for feature editor
Using the features editor as an example, when a user creates a new decision node in the graphical editor for the feature
SCHKZ (default value for shift indicator), the editor guides the user by first displaying a list of possible decision fields based on the structure definition of the feature (
Figure 10). The user can fine-tune the decision operation by using field offsets and comparisons by using the buttons at the bottom of the pop-up (
FldComp., Comparative value, Comparison field). The user can gain direct access to the data dictionary definition of any decision operation field by using the
Technical Information button. Based on the user’s selection, the correct source text is generated without the user having to remember the correct command syntax and parameters.
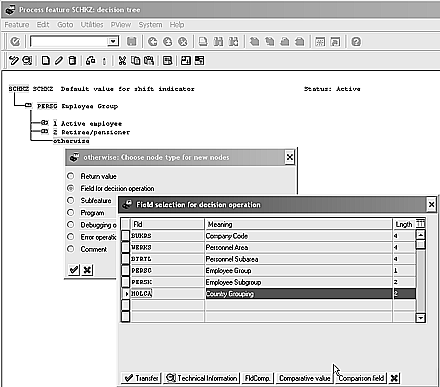
Figure 10
New node pop-up menu showing list of possible decision fields
Once the new decision node is created, the graphical interface provides further assistance by automatically limiting the return variable length and value based on the data dictionary definition of the decision field. When the decision operation field has a value list associated with it in the data dictionary, as in the
MOLGA decision field, the interface limits the user to the values in that list (
Figure 11). The graphical interface to the features editor allows the user to insert multiple decision values from the value list in a single step. This saves time compared to the same task in the table editor interface. In the event that there is no value list associated with the field, the interface limits the variable length based on the decision field’s data dictionary definition. For example, adding the country code field (
MOLGA) as a decision operator in feature
SCHKZ limits the possible return field values to the two-character length defined for the
MOLGA field in the SAP data dictionary.
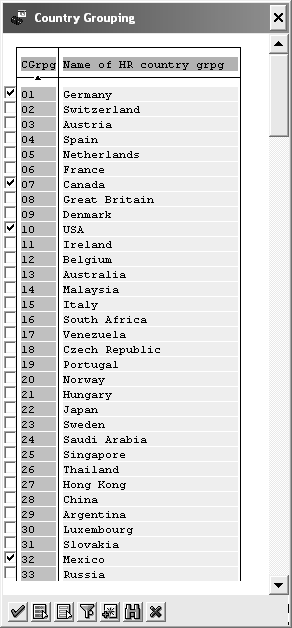
Figure 11
Value list for decision field MOLGA with multiple value selections
Many more user interface enhancements are available in the graphical editor mode that may be beneficial to the way you work.
I have used the table user interface for many years, and was a little confused by the newer graphical layout. However, I was able to quickly gain a better understanding of the new graphical maintenance environment by making my edits using the familiar table user interface and then switching to the graphical mode to see how the changes were translated to the new graphical layout. After a few times toggling back and forth between the modes, it became very easy to use and understand the new graphical interface. Since I have used the table user interface for many years and am very accustomed to command- line keystrokes, I am still somewhat partial to the table mode of editing. Each editor mode has its various strengths and weaknesses and each user must decide on their own which is easier and more intuitive to use. So the next time you have to maintain a feature, schema, or rule, give both methods a try and see which one you prefer and find more productive.
For More Information
For SAP release 4.7, standard SAP help documentation on the feature, schema, and rule editors can be found at or https://help.sap.com or at SAP Library > SAP R/3 Enterprise Application Components > Human Resources > HR Tools (PY-XX-TL) > Editor for Personnel Calculation Schemas or Editor for Personnel Calculation Rules or Features Editor.
Graham Wong
Graham Wong is a consultant and co-founder HR Focal Point, an SAP and technology consulting company. He has been working with SAP applications and technology since 1994. He holds bachelors degrees in commerce and French from the University of Virginia as well as a master's degree in management information systems from the McIntire School of Commerce at the University of Virginia.
You may contact the author at
graham.wong@hrfocalpoint.com.
If you have comments about this article or publication, or would like to submit an article idea, please contact the
editor.


