BW 3.x offers greater integration with Enterprise Portal (EP) to provide centralized, Web-based access to analytical data. You have four ways to publish BW content to SAP EP, each with a different level of technical skill required. The author walks you through the publishing process for each method and explains for which circumstance each method is best suited.
One of the core goals of the SAP BW 3.x release was to provide enhanced Web-based, centralized access to analytical content and output. SAP accomplished this through greater integration between its Enterprise Portal (EP) and SAP BW. This is important to both administrators who want to publish content centrally and to end users who need to publish content for themselves or workgroups.
I’ll describe four ways to publish SAP BW content in SAP EP in order of required technical know-how, from least to greatest. I will also provide tips, tricks, and details on which approach might be the best fit for your organization. The particular approach you take is largely at the discretion of your SAP BW and Portal administrators and your corporate policy regarding who has access to create content, both in SAP BW and SAP EP. See Table 1 below for a comparison of all the methods.
1. Save a BEx Web AD Template as an iView File and Import It into the SAP EP
In addition to a default Web template for query and analysis, SAP BW 3.x comes with the Web Application Designer (Web AD) for creating and publishing advanced custom templates and dashboards to the Web. (See the sidebar, “Publish a Menu Item in a Web Application Designer Template,” for more details.) If you play with Web AD, you'll notice two inviting SAP EP-related options in its Publish menu: as iView file and as iView (this latter option is discussed in the next section). With the first option, you create a Web application in the Web AD and save it. You then follow the Web AD menu path Publish>as iView file. This saves an XML description of the Web AD template to the file you designate. This XML description is compatible with the Portal's iView import facility.
Note
Under normal circumstances, stylesheet settings should already be taken care of. After iViews are created, stylesheet settings can be maintained by logging in as a Portal administrator and then following the menu path: Content Admin>iViews>Channel. Next, select Edit on the far right of the iView, click on the Java tab, and go to the Look and Feel Theme Part for BW Reports section of the iView definition. Select BIReports30 for SAP BW 3.0 or higher Web queries. For SAP BW 2.0B/2.1C Web queries, select SAPBWreports. This applies to all methods listed below.
Note
This method is potentially for end users/power users who can create SAP BW content but don't have authorization to publish to the SAP EP. iViews are typically discrete views of information that form one pane of a large window of user-selected content in the Portal. So, this method allows an SAP BW power user to quickly create content and then send an iView definition file to an administrator for import into the Portal.
What you do next with this file is determined by your corporate SAP EP authorization policy. You could transfer the iView file to a Portal administrator. The procedure to publish the iView file follows:
Import the iView file by logging on to the Portal as an administrator and using the Import option under Content Admin/iViews. SAP BW iViews are built in Java, so you must select the Java iView as the initial step in the import process (Figure 1).

Figure 1
Portal administrator importing an iView file
Publish a Menu Item in a Web Application Designer Template
The BEx Web Application Designer (Web AD) provides a simple, drag-and-drop, “what you see is what you get” interface to create custom Web templates (also called “Web applications”) with analytic content and controls from SAP BW. SAP designed Web AD to allow non-technical users to create highly customized Web content. Yet advanced Web application design (even Web dashboards) is also possible via Web AD.
You can use this interface in an administrative portal publishing process to produce “single-click Portal publish” for your user community. In short, this is accomplished by placing a “menu item” on a Web AD template and publishing the template to SAP EP.
The menu item functionality provides powerful deployment options for administrators and content creators to allow users to be more self-sufficient in placing content into SAP EP (within the bounds of your content deployment policies). With the BEx Web Ad Hoc Query Designer, users can complete a full query lifecycle — from design to deployment to modification, all from their Web browser.
The menu item is placed on a Web AD template and then connected to the desired SAP BW roles or favorites (e.g., SAP BW “favorites” created in the BEx Query Designer). The most powerful aspect of this functionality relative to SAP EP is the option in the menu item properties to select User Favorites and Roles rather than just specific, named roles. The template presents a window into the role-based SAP BW world for users through the Portal as shown above.
Note
Initial publishing of the SAP BW menu item template typically requires administrative intervention on the Portal. After that step is accomplished (once for all users), any SAP BW user can see his or her favorites and role-based Web content via a browser in SAP EP.
When you launch the template, authentication is performed for a given user against the source SAP BW system (typically via single sign-on in SAP EP). The result displays that user's roles or favorites in a Web folder (tree) structure, with all Web templates, queries, and Crystal Enterprise content displayed as leaf nodes of the tree.
Again, someone with Portal administrator rights now has to publish this SAP BW template to SAP EP via method 1, 2, or 3 described in the main article. Once this template is published in SAP EP, single-click publishing for your users can begin. If they create content with the BEx Query Designer, BEx Web Ad Hoc Query Designer, or Crystal Enterprise reports on SAP BW, that content must be saved in their personal favorites or in roles. The newly published Web AD template with the menu item now displays a link to this new content in its tree display. No more fuss, no more muss; all users see only what their authorizations allow within the menu item template for both their public (role-based) and private (favorites) content for an SAP BW system.
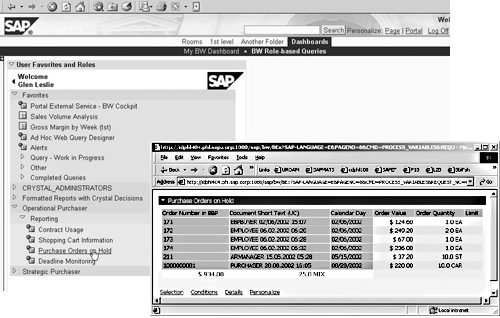
Web AD menu item published in SAP EP
OpenFigure 2ImportFigure 3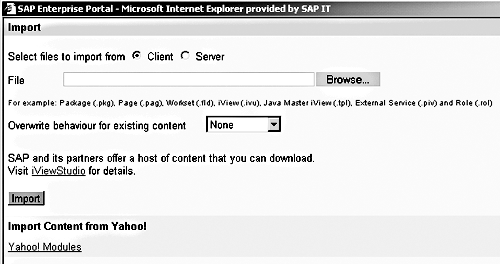
Figure 2
Import the iView file
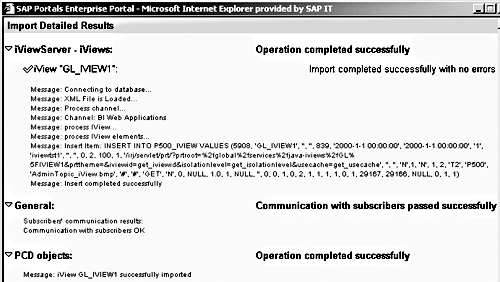
Figure 3
Results screen for importing the iView file
Once you complete the wizard, this iView is stored by default in the channel called BI Web Applications. Channels are a Portal construct used to organize iViews into logical groups. Every iView must be assigned to a channel, and channels can be attached to roles for quick administrative assignment of groups of iView content to roles rather than individuals. Channels allow users to navigate more quickly and select relevant content for their Portal pages.
Once the import procedure has been completed successfully, the iView is available for normal usage within Portal administration. For users to view the iView from here:
- Assign the iView to a page or pages
- Assign the pages to a Portal role or roles and then assign Portal users to the roles to make the iViews available to the users
To return to an existing iView to make changes, follow the menu path Content Admin>iViews> Channel>Edit.
2. Save the Web AD Template or BW Query to a SAP BW Role
The next publishing approach is also based on iViews but relies on direct role synchronization between SAP EP and SAP BW. You create a Web application in Web AD, but you must save it to a SAP BW role (you can't migrate your favorites!). Once you've saved the template to the SAP BW server, select the following menu options in the Web AD: Publish>as iView. This saves an XML description of the Web AD template to a role in the SAP BW system.
Note
This functionality is typically reserved for the Portal administrator. It is a way to bring SAP BW content to the Portal en masse (although content can be brought across selectively with this method) and requires administrative authorizations in both the SAP EP and SAP BW systems.
Content Admin>SAP Role MigrationFigure 4DestinationsmustMigrate assignment between role and user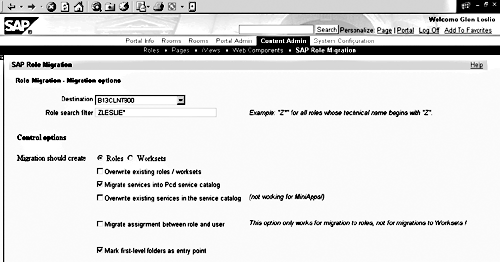
Figure 4
Synchronize Portal roles on the Role Migration screen
Tip!
You can use wildcards (“*” for multiple characters and “?” for a single character) in the filter to select groups of SAP BW roles (or specific, individual roles) rather than all SAP BW roles.
Mark first-level folders as entry pointContent Admin>RolesIf you want to change the arrangement and display of the folders after the import, log in as a Portal administrator, follow the menu path Content Admin>Roles, enter the role name, and then edit that role (Figure 5). Notice that you can't directly access the iView here. The iView must be assigned to a page, which then appears in a folder in the Portal.
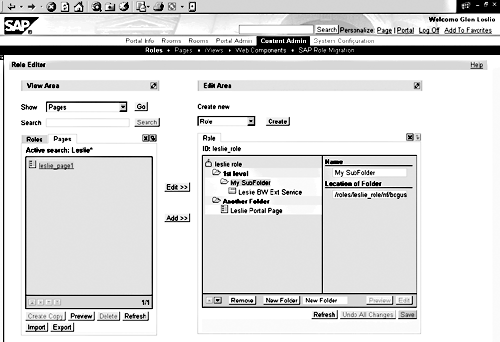
Figure 5
Edit SAP EP roles and rearrange folders on this screen
The iViews contained in each imported SAP BW role are created on the SAP EP server via the synchronization process, with a separate channel for every role selected in the the filter. To view migrated iViews in the Portal, use Content Admin>iViews and select the channel that corresponds to the SAP BW role name.
If the iView already exists, it may be overwritten if the Overwrite option is checked in the SAP Role Migration screen (Figure 4). If the Overwrite existing roles/worksets option is not checked, the Portal synchronization log reflects which roles already existed in the Portal and were therefore skipped during the migration process. Again, your Portal and SAP BW administration policy dictates whether you overwrite or not. Allow overwriting only if no subsequent changes are allowed in the SAP EP iView definitions once they get to the Portal. Complete the migration by clicking Continue.
You can check the migration using Content Admin>Roles. Select the role of interest in the left side of the screen (using the Find feature if necessary) and then click on Edit to get it to the right panel of the Role administration screen. Here you can see the folder structure as described above. You can also see the External Services migrated in the role synchronization. The Preview button on this screen allows migrated services to be executed in a browser window preview.
Note
If the option Migrate services into Pcd service catalog is checked on the Role Migration screen (Figure 4), other content in the roles is also migrated during the synchronization. Any Web queries or templates saved to the role also come over to the SAP EP, but with “External Service” definitions, not iView definitions.
3. Copy the SAP BW Query or Template URL to Create an External Service or iView
When an SAP BW query (displayed via the default SAP BW Web template) or a Web AD template (a custom Web template) is launched in a Web browser, the URL to generate the query is displayed in the address bar of the Web browser. This URL can be used to manually create an iView or an External Service.
The practical distinction between an External Service and an iView is simply a matter of real estate: External Services are full-page views; iViews are discrete subcomponents and must be assigned to a page or pages before they are viewable. External Services are, therefore, more suited for full navigation, slice-and-dice SAP BW queries. They are often the better choice if you've created a complex SAP BW dashboard or cockpit. On the other hand, if you've created a slick graph with a limited number of entries (e.g., Revenue for Top 5 Product Lines) that fits nicely in the corner of a larger page, an iView is a good candidate. There's no hard and fast rule here — it's part of your overall approach to Portal aesthetics and the intent of the Web content you're publishing.
Integrating an SAP BW Query or Template as an iView
To integrate an SAP BW query or template as an iView, use the Portal iView Wizard accessed via menu path Content Admin>iViews and follow these steps:
1. Select the Portal channel in which you want to create the new iView.
2. For both SAP BW queries and Web templates, select Java in the New iView drop-down list (Figure 1).
Note
The Portal administrator would typically be sent the (SAP BW) query or template URL and would add it as an External Service. This method is provided to create an iView from SAP BW queries (e.g., queries launched in the SAP BW default Web template). However, both query URLs and Web AD template URLs can be deployed to the Portal this way. Therefore, this may be your chosen method for deploying both URLs for consistency's sake (i.e., SAP BW content creators are given one method of submitting content to the Portal administrator versus two).
not4. No changes are necessary on the Appearance tab.
5. On the Load tab, change the iView Load Method to Isolation Level 4 – Bypass iViewServer (Figure 6).
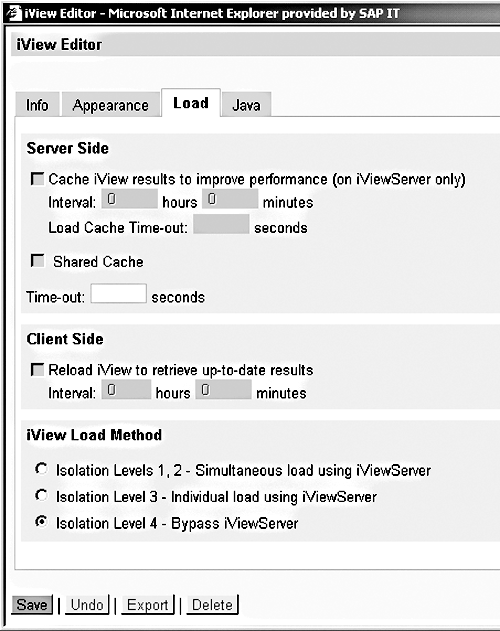
Figure 6
Settings for the Load tab of the iView Editor
6. On the Java tab, select BW Web Application as the Application Type. Click on Next.
7. Select the SAP BW source system (this presumes you've configured SAP EP as advised in the first footnote in this article).
8. The SAP BW query string (or SAP BW query ID in edit mode) is the section of the BEx Web application or BEx Web query URL from CMD=... onward. The italicized sections of the following URLs would be inserted into the iView Wizard entry:
- BEx Web query URL: https://<server>:<port>/sap/bw/ BEx?sap-language=EN&CMD=
LDOC&INFOCUBE=ZGLCUBE&QUERY=ZGLQUERY1
- BEx Web application URL: https://<server>:<port>/sap/bw/BEx?sap- language=EN&cmd=ldoc& TEMPLATE_ID=Z_ MYSLICKGRAPH
Click on Next.
9. Click on Finish and then on Save (important!). You should briefly see an Action completed successfully dialog box, and then you'll be taken back to the Info tab of the iView. You can review all your settings by clicking on the Java tab again. This provides a comprehensive view of the details of your iView — CSS sheet being applied, source system, the query string, and a host of other parameters affecting the iView — should you want to change those later. Close the iView definition.
10. The new iView is now listed in your channel. You can preview it on the right. You'll need to assign it to a page or pages for users to see it. Figure 7 shows the resulting Portal page, and Figures 8 and 9 show the user options for displaying an iView (accessed via the Personalize: Page option below the welcome banner in the Portal).
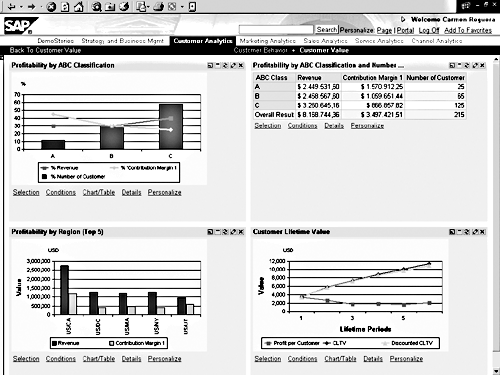
Figure 7
The Portal page for customer analytics showing multiple iViews
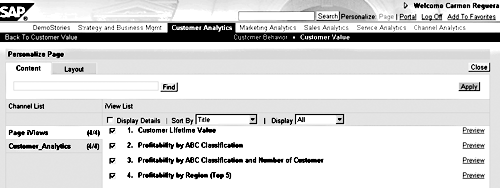
Figure 8
The user can select which iViews display on a page (if the SAP EP administrator leaves personalization “unlocked”)
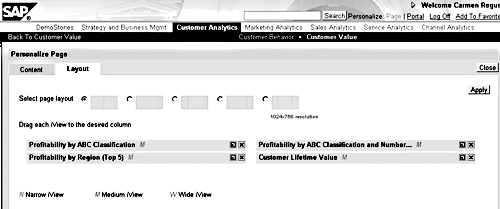
Figure 9
The user can change the page layout of the iViews
Integrating an SAP BW Query or Template as an External Service
The steps to integrate an SAP BW query or template as an External Service are similar to those for creating an iView. Since External Services are discrete modules that can be added directly to roles, they require fewer steps before you can view them in the Portal. Use the External Service Wizard to create the new display. Log on as a Portal administrator and follow the menu path: Content Admin>Roles. Make the following selections:
- On the right side in the Edit Area, select object External Service and click on Create (Figure 10).
- Enter an ID and a description for the External Service and choose Next.
- Select the language and then click on Next.
- Select BW Web Application as the type and click on Next.
- Select the source SAP BW system and choose Next.
- Enter the query string for an SAP BW query or template as described for an iView (Figure 11), and choose Next.
- Check your entries in the settings overview and choose Finish.
- Save the External Service.
- Add the External Service to a Portal role by first opening the Role Editor (Figure 12), highlighting the External Service name, and clicking on Add. Figure 13 shows the published External Service content.
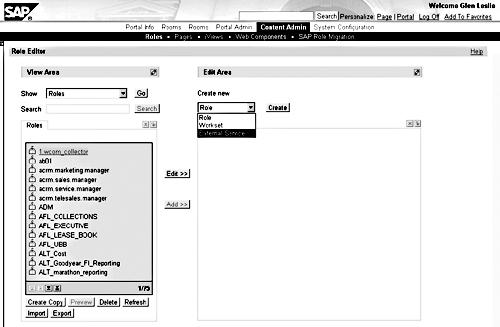
Figure 10
Create a new External Service
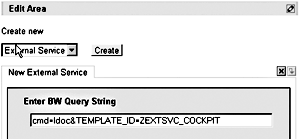
Figure 11
Enter the BW query string
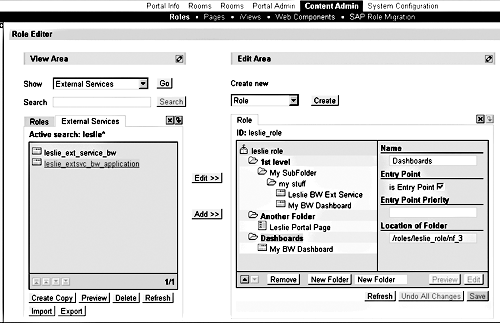
Figure 12
Add the External Service to a Portal role
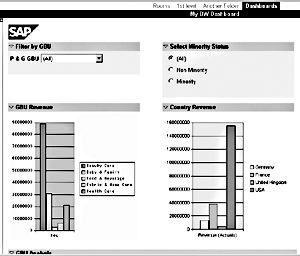
Figure 13
A user’s view of the published External Service content
Tip!
An SAP EP feature called “third level navigation” can be quite handy when you have a lot of External Services to add to a role. Figure 14 below shows that when you stack your menus into the third level, the Portal automatically provides a toolbar on the left side (you can turn it off) for all the content underneath the third folder level in your role.

Figure 14
External Service (BW Web template) shown with third level navigation toolbar
Integrating SAP BW-based Crystal Enterprise Content
Integrating SAP BW-based Crystal Enterprise content requires that you have Crystal Enterprise — SAP Enhanced Edition installed and configured. It also assumes that you have successfully published Crystal Reports based on SAP BW content into Crystal Enterprise. As far as integration with SAP EP, the Crystal Enterprise Reports are handled as a special type of External Service. The steps are similar to those mentioned in the last section, except that:
1. For Application Type in the External Service Wizard, select Crystal Reports and click on Next.
2. Select the source SAP BW system.
3. Paste in the SAP BW query ID of the Crystal Report (not the Crystal Enterprise Report ID) and click on Finish.
4. Assign the External Service to a role.
Uh, oh. You're stuck on step 3. That's the only tricky part to this exercise. You have two ways to get the Crystal Report ID (without hacking around in SE16):
- In the Crystal Reports interface, log on to an SAP BW system using the BW Add-On menu. Use the SAP BW toolbar in the Crystal Reports interface and click on Open. Navigate to the Crystal report in question, single-click on it, and then turn on the technical names display. Finally, do a Windows copy (ctrl-C) with the report name and technical name highlighted. Paste this into Windows Notepad and then pick out the right-most 25 characters — this is the SAP BW query ID of the Crystal report. Paste these 25 characters into the External Service Wizard during step 3.
- Alternatively, you can log on to a SAPGUI session on the SAP BW server. In the initial screen, you can view the properties for favorites in the User Menu by right-clicking on a favorite and selecting Change Favorite. In this dialog, the 25 characters following the ID= parameter is the SAP BW query ID of the Crystal report. Paste these 25 characters into External Service Wizard during step 3. Hey, wait a second...the report isn't in your favorites. It's in a role and you can't see the properties. No problem, right-click and select Add to Favorites. Then you can follow the procedure just outlined. Figure 15 shows a Crystal report published to SAP EP as an External Service.
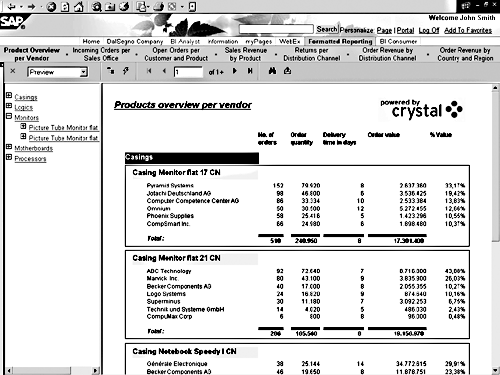
Figure 15
A BW/Crystal report published as an External Service in SAP EP
| Method |
Custom
Template |
Typical User |
When to Use |
| Web Application Designer menu item — publish once in the Portal for subsequent “single-click Portal publish” of content |
C, D |
End users publish content into favorites and roles viewable from the Portal
Portal administrator sets up menu item template in Portal
|
This method provides the most direct way for Portal users to publish SAP BW content into the portal (without consistent administrative intervention). The Portal administrator builds one Web AD template with a menu item, publishes it to the portal, and assigns it to roles, and then all related users see their own role-based SAP BW content (plus SAP BW favorites) in a folder structure in the Portal. |
| Save iView file, import to Portal |
C |
End users create content and send iView file to the Portal administrator — limited to Web AD content
Portal administrator creates iViews in Portal from iView file and attaches them to appropriate Portal channels, pages, or roles for Portal deployment |
Simple method for allowing individual users the ability to initiate the process of Portal content creation. The ultimate publishing process requires intervention of someone with Portal administrator authorization. |
| Save as iView to BW role, import SAP BW roles to Portal |
C |
End users create content and save to SAP BW role
Portal administrator imports SAP BW content via roles to the Portal |
A centralized method for gathering SAP BW content iViews into the Portal from an SAP BW system based on the iView role assignment
(filtering by role allowed). This method requires involvement of someone with Portal administrator authorization to do the migration. |
| Use the SAP BW query/template URL to create an iView/External Service |
C, D |
End users create content,
publish to Web, send the URL to the Portal administrator
Portal administrator creates iView or External Service depending on content or Portal policy |
Allows creation of iViews and External Services from the URL of an SAP BW Web application or query. Requires administrative access to the Portal for use of the iView creation wizard. In general, iViews are most appropriate for limited screen space, limited navigation, and key performance indicator-focused output. External Services are generally better suited to full-page, navigable, analytic output. These are not hard limitations but suggested use approaches. |
| Launch BEx Analyzer workbooks from the Portal |
|
End user supplies BEx workbook ID to Portal administrator |
This is a Windows/Microsoft Excel* option only. You must have SAPGUI with the SAP BW extensions installed on all client PCs for this to work. |
|
C=custom D=default
* Both custom and default Web templates support “download to Excel” for tabular data on the report.
|
| Table 1 |
BW-to-EP publishing methods compared |
4. Integration of BEx Analyzer Workbooks in SAP EP
Let's clear up a point of confusion straight out of the chute. You have two ways to view SAP BW data in an Excel workbook from the Portal:
1. You can launch a Web query or template and drop the tabular data into a “disconnected” spreadsheet. This can be done with the Excel icon in the BEx Web default toolbar or via the Export to Excel menu option. The data drops into Excel with no further BEx navigation possible. This requires only Microsoft Windows Excel 2000 or above on the client.
If you export tabular data into Excel from an SAP BW Web template, it is possible to get “reconnected” in Excel as a BEx Analyzer client and continue navigation. To do so, you must make a Windows registry change that allows Excel to fully launch rather than doing an in-place activation in the browser. Warning! Check with your PC administrator before making changes to the registry. Then follow the instructions available at https://support.microsoft.com/ default.aspx?scid=KB;en-us;q162059. Finally, you have to set up the BEx Analyzer as a “permanent” add-in within Excel. Open Excel and follow the menu path Tools>Add-ins>Browse. Select C:PROGRAM FILESSAPFRONTENDBW SAPBEX.XLA (this is the default location for SAPBEX.XLA). Click on OK twice, and you should get the BEx toolbar whenever you open Excel.
2. You launch a BEx Analyzer workbook directly from the Portal with full BEx Analyzer navigation possible. This is the option I address below.
BEx Analyzer workbooks are Excel workbooks with one or more embedded SAP BW queries. Viewing BEx Analyzer workbooks requires the local installation of SAPGUI for Windows along with the SAP BW front-end add-on. In general, this integration is not recommended at this time by SAP BW development. Review SAP notes 444247 and 563833 for qualifying conditions and up-to-date information related to using this functionality.
Glen Leslie
Glen Leslie is a product manager for SAP’s Business Intelligence solution. Originally a data warehousing consultant, Glen has been working with SAP BW since the 1.2B release in a variety of environments.
If you have comments about this article or publication, or would like to submit an article idea, please contact the editor.


