The SAP HR module is delivered with PU12, an interface development framework that is often overlooked because of the learning curve associated with its use. The author, using the example of a master data interface designed to extract employee data for an employee directory, explains the major concepts and flow behind the technology.
“Think of PU12 as one big user exit.” This is the response that I most often give when I am asked about the Interface Toolbox, more commonly known as PU12 for the transaction code that invokes this functionality.
SAP HR implementations, like all SAP implementations, almost always require interfaces to both internal and external systems. The SAP HR module is delivered with PU12, a fully supported1 interface development framework that is often overlooked because of the learning curve associated with its use.
In fact, R/3 project team management and development staffs often opt for the familiar over the new. It is more likely that an HR interface will be developed using standard ABAP because of the larger knowledge pool and the relative scarcity of experienced PU12 developers. This choice requires the developer to reinvent much of the HR business logic and functionality that is already delivered and tested in the PU12 application. Whatever interface is created will most likely require maintenance and re-writes to support newly requested standard SAP HR features and any new SAP-delivered functionality.
PU12 provides a framework of user exit-like functionality that automatically adheres to the most important HR process and data model concepts. The developer/user is freed to concentrate on requirements for data conversion and file layout, as well as complex features such as change validation and retrocalculation support, without having to worry about the technical implementation.
Much of the available documentation for PU12 takes a very technical approach. In contrast, this article will help HR project team members understand the major concepts and flow behind the PU12 toolset technology. I’ll use the example of a master data interface designed to extract employee data to be used in an employee directory from infotypes 0001 (Organizational Assignment), 0002 (Personal Data), and 0006 (Addresses).
PU12 Characteristics
Imagine that you have a custom HR interface program developed in-house. How many times has a simple request to add a field or change the data conversion logic of a custom HR interface program caused the entire interface to behave erratically because of an overlooked dependency or hard-coded piece of logic? Any project member who has worked with R/3 HR data knows its peculiarities – from the HR-specific concept of infotypes that group together HR data, to the difficult-to-understand-and-extract cluster table data that contains the actual and historical payroll and time evaluation data, to the fact that almost all data in HR is date-specific. The PU12 framework addresses these and other HR-specific complexities that are an integral part of the way the HR module was developed.
Although simple PU12 interfaces may be completely configured by non-technical users without having to write a single piece of ABAP code, it is more likely that an ABAP coder will use PU12 to simplify and speed up the interface development process. Most changes in a PU12 interface requirement can be added to the interface with minimal ABAP code modifications. That includes something as simple as changing the layout of the exported file to the complex concept of adding change validation or retrocalculation support for evaluated results. When PU12 regenerates the interface program, these changes are automatically, consistently, and correctly incorporated into the interface without the user having to wonder if these changes “break” any other features of the interface.
PU12 Components
A completed PU12 interface is made up of two separate executable ABAP programs: an export program to retrieve the required data from the various database tables and a file layout conversion program to take that data and manipulate and convert it into the desired file format that is required by the target system. The PU12 interface framework generates these programs based on the user input carried out in the configuration steps.
The export program is primarily responsible for the initial data retrieval from the HR module. It ties together the PU12 configuration tables for data selection and difference checking, and generates the intermediate export data file that is stored in the R/3 TemSe (temporary sequential storage) area in an R/3-specific data format.2 If active, the export program processes change validation or difference checking as well as retroactive accounting instructions before storing the data in TemSe storage. The separate file layout conversion program then takes the export program output from the TemSe database, reads the SAP-specific data format, and manipulates, enhances, and formats it into the desired final interface output file format.
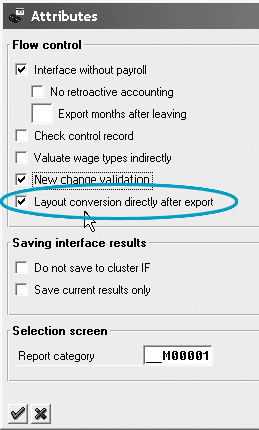
Figure 1
Linking export and file layout programs
Tip!
A configuration option, Layout conversion directly after export, in the Interface Format Attributes section allows you to link PU12 and ABAP programs together. In Release 4.6C, this option is checked by default (Figure 1). The export and file layout conversion process is treated as a single executable program. The user interface of the export program then exhibits the features of both export and file layout conversion programs (Figure 2).

Figure 2
Export and layout conversion user interfaces are included
Overview of Main Configuration
A step-by-step explanation of a PU12 interface is beyond the scope of this article. Two SAP notes, 096298 and 126260, provide how-to instructions for setting up PU12 interfaces.3 The rest of this article focuses on five specific aspects of PU12 to give you an overview of its functionality:
- Infotype 0415: Export status
- Defining what R/3 data is read, processed, and stored
- Limiting the amount of data that is exported and processed by using change validation or difference checking
- Defining how data is converted into the final file format
- Generating program objects
Infotype 0415: Export Status
Infotype 0415: Export status contains most of the control and status information for each PU12 interface. This infotype is analogous to the Payroll status infotype 0003 and contains many of the same key fields. Each time a PU12 interface runs, this infotype is automatically maintained by PU12 processing. For example, when master data is changed in a previous payroll, the earliest master data change field date is updated in both infotypes 0003 and 0415. This date determines how far back the next processing run goes to capture historical data changes.
Defining the Data
To get started, enter transaction code PU12 or use the SAP Easy Access menu path SAP Menu > Human Resources > Payroll > America > USA > Tools > Outsourcing – Interface Toolbox > PU12 – Interface Toolbox. The Configuration tab in Figure 3 provides access to the development and maintenance environment for PU12.
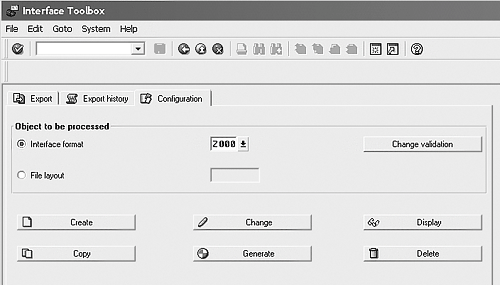
Figure 3
Interface Toolbox configuration
The choices made in this step determine what R/3 data is made available to other parts of the PU12 framework. The interface format defines what R/3 data is read, processed, and stored by the export routine. For infotype and cluster data to be visible in the rest of the PU12 configuration process, they must first be made available in the interface format definition. For example, the export routine does not “see” or export an employee’s address if Infotype 0006 (addresses) is not listed in the interface format. (See Figure 4.)

Figure 4
Data selection for the employee directory
You can carry out simple data conversion and filtering during this step on a field-by-field basis by selecting a field and clicking on the conversion icon or the restrictions icon. These options allow the user to implement basic (Constant, Table value) and semi-advanced (User exit) conversion option interface logic. (See Figure 5).

Figure 5
Selecting a conversion option
Selecting a field and choosing the Constant conversion type results in a static value mapping. Any time the export routine encounters a value in the old data column, it replaces it with the value in the new data field column.4 (See Figure 6.) For example, R/3 stores gender data as blank for unknown, 1 for male, and 2 for female. A Constant static mapping can be set up to convert the blank to a U(nkown), the 1 to M(ale) and the 2 to F(emale). The asterisk is used to represent any old value not specifically listed in the conversion mapping; for example, a blank or 4 would be converted to U.
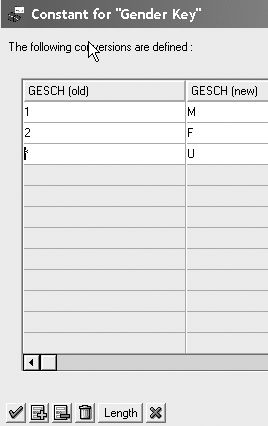
Figure 6
Constant conversion type
Alternatively, if you know the name of the R/3 text table that contains the target conversion values, you can choose the table value conversion type option. R/3 compares the value read by the export routine and references the conversion table to find the replacement value.
For example, you select the field P0002-SPRSL and choose the table value conversion option referencing the SAP table T002T: Language Key Texts. This table contains the long text values for the language key field stored in each employee’s 0002: Personal Data infotype. You enter the table name and field value that contain the target conversion values in the table field section of the pop-up screen. In the key fields section, enter the key fields that R/3 uses to read the appropriate reference table. In this case, the database table field T002T-SPTXT contains the long-text description of the language code stored in the P0002: Personal Data infotype. The key field from P0002 that matches the long-text key values in the conversion table is P0002-SPRSL. (See Figure 7.) This results in the P0002-SPRSL field value of E or EN being replaced by the T002T-SPTXT value of English.
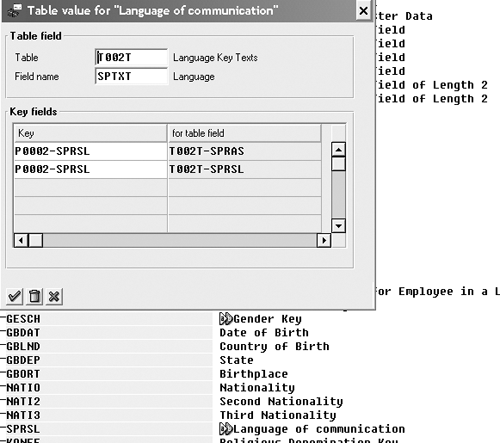
Figure 7
Table value conversion type
One of the primary advantages of this technique is that if the values in the reference table change, the interface automatically uses whatever values are stored in the reference table at conversion run time. For example, the field P0002-SPRSL can have a value of E with a related description in T002T of English. If you were to change the T002T entry description from English to American English, the interface would automatically pick up the change.
Tip!
Typically, I do not implement any type of field data conversion or restriction at this stage, even though it is an option. Debugging and testing the PU12 interface is made simpler by not implementing any type of conversion logic in the interface format. In this manner, the data that is generated by the export program matches the data that is stored in the actual physical database tables. I like to separate the data selection process from the data conversion process.
If the Constant or Table Value conversion types are not sufficient for your conversion mapping needs, you can drop down to the ABAP programming level via the User exit conversion type. By specifying a custom program name containing a custom ABAP FORM routine, you can code your own custom conversion logic. (See Figure 8.)
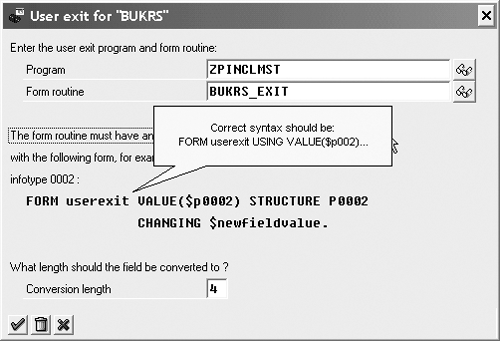
Figure 8
User exit conversion type
Any conversion or filter logic implemented on fields in this step modifies the data that is generated and stored by the export program in the TemSe storage area. For example, say that you implemented a Constant conversion on the field P0002-GESCH so that the value of 1 is converted to M. The value of M is stored in R/3 and appears in any further PU12 processing.
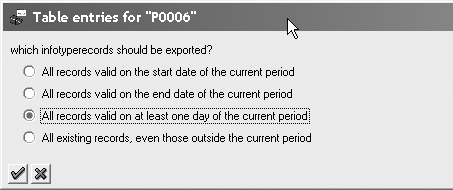
Figure 9
Infotype selection screen
The table entries icon controls which records of an infotype are processed by the export program. (See Figure 9.) SAP recommends leaving the default All records valid on at least one day of the current period option selected. The first two options are usually too restrictive and the last one typically returns too large a dataset. Let’s say an employee has had an address change in the middle of a payroll period. There would be two consecutive address records in R/3. The first two options would select only one of these records, which may lead to inaccurate data, depending on the target system’s requirements.
Maintain Change Validation and Difference Checking
Change validation or difference checking is used to limit the amount of data that is exported and processed by the interface. When activated, change validation causes the export program to process only data that has changed since the last interface run.5 Each PU12 interface run then creates a record in the interface format cluster table IF. These historical records along with the change validation table and field listing6 are the basis by which PU12 determines if there has been a change to the data since the last export. A difference between the current values of the fields listed in change validation compared with the values of these same fields from a historical run trigger the export of data during the export routine.
For example, since the employee directory application does not make use of the birth name or second name fields of infotype 0002, you do not want to trigger an export of an employee’s information if only data in those fields changed since the last interface run. Therefore, you would not include these fields in the change validation field listing. The fields listed in change validation are typically the fields that contain the most important data required by the target system.
PU12 provides multiple trigger mechanisms for change validation that allow the user to control just what fields or sets of fields trigger the export of data by the interface. By default, R/3 exports all table field data listed in the interface format whenever at least one of the fields listed in change validation has changed since the last run. Selecting a table name and activating the Single field valid. button tells R/3 to only export field data if data for that single field has changed. This can significantly reduce the physical size of the final interface output file. All other table fields that have not changed are exported with a “#” symbol. If no table fields have changed, the entire table is ignored. Activating the Relations button on a field allows you to link fields so that a change in any of the linked table fields results in the automatic export of all linked field data. For example, you can instruct R/3 to export organizational unit, job, and position data if the contents of any of these fields changes.
Since tables can have multiple records per period, Key field flags are used to identify which historical records are compared with which current table records to determine if there has been a change in data. Selecting a table and activating the Delimit function instructs R/3 to identify a table record as being delimited — i.e., no longer active/valid for the current period, by exporting the “<” symbol in each table field of that record. The delimit “<” symbol appears in each of the non-key fields of the delimited table record.
Converting Data into the Final File Format
The decisions made here determine how R/3 takes data stored in the TemSe storage area by the export program, manipulates it, and converts it into the final interface file format.
The file layout is made up of three hierarchy levels: blocks, structures, and fields. Blocks (Figure 10) control how and when subordinate structures and fields are processed. Each structure object represents a single line in the final physical output file. Fields are assigned to each structure object and appear in the output file in the order that they appear in the structure to which they belong.

Figure 10
File layout conversion screen
Although it is possible to pass on the export data from the TemSe database unchanged, user exits can be implemented at many points within each hierarchy level of the file layout, from block down to individual field object. These user exits permit a great deal of control over exactly how and when data is written to the physical interface file. This is the main reason I view PU12 as one big flexible user-exit. Once you are within the user exit routine, there is virtually no limit to the data that you can access and combine. This allows you to merge data from multiple infotypes and R/3 tables within a single line of the output file.
For example, let’s say that you create a field object called NAME that is to contain an employee’s name in the format of last name, first name. You then could choose the user exit field determination option and write code that would read the employee’s first and last name values from infotype 0002, put the values in the right format, and place them in the NAME field.
Tip!
A separate block should be created for processing each infotype that has subtypes that exist during the same time period. For example, infotype 0006 (Addresses) has multiple subtypes that can have the same validity period. By creating a separate block for this infotype you can then set the block repetition factor to Table-dependent. This causes PU12 to automatically loop through and process each infotype table entry in turn. (See Figure 11.) The block level repetition configuration option directly correlates to LOOP-ENDLOOP processing of an infotype table. The for each table entry option shown in Figure 12 ensures that all valid infotype/ subtype records are read and processed for the infotype table. In the employee directory example, this would be useful in exporting data for different types of employee addresses, such as the mailing address, home address, or work address. Each subtype would then be output as a separate line in the final output file.

Figure 11
Repeating the block

Figure 12
Ensuring all valid infotype/subtype records are read
Generate Program Objects
In this step, PU12 examines all the user selections and any user exits referenced in the interface format. It generates an executable ABAP program containing nine ABAP include sub-objects with all the interface format configuration translated into ABAP source code. All the R/3 standard PU12 export logic is contained in these nine include objects. All user-created ABAP routines are contained in the specific user include program specified in prior steps. The user-defined Include objects are linked automatically to the standard program objects (Figure 13).

Figure 12
Ensuring all valid infotype/subtype records are read
When creating the initial interface format, R/3 can automatically generate program object names if you choose the Suggest values button. The nine R/3-defined include sub-objects are required no matter how much or little interface format configuration is carried out. The export program and all of its components are automatically tied to a Workbench Transport Request during the generation step. Prior to 4.5B, the user must call the transport menu option within the PU12 transaction to associate the interface format export program components to a transport request. The generation of the file layout program logic follows the same process.
________
Footnotes:
1 As of Release 4.5x, the SAP change control system fully supports PU12 configuration. SAP-stated prerequisites for the use of PU12 are implementation of the Personnel Administration, Time Management, and Payroll modules. However, I have successfully used and implemented PU12 for PA-only and PA-PT clients as well. This, however, still requires configuration, setup, and maintenance of payroll periods and payroll control records, since PU12 is designed to be run according to payroll periods.
Graham Wong
Graham Wong is a consultant and co-founder HR Focal Point, an SAP and technology consulting company. He has been working with SAP applications and technology since 1994. He holds bachelors degrees in commerce and French from the University of Virginia as well as a master's degree in management information systems from the McIntire School of Commerce at the University of Virginia.
You may contact the author at graham.wong@hrfocalpoint.com.
If you have comments about this article or publication, or would like to submit an article idea, please contact the editor.


