Learn how to set up a security-related organizational structure and what your options are for doing so.
Key Concept
An organizational structure is mainly used to manage personnel development (OM-PD), but you can also use it to manage your security concept during the assignment of authorizations. Options to consider include using an existing HR-oriented organizational structure or creating a new organizational structure that is security-oriented.
Several common problems can occur when an authorization assignment works in conjunction with an organizational structure (e.g., more than one team or department is involved). This can complicate managing the structure across your landscape and managing the same objects between different teams (i.e., HR and security). Using examples of different scenarios, I explain possible solutions to these problems.
I cover the SAP transaction codes involved in managing an organizational structure, go through the process of creating a new security-oriented structure, and show how to assign users and roles at the position level with transactions PPOM or PFCG (profile generator). After that you can distinguish the advantages or disadvantages of using a structure and understand how all stakeholders should be involved to ensure its proper maintenance.
SAP Transactions
Let’s start by looking at all the transactions that are involved in creating, maintaining, and viewing an organizational structure (Table 1).
Table 1
Organizational structure transaction codes
Creating an Organizational Structure
The first step in using an organizational structure is to create it. Use transaction PPOCW to create a root (the top organizational unit in an organizational structure). Figure 1 shows the result. In my example, I created a new top organizational structure named My Company. Once you have created a root you can design and define your company structure.
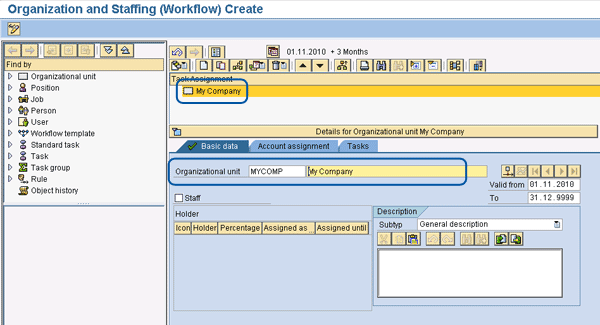
Figure 1
Create a root
By clicking your new organization unit (My Company in my example) you can add other Organizational Management (OM) objects (e.g., organization unit or positions) as shown in Figure 2. From a security point of view, not all objects are relevant and used. The relevant security objects are:
- Organization unit, which is identified with the letter O
- Position/job, identified with S/C
- User, identified with US
- Role, identified with AG
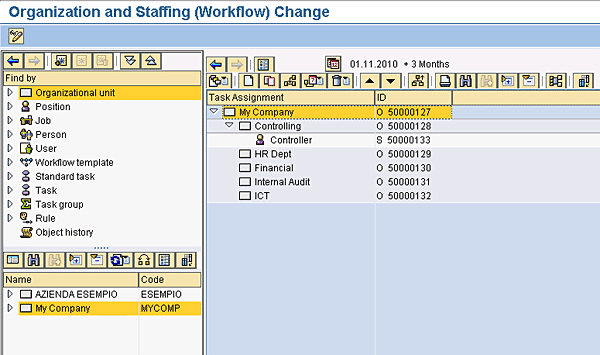
Figure 2
Example of an organizational structure
Each object in an organizational structure has a unique identifier. You can see this information by enabling the ID object in column configuration (Figure 3). Click the Column Configuration button and then check the ID check box. This Column Configuration button is visible in all PPOM transactions. After enabling this column, you can see the column ID to the right of the Task Assignment column.
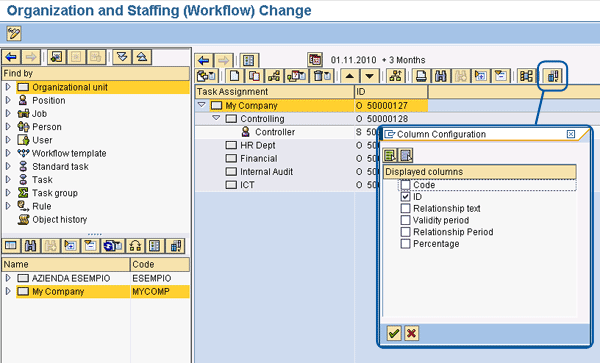
Figure 3
Enabling Column ID
Click the Column Configuration button to show Displayed columns. Click the ID box to show a new column ID next to the Task Assignment column. That column is where you can read all unique IDs for each position (e.g., O 50000127).
Useful SAP tables that store the underlying data of the organizational structure are:
Link User and Role in the Organizational Structure
Click the Position object in the structure you just created to assign a role or user ID (Figure 4). Then click the Assign item from the right-click context pop-up menu so you can select the role or user’s relationship.
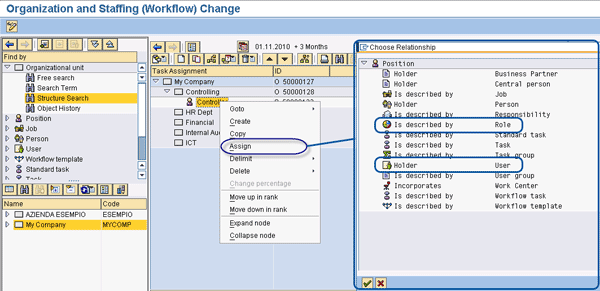
Figure 4
Assign a role or user ID at the position level
You can assign a role at the position level or the organization unit level; you can assign a user at the position level. See SAP Notes 578265 (PFCG integration HR Org and role administration) and 578271 (PFCG integration of role assignment maintenance in PPOME). The first note is the SAP help documentation about role assignment and the second is useful when you maintain indirect role assignments in the maintenance of the organizational structure (transaction PPOME). If a role is assigned at the position level or a higher level such as the Organizational unit, all user IDs assigned at this position inherit all authorizations inserted into the role (Figure 5).
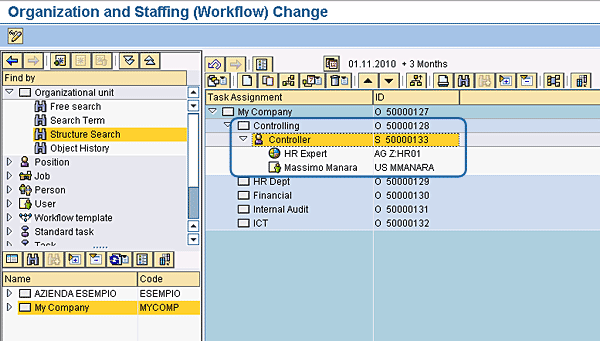
Figure 5
Example of role and user ID assigned at the position level
Assign a Role with the Profile Generator at the Position Level
Now I describe how to assign a role with transaction PFCG in a structure that you have already created. To assign a role or user at the position level, you use profile generator transaction code PFCG. You can perform this task with transaction PPOM or PFCG when the Complete view is active (Figure 6). With this view enabled, the link between the PFCG transaction and PPOM context is completed. In other words, from transaction PFCG you can see and assign a role to your organizational structure.
In transaction PFCG, click the Goto > Settings > Complete view (Organizational Management and workflow) radio button (Figure 6). See SAP Note 1268536 (PFCG: Incorrect display of maintenance options). You can switch off the maintenance of HR-related data for a role.
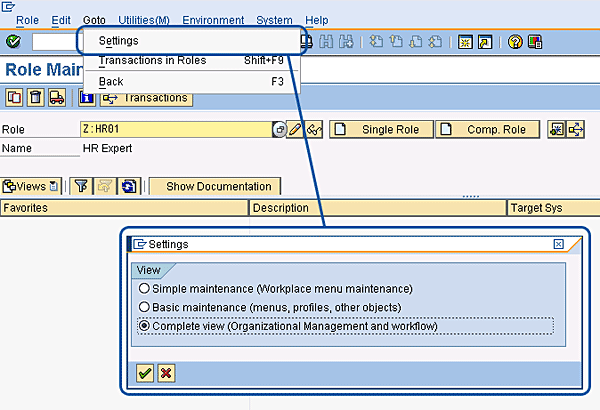
Figure 6
Complete view of transaction PFCG. If the complete view is not checked you cannot use transaction PFCG to assign a role to a position in an organizational structure.
Now select Complete view (Organizational Management and workflow) in transaction PFCG. Click the User tab and you see the Organizational Mg… button (Figure 7). From transaction PFCG, you can assign a role at the position level to an organizational structure by clicking on the Organizational Mg… button.

Figure 7
Organizational Mg… button on the PFCG User tab
The visibility of this button is also controlled by table PRGN_CUST, which contains the HR_ORG_ACTIVE switch. With this switch, you can make the button visible or not. If you don’t use the organizational structure to assign roles, you do not need to show this button.
If you click the Organizational Mg… button, you can assign this role as you do when you are using transaction PPOM. Click the create assignment icon (step 1) in Figure 8 to assign this role to an HR object (Work Center, Job, Organizational unit, Person, Position, or User). If you choose Position (step 2) you can freely search a position. If you click the hierarchy icon (step 3), it opens the Choose Position box (step 4). You then can choose the position to which you want to assign the role.
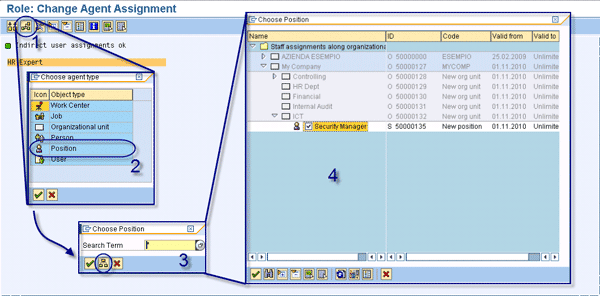
Figure 8
Assign a role at the position level
Even if you have assigned a role at the position level and this position has some user IDs assigned to it, the authorization is not automatically assigned. To distribute the authorizations to these user IDs, you must perform the user-comparison activity Require reconciliation of indirect user assignment. Click the circled indirect user assignment reconciliation icon (Figure 9).
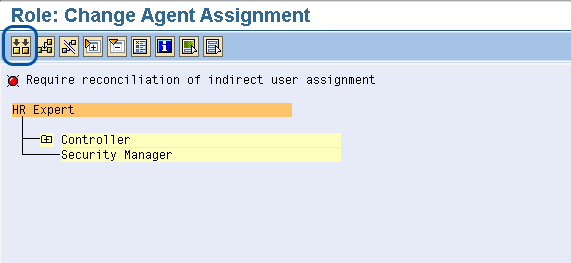
Figure 9
Perform a user comparison
As explained in the SAP documentation, user assignments assigned by position or job are entered in a role as indirect user assignments. Because the assignments in organizational management are time-dependent, the time dependency must be taken into account when user assignments are set up. This occurs during a comparison in which the relationship period from organizational management is transferred to the indirect user assignments. Changes in the organizational structure itself (changes to the assignment user position or deletion of assignments, for example) cannot automatically be compared. To allow an exact comparison you can use transaction PFUD to schedule a batch report that can compare these changes with roles once a day. Figure 10 shows the result after user reconciliation.

Figure 10
User reconciliation labeled as ok
Now the users assigned at the position level inherit all authorizations of the role assigned at this position. When you performed the indirect user assignment reconciliation, the red flag in Figure 10 turned green. Assigning a role at the position level is called indirect role assignment. In other words, the role was not assigned directly to a user ID with transaction code SU01. Instead it was assigned on the organizational structure at the position level, which means that all user IDs assigned at this position receive the role.
In transaction SU01, you can see these different assignments. If you assign a role directly in the Roles tab using transaction code SU01, the role names are in black and you can edit the validity date of the role user assignment. If the role was received by a position (because the user ID was assigned at this position where the role was assigned) the color is blue and you cannot edit the validity date of this role user assignment using transaction code SU01. Figure 11 shows these differences.
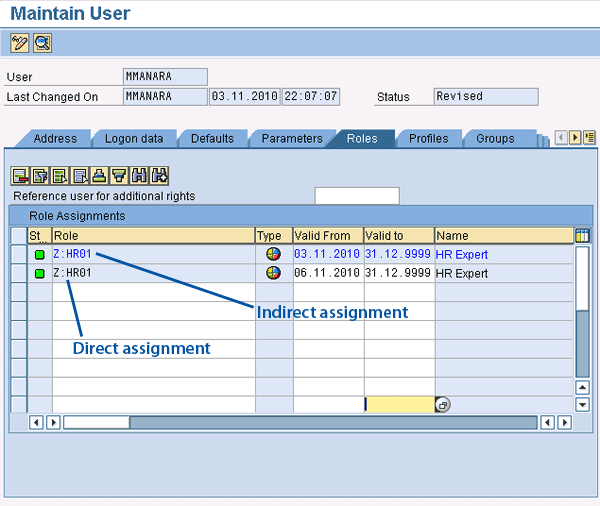
Figure 11
Roles tab with a role assigned directly and another assigned indirectly
Importance of HR Department and Security ICT Cooperation
As shown above, you can use your organizational HR structure to assign the authorizations and system access. In other words, you can assign your job role to a position in your organizational structure. A job role, which technically speaking is a composite role, represents the sum of activities that make up a company role such as a controller or security administrator.
If you use an organizational model to assign and manage your authorization concept, it’s important to involve the business. It is not just a task for the IT department. The HR department, the business departments, and the SAP security team need to work together to set up the authorizations.
In many companies, a common situation is that the HR department designs all the positions and the security manager designs all job role authorizations. It’s important that they work together to ensure one-to-one alignment.
However, in some cases it is not possible to align one job role to one position. For example, a security administrator may need to split a job role into several job roles for legal reasons, or may need to create a more technical role to segregate some business activity, such as a buyer who can manage only some types of purchase orders and see only some views of material master data that another buyer must manage.
In such cases, you may have to manage two different organizational structures, one that is HR-oriented and another that is security-oriented. Then you need to decide where to maintain the structures to manage the overlap situation. The following section outlines a method for maintaining the structures and managing possible overlap problems.
How and Where to Maintain the Organizational Structure
You can create an organizational structure in a development system and then transport it with the Transport Management System (TMS). Usually an HR organizational structure is maintained directly in the production system. If you choose to manage your security structure parallel to the HR structure, you can use the TMS to maintain all objects in the development system and then transport them into production. Using transaction code RE_RHMOVE30 you can manually transport your organizational structure throughout the entire landscape (see SAP Notes 33582, 163897, 327908). For Human Resource - Personnel Development (HR-PD) transport problems see SAP Note 138411. The sequence of transaction code RE_RHMOVE30 is shown in Figure 12.

Figure 12
Manual transport process
Transaction code RE_RHMOVE30 doesn’t perform the transport, it only inserts all OM-selected objects into a customizing request. Before entering this transaction code, you must create a customizing request with transaction code SE09. After you create the customizing request, you can run transaction code SE09. Next you decide on the type of transport, the type of objects (i.e., organizational unit or position), and the root ID. If the root ID is My Company ID, all objects (according to the evaluation path inserted) below this ID are inserted into the request.
Once you define the object transport, execute transaction code RE_RHMOVE30 to enter the objects into the empty customizing request. Then you can use the TMS to release and transport the organizational structure throughout your landscape. Be sure that the active plan version on the source system is the same as on the target system to avoid inconsistencies using transaction code OOAP (Figure 13). You can both see and set the active plan version. If the active plan version is different, use transaction OOAP to set the same active plan version in the source and target systems.
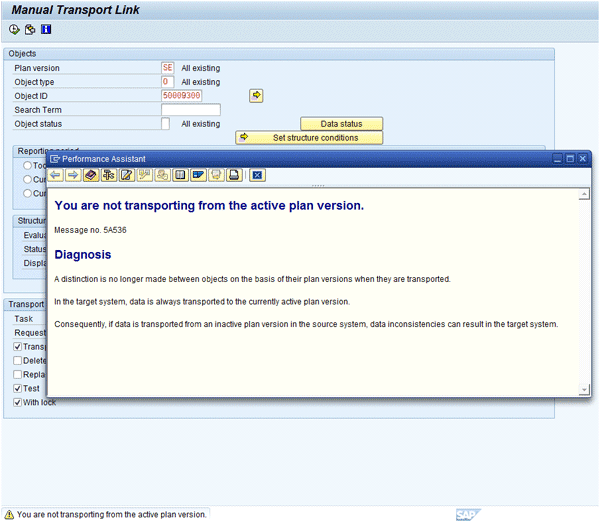
Figure 13
Manual transport plan version warning
As explained in section 5a of SAP Note 138411, you can also manage the objects transport locks with the object lock in table T77TR. A possible scenario is to create all organizational units and positions in the development system. Don’t transport the user ID linked at the position level; instead create the link directly in the production system. By default, all objects and links are transported.
How to Manage Number ID Overlapping During Transport
During a transport of a security organizational structure into this system, a numbering overlapping problem can arise. All objects are identified with a unique object ID, and this unique number ID is defined by a range. Using transaction code SPRO you can navigate to transaction codes OONC and OONR (Figure 14). You then can see the number range for each object and evaluate how to edit it to avoid overlapping number ranges.
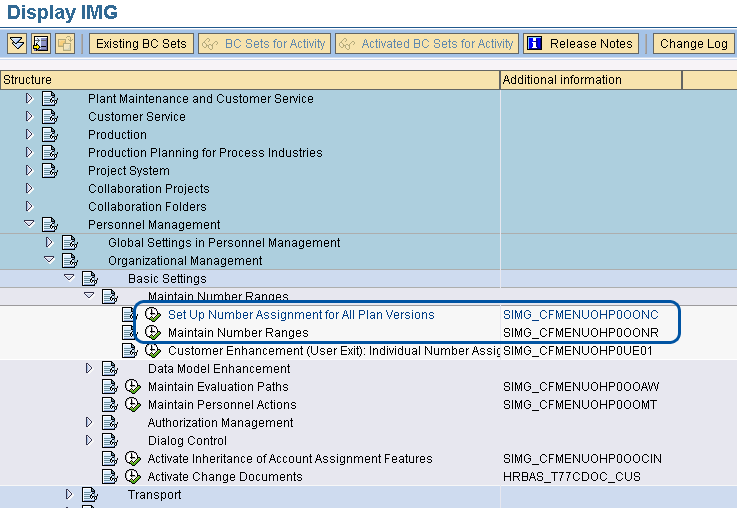
Figure 14
Maintain number ranges
With transaction code OONC, you specify whether the number assignment is plan version-specific or plan version-independent (i.e., you can find out if it is valid for all plan versions). With parametrical transaction code OONR, you specify the number ranges for your Personnel Development objects and the type of number assignment. The SAP system assigns the internal number ID automatically and the user must assign the external number ID. For more information see SAP Note 109778.
When you execute transaction code OONR, click the Number range maintenance button (Figure 15) to connect to transaction code SNRO (Figure 16). Click the Intervals button to edit the actual number range of the object.
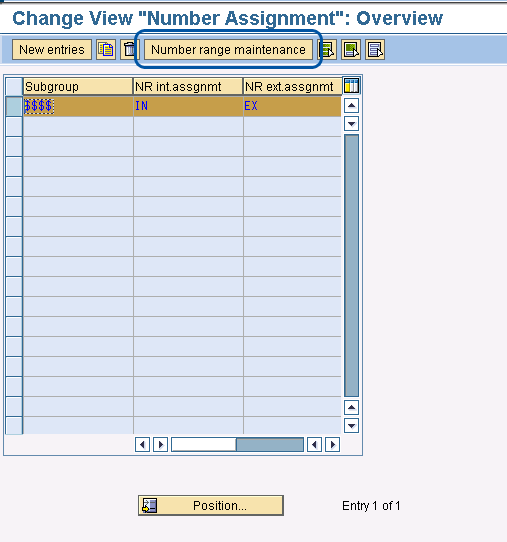
Figure 15
Number range maintenance
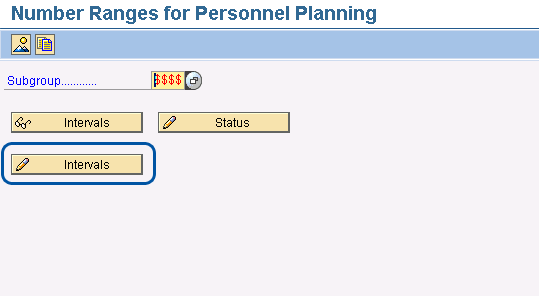
Figure 16
Display all ranges already defined or edited by someone else. With the Status button, you can see/edit the current number.
To ensure that there are no overlapping ID numbers between source systems, the range on the development system must be different from that on the production system. For example, in the development system, use a range from 50000000 to 70000000 and in the production system, use a range from 70000001 to 90000000. Click the Intervals button in Figure 16 to reach the screen in Figure 17 where you can maintain the number range.
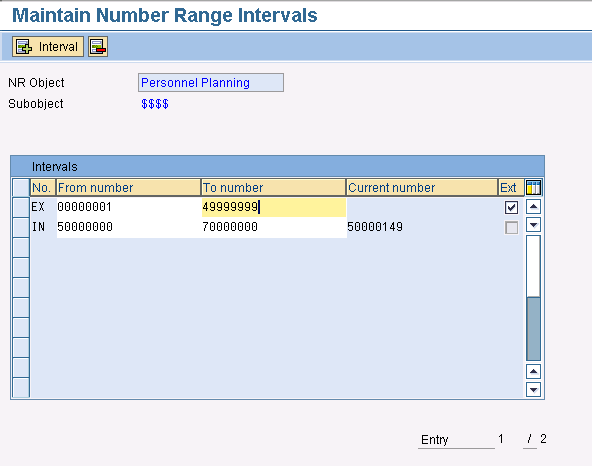
Figure 17
Maintain number range intervals
Massimo Manara
Massimo Manara
is an SAP-certified security and compliance consultant at Aglea s.r.l. (www.aglea.com), the only Italian company whose core business is SAP security and compliance. He has nearly 10 years of experience in IT security and a bachelor’s degree and master’s degree in security computer science and on SAP projects.
You may contact the author at mmanara@aglea.com.
If you have comments about this article or publication, or would like to submit an article idea, please contact the editor.