Learn about the main functionalities relevant for subcontracting activities during the production process in the case of discrete manufacturing, using the materials management (MM), Production Planning (PP), Quality Management (QM), and Financial Accounting (FI) modules. Follow details about the main customizing settings to be done in the system from a financial point of view.
Key Concept
In the subcontracting process, a subcontract purchase requisition, which can be generated via the Material Requirements Planning (MRP) process or manually by a requestor, is generated automatically by the release of a production order. A buyer validates the accuracy of the purchase requisition and converts it into a purchase order (PO). The PO can be subject to approval based on predefined parameters prior to being issued to a vendor. The consumption of sent components is recorded upon receipt of the value-added finished material. The vendor sends the invoice for the services provided, which is paid during the normal payment cycle.
The subcontracting process involves sending raw components to a vendor for a specific manufacturing processes and receiving the value-added finished material back into inventory. I focus on the main quality management activities that are involved during the subcontracting processes related to production operations. In particular, I explain how this process is integrated with Production Planning (PP), Quality Management (QM), Materials Management (MM), and Financial Accounting (FI) considering the following two flows:
- Evaluate the subcontracting processes for a specific operation using QM functionalities with Inspection Type 0130 (Receiving Insp. from External Processing), before performing a subcontractor’s payment
- Evaluate the overall production processes using QM functionalities with Inspection Type 04 (Goods receipt [GR] inspection from production) to validate overall production activities before shipping the products to the final customers
In the SAP system, you should distinguish external processing from the subcontracting process that is the topic of this article. I have noticed that there is often confusion about how these two processes differ. Following are the most important differences between the two.
External processing is tied to production orders or maintenance orders on the shop floor. This process occurs when an organization sends the material in process on the order to an outside vendor to do work it can't do itself or for which it lacks available capacity. When the parts are received back, they return to the same order and are finished on the shop floor. The key here is that the part number doesn't change and the value of the outside work is collected on the shop order.
Subcontracting is different in that you are not just sending out an operation, but you are purchasing a new part that consists of some of your own materials. In subcontracting the part number can change. The subcontracting costs are charged to the part number. Subcontracting uses a bill of material (BOM) to determine what internal parts are required.
For external processing, a purchasing info record is set up at the material group level with a sort string to differentiate between different info records with the same material group. This info record is referred to in the routing operation purchasing details. When this is done, at order release the system creates a requisition for the order amount in accordance with the info record data. The parts are not issued to the purchase order (PO), but the operations are confirmed as normal on the production/maintenance order. The PO is received in the standard manner.
Subcontracting is done at the part number level that the sub-contractor supplies via Material Requirements Planning (MRP). The special procurement key 30 Subcontracting is defined in the MRP-2 view of the part that needs to be sent to subcontracting. A subcontracting info record needs to be created for the part number and vendor combination. When this is done, MRP or the Releasing of Production Order process creates a subcontracting requisition that converts into a sub-contract PO.
If a BOM exists for the subcontracting part number, the system generates reservations for the components. A separate transaction is used to post the movement to issue the parts to the subcontractor. A standard GR is done against the sub-contract PO that in turn consumes the vendor’s inventory of your parts.
Business Activities in the SAP System
The transactional flow for the subcontracting process is managed by the procurement, PP, MM, QM, and FI modules, as shown in
Figure 1.

Figure 1
Main activities related to production’s subcontracting
Note
In Figure 1 TECO stands for technically completed status.
In this process, the buying department can create a PO in MM with reference to the purchasing requisition generated automatically from the production order’s releasing stage. Then the subcontractor receives the parts under special stock O and performs its work. Upon the GR with reference to a PO, the QM activities are triggered via an appropriate inspection lot. The invoice is paid only if the quality services are accepted by the company.
The business activities that are shown in the system are the following:
- Purchase requisition generated upon production order’s release
- Create a PO with reference to a purchasing requisition
- Post the goods issues to ship the products to the subcontractor
- Receive the goods back from the subcontractor and post the GR with reference to the PO
- Trigger the inspection lot creation
- Post the results recording
- Post the usage decision (UD)
- Post the logistic invoice verification (LIV)
- Release the invoice verification (if needed)
- Check the result in the PO history (optional step)
- Pay the subcontractor
Let's delve deeper into these steps in the SAP system now.
Maintain the QM View of Relevant Goods
The QM department can maintain the quality management view of the relevant goods either by executing transaction code MM01 or by following menu path SAP Menu > Logistics > Quality Management > Quality Planning > Logistics Master Data > Material > Create. This action opens the screen in
Figure 2.

Figure 2
QM view (Inspection Type for external processing 0130)
In the Quality management tab in
Figure 2, you maintain the inspection type for external processing. Click the Insp. setup button to open the pop-up screen in which you enter 0130 in the Insp Type field and a short description (Receiving Insp. from External Processing). Verify that the default information is in line with your business requirements. For example, verify that the inspections are performed based on the inspection task list.
You also need to maintain the inspection type for GR inspection from production. In the Quality management tab in
Figure 3, enter 04 in the Insp Type field and a short description (Goods receipt inspection from production). Click the continue icon (the green checkmark).
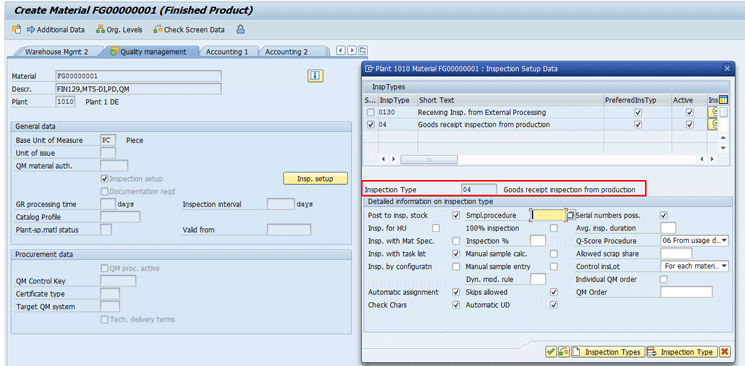
Figure 3
QM View (Inspection Type for goods receipt from production 04)
Note that you can also maintain a large amount of data in batch processing for the inspection type for materials using either transaction code QA08 or by following menu path SAP Menu > Logistics > Quality Management > Quality Planning > Logistics Master Data > Material > Inspection Setup.
Maintain the Work Scheduling View of Relevant Goods
The production department can maintain the working scheduling view of the relevant goods either by executing transaction code MM01 or following menu path SAP Menu > Logistics > Quality Management > Quality Planning > Logistics Master Data > Material > Create. This action displays the screen in Figure 4.

Figure 4
The Work scheduling tab
In the Work scheduling tab in
Figure 4, you need to maintain the scheduling profile and serial number profile (if needed) in the Scheduling Profile and Serial no. profile fields, respectively. Without a working scheduling view a product cannot be manufactured. The scheduling profile is used to specify that certain business transactions are carried out in parallel in a production order (e.g., create and release an order at the same time, or release an order and print the shop papers)
. You also select the Batch Mgmt Rqt (batch management required) check box (if needed).
Usually, you also need to populate the Prod. Stor.Loc. (production storage location) field, and if necessary, populate the fields in the Tolerance data section to indicate tolerance percentages for a goods receipt. Click the save icon

(not shown) to save your data.
Then, after all the other departments have maintained their views, the material master can be saved. You can see the maintenance status of the materials either via end-user transactions or via a data browser. Usually the master data management process is centralized and managed by workflow, but this is not part of this article. In such a case, the system issues an information message as shown in
Figure 4 to state that the material has been created successfully.
Create a Master Inspection Characteristic (MIC)
The QM department can create an MIC using transaction code QS21 or following menu path SAP Menu > Logistics > Quality Management > Quality Planning > Basic Data > Inspection Characteristic > Create. This action opens the screen in
Figure 5.

Figure 5
MIC (general view)
Enter the master inspection characteristic code and the plant code. Then decide the type of characteristic, in this case Quantitative (to evaluate the characteristic from a quantitative point of view), the status, language key, and short text. Save the data by clicking the save icon.
When you click the Quantitative Data option in
Figure 5, the system shows the screen in
Figure 6. Here, for your characteristic, you can define the following main options: Decimal Places, Msmt unit (measurement unit), Lower Limit, Upper Limit, Target Value, UpPlaus. Lmt (upper plausibility limit), LoPlaus. Lmit (lower plausibility limit), number of classes, Class width, and Class midpoint. The class width is the difference between the upper limit and the lower limit of a class. The class midpoint is the arithmetic mean of the class limits (upper and lower limits of a class). A plausibility limit protects against the recording and processing of invalid or improbable values.

Figure 6
MIC quantitative data
When you click the Control Indicators button in
Figure 5, the system shows the screen in
Figure 7.

Figure 7
Specify details in the MIC control indicators screen
In this screen, you can specify the following details:
- Lower specif. limit: If set, you must enter a lower specification limit for the inspection characteristic.
- Upper specif. limit: If set, you must enter an upper specification limit for the inspection characteristic.
- Check target value: If either the Upper specification limit or Lower specification limit indicator is set, then the system checks whether the target value lies within the tolerance.
- Sampling Procedure: If set, a sampling procedure must be assigned to the characteristic in the task list.
- Required char.: If set, the inspection characteristic must be inspected, which leads to the fact that a UD can be posted only after you have confirmed inspection results for this inspection characteristic.
- Classed Recording: If set, the inspection results for the inspection characteristic are recorded as classed values.
- Defects Recording: If set and an inspection characteristic is rejected during results recording, the function for recording defects for a characteristic is automatically called up and a recording procedure can either be initialized by the user or performed in the background.
Click the continue icon and the system shows
Figure 8.

Figure 8
Specify more details in the MIC control indicators screen
In this screen, you can specify the following details:
- Fixed Scope: If set, the number of inspected units must correspond to the pre-calculated number of units to be inspected for results recording.
- Docu. if rejected: If set, additional text has to be entered in case the characteristic has been rejected during the results recording.
- RR change docs (Create Change Documents During Results Recording): If set, change documents are created for this inspection characteristic when results are recorded based on characteristics.
- Record measured vals: If set, measured values for this quantitative characteristic have to be inspected and confirmed.
- Print: If set, the inspection characteristic is printed on the inspection instruction.
Click the save icon. You then receive a confirmation that the characteristic has been saved (
Figure 9).

Figure 9
MIC confirmation message
Create a Sampling Procedure
The QM department can create a sampling procedure either by using transaction code QDV1 or following menu path SAP Menu > Quality Management > Quality Planning > Basic Data > Sampling > Sampling Procedure > Create (
Figure 10).

Figure 10
Create a sampling procedure
Enter the Sampling Procedure description as the sampling procedure code was entered in the initial screen of the transaction QDV1. The Sampling Type is Fixed. The Valuation Mode that defines the rules for accepting or rejecting a characteristic or a sample is attributive inspection according to nonconforming units.
Click the Sample button to see the pop-up Fixed Sample, Attributive screen where you can specify the sample size and the acceptance number for failure. Then, save the data by clicking the save icon. The system issues the information message shown in
Figure 10.
Create Inspection Planning
The QM department can create an inspection plan either by using transaction code QP01 or following menu path SAP Menu > Logistics > Quality Management > Quality Planning > Inspection Planning > Create (
Figure 11).

Figure 11
Create an inspection plan for subcontracting (header data)
For my example, there are two inspection plans, respectively, for:
- External quality management activities via subcontracting (Figures 11 to 15)
- Internal quality management activities (Figures 16 to 19)
In
Figure 11, you can find the main header details of the Inspection Plan created for the material code FG00000001 and Plant 1010. In this case, I entered the usage of the inspection plan as 53 – GR external processes, the Status as 4 – Released (general), which means that the plan can be used without further restrictions, the Planner Group responsible for planning using that Inspection Plan, and the applicability of the lot size. In this case the plan is valid without limitations.
Click the Operations button and the system proposes the details shown in
Figure 12.

Figure 12
Create an inspection plan for subcontracting (operation overview)
Enter the appropriate work center, plant code, control key, and a description of the operation.
Note that the Control Key is a critical field that defines the activities expected or allowed for a specific operation. In my example, the control key ZQM1 is relevant for quality activities and for external processing. For more details, refer to the “Customizing Activities” section.
Select the operation and then click the Inspection Characteristics button. The system proposes the details shown in
Figure 13.

Figure 13
Create an inspection plan for subcontracting (characteristic overview)
In the Sample folder, specify the Sampling Procedure created in
Figure 10, as shown in
Figure 14.
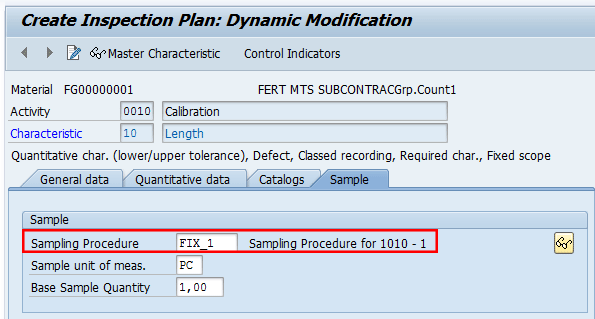
Figure 14
Create an inspection plan for subcontracting
Note
In Figure 14 dynamic modification means that based on the inspection results, the level of the next inspection stage can increase or decrease in terms of severity.
You then see the message in
Figure 15.

Figure 15
Inspection plan for subcontracting created
In
Figure 16, you can find the main header details of the Inspection Plan created for the material code FG00000001 and Plant 1010 and group counter 2. In this case, I entered the usage of the inspection plan as 5 – Goods receipt and the Status as 4 – Released (general), which means that the plan can be used without further restrictions. I also entered the Planner Group responsible for planning using that Inspection Plan, the Planning work center, and the applicability of the lot size. In this case the plan is applicable irrespective of the size.

Figure 16
Create an inspection plan for QM internal activity (header details)
Click the Operations button. The system proposes the details in
Figure 17. Enter the plant code, control key, operation description, and the duration of the operation in terms of labor, setup, and machine timings.

Figure 17
Create an inspection plan for QM internal activity (operation overview)
Select the operation and then click the Inspection Characteristics button. The system goes to the screen shown in
Figure 18. Enter the type of characteristic to be evaluated (in my example Qualitative), a description, and the sampling procedure created in
Figure 10.

Figure 18
Create an inspection plan for QM internal activity (characteristic operation)
The system confirms that the plan group is created (
Figure 19).

Figure 19
The inspection plan for the QM internal activity is saved
Create a BOM
The PP department can create the BOM either by using transaction code CS01 or by following menu path SAP Menu > Logistics > Production > Master Data > Bills of Material > Bill of Material > Material BOM > Create. In
Figure 20, you can display the BOM used for my example. In this case, the QM department can use transaction code CS03 and display the components and related quantity of the manufacturing BOM for the produced goods number FG00000001.

Figure 20
Display the BOM items
Create a Purchasing Info Record
The purchasing department can create a purchasing info record either by using transaction code ME11 or by following menu path SAP Menu > Logistics > Materials Management > Purchasing > Master Data > Info Record > Create. This action opens the screen in
Figure 21.

Figure 21
Create a purchasing info record
The purchasing department defines the logistics and price details for the vendor (subcontractor), material group, purchasing organization, and plant combination. Save the document by clicking the save icon. At this stage, the system shows an information message as displayed in the pop-up screen of
Figure 21.
Note that the Info Category must be defined as Subcontracting. The Info Category field is not shown in
Figure 21 as this is an option that is defined in the first screen of transaction code ME11.
Create a Work Center
The PP department can create a work center either by using transaction code CR01 or by following menu path SAP Menu > Logistics > Production > Master Data > Work Centers > Work Center > Create. This action displays the screen in
Figure 22.

Figure 22
Basic data for the work center
Here, specify the appropriate person responsible (e.g., 001), usage (e.g., 009), and standard value key SAP1 for the setup, machine, and labor timings.
Now select the Default Values tab (
Figure 23). Here, specify the appropriate Control key as standard PP01 and the Units of Measurement of Standard Values.

Figure 23
Default values for the work center
Click the Capacities tab (
Figure 24). Specify the appropriate formulas for setup and machine time requirements.

Figure 24
Work center capacities
Select the Scheduling tab (
Figure 25). Specify the Capacity category as 001 – Machine and the appropriate formulas for setup and machine time.

Figure 25
Scheduling for the work center
Specify the Validity period, the appropriate Cost Center, and the activity type with the appropriate formulas (
Figure 26). Click the Costing tab to go to
Figure 26.

Figure 26
The costing work center
Display the work center that will be used for the external subcontrating activities via transaction code CR03. In my example, specify the Plant Code 1010 and Work center QMLABS. Press Enter. Note that in this case, only the Basic Data view has been maintained with dummy data as the work in reality is performed externally by the subcontrator (
Figure 27).

Figure 27
Work center information message
Create a Standard Routing
To create, change, or display a routing, you can use transaction codes CA01, CA02, or CA03, respectively, or follow menu path SAP Menu > Logistics > Production > Master Data > Routings > Routings > Standard Routings > Create/Change/Display. In the initial screen that the system opens (not shown), enter the material code number and plant. After you press Enter, the system displays the screen in
Figure 28.

Figure 28
Header details for routing
Specify the general data of the routing:
- Usage: 1 – Production
- Status: 4 – Release (general)
- Planner Group: PP department
- Lot size: It depends. In my case I defined it without any limitation.
Click the Operation button and then in
Figure 29 specify the work center, plant code, control key, description, and duration data (i.e., setup, machine, and labor time) per each operation.

Figure 29
Operation overview for routing
Click the Inspection Characteristics button in
Figure 29 and then in
Figure 30 specify the master inspection characteristic, plant, version, and sampling procedure.

Figure 30
Routing (characteristic overview)
In
Figure 29, select the operation 0020. Then follow menu path Details > Operation Detail and scroll down the screen. You reach the External processing details shown in
Figure 31. Make sure that the Subcontracting check box is selected and then specify your purchasing organization, inspection type 0130, the cost element, and the appropriate purchasing info record number. Click the save icon to save the data.

Figure 31
Routing (external operation overview)
Note
To create the purchasing requisition from the operation’s control key ZQM1, the purchasing department has to maintain the Purchasing info record via transaction code ME11.
The system confirms that the routing was saved (
Figure 32).

Figure 32
Routing information message
Create a Production Version
To create, change, or display a production version, the PP department can either use transaction codes MM01, MM02, and MM03, respectively or follow menu path SAP Menu > Logistics > Materials Management > Master Data > Material > Create (General)/Change (Immediately)/Display (Current). This action displays the screen in
Figure 33.
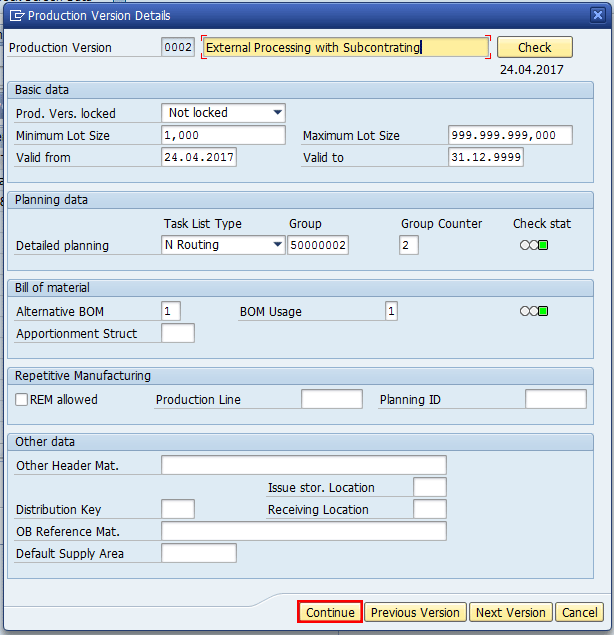
Figure 33
A production version for subcontracting
For my example, link Routing 50000002/2 and the BOM 1/1 within an unlimited time for all lot sizes, as shown in
Figure 33. Confirm that the status, lot size, validity, routing, and BOM data are correct. Click the Continue button.
Check a General Ledger (G/L) Account
To edit (create, change, or display) a G/L Account, the FI department can either use transaction code FS00 or follow menu path SAP Menu > Accounting > Financial Accounting > General Ledger > Master Records > G/L Accounts > Individual Processing > Centrally. This action displays the screen in
Figure 34. For my example click the display icon

as the G/L account was already created by the production planning department (which should be the case also in production).

Figure 34
G/L (account type and description)
In the Type/Description tab confirm that the GL account type has been defined as Primary Costs or Revenue, the Account Group has been defined as Income statement accounts, and the text descriptions are appropriate.
Click the Control Data tab (
Figure 35). In the Control Data tab, verify that the G/L account has been linked to a Subcontracting Services account, the cost element category is 1, and the sort key is 008.
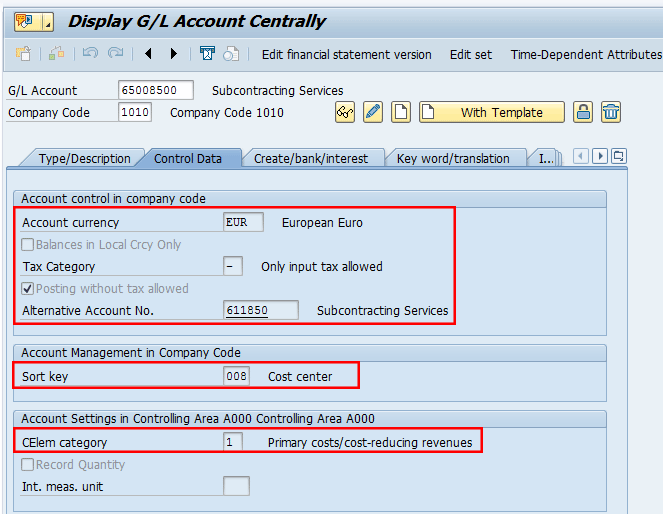
Figure 35
G/L control data
Click the Create/bank/interest tab (
Figure 36).
In
Figure 36 make sure that the Field status group has been set for Cost accounts for external services. This data should be maintained by the financial department. Click the save icon.

Figure 36
Set the field status group for external services
Transactional Data
To perform the quality activities for the subcontracting processes, perform the following main flows in the system:
- Evaluate the subcontracting processes for a specific operation using QM functionalities with Inspection Type 0130 - Receiving Insp. from External Processing
- Evaluate the overall production processes using QM functionalities with Inspection Type 04 - Goods receipt inspection from production
Step 1. Create a Production Order
To create, change, or display a production order, the production planning department can use either transaction codes CO01, CO02, or CO03, respectively, or follow menu path SAP Menu > Logistics > Production > Shop Floor Control > Order > Create > With Material/Change/Display.
In the selection screen (not shown), you specify the material code, plant code, and order type. After you enter your data, press Enter. The system then displays the screen in
Figure 37.
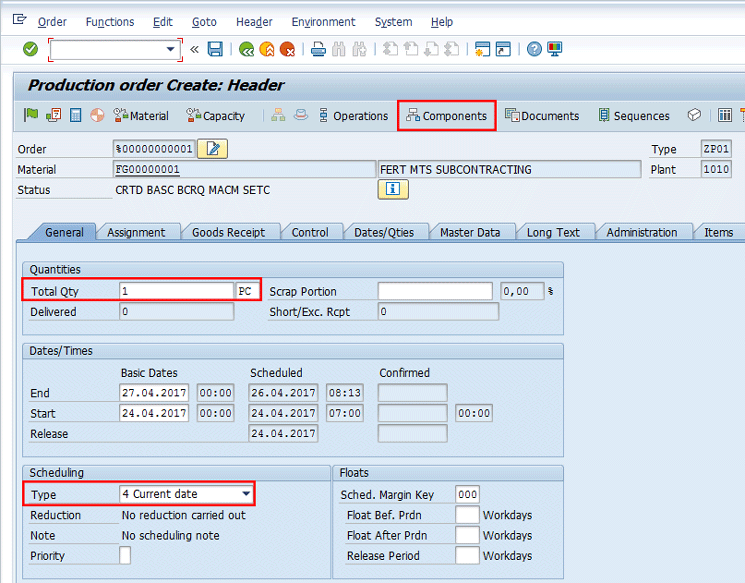
Figure 37
Header (general data) for creating a production order
For my example, use transaction code CO01, then enter the Material code number FG00000001, Plant code number 1010, and order Type ZP01. Press Enter and the system displays the screen shown in
Figure 37. Here you can enter the produced quantity and the scheduling type.
Click the Components button in
Figure 37 to assign the components to be sent to the subcontrator for Operation 0010, as shown in
Figure 38. Note that the components are defaulted from the BOM of the produced good.
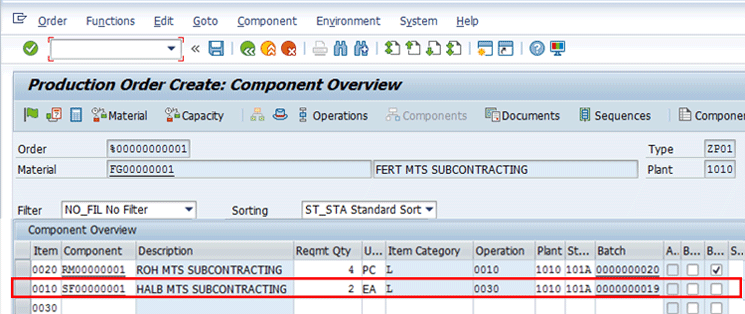
Figure 38
Component overview of the Production Order Create screen
Double-click the operation number 0010 and go to the Ext. Processing tab. Here, specify the Purchasing Info Record document number 5500000030 in the External processing tab. All relevant details to manage the subcontractor’s services will be automatically retrieved from the Info Record document as shown in
Figure 39.

Figure 39
Operation details for subcontracting
To release the production order, you can either click the flag icon

or use the option Functions > Release, as shown in the
Figure 40.

Figure 40
Release the production order
You then see that the production order document number is saved (
Figure 41).

Figure 41
Confirmation message about the creation of the production order
Step 2. Display the Purchase Requisition
To display the puchasing requisition created for the external subcontrating operation activities, you can either use the reports available in the Purchasing module or use transaction code CO03 and go to the Operation details of the external processing, as shown in
Figure 42.

Figure 42
Display the purchasing requisition document number
Double-click the document number in the Purchase Requisition field in
Figure 42. The system then calls the Display Purchase Requisition transaction (transaction code ME53N), in the background as shown in
Figure 43.
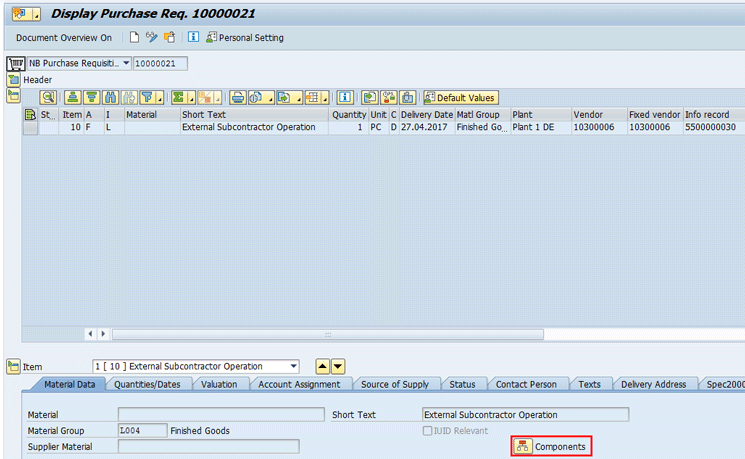
Figure 43
Display purchasing requisition document details
Click the Components button. You then see the components that will be delivered to the subcontractor with your premises, as shown in
Figure 44. With your premises means that the company issues the components to the subcontractor but the legal owner of the stock is still the company.
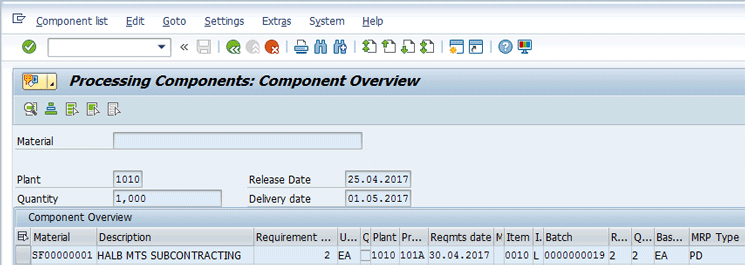
Figure 44
Display the purchasing requisition components
Step 3. Create a PO
The purchasing department can create a PO with reference to the purchasing requisition either by executing transaction code ME21N or by following menu path SAP Menu > Logistics > Materials Management > Purchasing > Purchase Order >Create > Vendor/Supplying Plant Known. This action displays the screen in
Figure 45. Save it by clicking the save icon.

Figure 45
Convert the purchasing requisition in the PO
Verify the components retrieved from the purchasing requisiton, as shown in Figure 46. For my example, note that the Material number SF00000001 appears.

Figure 46
Convert the purchasing requisition in the PO in the Component Overview screen
Step 4. Provide Components to the Subcontractor
The logistics department can deliver the components to the subcontractor either by executing transaction code ME2ON or following menu path SAP Menu > Logistics > Materials Management > Purchasing > Purchase Order > Reporting > Subcontracting Cockpit. This action displays the screen in
Figure 47. Specify the selection criteria (e.g., subcontractor and plant) and then run the report by pressing F8 or by clicking the execute icon.

Figure 47
Specify criteria in the selection screen for the Subcontracting Cockpit
The system reports the details shown in
Figure 48.
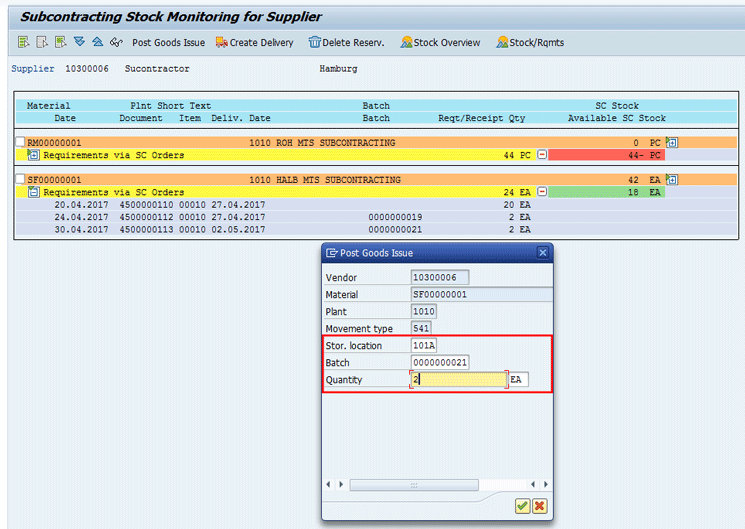
Figure 48
The output screen for the Subcontracting Cockpit
Enter the issue storage location, batch, and quantity you need to send to the subcontrator and then click the save icon to save your entry. The system then shows the information message in
Figure 49 that one item was posted.

Figure 49
Confirmation message in the Subcontracting Cockpit
To display the material document created from the previous step, execute transaction code MB51 or follow menu path SAP Menu > Logistics > Materials Management > Inventory Management > Environment > List Displays > Material Documents. This action displays the screen in
Figure 50.

Figure 50
Display of details for the material document
Step 5. Verify the Stock Level
All affected departments can verify the inventory stock level at the subcontractor’s site and associated status either by executing transaction code MMBE or following menu path SAP Menu > Logistics > Materials Management > Environment > Stock Overview. This action opens the screen in
Figure 51 that displays a report to verify the stock level and status.
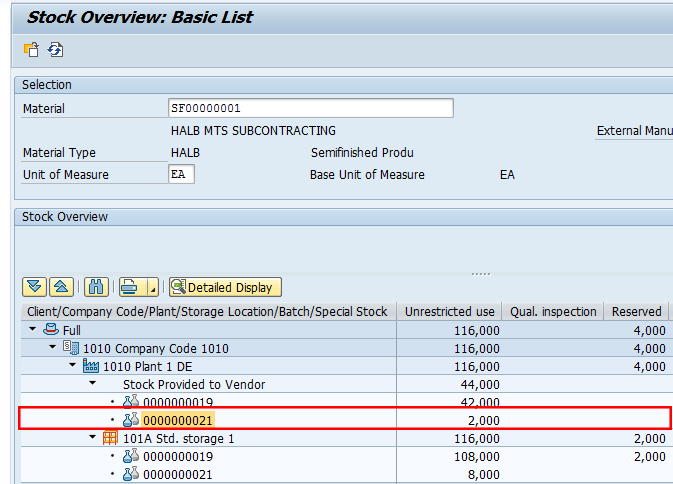
Figure 51
Display the stock at the subcontractor’s site
Step 6. Post the GR
To post the GR with reference to the PO upon the reception of the goods and services from your subcontractor, the logistics department can execute transaction code MIGO with MvT (movement type) 101 or follow menu path SAP Menu > Logistics > Materials Management > Inventory Management > Goods Movement > Goods Movement. This action displays the screen in
Figure 52. Specify the PO document number and associated line item 4500000113/10 and check the Item OK check box. The data is always saved using the save icon.

Figure 52
Post the GR with reference to the PO
Step 7. Display the Inspection Lot
Upon the goods receipt, the system has created an inspection lot automatically. To display the inspection lot, you can use transaction code MIGO, specify the material document, and then click the InspLot (inspection lot) button, as shown in
Figure 53.

Figure 53
Display the material document and associated inspection lot
In case the material document created during the GR process is not known, the QM department can either use transaction code QA03 or follow menu path SAP Menu >Logistics > Quality Management > Quality Inspection > Inspection Lot > Processing > Display.
Another way to search for the inspection lot (and this is my recommended one) is to use transaction code QA33 or follow menu path: SAP Menu >Logistics > Quality Management > Quality Inspection > Worklist > Inspection > Display Data.
After you click InspLot button in
Figure 53, the system displays the following Inspection Lot details in the Data for Lot Origin tab, as shown in
Figure 54.

Figure 54
Display the inspection lot (data for the lot origin)
The main details of the inspection specifications are shown in the Inspection Specifications tab (
Figure 55).
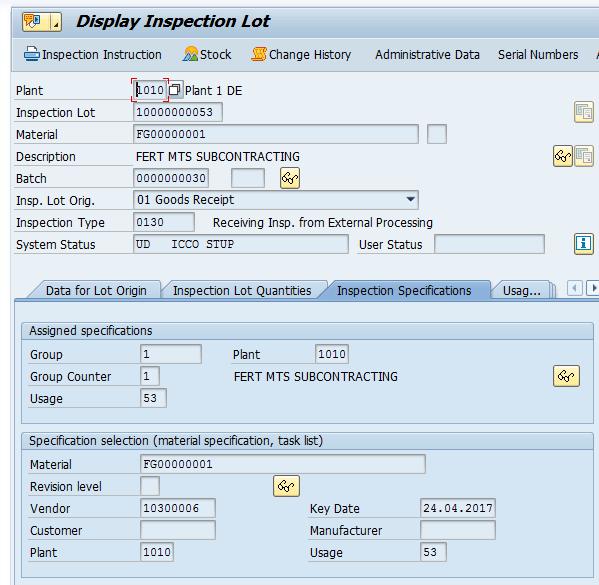
Figure 55
Display the inspection specifications in the inspection lot
Step 8. Enter Results Recording
To enter Results recording, you can either use transaction code QE51N or follow menu path: SAP Menu > Logistics > Central Functions > Batch Management > Environment > Quality Inspection > Worklist > Results Recording.
Select the inspection lots for your material FG00000001. Enter any value within the tolerances that is different than the planned value in the Result field in the data entry section and press Enter to confirm. Click the save icon. The system then saves the record results, as shown in
Figure 56.

Figure 56
Confirmation message that record results were saved
You need to evaluate the inspected quantity that in my example is 1 PC. The valuation was accepted by the class 2 and then based on that the results were accepted and saved.
Step 9. Record the UD
To record the UD, the user can use transaction code QA11 or follow menu path SAP Menu > Logistics > Central Functions > Batch Management > Environment > Quality Inspection > Worklist > Results Recording. Specify the Inspection Lot in the main screen and then press Enter. The screen in
Figure 57 appears.

Figure 57
Record the usage decision (enter the UD code)
In the UD Code field, use F4 help to enter an acceptance without further action (code A1) and click the save icon to save the UD.
Step 10. Verify the Stock Consumed by the Subcontractor
All affected departments can verify the inventory stock level and status - in this case the stock consumed from subcontractor for the batch number 000000021, either by executing transaction code MMBE or following menu path SAP Menu > Logistics > Materials Management > Environment > Stock Overview. This action opens a screen that shows a report used to display the stock level and status (
Figure 58).

Figure 58
Stock received from the subcontractor
Step 11. Enter the Incoming Invoice
To post the Logistic Invoice Verification (LIV), the user can use transaction code MIRO or follow menu path SAP Menu > Logistics > Materials Management > Logistics Invoice Verification > Document Entry > Enter Invoice. In the screen that the system displays, enter the data as specified in
Figure 59.

Figure 59
Enter the LIV (basic data screen)
Step 12. Display and Release the LIV
To display and release the LIV, you can use transaction code MRBR or follow menu path SAP Menu > Logistics > Materials Management > Logistics Invoice Verification > Further Processing > Release Blocked Invoices. In the screen that the system displays, enter the data as specified in
Figure 60. After you have entered all your data, click the execute icon.

Figure 60
The selection screen for releasing a blocked invoice
The system shows the details in the next screen (
Figure 61).

Figure 61
The output screen for releasing a blocked invoice
Note that the invoice was blocked due to the different days (7). The delivery date of the purchase order was specified as 02.05.2017 while the invoice was posted on 25.04.2017.
Step 13. Check the Result in the PO History
To display the PO history, you can use transaction code ME23N or follow menu path SAP Menu > Logistics > Materials Management > Purchasing > Purchase Order > Display. This action opens the screen in
Figure 62. Click the Purchase Order History tab to view the GR (
Figure 62).

Figure 62
Display PO history
Step 14. Confirm the Production Order
The production operator can enter the production’s confirmation either by executing transaction code CO11N or following menu path SAP Menu > Logistics > Production > Shop Floor Control > Confirmation > Enter > For Operation > Time Ticket. This action opens the screen in
Figure 63. Enter the data as specified in
Figure 63. For my example, enter partial confirmation details for the operation 0010.
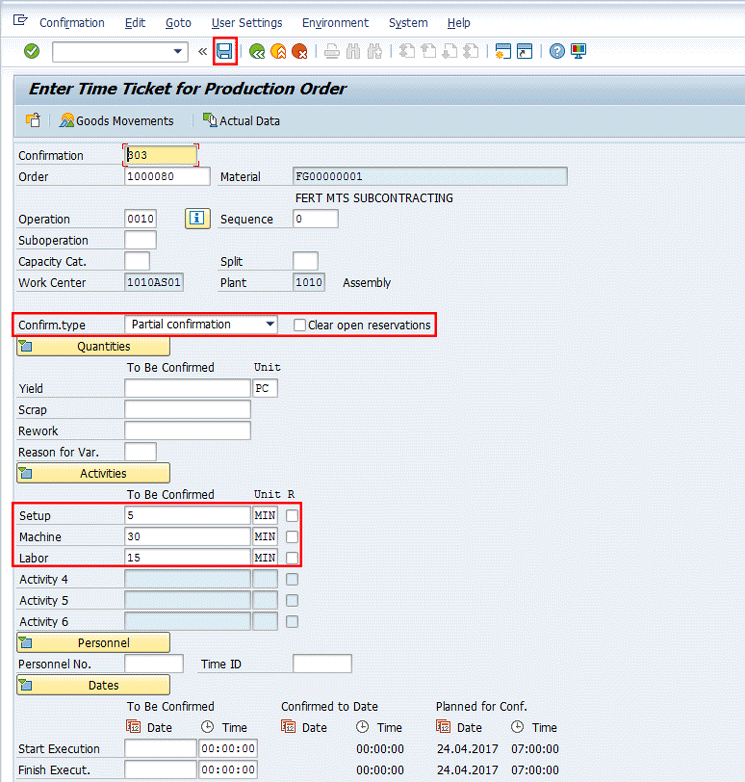
Figure 63
The production operation’s partial confirmation (selection screen)
Verify the planned goods movements and post the confirmation. After you click the save icon to post the confirmation, the system then displays the details shown in
Figure 64.

Figure 64
The production operation’s confirmation for planned goods movements
Enter the production order confirmation (Final confirmation) for operation 0010, then save the data, as shown in
Figure 65.

Figure 65
The production operation’s final confirmation selection screen
Note that at this stage the status of the production order operations has been updated as CNF – Confirmed and EODL - External operation delivered as shown in
Figure 66. To open the screen in
Figure 66, execute transaction code CO03, specify the production order document number, and press Enter.

Figure 66
The production operation’s final confirmation status
Step 15. Post a GR against a Production Order
To post the GR with reference to a production order, you can either use transaction code MIGO or follow menu path SAP Menu > Logistics > Materials Management > Inventory Management > Goods Movement > Goods Movement. This action opens the screen in
Figure 67.

Figure 67
Post the GR against the production order
Note that these movements are also visible in the production order document via transaction code CO03, especially the costs for the subcontracting’s services as shown in
Figure 68.

Figure 68
Display the goods movements in the production order document
Step 16. Display the Inspection Lot
If the material document created during the GR process is not known, the QM department can either use transaction code QA03 or follow menu path SAP Menu >Logistics > Quality Management > Quality Inspection > Inspection Lot > Processing > Display.
Another way to search for an inspection lot (and this is my recommended one) is to use transaction code QA33 or follow menu path SAP Menu >Logistics > Quality Management > Quality Inspection > Worklist > Inspection > Display Data or SAP Menu >Logistics > Materials Management > Inventory Management > Goods Movement > Goods Movement (MIGO). These activities display the screen in
Figure 69.

Figure 69
Display the GR material document
After you click the InspLot button in
Figure 69, the system calls the Display inspection lot transaction (transaction code QA03) in the background and displays the details shown in
Figure 70.

Figure 70
Display the inspection lot (data for the lot origin)
Now you can navigate within the document and in particular you can go to the Inspection Specifications tab to verify the task list associated to the Inspection lot, as shown in
Figure 71.
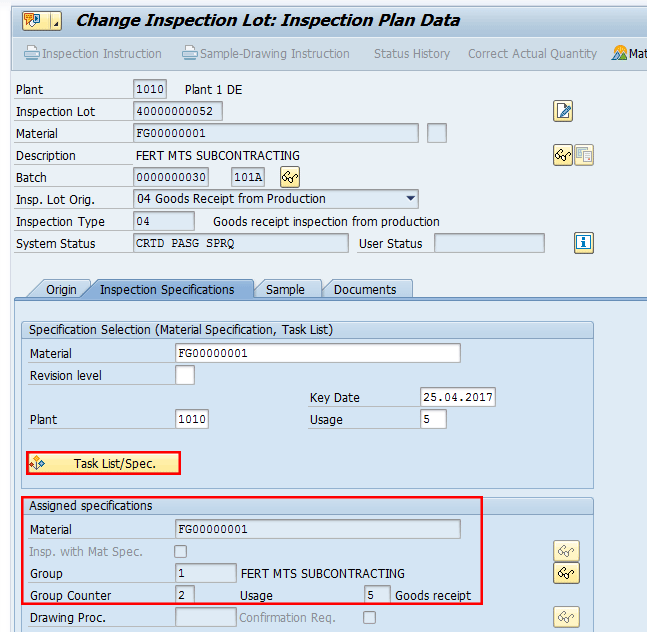
Figure 71
Display the inspection lot inspection specifications
In the Sample tab, you can see the Inspection Lot quantity details, as shown in
Figure 72.

Figure 72
Display the inspection lot quantity details
Step 17. Verify the Stock Status Before the UD
All affected departments can verify the inventory stock level of the finished goods and associated status either by executing transaction code MMBE or following menu path SAP Menu > Logistics > Materials Management > Environment > Stock Overview. This action opens the screen in
Figure 73. Verify that the stock level of the material number FG00000001 and batch number 0000000030 is 1 EA in the status quality inspection.
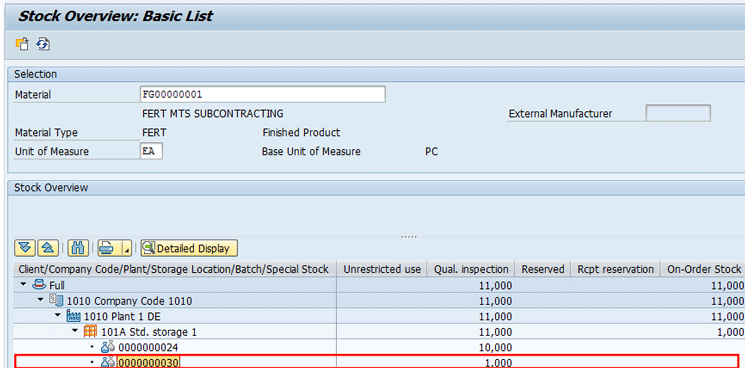
Figure 73
The stock status (before the UD)
Step 18. Record the Results
To record results for the inspection lot, the QM department can either use transaction code QE51N or follow menu path SAP Menu > Logistics > Quality Management > Quality Inspection > Worklist > Results Recording. Enter the data in the selection screen and then run the report either by using the execute icon or by pressing F8. The system then displays the details shown in
Figure 74.

Figure 74
Details displayed for the record results for the inspection lot
After making your decision about the valuation code, save the document. The system issues the message shown in
Figure 75.

Figure 75
Record results completed
Step 19. Post the UD
To perform the UD for the inspection lot, the QM department can either use transaction code QA11 or follow menu path SAP Menu > Logistics > Quality Management > Quality Inspection > Inspection Lot > Usage Decision. This action displays the screen in
Figure 76. Specify the appropriate UD code. In my example, I am going to accept the UD as the results recorded for the Inspection Lot passed the quality inspection controls.

Figure 76
Valuation code for the UD
Then, specify the stock status of the goods from the UD, as shown in
Figure 77.

Figure 77
UD stock posting
After making your decision about the valuation code and stock type, save the document. The system displays the confirmation message shown in
Figure 78.

Figure 78
Confirmation message that the UD is completed
Step 20. Verify the Stock Status After the UD
All affected departments can verify the inventory stock level and status either by using transaction code MMBE or following menu path SAP Menu > Logistics > Materials Management > Environment > Stock Overview. This action opens the screen in
Figure 79.
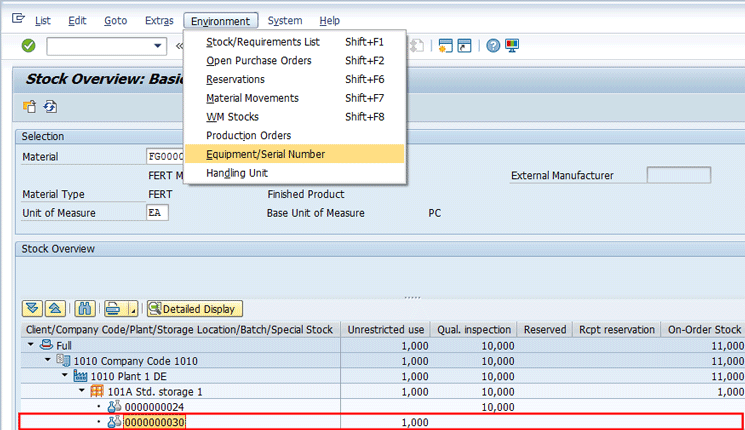
Figure 79
Stock status (after the UD)
As shown in the
Figure 79, you can see that the unrestricted use status of the stock of the material number FG00000001 has been increased of 1 EA as the Inspection Lot Stock associated to the IL has been put to unrestricted status.
From
Figure 79, follow menu path Environment > Equipment/Serial Number, the system will show the details of the serial number data associated to the stock has been posted for the material number FG00000001 and batch number 0000000030, as shown in the
Figure 80.
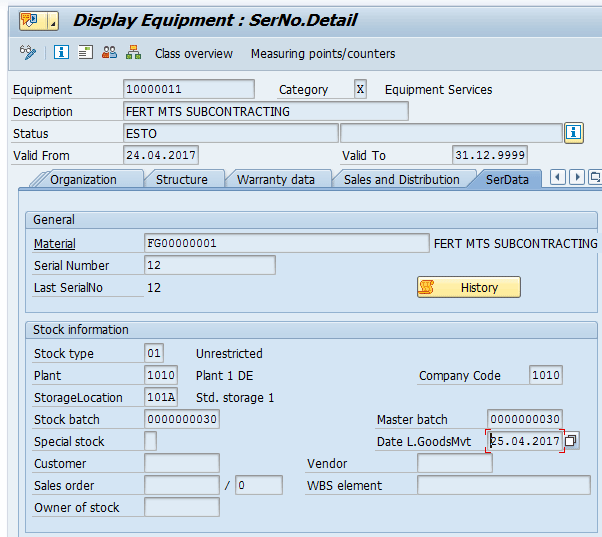
Figure 80
Serial number associated with the material’s batch
Step 21. Run Reports
All affected and authorized departments can display the details of the QM documents (e.g., Inspection Lot) either by using transaction code QA33 or following menu path SAP Menu > Logistics > Quality Management > Quality Inspection > Worklist > Inspection > Display Data. This action displays the screen in
Figure 81. This is a report. The user can run this report based on specific requirements. In my example, I ran the report and selected the plan, inspection lot origin, material code, and lot creation date.

Figure 81
The input screen for inspection lot selection
After specifying the selection option, press F8 or click the execute icon to run the report. The system displays the details shown in
Figure 82.
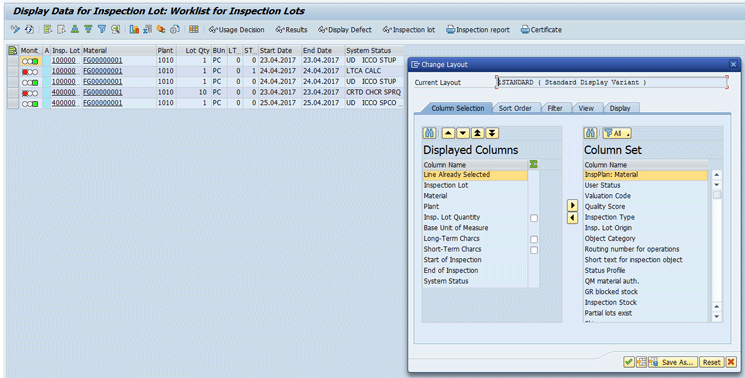
Figure 82
The output screen for the inspection lot selection
Customizing Activities
Now I describe the most important customizing activities that you need to check and complete to enable the subcontracting processes.
Define a New Control Key Relevant for Quality Management Activities and External Process Operations
Without the Control key set as described, the subcontracting process cannot be triggered from the production order’s operation.
To complete this step, you can either use the IMG transaction code OPJ8 or follow menu path Tools > Customizing > IMG > Edit Project (SPRO) Pushbutton: SAP Reference IMG. Production > Shop Floor Control > Master Data > Routing Data > Define control key. This action opens the screen in
Figure 83.

Figure 83
Define Control key ZQM1
The Control key is used in the operation of the production order. To enable the subcontracting functionalities in the QM module, you need select the Insp.char.required check box and enter the value + in the External processing field. Click the save icon.
Define Task List Usages to Be Used during the Routing Creation for Internal Production and External Subcontracting Activities
Follow menu path Tools > Customizing > IMG > Edit Project (SPRO) Pushbutton: SAP Reference IMG. Quality Management > Quality Planning > Inspection Planning > General > Define Task List Usages. Task list usages are used in conjunction with routing. For my example, use the value 5 for the GR with reference to the production order and 53 for the GR with reference to the subcontracting PO, respectively, as shown in
Figure 84.
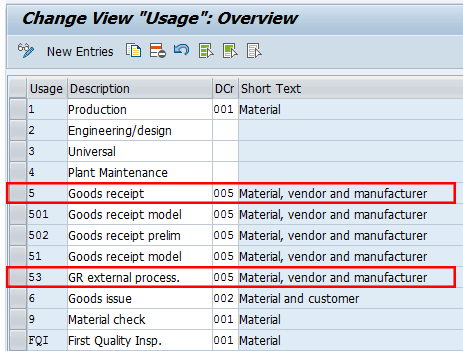
Figure 84
Define task list Usage 5 and 53
Verify the Customizing Settings for Inspection Type 0130 - Receiving Insp. from External Processing
To complete this step follow menu path Tools > Customizing > IMG > Edit Project (SPRO) Pushbutton: SAP Reference IMG. Quality Management > Quality Inspection > Inspection Lot Creation > Maintain Inspection Types. This path takes you to the screen in
Figure 85.
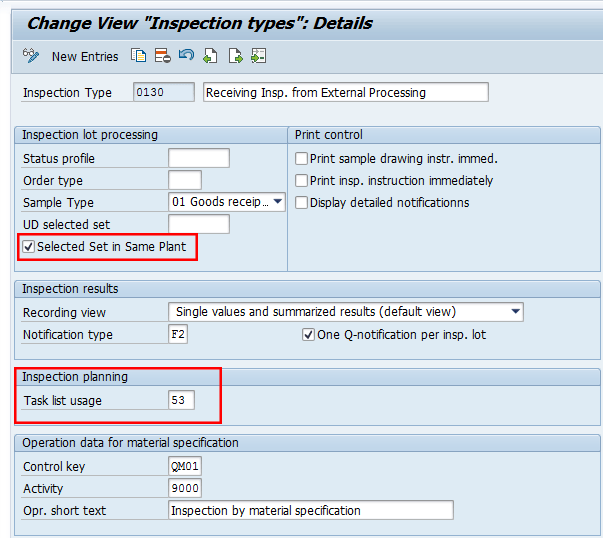
Figure 85
Display inspection type 0130
For my example, the task list usage value in the routing used for subcontracting was 53 - GR external process. Based on this value the system determines the task list to be associated to the inspection lot created automatically with reference to the subcontracting PO.
Maintain the Inspection Lot Origins and Assign Inspection Types
In this step you make sure that the Inspection Type 0130 - Receiving Insp. from External Processing has been assigned to the Inspection Origin 01 - Goods Receipt. Inspection Type 04 - Goods receipt inspection from production should be assigned to the Inspection Origin 04 - Goods Receipt from Production.
To complete this step follow menu path Tools > Customizing > IMG > Edit Project (SPRO) Pushbutton: SAP Reference IMG. Quality Management > Quality Inspection > Inspection Lot Creation > Maintain Inspection Lot Origins and Assign Inspection Types. This path takes you to the screen in
Figure 86. You link the lot origins 01 and 04 with the Task List Type Q - Inspection Plan and status 4 - Released (general). Note that these settings should already have been set by standard QM module activation. Click the save icon.

Figure 86
Display entries for inspection origins 01 and 04
Selecting the second line item in
Figure 86. Then double-click the folder Inspection types for the origin. The system reports the details as shown in
Figure 87.

Figure 87
Display the link between inspection type 04 and origin 04
The entry listed in
Figure 87 should have already been created by the system upon the activation of the QM module. In my example, the entry I need to enable is 04 as the origin of the GR and 04 as the inspection type. Having this entry, the system automatically creates an inspection lot with type 04 upon the GR of the production order. Click the save icon. To go to the next screen, click the next entry icon

.
The entries listed in
Figure 88 also should have already been created upon the activation of the QM module. In my example, the entry I need to enable is 01 as the origin of the GR and 0130 as the inspection type. With this entry, the system automatically creates an inspection lot with type 0130 upon the GR of the PO created with reference to the purchase requisition from the production order. Click the save icon.
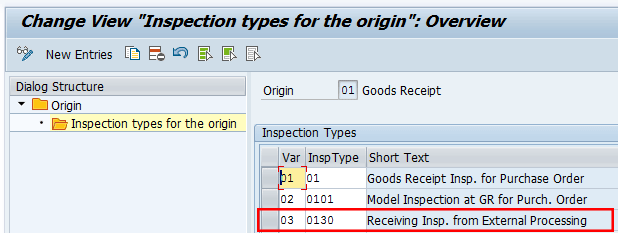
Figure 88
Display the link between inspection type 0130 and origin 01
Select the first line item in
Figure 86 and then double-click Inspection types for the origin folder. The system reports the details in
Figure 88.
Define Default Values for the Inspection Type
In this step you define default values for inspection types 04 and 0130. To do so, follow menu path Tools > Customizing > IMG > Edit Project (SPRO) Pushbutton: SAP Reference IMG. Quality Management > Quality Inspection > Inspection Lot Creation > Define Default Values for Inspection Type. This path takes you to
Figure 89.
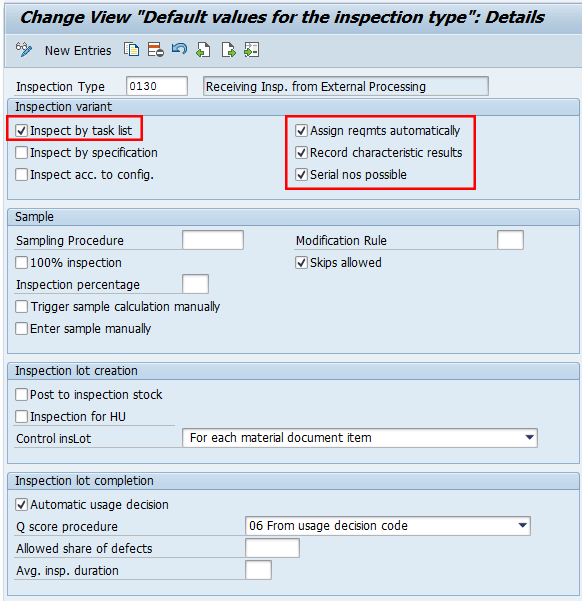
Figure 89
Default values for inspection type 0130
In the Inspection Lot, with inspection type 0130, select these check boxes: Inspect by task list, Record characteristic results, and Serial nos possible. Leave the rest of the fields as defaulted by standard. Click the save icon and to go to the next screen, click the next entry icon.
In the Inspection Lot, with inspection type 04 as shown in
Figure 90, select these check boxes: Inspect by task list, Record characteristic results, Serial nos possible, and Post to inspection lot. Leave the rest of the fields as defaulted by standard. Click the save icon.

Figure 90
Default values for inspection type 04
Maintain the Item Category and Account Assign Category Linkage
In this step you make sure that the combination of Item Category (IC) L - Subcontracting and Account Assignment Category (AAC) F - Order has been defined in the purchasing configuration. This ensures that you can create a purchasing document with these two elements to manage the subcontracting activities.
To complete this step follow menu path Tools > Customizing > IMG > Edit Project (SPRO) Pushbutton: SAP Reference IMG. Materials Management > Purchasing > Account Assignment > Define Combination of Item Categories/Account Assignment Categories. This path takes you to the screen in
Figure 91.

Figure 91
Link ItCat. L with AAC F
Enter L in the ItCat. Field and F in the AAC field. Enter Order in the Acc.Assgt Cat.Dscr. field. Click the save icon.
Maintain the Purchasing Requisition Option
In this step you make sure that the Reservation Relevance/Generation of Purchase Requisition option is flagged to 3 - Immediately to have purchase requisitions generated automatically for non-stock material and external operations.
To complete this step, you can either use IMG transaction code OPL8 or follow menu path Tools > Customizing > IMG > Edit Project (SPRO) Pushbutton: SAP Reference IMG. Production > Shop Floor Control > Master Data > Order > Define Order-Type-Dependent Parameters. The system displays the screen shown in
Figure 92.

Figure 92
Select the plant and order type combination
Select your plant and production order type and then double-click the line item. Click the save icon. The system displays the details in the next screen (
Figure 93).
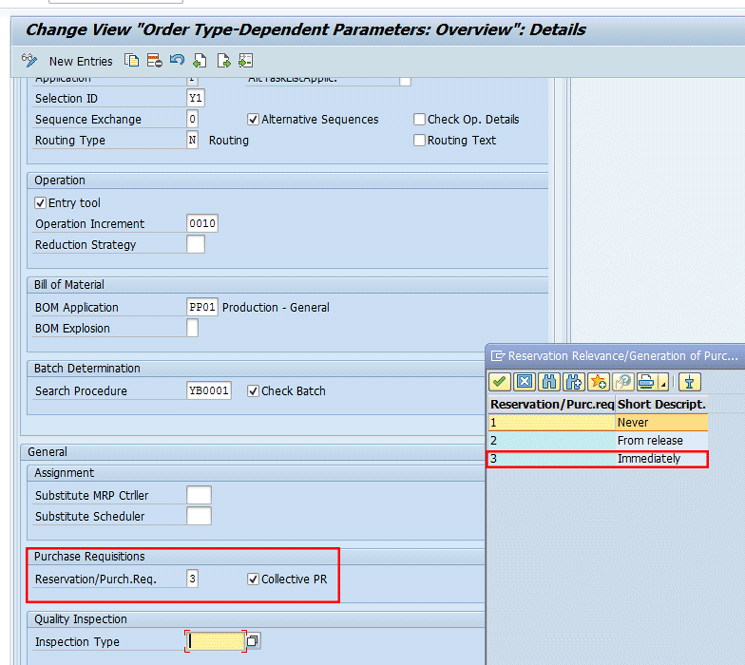
Figure 93
Set the value as 3 - Immediately for purchase requisitions creation
In
Figure 93, you should set up the parameters related to the Purchase Requisition (PR) management. You can decide how to generate the Purchase Requisition (PR) in case of operations relevant for subcontracting:
Reservation/Purch. Req field: You can choose either the value 2 - PR creation upon the releasing of production orders or the value 3 - PR creation immediately upon creation of production orders.
Collective PR flag field: If flagged, only one PR is created per production order. If it is not flagged, then a separate purchase requisition is created for every externally processed operation or non-stock component.

Gaetano Altavilla
Dr. Gaetano Altavilla is a senior SAP practice manager. His focus is on pre-sales, delivery of SAP application solutions for large international corporations, and SAP knowledge management in Europe, the Middle East, and Africa (EMEA).
In his 18 years of SAP application experience working for many multinational companies, such as Procter & Gamble and Hewlett-Packard, he has covered a wide range of ERP logistic areas, focusing on the MM, WM, SD, LES, PP, PP-PI, PLM (QM, PM, PS) modules, as welll as CRM (TFM), SRM (EBP), SCM (SAP APO), and MES (ME) components.
Dr. Altavilla holds a degree with first-class honors in mathematics from the University of Naples and is certified in many SAP modules: SAP Logistics Bootcamp, SAP MM, SD, LE (SHP/WM/LE), PP, PLM (PM, QM, PS), SRM, CRM, SCM (APO), SCM (TM), FI, CO, and Solution Manager. He also has experience in ABAP/4 and application link enabling (ALE) and IDocs. He has participated in numerous industry conferences, such as the SAP Skills Conference in Walldorf at SAP SE.
You may contact the author at
Gaetano_altavilla@hotmail.com.
If you have comments about this article or publication, or would like to submit an article idea, please contact the
editor.


