Learn about the main Quality Management (QM) functionalities relevant for external activities during the production process in the case of discrete manufacturing, using the Materials Management (MM), Production Planning (PP), Quality Management (QM), and Financial Accounting (FI) modules. Follow details about the main customizing settings to be done in the system from a QM point of view.
Key Concept
External processing occurs when an organization sends the material in process on the order to an outside vendor to do work it can't do itself or for which it lacks available capacity. When the parts are received back, they return to the same order and are finished on the shop floor. The key here is that the part number doesn't change and the value of the outside work is collected on the shop order.
External processing is tied to production orders or maintenance orders on the shop floor. When external processing is used, the stocks movement is not visible and you do not create a document to issue materials to the vendor and a document to receive the materials. This process is used (mostly) to cost the services provided by the vendors inside the plant. For example, one of your processes requires cutting and painting. This step is done by a different vendor and you need to pay the vendor. The vendor works in your plant and then you can use this external processing scenario. I describe external services management using an example with calibration tasks related to finished goods.
For external processing, a purchasing info record is set up at the material group level with a sort string to differentiate between different info records with the same material group. This info record is referred to in the routing operation purchasing details. When this is done, at order release the system creates a requisition for the order amount in accordance with the info record data. The parts are not issued to the purchase order (PO), but the operations are confirmed as normal on the production order. This is the main difference between the subcontracting processes and external processes. In the case of external services, the company is not issuing any parts to the vendor along with the goods he needs to manipulate or rework. The PO is received in the standard manner. The vendor sends the invoice for the services provided, which is paid during the normal payment cycle.
Business Activities in the SAP System
The business transactional flow for the external activities is managed by the Procurement, Production Planning (PP), Quality Management (QM), and Financial Accounting (FI) modules, as shown in
Figure 1.

Figure 1
Main activities related to production’s external services
In this process, the buying department can create a PO in MM with reference to the PR generated automatically from the production order’s releasing stage. Then the vendor performs its work. Upon the GR with reference to a PO, the QM activities are triggered via an appropriate inspection lot. The invoice is paid only if the quality services are accepted by the company.
The business activities that are shown in the system are the following:
- Maintain a Purchasing Info Record (PIR)
- Generate a PR upon a production order’s release
- Create a PO with reference to a PR
- Post a GR with reference to a PO for services
- Trigger the creation of the inspection lot
- Record the defects
- Post a Quality Notification
- Post the results recording
- Post the UD
- Post the LIV
- Release the LIV (if needed)
- Check the result in the PO history (optional step)
- Pay the Vendor
Let’s delve deeper into these steps in the SAP system now.
Maintain the QM View of Relevant Goods
The QM department can maintain the QM view of the relevant goods either by executing transaction code MM01 or by following menu path SAP Menu > Logistics > Quality Management > Quality Planning > Logistics Master Data > Material > Create. This action opens the screen in
Figure 2.

Figure 2
QM view (inspection type for external processing 0130)
In the Quality management tab in
Figure 2, you need to maintain the inspection type for external processing by clicking the Insp. setup button. In the pop-up screen that appears, enter 0130 in the Inspection Type field and a short description (Receiving Insp. from External Processing).
Verify that the default information is in line with your business requirements (for example, that the inspections are performed based on the Inspection task list).
You also need to maintain the inspection type for GR inspection from production. In the Quality management tab in
Figure 3, enter 04 in the Inspection Type field and a short description (Goods receipt inspection from production). Click the save icon

to save your data.

Figure 3
QM View (inspection type for GR from production 04)
Note that you can also mass maintain the inspection type for materials using either transaction code QA08 or following menu path SAP Menu > Logistics > Quality Management > Quality Planning > Logistics Master Data > Material > Inspection Setup. In the screen that the system displays (not shown) select the parameters needed for your scenario, such as plant and materials, and in the Mass Processing tab, specify the quality management data to be updated, such as Inspection Type.
Maintain the Working Scheduling View of Relevant Goods
The production department can maintain the working scheduling view of the relevant goods either by using transaction code MM01 or by following menu path SAP Menu > Logistics > Quality Management > Quality Planning > Logistics Master Data > Material > Create. This action displays the screen in
Figure 4.

Figure 4
The Work scheduling tab
In the Working scheduling tab in
Figure 4, you need to maintain the scheduling profile and serial number profile (if needed). You also select the Batch Mgmt Rqt (batch management required) check box (if needed).
Usually in the work scheduling view, you maintain the following information:
- Production storage location
- Tolerance percentage information relevant for the good receipt process (if needed)
Then, after all the other departments have maintained their views, the material master can be saved. In such a case, the system issues an information message as shown in
Figure 4 to state that the material has been created successfully.
Create a Master Inspection Characteristic (MIC)
The QM department can create an MIC by using transaction code QS21 or by following menu path SAP Menu > Logistics > Quality Management > Quality Planning > Basic Data > Inspection Characteristic > Create. This action opens the screen in
Figure 5.

Figure 5
MIC (general view)
To create an MIC, enter the following information:
- The master inspection characteristic code
- The plant code
- The type of characteristic (qualitative or quantitative)
- The status
- Language key
- Texts
Click the Quantitative Data button in
Figure 5 and the system shows the screen in
Figure 6. Here, for your characteristic, you can define the following main options: Decimal Places, unit of measure, lower and upper limits, Target Value, lower and upper plausibility limits, number of classes, Class width, and Class midpoint.
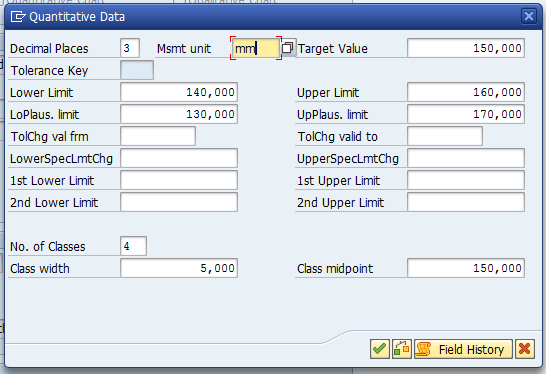
Figure 6
MIC (quantitative data)
Click the Control Indicators option in
Figure 5 and the system shows the screen in
Figure 7.

Figure 7
Specify details for MIC controls
In this screen, you can specify the following details:
- Lower specif. limit: If set, you must enter a lower specification limit for the inspection characteristic.
- Upper specif. limit: If set, you must enter an upper specification limit for the inspection characteristic.
- Check target value: If set and either the Upper specification limit or Lower specification Limit indicator is set, the system checks whether the target value lies within the tolerance.
- Sampling Procedure: If set, a sampling procedure must be assigned to the characteristic in the Task list.
- Required Characteristic: If set, the inspection characteristic must be inspected, which leads to the fact that a UD can only be posted if you have confirmed the inspection results for this inspection characteristic.
- Classed Recording: If set, the inspection results for the inspection characteristic are recorded as classed values.
- Defects Recording: If set, an inspection characteristic is rejected. During results recording, the function for recording defects for a characteristic is automatically called up and a recording procedure can either be initialized by the user or performed in the background.
Click the continue icon (the green arrow) and the system shows the screen in
Figure 8.

Figure 8
Specify more details for MIC controls
In this screen, you can specify the following details:
- Fixed Scope:If set, the number of inspected units must correspond to the pre-calculated number of units to be inspected for results recording.
- Docu. if rejected: If set, additional text has to be entered in case the characteristic has been rejected during the results recording.
- RR change docs(create change documents during results recording): If set, change documents are created for this inspection characteristic when results are recorded based on characteristics.
- Record measured vals: If set, measured values for this quantitative characteristic have to be inspected and confirmed.
- Print: If set, the inspection characteristic is printed on the inspection instruction.
In
Figure 9, you can find the system’s confirmation message that the characteristic has been saved.

Figure 9
MIC confirmation message
Create a Sampling Procedure
The QM department can create a sampling procedure either by using transaction code QDV1 or by following menu path SAP Menu > Quality Management > Quality Planning > Basic Data > Sampling > Sampling Procedure > Create (
Figure 10).

Figure 10
Create a sampling procedure
Enter the Sampling Procedure description, as the sampling procedure code was entered in the initial screen of transaction code QDV1. The Sampling Type is Fixed and the Valuation Mode, which defines the rules for accepting or rejecting a characteristic or a sample, is Attributive inspection nonconf. units.
Click the Sample button to open the Fixed Sample, Attributive popup. Here you can specify the sample size and the acceptance number of failures. Click the save icon to save your data. The system issues the information message shown in
Figure 10.
Create Inspection Planning
The QM department can create an inspection plan either by using transaction code QP01 or by following menu path SAP Menu > Logistics > Quality Management > Quality Planning > Inspection Planning > Create. This action displays the screen in
Figure 11.
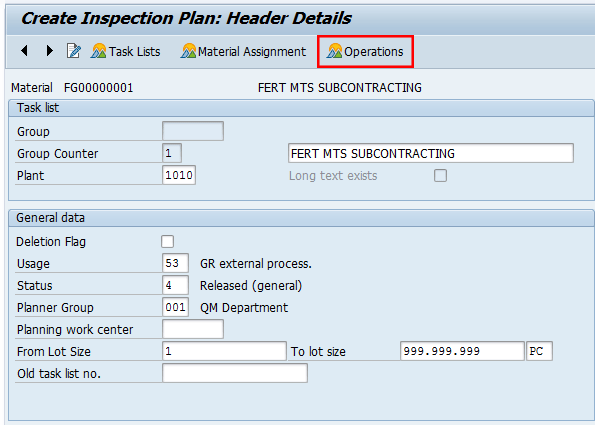
Figure 11
Create an inspection plan for external activities (header data)
In
Figure 11, you can find the main header details of the inspection plan created for material code FG00000001 and Plant 1010.
In this case, I have entered the following details:
- Usage of the inspection plan as 53 – GR external processes
- Status as 4 – Released (general), which means that the plan can be used without further restrictions
- Planner Group responsible to plan using that inspection plan
- Applicability of the lot size, in this case the plan is valid without limitations.
Select the Operation option and the system proposes the details in
Figure 12. Here enter the Work center, plant code, control key, and a description of the operation.
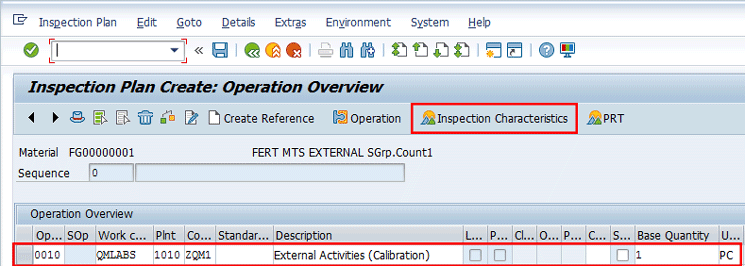
Figure 12
Create an inspection plan for external activities (Operation Overview)
Select the operation and then choose the option Inspection Characteristics. The system proposes the details in
Figure 13.

Figure 13
Create an inspection plan for external activities (Characteristic Overview)
In the Sample folder, specify the Sampling Procedure created in
Figure 10, as shown in
Figure 14.
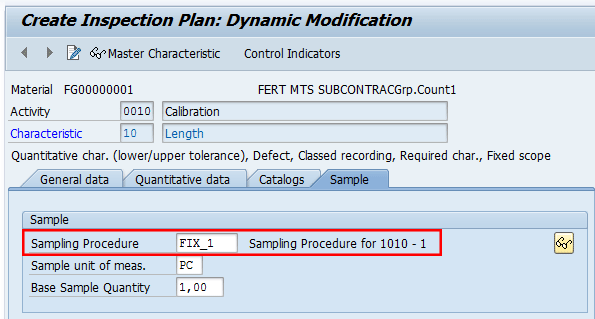
Figure 14
Create an inspection plan for external activities (Dynamic Modification)
A dynamic modification rule contains the definition of the inspection stages, the dynamic modification time, and the conditions that lead to an inspection stage change. In this article I don’t cover this topic as the sampling procedure is fixed.
In
Figure 15, you can find the system’s confirmation message that the inspection plan has been created.

Figure 15
Create an inspection plan for external activities (confirmation message)
Create a Bill of Materials (BOM)
The PP department can create the BOM either by using transaction code CS01 or by following menu path SAP Menu > Logistics > Production > Master Data > Bills of Material > Bill of Material > Material BOM > Create. In
Figure 16, you can display the BOM used for my example. In my example, the QM department can use transaction code CS03 and display the components and related quantity of the manufacturing BOM for the produced good # FG00000001.
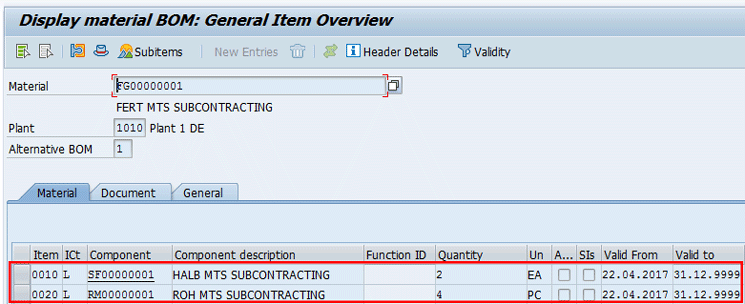
Figure 16
Display the BOM items
Create a Purchasing Info Record (PIR)
The purchasing department can create, change, or display a purchasing info record either by using transaction codes ME11, ME12, or ME13 or by following menu path SAP Menu > Logistics > Materials Management > Purchasing > Master Data > Info Record > Create/Change/Display.
In my example, I am going to display the document using transaction code ME13. Then after entering the Vendor, Plant, Purchasing Organization, and PIR document number, press Enter and select the option Purch. Org. Data 1. This action shows the screen in
Figure 17.

Figure 17
Display the purchasing info record
In this screen, just familiarize yourself with the control and conditions details and note that the material Group used is the same as the one defined for the finished product you are producing.
Create a Standard Routing
To create, change, or display a routing, you can use transaction codes CA01, CA02, or CA03, respectively, or follow menu path SAP Menu > Logistics > Production > Master Data > Routings > Routings > Standard Routings > Create/Change/Display. Then enter the material code # and the plant. Press Enter to display the screen in
Figure 18.
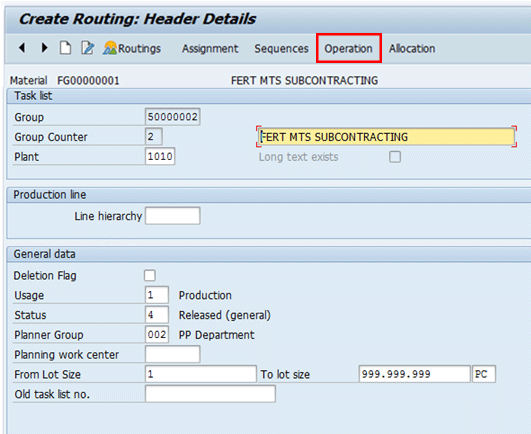
Figure 18
Routing (header details)
Specify the general data of the routing:
- Usage: 1 – Production
- Status: 4 – Release (general)
- Planner Group: PP department
- Lot size: It depends. In my case it was defined without any limitation.
In
Figure 18, choose the option Operation and then specify the following data in
Figure 19:
- Work center relevant for Quality management operations
- Plant code
- Control key relevant for external activities
- Operation’s description
- Base quantity and unit of measure (UoM)

Figure 19
Routing (Operation Overview)
Select the option Inspection Characteristics and the system shows
Figure 20 in which you can specify the MIC, plant, version, and relevant sampling procedure.

Figure 20
Routing (Characteristic Overview)
Double-click operation 20 and scroll down the screen to the External processing details, as shown in
Figure 21. Here, make sure that the Subcontracting check box is not set. Then specify your Purchasing organization, Inspection Type 0130, Cost Element, and the appropriate purchasing info record number. Click the save icon to save your data.

Figure 21
Routing (external operation overview)
Note
To create the PR from the Operation’s Control Key PP02, the purchasing department has to maintain the purchasing info record via transaction code ME11.
After you save the data, the system provides a confirmation message (Figure 22).

Figure 22
Routing confirmation message
Create a Production Version
In my example, I use production version to differentiate the external processes handled with subcontracting and with external activities. To create, change, or display a production version, the PP department can either use transaction codes MM01, MM02, and MM03 respectively or follow menu path SAP Menu > Logistics > Materials Management > Master Data > Material > Create (General)/Change (Immediately)/Display (Current). This action displays the screen in
Figure 23.
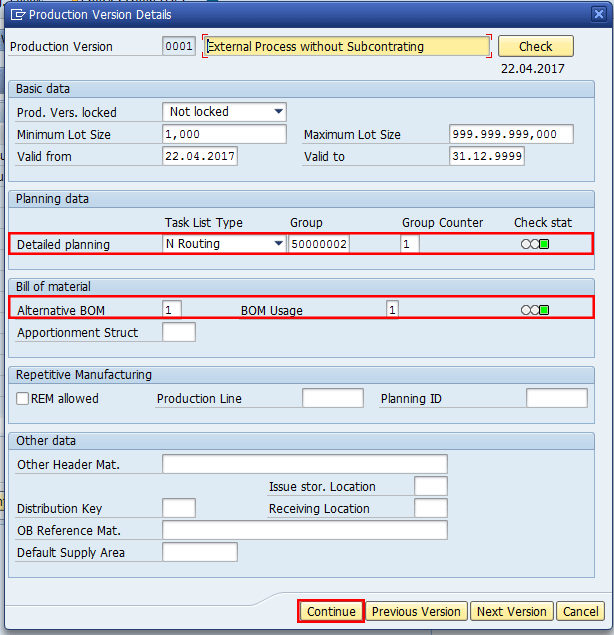
Figure 23
Production version for external services
For my example, link Routing 50000002/1 and BOM 1/1 within an unlimited validity time despite the lot size details, as shown in
Figure 23. Click the Continue button and then click the save icon.
Check a General Ledger (G/L) Account
To edit (create, change, or display) a G/L Account, the FI department can either use transaction code FS00 or follow menu path SAP Menu > Accounting > Financial Accounting > General Ledger > Master Records > G/L Accounts > Individual Processing > Centrally. This action displays the screen in
Figure 24.
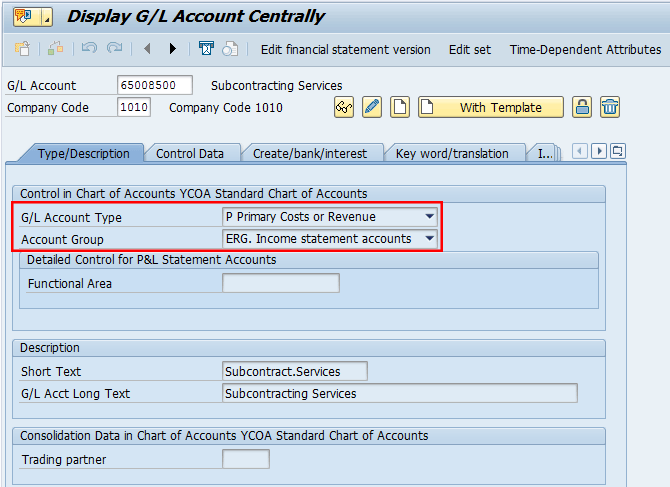
Figure 24
Check the G/L account type and description
For my example use the display option, as the G/L account was already created by the production planning department (which should be the case also in production). Click the display icon

.
For my example, just display that the G/L account type has been defined as Primary Costs or Revenue, the account group has been defined as Income statement accounts, and the texts are appropriate. Then click the Control Data tab (
Figure 25).
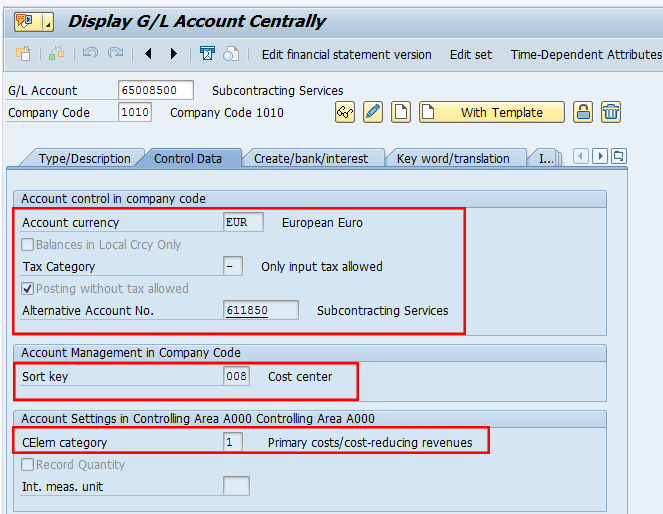
Figure 25
Link the G/L account
In
Figure 25, check that the G/L account has been linked to a Subcontracting Services account, in this case external activities, the cost element category is 1, and the Sort key is 008. Then go to the next screen by selecting the Create/bank/interest tab.
In
Figure 26, just make sure that the Field status group has been set for Cost accounts for external services and then exit the transaction.
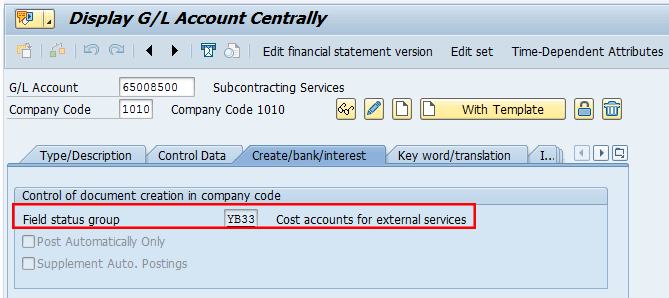
Figure 26
Check data for the field status group in the Create/bank/interest tab
Transactional Data
To perform the quality activities for the external processes, perform the following main flows in the system:
- Evaluate the external processes for a specific operation using QM functionalities with Inspection Type 0130 - Receiving Insp. from External Processing
- Evaluate the overall production processes using QM functionalities with Inspection Type 04 - Goods receipt inspection from production
Step 1. Create a Production Order
To create, change, or display a production order, the PP department can use transaction codes CO01, CO02, and CO03 respectively, or follow menu path SAP Menu > Logistics > Production > Shop Floor Control > Order > Create > With Material/Change/Display.
For my example, use transaction code CO01, then enter the Material code # FG00000001, Plant code # 1010, and order Type ZP01. Press Enter. Then, enter the produced quantity and the scheduling type as Current date. Select the appropriate production version from the pop-up screen. Click the Choose button, as shown in
Figure 27.

Figure 27
Production Order Create: Header (general data)
At this stage the system should perform the availability check of the components and provide details about shortages, if any. Then, display the components associated to the production order, clicking the Components button highlighted in
Figure 27. The system shows
Figure 28.

Figure 28
Production Order Create: Component Overview
Note that the components will be defaulted from the BOM of the produced good.
At this stage, let’s check the details of the Ext. processing details of the Operation 20. To do so, select the Operations option in
Figure 28 and then select the Ext. Processing (external processing) tab, as shown in
Figure 29. Here, verify that the PIR document number and other related information have been retrieved correctly from the routing created in
Figure 21.
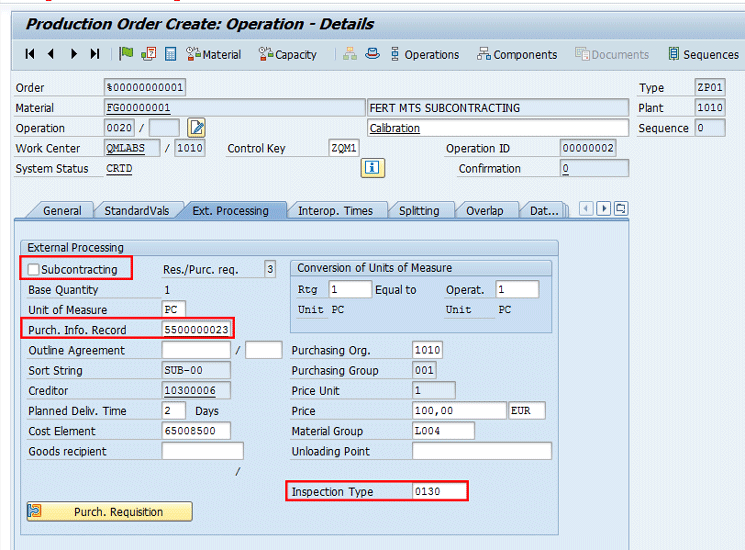
Figure 29
Operation details for external services in the Production Order Create screen
Now follow menu path Header > Serial Number. A pop-up to maintain the serial numbers appears (
Figure 30). Enter a value in the Serial Number field (if serialization is used) and click the option Create serial number automatically button. Release the production order either by clicking the flag icon

or by using the option Functions > Release.
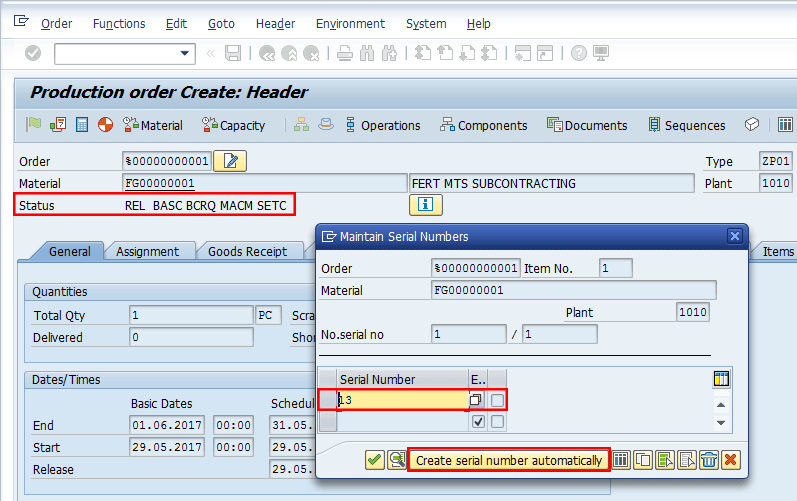
Figure 30
Production Order Create: Releasing
Save the document using the save icon. The system issues the Production order document number, as shown in
Figure 31.

Figure 31
Confirmation message that the production order was saved
Step 2. Display the PR
To display the PR created for the external subcontrating operation activities, you can either use the reports available in the Purchasing module or use transaction code CO03. Go to the Operations details in the External Processing section, as shown in
Figure 32.
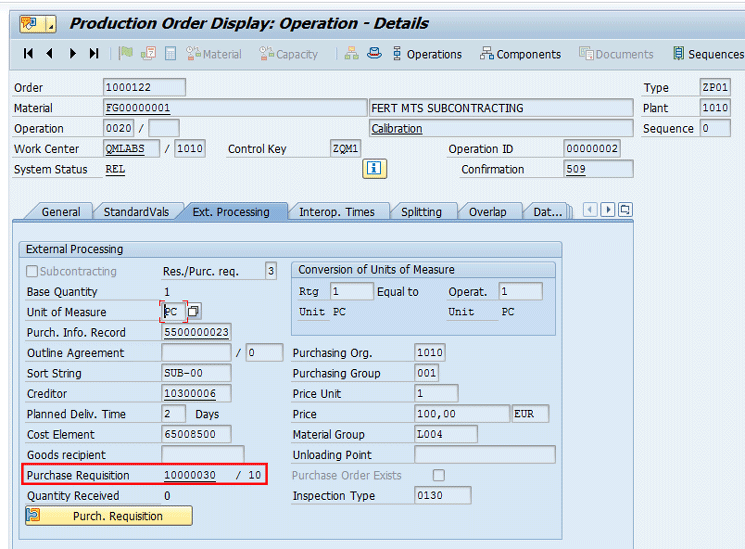
Figure 32
Display the Purchase Requisition document number
Double-click the Purchase Requisition field in
Figure 32. The system calls transaction code ME53N in the background and provides the details shown in
Figure 33. Here, verify that the data stored in the PR has been retrieved from the PIR defined in
Figure 21.
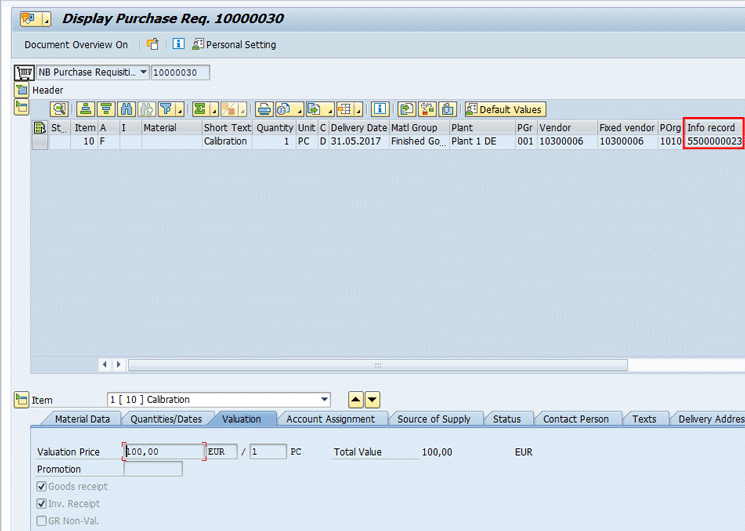
Figure 33
Display the PR document details
Step 3. Create a PO
The purchasing department can create a PO with reference to the PR either by executing transaction code ME21N or by following menu path SAP Menu > Logistics > Materials Management > Purchasing > Purchase Order > Create > Vendor/Supplying Plant Known. This action displays the screen in
Figure 34.
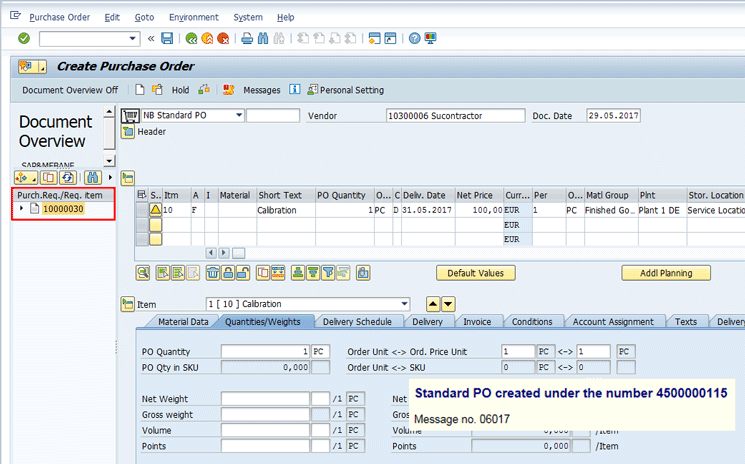
Figure 34
Convert the PR in the PO
In this screen, select the PR you need to convert into a PO and then save the document.
Step 4. Post the Goods Receipt (GR)
To post the GR with reference to the PO, upon the reception of the external services from your external vendor, the logistics department can execute transaction code MIGO with Movement Type 101 or follow menu path SAP Menu > Logistics > Materials Management > Inventory Management > Goods Movement > Goods Movement. This action displays the screen in
Figure 35.
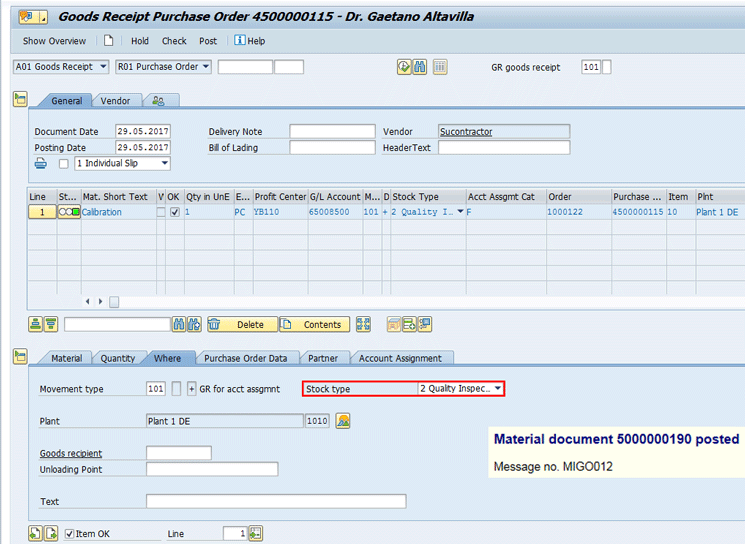
Figure 35
Perform GR with reference to a PO
Here, specify the PO document number and associated line item 4500000115/00010, click the Item OK check box, and then save the data using the save icon.
Step 5. Display the Inspection Lot
Upon GR, the system has created an inspection lot automatically. To display the inspection lot, you can use transaction code MIGO, specify the material document, and then click the InspLot (inspection lot) button, as shown in
Figure 36.
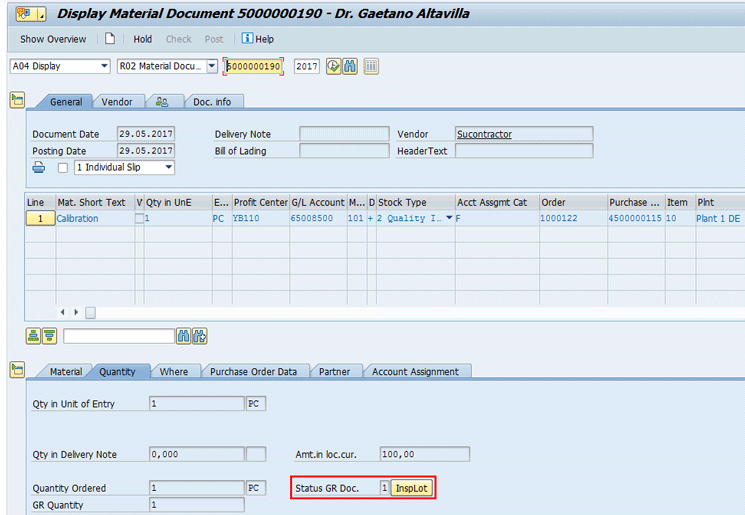
Figure 36
Display the material document and associated inspection lot
In case the material document created during the GR process is not known, the QM department can either use transaction code QA03 or follow menu path SAP Menu > Logistics > Quality Management > Quality Inspection > Inspection Lot > Processing > Display.
Another way to search for the inspection lot, and this is my recommended one, is to use transaction code QA33 or follow menu path SAP Menu > Logistics > Quality Management > Quality Inspection > Worklist > Inspection > Display Data.
After you click InspLot button in
Figure 36, the system displays the following Inspection Lot details in the Data for Lot Origin tab, as shown in
Figure 37.

Figure 37
Display the inspection lot (data for the lot origin)
The main details of the inspection specifications are shown in the Inspection Specifications tab (
Figure 38).
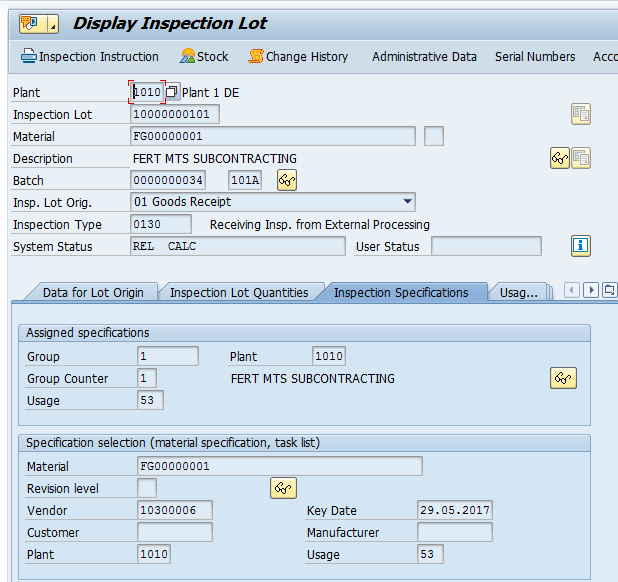
Figure 38
Display the inspection lot (inspection specifications)
Step 6. Results Recording
To enter Results recording, you can either use transaction code QE51N or follow menu path SAP Menu > Logistics > Central Functions > Batch Management > Environment > Quality Inspection > Worklist > Results Recording. Select the inspection lots for material FG00000001. Enter any value outside the tolerances that is different than the planned value in the Class size field in the data entry section. Press Enter to confirm the entry.
Step 7. Defect Recording
At this stage the system shows a pop-up to record the defects. Enter the Serial Number, Defect Class, Results, and other details as shown in
Figure 39.
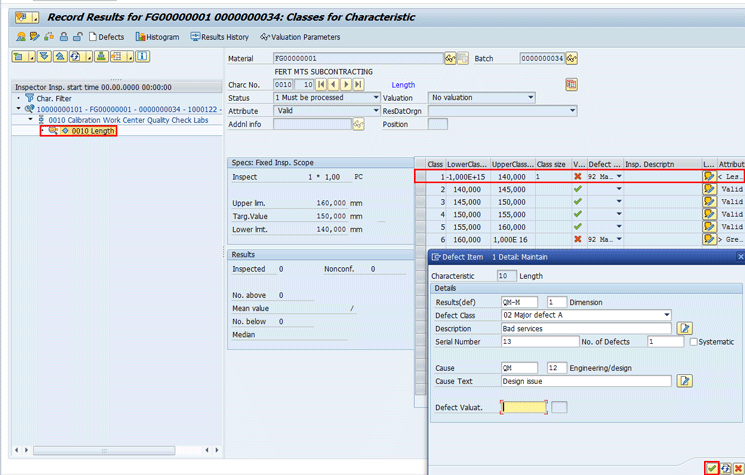
Figure 39
Enter the results
After specifying all relevant details to record the defect, click the continue icon. The system displays a pop-up to let you enter a description in the Short Text field for further details about the inspection done, as shown in
Figure 40.
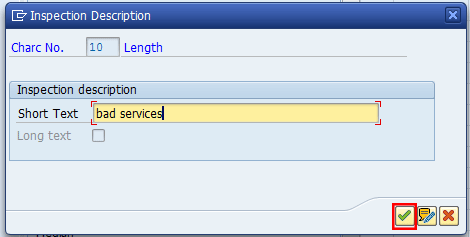
Figure 40
Enter a description for the inspection in the Short Text field
Then click the continue icon, and in the next screen (
Figure 41), you can see that the valuation was rejected by the class 1. Based on that, the results were not accepted.
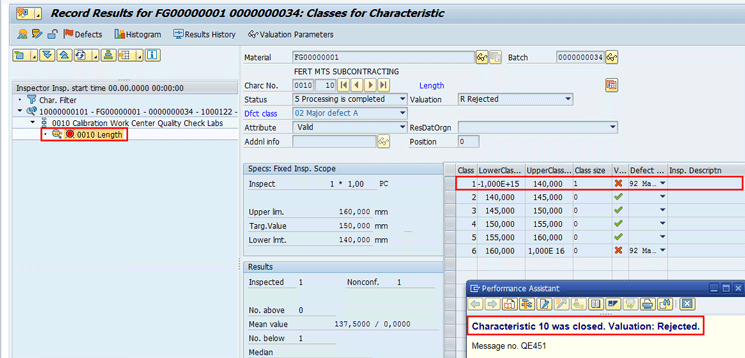
Figure 41
Valuation is rejected
Step 8. Quality Notification Recording
At this stage, we can create a Quality Notification based on the defect recorded so far, as shown in
Figure 42.
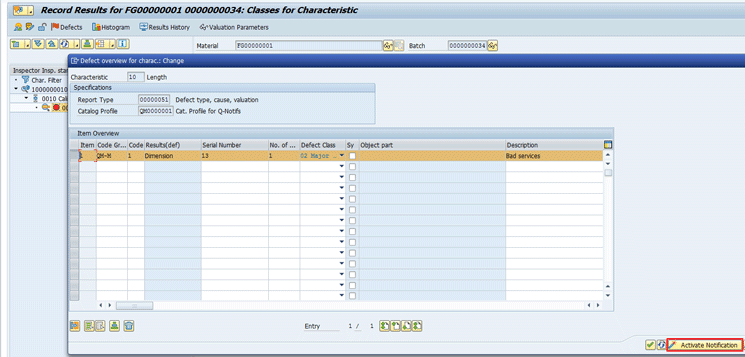
Figure 42
Record Results (enter results)
Click the Activate Notification button and the system shows
Figure 43. In this screen you classify the problem using the priority, the coding catalogue with a description, and the department and user responsible.

Figure 43
Activate the Quality Notification
At this stage, you can save both the Quality Notification and Results Recording. The system issues the message shown in
Figure 44.

Figure 44
Record results message
Step 9. Update the Quality Notification
Upon the GR, the system has created an inspection lot automatically. To display the inspection lot, you can use transaction code QM02 or follow menu path Logistics > Quality Management > Quality Notification > Change. Specify the material document and then press Enter. At this stage, the system shows
Figure 45.
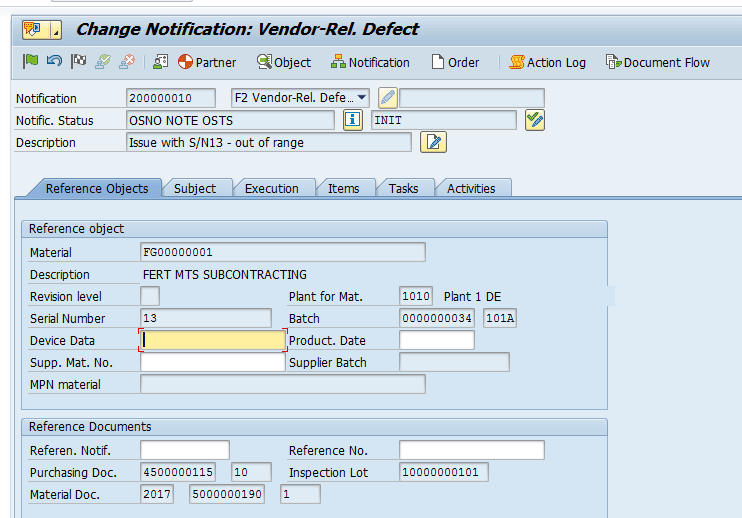
Figure 45
Verify object references
In this screen you can verify the object references such as material, batch, serial number, purchasing document, GR, and inspection lot document numbers.
Then, verify and, if needed, modify the related information about Causes, Tasks, and Activities and release the Quality Notification by selecting the Released for Processing radio button, as shown in
Figure 46.
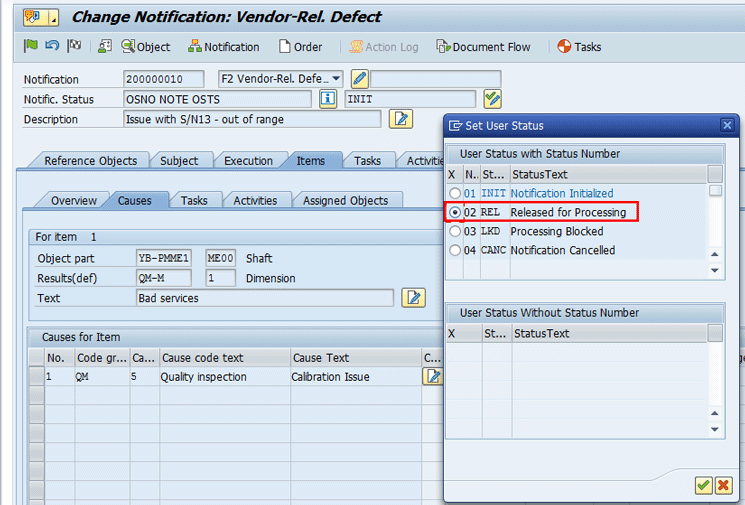
Figure 46
Release the Change Notification for Processing
Click the save icon to save the document.
Step 10. Record the UD
To record the UD, the user can use transaction code QA11 or follow menu path SAP Menu > Logistics > Central Functions > Batch Management > Environment > Quality Inspection > Worklist > Results Recording. Specify the Inspection Lot in the main screen and then press Enter. The screen in
Figure 47 appears.
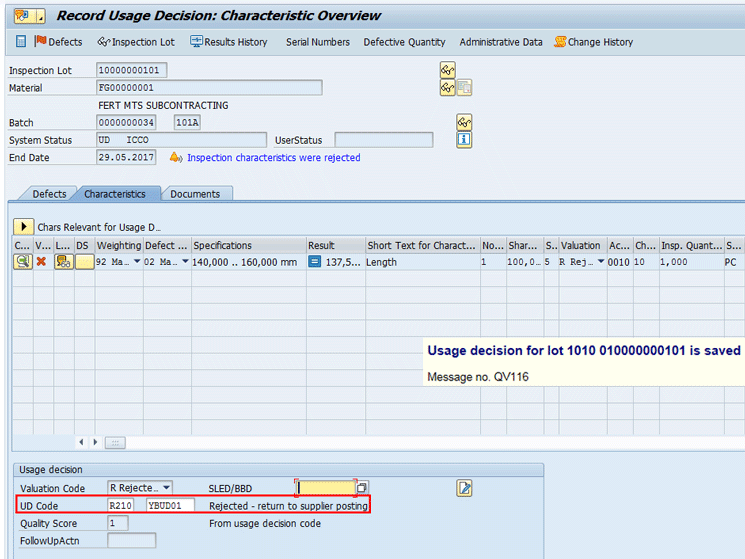
Figure 47
Record the usage decision (enter the UD code)
In the UD code field, use F4 help to enter a code R210 Rejected – return to supplier posting. Click the save icon to save the UD. The system issues an information message that the UD has been saved.
Step 11. Enter the Incoming Invoice
To post the LIV, the account payable user can use transaction code MIRO or follow menu path SAP Menu > Logistics > Materials Management > Logistics Invoice Verification > Document Entry > Enter Invoice. In the screen that the system displays, enter the data in the following fields shown in
Figure 48:
- Invoice date
- Posting Date
- Amount
- Quantity(the field below the Quantity column)
- Tax code (the field below the Tax… column)
- Purchase Order (the first field below the PO Reference tab)
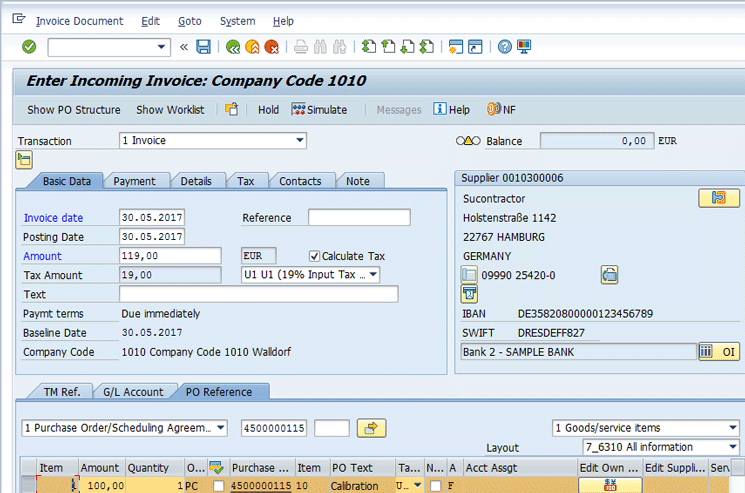
Figure 48
Enter the LIV in the Basic Data tab
Step 12. Display and Release the LIV
To display and release the LIV, you can use transaction code MRBR or follow menu path SAP Menu > Logistics > Materials Management > Logistics Invoice Verification > Further Processing > Release Blocked Invoices. In the screen that the system displays, enter the data as specified in
Figure 49. After you have entered all your data, click the execute icon.
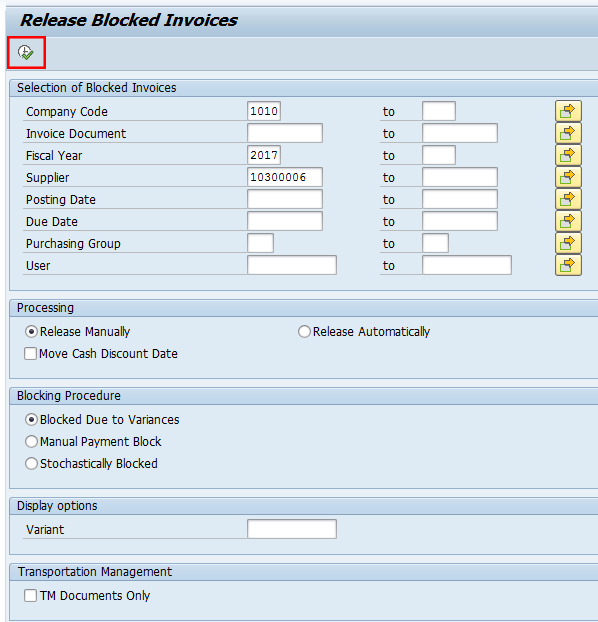
Figure 49
The selection screen for releasing a blocked invoice
The system shows the details in the next screen (
Figure 50).

Figure 50
The output screen for releasing a blocked invoice
Note that the invoice was blocked due to the different days (1). The delivery date of the purchase order was specified as 31.05.2017 while the invoice was posted on 30.05.2017.
Step 13. Check the Result in the PO History
To display the PO history, use transaction code ME23N or follow menu path SAP Menu > Logistics > Materials Management > Purchasing > Purchase Order > Display. This action opens the screen in
Figure 51. Click the Purchase Order History tab to view the GR (
Figure 51).

Figure 51
Display the PO history
Step 14. Run Reports
All affected and authorized departments can display the details of the QM documents (e.g., Quality Notification) either by using transaction code QM10 or by following menu path SAP Menu > Logistics > Quality Management > Quality Notification > Worklist > Notification > Change Data. This action displays the screen in
Figure 52. Specify the selection criteria (e.g., Notification statuses, Notification date, Material code, and Notification type).
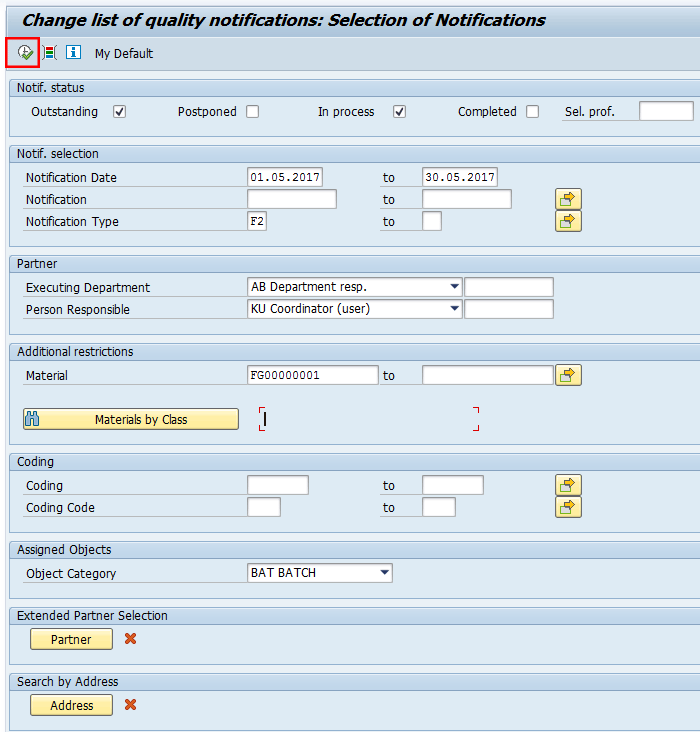
Figure 52
The input screen for changing the list of Quality Notifications
After specifying the selection options, run the report either by clicking the execute icon or pressing F8. The system then displays the details shown in
Figure 53.
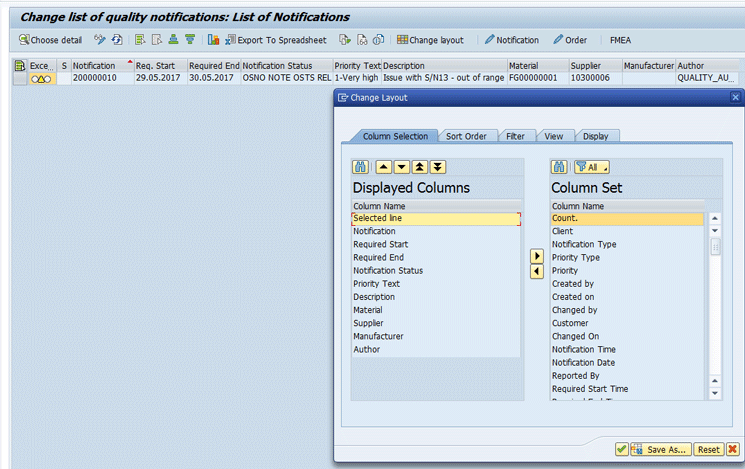
Figure 53
The output screen for changing the list of Quality Notifications
Other useful reports are shown in
Table 1.
| Report title |
Transaction code
|
Comment
|
| List Display of PRs |
ME5A |
A list of all selected PRs is displayed |
| List of Inspection Lots |
QA32 |
A list of several inspection lots from which you can select one or more inspections for editing or displaying |
| Defects: Error Analysis
> Key Figures for Material |
MCXX |
Display error analysis for material |
| Defects: Error Analysis
> Key Figures for Vendor |
MCVX |
Display error analysis for vendor |
| Stock Overview |
MMBE |
The stock overview is displayed |
| Material Document List |
MB51 |
Display material documents generated during the process |
Table 1
Useful reports
Customizing Activities
Now I describe the most important customizing activities that you need to check/complete to enable the external processes.
Define a Control Key
Define a new Control Key relevant for QM activities and externally processed operations. Note that without the Control Key set as described, the external process cannot be triggered from the production order’s operation.
To complete this step, you can either use IMG transaction code OPJ8 or follow menu path Tools > Customizing > IMG > Edit Project (SPRO) Pushbutton: SAP Reference IMG. Production > Shop Floor Control > Master Data > Routing Data > Define control key. This action opens the screen in
Figure 54.
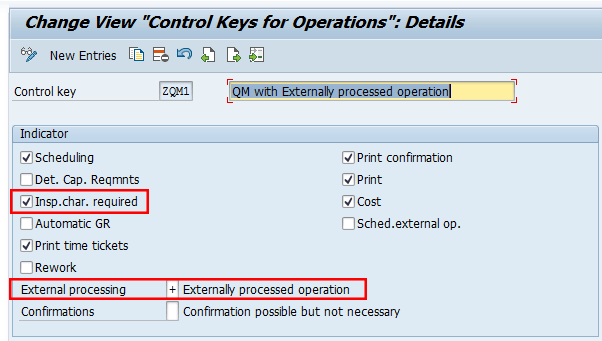
Figure 54
Define Control Key ZQM1
The Control Key is used in the operation of the production order. To enable the external activities functionalities with QM module, you need to check the Insp.char. required check box and enter the value + in the External processing field. Click the save icon to save the data.
Define Task List Usages
To define a task list usage to be used during the routing creation for internal production and external activities, follow menu path Tools > Customizing > IMG > Edit Project (SPRO) Pushbutton: SAP Reference IMG. Quality Management > Quality Planning > Inspection Planning > General > Define Task List Usages.
The task list is used in conjunction with the routing and in my example, I have used the value 5 for the GR with reference to the production order and 53 for the GR with reference to the vendor’s PO, as shown in
Figure 55.
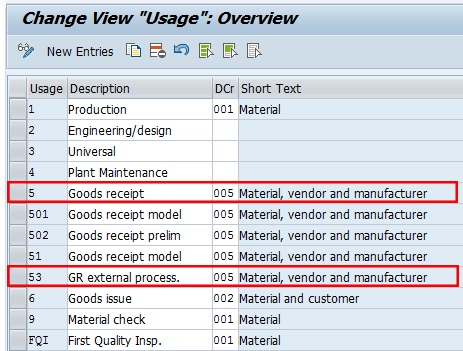
Figure 55
Define task list usage 5 and 53
Define Inspection Types
In this step you verify the customizing settings for the inspection type 0130 - Receiving Insp. from External Processing.
To complete this step follow menu path Tools > Customizing > IMG > Edit Project (SPRO) Pushbutton: SAP Reference IMG. Quality Management > Quality Inspection > Inspection Lot Creation > Maintain Inspection Types. This path takes you to the screen in
Figure 56.
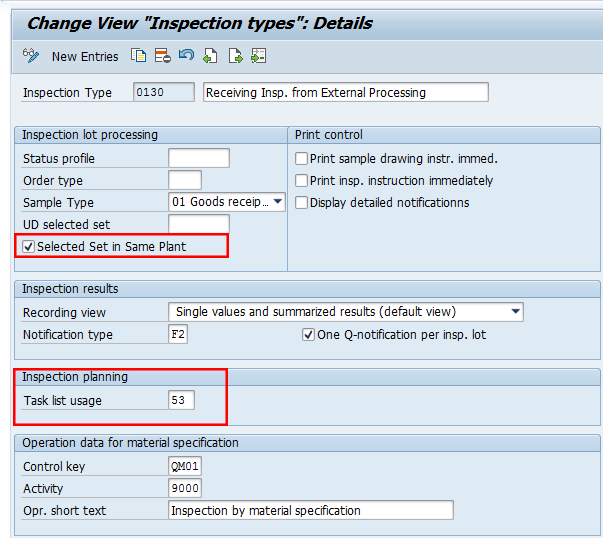
Figure 56
Display inspection type 0130
For my example, the task list usage value in the routing used for external activities was 53 - GR external process and based on this value the system determines the task list to be associated to the inspection lot created automatically with reference to the external activities PO.
Maintain Inspection Lot Origins and Assign Inspection Types
In this step you make sure that the Inspection Type 0130 - Receiving Insp. from External Processing has been assigned to the Inspection Origin 01 - Goods Receipt and the Inspection Type 04 - Goods receipt inspection from production to the Inspection Origin 04 - Goods Receipt from Production.
To complete this step follow menu path Tools > Customizing > IMG > Edit Project (SPRO) Pushbutton: SAP Reference IMG. Quality Management > Quality Inspection > Inspection Lot Creation > Maintain Inspection Lot Origins and Assign Inspection Types. This path takes you to the screen in
Figure 57.

Figure 57
Display entries for inspection origin 01 and 04
You have to link the lot origin 01 and 04 with the Task List Type Q – Inspection Plan and status 4 - Released (general). Note that these settings should already have been set as standard upon the QM module activation.
Select the second line item in
Figure 57 and then double-click the folder Inspection types for the origin. The system reports the details as shown in
Figure 58.

Figure 58
Display the link between inspection type 04 and origin 04
Note that the entry listed in
Figure 58 should have already been created by the SAP system upon the activation of the QM module. In my example, the entry you need to enable is 04 as origin of the Goods Receipt and 04 as Inspection Type. With these entries, the system automatically creates an inspection lot with type 04 upon the GR of the production order. Then click the next screen icon

to display the screen shown in
Figure 59.
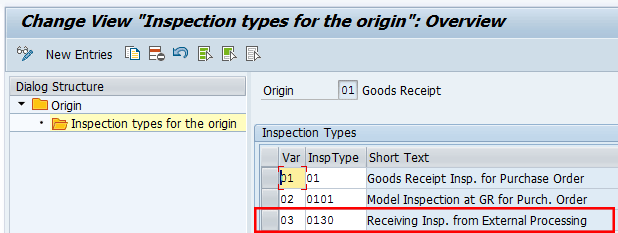
Figure 59
Display the link between inspection type 0130 and origin 01
The entries listed in
Figure 59 should have already been created by the SAP system upon activation of the QM module. In my example, the entry you need to enable is 01 as the origin of the Goods Receipt and 0130 as Inspection Type. With these entries, the system automatically creates an inspection lot with type 0130 upon the GR of a PO created with reference to a PR from a production order. Select the first line item in
Figure 57 and then double-click the folder Inspection types for the origin and the system reports the details in
Figure 59.
Define Default Values for Inspection Type
In this step you define default values for inspection types 04 and 0130.
To do so, follow menu path Tools > Customizing > IMG > Edit Project (SPRO) Pushbutton: SAP Reference IMG. Quality Management > Quality Inspection > Inspection Lot Creation > Define Default Values for Inspection Type. Then, double-click the line item containing the Inspection Type 0130, which takes you to
Figure 60.

Figure 60
Default values for inspection type 0130
In the Inspection Lot, with inspection type 0130, enable the usage of Inspect by task list, Record characteristic results, and Serial nos possible by selecting the check boxes. Leave the rest of the fields as defaulted. In an SAP system, the data is always saved using the save icon and to go to the next screen, click the next screen icon.
In
Figure 61, you can find the configuration details of the inspection type 04. In this screen, make sure that the check box for Inspect by task list has been enabled and that Record characteristic results, Serial nos possible, and Post to inspection stock are selected. Leave the rest of the fields as defaulted by standard. Note that the Assign reqmts automatically check box was already selected.
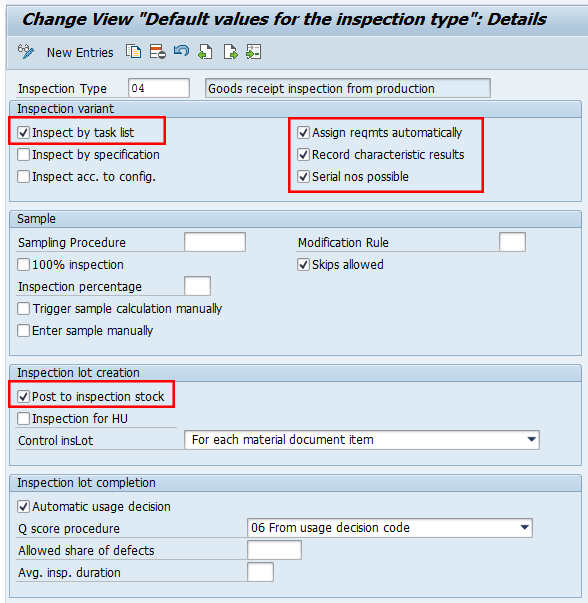
Figure 61
Default values for inspection type 04
Maintain Item Category and Account Assign Category Linkage
In this step you make sure that the combination of Item Category (IC) L - Subcontracting and Account Assignment Category (AAC) F - Order has been defined in the purchasing configuration. This ensures that you can create a purchasing document with these two elements to manage the external activities.
To complete this step follow menu path Tools > Customizing > IMG > Edit Project (SPRO) Pushbutton: SAP Reference IMG. Materials Management > Purchasing > Account Assignment > Define Combination of Item Categories/Account Assignment Categories. This path takes you to the screen in
Figure 62.

Figure 62
Link Item Category L with Account Assignment Category F
Maintain the PR Option
In this step you make sure that the Reservation Relevance/Generation of Purchase Requisition option is flagged to 3 - Immediately to have PRs generated automatically for non-stock material and external operations.
To complete this step, use the IMG transaction code OPL8 or follow menu path Tools > Customizing > IMG > Edit Project (SPRO) Pushbutton: SAP Reference IMG. Production > Shop Floor Control > Master Data > Order > Define Order-Type-Dependent Parameters. Then the system displays the screen shown in
Figure 63.

Figure 63
Select plant and order type combination
Select your plant and production order type and then double-click the line item. The system displays the details in
Figure 64.
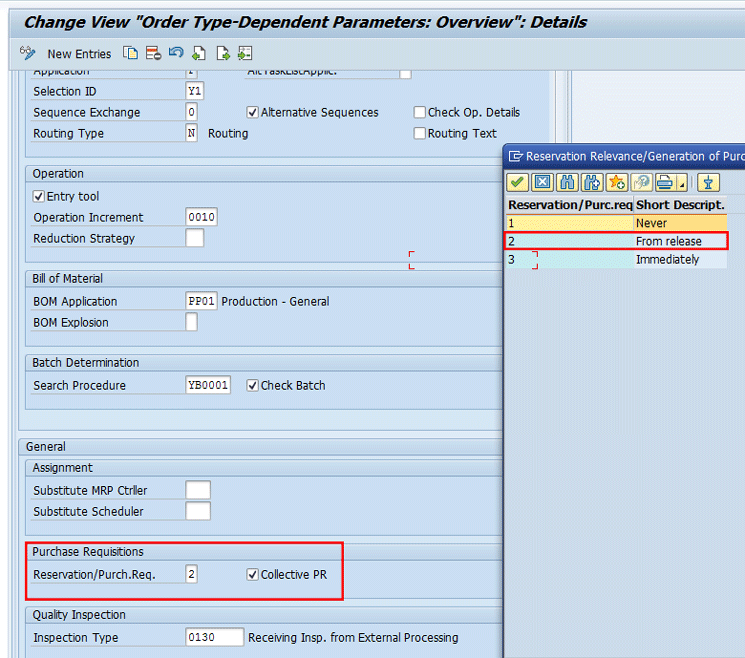
Figure 64
Trigger PR creation upon release of the production order
In
Figure 64, you should set up the parameters related to the PR management. You can decide how to generate the PR in the case of operations relevant for external activities:
- Reservation/Purch.Req field: You can choose either the value 2 - PR creation upon the releasing of production orders or the value 3 – PR creation immediately upon creation of production orders. Usually, I recommend that you specify the value of 2.
- Collective PR flag field: If flagged, only one PR is created per production order while if it is not flagged, then a separate PR is created for every externally processed operation or non-stock component.
Define Notification Types
In this step you define the Notification document type that will be used during the vendor’s Quality Notification processes. To complete this step, follow IMG menu path Tools > Customizing > IMG > Edit Project (SPRO) Pushbutton: SAP Reference IMG. Quality Management > Quality Notifications > Notification Creation > Notification Type > Define Notification Types. Double-click the Notification Type F2 and the system displays the screen shown in
Figure 65.

Figure 65
Define the notification type
In the previous screen, enter the following data:
- Q2 as Notification origin. It defines the screen sequence control for a Notification Type
- QM0000001 as Catalog Profile. It restricts the list of values for the information contained in the quality notification based on your business requirements.
- 33 as Update group statistics. It is used to determine the fields that will be created for the statistics in the Logistics Information System (LIS).

Gaetano Altavilla
Dr. Gaetano Altavilla is a senior SAP practice manager. His focus is on pre-sales, delivery of SAP application solutions for large international corporations, and SAP knowledge management in Europe, the Middle East, and Africa (EMEA).
In his 18 years of SAP application experience working for many multinational companies, such as Procter & Gamble and Hewlett-Packard, he has covered a wide range of ERP logistic areas, focusing on the MM, WM, SD, LES, PP, PP-PI, PLM (QM, PM, PS) modules, as welll as CRM (TFM), SRM (EBP), SCM (SAP APO), and MES (ME) components.
Dr. Altavilla holds a degree with first-class honors in mathematics from the University of Naples and is certified in many SAP modules: SAP Logistics Bootcamp, SAP MM, SD, LE (SHP/WM/LE), PP, PLM (PM, QM, PS), SRM, CRM, SCM (APO), SCM (TM), FI, CO, and Solution Manager. He also has experience in ABAP/4 and application link enabling (ALE) and IDocs. He has participated in numerous industry conferences, such as the SAP Skills Conference in Walldorf at SAP SE.
You may contact the author at
Gaetano_altavilla@hotmail.com.
If you have comments about this article or publication, or would like to submit an article idea, please contact the
editor.


