You now can enhance your user interface (UI) pattern to enable you to print your reports in Microsoft Excel using default print parameters. This solution permits users to specify their default print settings using the BI template wizard. When the Web template is generated, a button is added to the template and the default print parameters are passed to Excel for printing.
Key Concept
The BI template wizard, which was introduced in BW 3.0 and improved for BW 3.5, allows power users to create a wide variety of complex reporting solutions without the need to know any Web programming languages. These templates are configured to allow power users to easily enter their reporting information into a user interface (UI) pattern. While you can create additional UI patterns to further standardize other specific reporting scenarios, you can also enhance a delivered UI pattern.
Have you ever wished your power users could create Web templates that specify how the information should be printed? I’m going to show you how to add Microsoft Excel print settings to a UI pattern so that power users can specify their settings without having to learn any Web programming. Instead of just downloading a report to Excel and adjusting their print settings, they can use a template that specifies how the information should be formatted. For example, wide reports would be set to print in landscape and narrow reports in portrait mode.
To achieve this, you combine two underused functionalities using the BI template wizard:
- Use of custom UI patterns in a production environment
- Microsoft Excel printing solution available for BW 3.0+
This BI template wizard creates a UI pattern that then uses Extensible Stylesheet Language Transformation (XSLT) to generate the corresponding HTML, XML, and Web Application Designer (Web AD) commands to create a UI that defaults to Excel print settings. This method provides an efficient way to create a consistent interface for complex Web template designs, minimizing the need for complex HTML coding for the creation of each Web template. I developed my example using a Web template based on 0ANALYZER on a BW 3.5 system.
Note
The 0ANALYZER template was enhanced with an additional tab for printing. When this tab is selected, the navigational status of the table is turned off, which prevents additional graphics from being transferred to Excel.
At this time, the program is delivered with three UI patterns: casual user, information consumer, and BI analyst. I’m going to enhance the information consumer UI pattern to take advantage of the new Excel Web printing capability. You’ll see how to graphically set default print parameters that will be saved with the Web template instead of hard coding these default print parameters into the Web template using XML. The enhanced UI pattern allows the user to enter default print values to the Web template at the time of creation using simple dialog controls provided by the BI template wizard program.
To enhance the information consumer UI pattern, perform the following steps:
Step 1. Add an entry to the BI template wizard for the new UI pattern
Step 2. Create the UI for the Web printing solution
Step 3. Create a command line sequence that translates the files from XML to a Web template
Step 4. Create the Extensible Stylesheet Language (XSL) file to transform the user input into a Web AD template file
Step 5. Enable the solution
All coding for this example is available by clicking this link. For this example, I enhanced the information consumer UI pattern with the Excel Web printing solution to create a new UI pattern called the print information pattern. Now I’ll explain how to create this new UI pattern.
Step 1. Add an entry to the BI template wizard for the new UI pattern. After you install the BI wizard template, the next step is to create an entry in the TEMPLATEWIZARDCONFIG.XML file. This file contains a list of all UI patterns available for the tool. This task allows you to use the new UI pattern in the BI template wizard program to produce Web AD templates that can be used by BW. Edit the file using Notepad or an XML editor. This file should be located in the root directory for the BI template wizard. For a default installation of the BI template wizard program, the file is located at C:Program FilesSAP SDNBI Template Wizard. From now on, I will refer to this directory location as the BITEMPLATEWIZARD directory.
To add the new UI pattern to the UI pattern selection tree, add the boxed code shown in Figure 1 to the TEMPLATEWIZARDCONFIG.XML file. I used the delivered ONE_EMPTY.GIF file that is included in the BITEMPLATEWIZARD directory so that the new UI pattern will have a graphic file associated with it.

Figure 1
Add the boxed code to the TEMPLATEWIZARDCONFIG.XML file to display the new print information pattern template in the BI template wizard tool
The Excel print solution is available for download from the SAP Developer Network (SDN) at
www.sdn.sap.com. Enter a search for
How to Use Web Printing with Microsoft Excel under
How-To-Guides.
The BI template wizard is available for download from SDN at
www.sdn.sap.com. Enter a search for
BI template wizard under
SDN Downloads.
The code that you add to the TEMPLATEWIZARDCONFIG.XML file is written in XML. The BI template wizard program interprets the XML to tell the program what patterns are available. The code uses XML tags to tell the program what the object is and then assigns the tag a value. XML uses markup tags extensively to define an object and set a value for this object. Further explanations of the tags added to the TEMPLATEWIZARDCONFIG.XML file are included in Table 1.
|
Text description for the tree node |
| typename="FOLDER" or typename="PT_PIP" |
The typename FOLDER is a reserved name that indicates that this is a node on the tree. The second pattern (typename="PT_PIP") is not a reserved name and will be used to indicate which file to process to initiate the dialog processes. |
| visible="true" |
Indicator that this node should be displayed |
| imgsmall="folder.gif" |
Picture that will be shown in the layout tree. The size should be a pixel size of either 16x16 or 32x32. The file should be located in the root directory of the template wizard. |
| imglarge="folder.gif" |
Picture that will be shown on the right side of the wizard when a node is selected. The size should be a pixel size of either 180x90 or 192x92. The file should be located in the root directory of the template wizard. |
| longtext="Custom Pages used in 3.1/3.2/3.3 Content"> |
Text that is displayed on the right side of the wizard in the lower corner |
|
| Table 1 |
Explanation of the tags edited in the TEMPLATEWIZARDCONFIG.XML file. These tags are shown in the code contained in Figure 1. |
Add this new UI pattern to the custom pages section and call it the print information pattern. The ONE_EMPTY.GIF file provides a graphic for this file that, when executed, is displayed as shown in Figure 2. The next step is to create the supporting programming files that allow the new print information pattern to be used to create new Web templates.

Figure 2
The BI template wizard after making the coding changes to the TEMPLATEWIZARDCONFIG.XML file. The Customize Layout List tab makes the new pattern available in the List of Layouts tab.
Step 2. Create the UI for the Web printing solution. In this step, you create the UI in the new user pattern where you can set the default print parameters. To do this, you enhance the dialogpath file, which describes the input fields in the BI template wizard executed for a pattern.
The file should be named consistently with the typename created in the TEMPLATEWIZARDCONFIG.XML file. Include this typename followed by the __DIALOGPATH.XML extension. In my example, the name would be PC_PIP__DIALOGPATH.XML since the typename specified in Figure 1 is PC_PIP. This file was created as a copy of the PT_ADVANCED_ANALYSIS__DIALOGPATH.XML file and then renamed. The PT_ADVANCED_ANALYSIS__DIALOGPATH.XML file is located in the BI template wizard directory.
Edit this file using WADDIALOGPATHTOOL located in the BI template wizard directory, an XML editor, or Notepad. For this example, I’ll create the user input screen shown in Figure 3.

Figure 3
Excel printing defaults for Web printing
The code that was added to the PC_PIP__DIALOGPATH.XML file is available via this link. This file is organized around layout screens that are displayed in the wizard. The original file contained three layout screens. For this example, insert the code between the second and third layout screens to create a total of four layout screens.
I used drop-down boxes and check boxes to simplify the UI. I added comments to the program to provide further explanation of the solution to create the dialog box shown in Figure 3. Other objects that I could have added in the template include:
- Label
- Check box
- Text
- History combo box
- Drop-down
- Query view or query
- Grid
- Column of check boxes
- Column of texts
- Column with F4 Help
Now that you have configured the UI, change an entry related to the output generator. This file is a command line sequence that is used to specify what XSL document is used to translate the user input to a file that can be stored in Web AD. In this case, the file is specified as PT_PIP__OF.CMD, with the syntax shown in Figure 4. You add this code to the PC_PIP__DIALOGPATH.XML file, which should be located in the BITEMPLATEWIZARD directory.

Figure 4
Specify the output generator file in the dialogpath, which is the file containing the UI controls for the BI template wizard program
Step 3. Create a command line sequence that translates the files from XML to a Web template. The command line sequence file specifies how a file should be translated. In much the same way that a cascading style sheet (CSS) provides formatting rules for HTML, an XSL sheet provides rules on how to format an XML document. The command line sequence file, specified in Figure 4, indicates what program and rules should be used translate the Web template entries into a Web AD template.
Since the XSL transformation occurs on a local PC versus run time, you need to create a command line sequence that provides instructions on how to translate your UI pattern. Once again make a copy of the PT_ADVANCED_ANALYSIS__OF.CMD and rename the file to PT_PIP__ OF.CMD. Edit this file to indicate that the XSL file translates the PT_PIP__DTT__1.XSL file. Figure 5 shows the contents of this file, which basically indicates that you use the program WIZMXSL to translate the user input of the BI template wizard using the rules defined in PT_PIP_DDT_1.XSL. This file and the PT_PIP_DTT_1.XSL file should be located in the BITEMPLATEWIZARD directory.
Step 4. Create the XSL file to transform the user input into a Web AD template file. Define the rules that translate the user input during the execution of the print information pattern using the BI template wizard, into a Web AD template. You define the rules to perform this translation during the creation of the Web AD template.
When the dialogpath is configured and the file that will be used to translate this information is specified, create the XSL file. Since this scenario is based on enhancing the PT_ADVANCED_ ANALYSIS template, copy the PT_ ADVANCED_ANALYSIS__DTT__1.XSL file and rename it PT_PIP__DTT__1.XSL. This file is located in the BITEMPLATEWIZARD directory. Once copied, the PT_PIP__DTT__1.XSL file should reside in the same directory.
The purpose of this file is to translate a user’s input to the BI template wizard into a file that Web AD can eventually use. The resulting XSLT file acts as a style sheet to the document created by the wizard, similar to the way in which a CSS acts to an HTML document. In this case, it searches for patterns in the document and then follows a set of rules to process this file into a new file. Table 2 contains a list of the new XSLT variables that have been added to the new print information pattern template that will be referenced in the XSLT file that you will create shortly.
| EXCEL_ORIENTATION |
Allows the user to select either landscape, portrait, or the user's default setting |
| EXCEL_WIDTH |
Allows the user to specify the width of pages that will be used in printing. The output checks that that the width and height are specified before adding it to the template. |
| EXCEL_HEIGHT |
Allows the user to specify the height of pages that will be used in printing. The output checks that that the width and height are specified before adding it to the template. |
| EXCEL_SIZE |
Allows the user to specify the paper type (i.e., letter or legal). The values could be expanded for European users that use different paper sizes. |
| EXCEL_GRIDLINES |
Allows the user to print gridlines on the page |
| EXCEL_HIERARCHY |
Allows the user to turn off the display of hierarchies for printing |
| EXCEL_LOGO |
Allows the user to specify a logo for printing. The user must be using an Excel version greater than XP for this feature to work properly. |
| EXCEL_TOPMARGIN |
Allows the user to specify the top margin setting |
| EXCEL_BOTTOMMARGIN |
Allows the user to specify the bottom margin setting |
| EXCEL_RIGHTMARGIN |
Allows the user to specify the right margin setting |
| EXCEL_HEADERMARGIN |
Allows the user to specify the header margin setting |
| EXCEL_FOOTERMARGIN |
Allows the user to specify the footer margin setting |
|
| Table 2 |
New variables added to PT_PIP__DTT__1.XSL file to store the Excel print defaults written to the Web AD template. If a value is not specified, the user's default from Excel is used, except for orientation, gridlines, hierarchies, and logos. |
The code in the PT_PIP__DTT__1.XSL file that defines the variables shown in Table 2 is shown in Figure 6. This code is entered after the “bottom include” section of the file. Following the variable section, the specific print commands that reference the variables is also included as Figure 7. Note that the code in Figure 7 is included in an XSLT comment so that it is translated to the Web template as an HTML comment, which is required by the Excel print solution.
 |
| Figure 6 |
XSLT variables definitions for the Excel print defaults are shown in the box and are contained in the PT_PIP__DTT__1.XSL file |
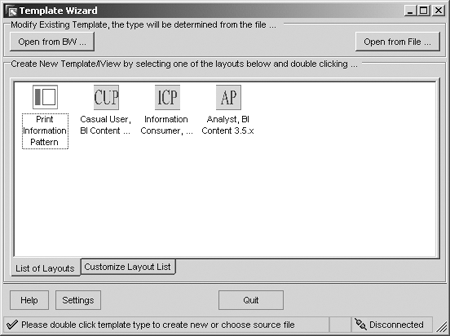
Figure 7
Use the XSLT variables to generate the XML coding in the Web template to default the Excel print settings. The code is included in file PT_PIP__DTT__1.XSL. This code is added just after the XSLT variables are defined, which is shown in Figure 6.
Once this file is created, include it in the temporary directory that is used when the BITEMPLATEWIZARD is executed. This process is also described in the how-to guide, “Web Printing with Excel.”
Step 5. Enable the solution. Before you can use the new UI pattern, you need to enable it. Open the BI wizard template and select the Customize Layout List tab. On this tab, you should see the Custom Page folder. Open this folder and select the Print Information Pattern that was just developed (Figure 1). Once this is done, the new pattern shows up on the List of Layouts tab (Figure 8).

Figure 8
List of Layouts tab of the BI template wizard program where the print information pattern is available for use as a UI pattern
At this point, you are ready to create a Web template. Figure 9 shows an example of Excel print defaults used for this solution when the print information pattern is executed. When you save the template to the BW system, you should see the Excel print defaults added to the Web template definition. Figure 10 shows the corresponding Excel XML that is added to the Web template generated through the print information pattern.

Figure 9
Create a Web template using the new print information pattern. The information entered on this screen generates the XML code that will be added to the Web template when it is generated to enable default print parameters to be passed to Excel.

Figure 10
Excel print defaults entered in the generated Web template
Next, enhance the Web templates to include the new print button. Before you test the solution, you need to add the print Help Service function and enhance a toolbar or menu to print using Excel. This process is well documented in the “Web Printing with Excel.” Add the button or menu to the template of your choosing, with the only restriction being that the template is defined explicitly or through nesting in the “ PT_PIP_DTT_1.XSL file.
When the template is executed, you can pass default print parameters to Excel. View the default print parameters by using the Excel menu path File>Page Setup.
Tips and Tricks
- You could use XSLT parameters instead of XSLT variables.
- It helps when adding code to the XML or XSLT files to save it often and check it either through a third- party validation tool or a browser.
- Add the configuration files to the temporary directory when processing the BI template wizard. The location of this directory is discussed in the “Web Printing with Excel” guide.
- Consider adding another tab on the 0ANALYZER template for the printing solution. This tab should disable navigation when the tab is selected to prevent unnecessary graphics from being transferred to Excel as part of the printing solution. You can use JavaScript to enable and disable navigation on the table depending on the tab selected.
Derek Johnson
Derek Johnson is a program manager on the Delivery Operations Team with SAP America, Inc. He is responsible for the design and development of analytical and reporting applications to support SAP America’s consulting organization. Formerly a platinum consultant with the National Competency Center (NCC), he has more than 10 years experience working with SAP NetWeaver BW. Besides traditional data modeling and reporting, he also has extensive experience with Yahoo! Widgets, SAP NetWeaver Visual Composer, Web reporting, BW data mining, Xcelsius, ABAP, and JavaScript. He holds a BS degree in engineering from the University of Michigan-Ann Arbor, an MS degree in engineering from Wayne State University-Detroit, and an MS degree in management information systems from Case Western Reserve University-Cleveland.
You may contact the author at derek.l.johnson@sap.com.
If you have comments about this article or publication, or would like to submit an article idea, please contact the editor.